Creating Custom Wave Criteria Templates
Wave criteria templates define the orders you want to include in wave transactions. You can customize the standard search template by predefining the standard filtering criteria or adding more filters to suit your wave requirements. You can also add columns to the order search results that appear on wave transactions.
For example, you can create separate custom templates for orders to be shipped by FedEx and by UPS. Include a custom field if you want to specify the route. When you create a wave transaction, you can select the custom template that contains the filters you want to apply to your order search.
You can also use custom wave templates if you run schedules to automatically generate and release waves. See Creating a Wave Release Schedule.
Read the following guidelines for creating wave criteria templates:
-
All custom search templates must have the _nswave suffix in the ID.
-
For the Location filter, you can select a warehouse location only. See Creating Warehouse Locations.
NetSuite WMS follows the location setting on employee records regardless of predefined filters on wave templates.
-
Before using a template, you can test it by clicking the Preview option on the saved search record. An error message appears when the order search retrieves more than 10,000 line items. To narrow down the results, you can add more filters or adjust the existing ones.
-
The fields on the Results subtab of a template appear as columns on the Orders and Line Item subtabs of wave transactions.
To create custom wave criteria templates:
-
To access the custom search template, do the following:
-
Switch to the Administrator role.
Tip:Alternatively, using the WMS Warehouse Manager role, go to Transactions > Order Management > Create a Wave. On the Wave Criteria form, click New. To continue, proceed to step 2.
-
On your browser's address bar, append your NetSuite account URL with the following string:
app/common/search/search.nl?id=-4241&e=T&cu=T
Example: https://<accountID>.app.netsuite.com/app/common/search/search.nl?id=-4241&e=T&cu=T
-
If this is your first time to access the URL, on the Transaction Search page, click Edit. Then, on the Saved Transaction Search page, click Edit this Search.
Tip:When you use the URL again after your initial access, the URL redirects you to the Saved Transaction Search page in edit mode. You can skip step 1.c.
-
-
Set values in the following fields:
-
In the Search Title field, replace the default name with your own name for your search template.
-
In the ID field, replace the default ID with your own unique ID for your search template, and then add the _nswave suffix.
-
Check the Public and Available as List View boxes.
-
-
(Optional) To remove or add fields that you want to define as search filters for this template, click the Available Filters subtab. Then, do the following:
Note:When you add or remove filters, you display or hide them, respectively, from the Wave Criteria form for this template. For more information about this form, see Creating Wave Transactions.
-
Add filters - In the Filter column, select a field to add as an available filter, and then click Add.
-
Remove filters - Click the filter's row and then click Remove.
-
Update filter labels - In the Label column, view or update a filter's label.
Labels appear as the field names on the Wave Criteria form.
Make sure that your custom templates contain the following required filters:
Required Filters
Description
Location
Warehouse location
Type
Any of the supported transaction types: sales orders or transfer orders
Depending on your wave requirements, you can keep or remove the following optional filters:
Optional Filters
Description
Transaction Number/ID
The transaction number of the sales or transfer order
Name
For sales order, name of the customer
Order Date
Order date on the transaction
Ship Date
The date when orders are scheduled for shipment
Ship Method
Shipping method on the order
Item : Item Process Family
Item process family associated with the ordered items
Item : Item Process Group
Item process group associated with the ordered items
Item
Name of the item
Order Type
Order type on the transaction
Printed Picking Ticket
Indicator for whether the pick ticket has been printed, not printed, or either.
-
-
To define your filtering criteria for the available filters, click the Criteria subtab, and then do the following:
Note:Your filtering criteria appear as default settings in their corresponding fields on the Wave Criteria form. For more information about this form, see Creating Wave Transactions.
-
In the Filters column, select the available filter you want to define.
The Saved Transaction Search popup window appears on the page. If the popup does not display automatically, click the Set Description
 icon beside the filter.
 -
On the popup window, define the filtering criteria, and then click Set.
The following examples show you how to define text and date filters:
-
For text filters, you can add a selector to enter part of a filter's value.
For example, to set the Transaction Number/ID filter, select the starts with selector, and then enter part of the transaction ID as the keyword.

-
For date filters, you can replace the default All date selector by clicking its field.
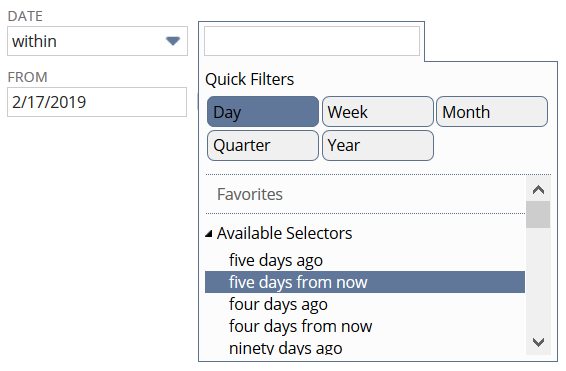
You can also specify a date range by entering or selecting dates in From, To, or both fields.
For detailed instructions on defining filters, see Defining a Saved Search.
-
-
Click Add.
Repeat steps a - c to define more filters.
-
-
(Optional) To add columns for your order search results on the Wave page, do the following:
Note:When your order search results appear on the Wave page, you can view the new columns on the Orders and Line Items subtab. For more information, see Creating Wave Transactions.
-
Click the Results subtab.
-
In the Columns subtab, select the field you want to add as a column on the Wave page.
-
Click Add.
Repeat steps a - c to add more columns.
-
-
To test and preview the results before you use the template, click Preview.
-
Click Save.
When you create a wave, you can select your custom wave template to search for the orders you want to include in the wave.
If you want to view or edit a custom search template, go to Lists > Search > Saved Searches.