Custom Address Forms as XML Definitions
Address forms are a type of entry form that you can use to collect address information localized to the countries that your business operates in. The addressform object supports the following:
-
Name
-
ID
-
Address Template
-
Fields
-
Country
-
Custom Code
-
Actions
For information about the custom code and actions tabs, see Custom Code Tab and Actions Tab in XML Definitions
To find address forms in a NetSuite account, go to Customizations > Forms > Address Forms. You can download and import a custom address form into your SuiteCloud project if it is not locked or part of another SuiteApp.
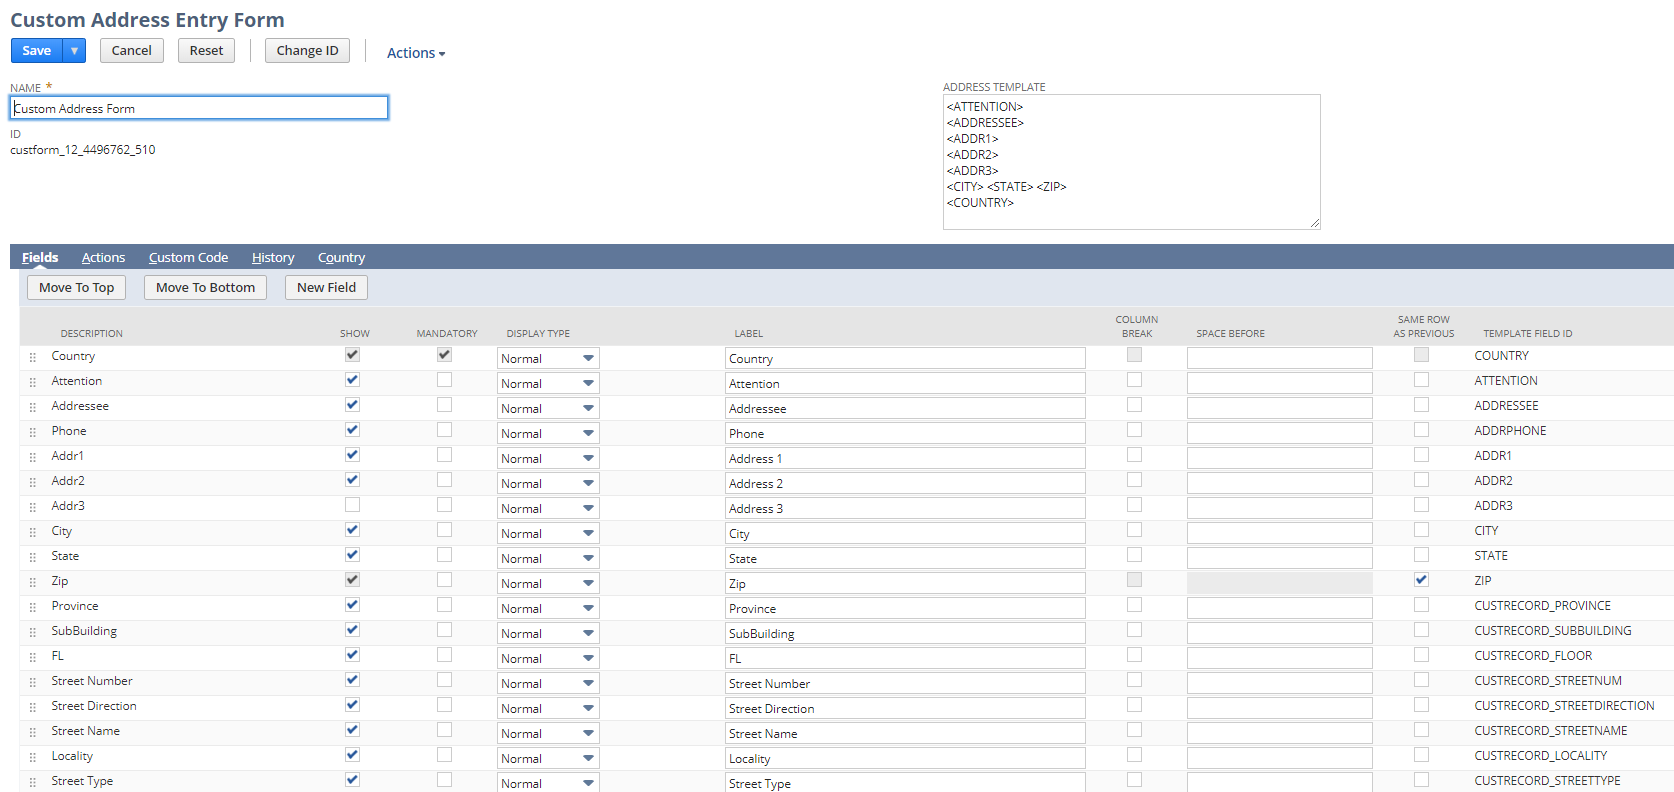
The following image shows a custom address form as it appears in the NetSuite UI.

Account Setup for Using Custom Address Forms
Check for the following to ensure you can work with custom address forms from your SuiteCloud project:
-
The LOCATIONS Feature in the target NetSuite Account must be enabled. To enable this feature, go to Setup > Company > Enable Features. On the Company subtab, in the Classifications section, select Locations.
-
Use a role with full permissions to the Custom Address Form record type. This permission is already enabled if you use the Developer role. For information about enabling permissions for the role you use with SuiteCloud projects, see Assigning the Developer Role (Administrator Only).
-
(Optional) To add or view the countries that you can associate with a customized address form, from the NetSuite account, go to Setup > Company > Countries.
Working with the Address Template and Address Form Fields
In your SuiteCloud project, you can write address template content, set values for supported fields, and add or modify custom fields.
The following table includes information about working with certain supported elements. The complete list of supported address template fields and template field IDs is available in SuiteCloud Development Framework XML Reference.
|
Description |
Example |
|---|---|
|
Address template content is rendered in CDATA format therefore it is not checked during project validation. The order of the displayed fields is determined by the address template. If you are not familiar with this element, go to a NetSuite account and use Customization to create your address form and address template. Then, import it into your SuiteCloud project. |
|
|
You can use a pipe (|) delimited list to associate multiple countries with an address form. When you assign a country to a custom address form, it acts as a subrecord on records with an editable address. The country-specific address form appears based on the value of the
Note:
To set a value for country, you must use the valid country code. Country codes are listed in countries. |
|
|
Other Custom Field Object To use an other custom field on your address form, you can reference it by script ID. For more information about references, see Specifying an SDF Custom Object Reference.
Note:
In the custom field object XML file, make sure that the Script ID requires the object prefix and the remainder of the ID is unique and may be user defined. The object prefix is |
See Custom Other Record Fields as XML Definitions for an example. |
Known Limitations of Custom Form Translations in SDF
The following are known limitations of custom form translations in SDF:
-
When exporting from your source account and importing a form into your SuiteCloud project, the button label values are not included for custom forms. Currently, translation collections do not support button labels.
-
To export to the SDF XML definition or import the SDF custom object into a SuiteCloud project, field labels must contain a value. If a field label has no value, validation of the SDF XML definition fails during installation. If you want to include a field that does not have a label, you can work around the SDF limitation by inserting a single space character as the translation for a field label. For example, you have fields for first name, middle name, and last name, but you only want a field label of Name to appear for the first field. You enter a label for the Name field and enter a single space for the other two fields.
-
Importing custom forms into SDF:
-
When importing a form from the source account into your SuiteCloud project, the form translation is defined using the company default language, not the language of the user importing the form.
-
When deploying a custom form using SDF, the target account receives the terms as they exist in the source account. If the target account does not have translations for the default language used in the source account, then the default language in the translation collection is used.
-
Example of a Custom Address Form Object
The following example is a custom address form object named 'Sample Address Form'. It uses script ID custaddressform_sample and all standard options are set to their default values.
            <addressForm scriptid="custaddressform_sample">

    <name>Sample Address Form</name>

     <mainFields>

          <defaultFieldGroup>

           <fields position="MIDDLE">

            <field>

                 <id>COUNTRY</id>

                 <label>Country</label>

                 <visible>T</visible>

                 <mandatory>T</mandatory>

                 <displayType>NORMAL</displayType>

                 <columnBreak>F</columnBreak>

                 <sameRowAsPrevious>F</sameRowAsPrevious>

            </field>

           <field>

                <id>ATTENTION</id>

                <label>Attention</label>

                <visible>T</visible>

                <mandatory>F</mandatory>

                <displayType>NORMAL</displayType>

                <columnBreak>F</columnBreak>

                <sameRowAsPrevious>F</sameRowAsPrevious>

            </field>

            <field>

                <id>ADDRESSEE</id>

                 <label>Addressee</label>

                 <visible>T</visible>

                 <mandatory>F</mandatory>

                 <displayType>NORMAL</displayType>

                 <columnBreak>F</columnBreak>

                 <sameRowAsPrevious>F</sameRowAsPrevious>

            </field>

            <field>

                 <id>ADDRPHONE</id>

                 <label>Phone</label>

                 <visible>T</visible>

                 <mandatory>F</mandatory>

                 <displayType>NORMAL</displayType>

                 <columnBreak>F</columnBreak>

                 <sameRowAsPrevious>F</sameRowAsPrevious>

            </field>

            <field>

                 <id>ADDR1</id>

                 <label>Address 1</label>

                 <visible>T</visible>

                 <mandatory>F</mandatory>

                 <displayType>NORMAL</displayType>

                 <columnBreak>F</columnBreak>

                 <sameRowAsPrevious>F</sameRowAsPrevious>

            </field>

            <field>

                 <id>ADDR2</id>

                 <label>Address 2</label>

                 <visible>T</visible>

                 <mandatory>F</mandatory>

                 <displayType>NORMAL</displayType>

                 <columnBreak>F</columnBreak>

                 <sameRowAsPrevious>F</sameRowAsPrevious>

            </field>

            <field>

                 <id>ADDR3</id>

                 <label>Address 3</label>

                 <visible>F</visible>

                 <mandatory>F</mandatory>

                 <displayType>NORMAL</displayType>

                 <columnBreak>F</columnBreak>

                 <sameRowAsPrevious>F</sameRowAsPrevious>

            </field>

                <field>

                 <id>[scriptid=custrecord_barangay]</id>

                 <label>Barangay</label>

                 <visible>F</visible>

                 <mandatory>F</mandatory>

                 <displayType>NORMAL</displayType>

                 <columnBreak>F</columnBreak>

                 <sameRowAsPrevious>F</sameRowAsPrevious>

            </field>

            <field>

                 <id>CITY</id>

                 <label>City</label>

                 <visible>true</visible>

                 <mandatory>F</mandatory>

                 <displayType>NORMAL</displayType>

                 <columnBreak>F</columnBreak>

                 <sameRowAsPrevious>F</sameRowAsPrevious>

            </field>

            <field>

                 <id>STATE</id>

                 <label>State</label>

                 <visible>true</visible>

                 <mandatory>F</mandatory>

                 <displayType>NORMAL</displayType>

                 <columnBreak>F</columnBreak>

                 <sameRowAsPrevious>F</sameRowAsPrevious>

            </field>

            <field>

                 <id>ZIP</id>

                 <label>Zip</label>

                 <visible>true</visible>

                 <mandatory>F</mandatory>

                 <displayType>NORMAL</displayType>

                 <columnBreak>F</columnBreak>

                 <sameRowAsPrevious>true</sameRowAsPrevious>

            </field>

          </fields>

         </defaultFieldGroup>

    </mainFields>

     <addressTemplate> <![CDATA[

<ATTENTION>

<ADDRESSEE>

<ADDRPHONE>

<ADDR1>

 <ADDR2>

<ADDR3>

<CITY> <STATE> <ZIP>

<COUNTRY>

]]>

    </addressTemplate>

    <country>PH|IN|US</country>

</addressForm>
To learn more about address forms, see Customizing Address Forms.