Avoiding Storage Issues by Using the Fallback Open Item
If your catalog might exceed the iOS or Windows device storage limits, you can use the Fallback Open Item solution. This option uses a single generic item instead of the item being sold. Your other catalog items aren't loaded for Fallback.
Fallback relies on a downloaded copy of your item and price catalog. This copy is refreshed each time a sales associate logs in to the device.
However, mobile iOS and Windows devices have storage limits for a Fallback catalog. Exceeding the storage limit can cause the SCIS application to fail on a device. This limit often applies to catalogs with more than 20,000 items. See Fallback and Storage Limits for Mobile Apps for more information about storage limits.
Sales associates can scan an item's barcode to add an Open Item instead of the real item, or search for it using the term Fallback Open Item.
The sales associate process is:
-
Shopper presents items for purchase.
-
Associate scans an item or, if the bar code won't scan, adds an Open Item from a search.
-
Associate manually enters the item's price.
-
If the item didn't scan, associate opens a Note and enters the ScannedUPC digits.
-
Associate repeats these steps for each item.
-
Associate tenders payment and provides receipt.
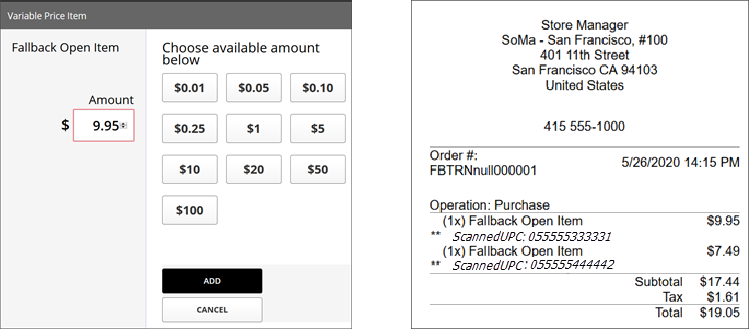
Note that the receipt lists Fallback Open Items with the UPC for each item purchased.
See the following topics:
For accounting purposes, the price that is entered manually remains the price in the transaction, even it if doesn't match the catalog price. You might want to have a pricing worksheet available for offline events that require using Fallback.
Capturing the UPC
SCIS captures the UPC from the scan and saves it as a ScannedUPC Note that is included in the transaction record. Before manually entered UPCs can be automatically reconciled, you must set up a ScannedUPC Note type. See Enabling Associates to Manually Enter a Reconcilable UPC.
Using the QuickAddBar
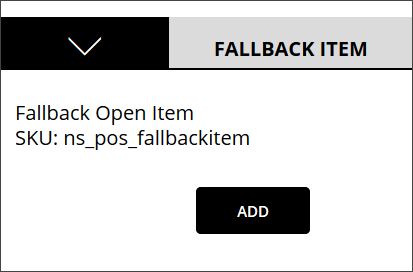
In addition to scanning an item's barcode or searching, you can choose to make the Open Item available in the QuickAdd Bar. See Adding the Fallback Open Item to the QuickAdd Bar for the steps to enable this option.
Reconciliation
Open Item transactions must be reconciled later to replace generic items with real items from your NetSuite catalog. Most transactions can be automatically reconciled from the ScannedUPC Note. See Reconciling Fallback Open Item Transactions.
Enabling the Fallback Open Item option
This option becomes active when you enable the Fallback Catalog feature. See Setting up a Fallback Catalog Limit and Open Item option.
To view the steps store associates take at the point-of-sale, see Entering an Order using a Fallback Open Item in the SCIS User Guide.
The Fallback Open Item ns_pos_fallbackitem is saved as a Non-inventory item for Sale in NetSuite. Do not change the item name or details. Doing so will cause the Open Item process to fail.
Adding the Fallback Open Item to the QuickAdd Bar
You can add a Fallback Open Item by scanning an item's barcode, searching for Fallback Open Item, or selecting the Open Item from the QuickAdd Bar.
Items don't appear in the QuickAdd bar automatically. Instead, you must add the item to a QuickAdd Group as a QuickAdd Key. See Configuring QuickAdd Keys for more information.
To create a QuickAdd Key for the Fallback Open Item:
-
Go to Customization > Lists, Records, & Fields > Record Types.
-
First, review your QuickAdd Groups to determine in which group to include the Fallback Open Item.
-
Find the SCIS QuickAdd Group record.
-
Click List.
-
Determine the correct group to use.
-
Go back to the Record Types list.
-
-
Find the SCIS QuickAdd Key record and click List.
-
Click New SCIS QuickAdd Key.
-
Select a QuickAdd Group from the Key Group list.
-
In the Item field, start typing or search for the name ns_pos_fallbackitem.
-
Click the Filters subtab, and select filters for Locations, Websites, and Subsidiaries.
Filters determine where the Fallback Open Item will appear in the QuickAdd Bar. For most businesses, you can select Apply to All for the three filters.
Important:Filter settings are required. If a filter isn't set up for Locations, Websites, and Subsidiaries, NetSuite will ignore this SCIS custom record.
Selecting Apply to All meets the filter requirement.
-
(Optional) Select from the Search Criteria subtab options as needed. For details about the options, see QuickAdd Keys.
-
Click Save.
Enabling Associates to Manually Enter a Reconcilable UPC
Automatic reconciliation uses the UPC saved from a scan as a ScannedUPC Note. Because some items might not be scannable, you can enable your sales associates to enter a ScannedUPC Note manually. Without this setup, manual notes can't be automatically reconciled.
To enable manual ScannedUPC Note entries:
-
Go to Commerce > InStore > Transaction Notes.
-
Click New SCIS Transaction Notes Types.
-
In the Name field, enter
ScannedUPC, without a space.Important:Enter the characters
ScannedUPCexactly as shown here. -
Open the Filters subtab.
-
Select the Locations, Websites, and Subsidiaries in which the manual note type will be used.
For most setups, you'll select Apply to All for each choice.
-
Click Save.
After setup, the sales associate will see the following after tapping the Note icon to manually enter a UPC.

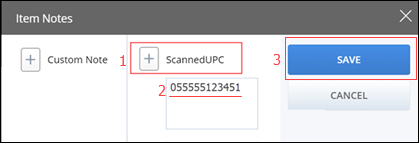
They should tap +ScannedUPC and enter the UPC using digits only.
Reconciling Fallback Open Item Transactions
Fallback transactions won't appear in NetSuite until the point-of-sale (POS) device is back online and the sales associate logs in. The SCIS POS device uploads transactions to NetSuite for processing into Cash Sale or Invoice records. Processing occurs every 15 minutes.
After the transactions are processed into records, the individual transaction lines that contain a Fallback Open Item must be updated to replace the Open Item with the real item from your catalog. The process of updating line items is called reconciliation.
Automatic Reconciliation
Most transaction lines can be reconciled automatically without manual intervention. This process for Fallback Open Items uses the UPC captured as a ScannedUPC Note to replace the generic item name (ns_pos_fallbackitem or Fallback Open Item) with the item from your NetSuite catalog. The UPC is captured in the note by the sales associate scanning an item's barcode or entering a UPC manually.
If a sales associate enters a UPC manually, the note must contain the UPC digits only. Entering other characters, such as dashes (hyphens, the minus sign), will prevent the transaction line from being automatically reconciled.
Automatic reconciliation begins soon after the Fallback transaction records are received in NetSuite. For accounting purposes, the price that was entered manually remains the price in the transaction, even it if doesn't match the catalog price.
Auto-reconciliation will reconcile items from most transactions, including inventory items, non-inventory items, and matrix inventory items.
Certain non-standard item types, such as lot or kit items, require manual reconciliation. See Item Types That Won't Automatically Reconcile. UPCs not found in your catalog and manual UPC entries with extra characters also require manual reconciliation.
-
Inventory Item
-
Non-Inventory Item
-
Matrix Inventory
Automatic reconciliation runs as a script in the background of your NetSuite environment. The script is called: NS_RP_Fallback_Create_Transaction_Inner.js.
Reviewing Fallback Open Item Auto-reconciliation Success
Follow these steps to verify whether all lines in a Fallback Open Item transaction were reconciled successfully.
To review Fallback Open Item transaction lines:
-
In NetSuite, in the search bar at the top, enter SCIS Fallback Transaction.
-
Click Page: SCIS Fallback Transaction (near the list bottom).
The SCIS Fallback Transaction List displays.
-
If not in date order, click the Transaction Date column to sort by recent transactions.
The transactions to review will show:
-
Status - Transaction Completed
-
Final Transaction - Cash Sale or Invoice
-
-
Click Cash Sale or Invoice for the first transaction to verify.
-
Open the SCIS Fallback subtab. A message displays if any Open Items failed to automatically reconcile.
-
If some items weren't automatically reconciled, see the next steps: Performing Manual Open Item Reconciliation.
If all items reconciled successfully:
-
Click Back to return to the SCIS Fallback Transaction List.
-
Review the next Fallback transaction to confirm reconciliation.
-
Performing Manual Open Item Reconciliation
Follow these steps to reconcile transaction lines that failed automatic reconciliation. Manual reconciliation must always be performed for certain non-standard item types, such as lot or kit items.
The Note column is often helpful for identifying why auto reconciliation failed for a line. The column holds the scanned or manually-entered UPC.
Other reasons that automatic reconciliation failed might not be obvious without viewing the transaction line details.
In these steps, you'll add catalog items and quantities to replace the unreconciled Open Item lines.
To manually reconcile a Fallback Open Item transaction:
-
Use the previous steps to display the Fallback transaction.
-
Open the Items subtab.
Open Items that didn't reconcile have the Item name ns_pos_fallbackitem.
-
Click Edit.
-
Scroll right to display the Item Note column. This column holds the ScannedUPC from the bar code scan or manual entry.
Tip:The Items subtab has its own scroll bar.
-
Copy the UPC numbers. For example, copy
055555333332only. -
Click Add Multiple.
-
Paste the UPC and click Search.
Tip:If the UPC isn't available, enter any part of the item name.
-
Highlight the item you want and enter the Qty (quantity) purchased.
-
Click Done to add the catalog item to the Fallback transaction.
-
Ensure that the catalog Price matches the price entered for the Open Item. If not, replace the catalog price.
Important:For accounting purposes, you should use the price entered for the purchase when the device was in Fallback.
-
If appropriate, edit other catalog line fields with details from the Open Item line.
-
Click OK if needed to close the new catalog item line.
-
Highlight the Open Item line you're replacing and click Remove.
-
Use Add Multiple to replace the next Open Item line.
-
Continue until all lines are reconciled with your catalog items.
-
Click Save.
Item Types That Won't Automatically Reconcile
Certain non-standard item types, such as lot or kit items, will always require manual reconciliation. These are:
-
Down-loadable Items
-
Gift Cards
-
Item Groups
-
Kit Items
-
Lot Items
-
Serial Items
-
Service Items
-
Discount Items (defined in NetSuite to use for promotions)