Setting Up Token-based Authentication
You must set up token-based authentication (TBA) in your Planning and Budgeting application to enable connection to NetSuite.
For general information, see the following help topics:
To set up token-based authentication:
-
In NetSuite, go to Setup > Integration > Manage Integrations > New.
-
In the Name field, enter a name for this integration record that should represent your Planning and Budgeting application.
-
In the Description field, enter a description to help you identify this integration record in NetSuite.
-
In the State field, leave the default Enabled option.
-
On the Authentication tab, make sure the Token-based Authentication box is checked.
-
Make any other necessary changes, and then click Save.
NetSuite generates the consumer key and consumer secret on the integration record.
-
Save the consumer key and consumer secret.
Note:The consumer key and consumer secret show only one time. If you lose these credentials, you can regenerate new ones. For more information, see Regenerating a Consumer Key and Secret.
-
Go to Setup > Users/Roles > Access Tokens > New.
-
On the Access Token page:
-
From the Application Name dropdown list, select the created integration record.
-
From the User dropdown list, select the user that should be used for the integration with your Planning and Budgeting.
For information about setting up the integration user, see Setting Up the Integration User.
-
From the Role dropdown list, select PBCS Integration, or your custom role that gives sufficient permissions to the integration user.
-
The Token Name field is populated with a concatenation of Application Name, User, and Role.
-
Click Save.
NetSuite generates the Token ID and Token Secret on the page.
-
Save the generated Token ID and Token Secret.
Note:The Token ID and Token Secret show only one time. If you lose these credentials, you must create a new token.
-
-
In your Planning and Budgeting application, click the Navigator icon
 , and then click Data Exchange.
 -
Click Actions, and then select Applications.
-
On the Applications page, click the Configure Connections icon
 .
. -
On the Connections page, click the Add icon
 , and then select NetSuite.
 -
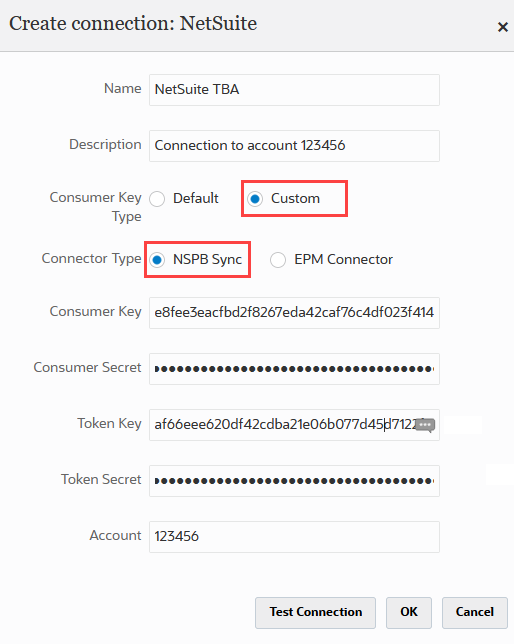
In the Create connection: NetSuite popup window, do the following:
-
In the Name field, enter a name for the connection.
-
In the Description field, enter a description to help you identify this connection.
-
For the Consumer Key Type, choose Custom.
Important:If you've selected Internal NS Application NS-PBCS as the application name when creating a token in step 9, then you need to choose Default. Otherwise, choose Custom.
-
For the Connector Type, choose NSPB Sync.
-
In the Consumer Key and Consumer Secret fields, enter the generated consumer key and consumer secret.
-
In the Token Key and Token Secret fields, enter the generated Token ID and Token Secret.
-
In the Account field, enter the integration user's NetSuite Account ID. The value must match exactly, including upper and lower case. You can find the account ID at Setup > Company > Company Information in the Account ID field.
The following screenshot shows the Custom and NSPB Sync connection configurations for NSPB Sync:
-
-
Click Test Connection.
-
If a popup window confirms that the connection to NetSuite was successful, click OK to complete the connection configuration.