Importing Electronic Bank Payments Data
You can transfer electronic bank payments data such as your entity bank details (vendors, employees, customers) in CSV format into NetSuite using the Import Assistant.
Before you attempt to import data with the Import Assistant, you need to set up CSV files and review their formatting carefully to avoid errors that prevent import and to ensure that data is imported with correct values. For help preparing files for CSV import, see Guidelines for CSV Import Files.
Make sure that the Run Server SuiteScript and Trigger Workflows preference is enabled in your account. For more information, see Setting CSV Import Preferences.
When importing entity bank details, do the following first:
-
On the Bank Payment Details tab of the vendor's record, make sure the EFT Bill Payment option is checked.
-
Get the internal ID of the parent entity and payment file format. For information about locating internal IDs, see Finding Internal IDs of Record Fields
Refer to the following options for parent entity:
-
Parent Customer - Use this field for customer payments through direct debit.
-
Parent Customer-Refund - Use this field for customer refunds through EFT.
-
Parent Employee - Use this field for employee payments through EFT.
-
Parent Vendor - Use this field for vendor payments through EFT.
-
-
On your CSV file, enter the internal ID in the column for the parent entity or format. Refer to the table following for the list of other fields or columns that you should include in your CSV file.
After completing your CSV file and entity record settings, you can upload the file using the Import Assistant. If you are using a role with import CSV file permission, you can access the Import Assistant at Setup > Import/Export > Import Tasks > Import CSV Records.
To import entity bank details with the Import Assistant:
-
On the Scan & Upload CSV File page, do the following: .
-
In the Import Type field, select Custom Records.
-
In the Record Type field, select Entity Bank Details.
-
Click Browse to locate and select your CSV file.
-
-
On the Import Options page, do the following:
-
Select the Data Handling option: Add, Update, or Add or Update.
-
Expand Advanced Options to display additional settings.
-
In the Custom Form field, select Standard Entity Bank Details Form.
-
-
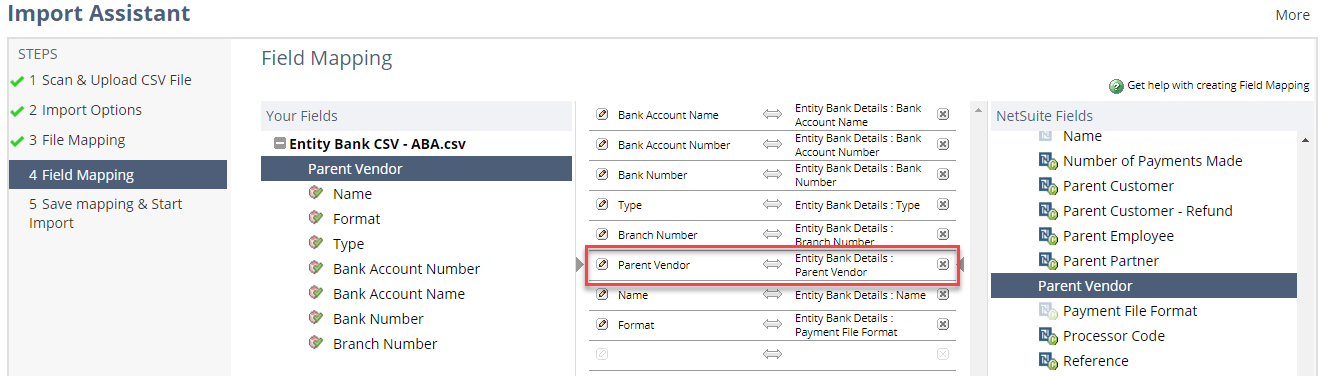
On the Field Mapping page, do the following for the fields for format and parent entity:
-
In the center pane, click the pencil icon next to the field name.
-
On the popup, in the Choose Reference Type field, select Internal ID to associate the specific entity or format with the entity bank details.
Note:When mapping entities and payment file formats, it's best to use Internal ID as your reference type. If you use Name as reference type, for example, formats with the same name might cause records to be mapped only to one format.
-
Click Done.
Other fields mapped from your CSV file to NetSuite fields are automatically displayed in the center pane. For more information, see Step Four Field Mapping.
-
-
On the Save Mapping & Start Import page, in the Import Map Name, enter a name for the import map to save the settings.
-
Click Save & Run.
You can import fields into NetSuite for each payment file format. For more information, see Importing Fields for Payment File Formats.