Filtering Issue Notifications Using Outlook Rules
Issue notification email messages have a text field in the header that tells you why you're receiving the notification. You can use this information to create filtering rules in Outlook, or similar email clients, to manage your inbox.
There are seven notification reasons, and one message header can contain one or more of them:
-
ASSIGNED_EMPLOYEE - The issue was assigned directly to you (the Email assignee box was checked, or the assignee changed).
-
ASSIGNED_TEAM_MEMBER - The issue was assigned to a group you're a member of (as above, but the assignee is a group, not an individual).
-
ASSIGNED_REVIEWER - You've been assigned to review this issue.
-
ISSUE_WATCHER - You're watching this issue and your Email me when criteria have been met.
-
COPIED_EMPLOYEE - The author of the issue selected you in the Copy employees field.
-
EMAILED_TEAM_MEMBER - The author of the issue selected a team you're a member of.
-
PRODUCT_TEAM_MEMBER - You're a member of a product team that was assigned to the issue.
This type of notification is only sent when the product team changes, or when a new issue is filed.
The following procedure is aimed at users of Outlook, however, it's common to most email clients supporting rules creation.
To set up a rule in Outlook to filter issue notifications:
-
Right-click any message in your inbox, and select Rules > Create Rule.
-
Select Advanced Options.
-
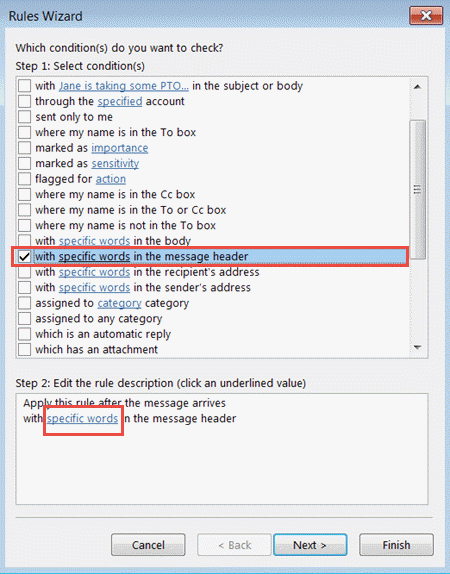
Check the with specific words in the message header box.
-
Click the specific words link in the box titled Step 2: Edit the rule description (click an underlined value).
A Search Text window opens.
-
Copy the required notification reason from the list above, for example ASSIGNED_TEAM_MEMBER.
-
Paste the notification reason into the Specify a word or phrase to search for in the message header: field.
-
Click Add.
-
When you finish adding required notification reason(s) to the Search list, click OK.
-
Click Next.
-
Select what you want to do with the messages (for example, move them to a specified folder). Check the box and click Next.
-
Specify any exceptions to this rule. Check the boxes and click Next.
-
Specify the name for this rule and choose your desired Setup rule options.
-
Click Finish.