Adding Items on a Sales Transaction
Every sales transaction needs at least one line item. You can add more details for each item, depending on what it is.
-
Most columns in the Items subtab are optional, so you can pick and choose what you need. To customize the columns, see Creating Custom Entry and Transaction Forms.
-
You can also apply a promotion to all items in the order from the Items subtab. For more information, see Applying a Promotion on a Sales Order.
A sales transaction must have at least one line item. You can enter additional details for each line item depending on the item added. Most line item columns in the Items subtab are optional. In the Items subtab, you can also apply a promotion to all items in the sales order - see Applying a Promotion on a Sales Order for more information.
To add items on a transaction:
-
On the sales order record page, click Edit.
-
Click the Items subtab.
-
If you use the Multiple Shipping Routes feature, check the Enable Item Line Shipping box to enter multiple shipping addresses and shipping methods on a sales order. For more information, see Multiple Shipping Routes.
-
In the Item column, select the item you want to add. Note the following:
-
To add several items to a transaction at one time, click Add Multiple. This button above the item list opens a window with a list of the items you can add.
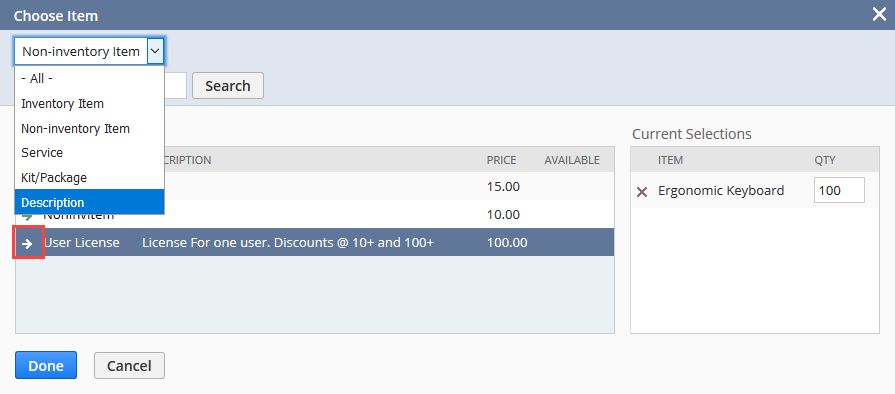
You can filter by item type or search by name to find what you need. Click the arrow next to the item to add it. The item moves to the Current Selections list, where you enter the quantity. To add the current selections to the item list, click Done.
-
To discount a single item, add a discount item to the order. For information, see Discount Items.
-
The list of items may include item groups. For more information, see Item Groups.
-
-
If you use locations in your NetSuite account, select a fulfillment location in the Location column. Take the following into account:
-
If you use the Intercompany Cross-Subsidiary Fulfillment feature, select a fulfillment location in the Inventory Location column instead.
-
If you use the Automatic Location Assignment feature, you do not need to set a location because NetSuite will assign a location automatically.
-
If the Location column is not displayed and the location will not be assigned automatically, you will need to select the fulfillment location when fulfilling the sales order.
-
-
In the Quantity column, enter the quantity for this item.
Do not enter a negative quantity in a transaction that has a net positive total value. Use a return authorization instead. For information, see Entering a Linked Return Authorization.
Note:Decreasing the quantity on fulfilled sales order lines, including the inventory details, does not adjust the inventory levels of an item. It also does not change the fulfilled quantity on associated fulfillment records.
-
In the Serial/Lot Numbers field, enter the serial or lot number of the item.
-
Separate each serial number with a space, a comma, or by pressing Enter after each one.
You must enter a serial number for each serialized item. For example, if you enter a quantity of 2, then you must enter two serial numbers.
-
Lot numbers must be entered in this format: LOT#(Quantity)
For example, to enter a quantity of 100 items as Lot number ABC1234, enter ABC1234(100).
Note:By entering a specific serial or lot number, you are designating a specific item and NetSuite attempts to allocate the specific item for this order. If you do not enter a specific serial or lot number, NetSuite allocates only the specified quantity of this item to the order. Then, you can designate the specific serial or lot number for the item later.
-
-
If you use multiple prices, in the Price Level column, choose a price level for this item.
If you choose Custom, you can enter a custom price for this item in the Unit Price column.
This price applies to this transaction only.
The tax code for this item is shown in the Tax Code column.
-
In the Commit column select one of the following:
-
Available Qty - Items for this line item are committed as available. Available items are shipped, and items that are not available are placed on backorder.
-
Complete Qty - This line item only ships when all items are committed.
-
Do Not Commit - Items are not committed to this line item until this setting is changed.
-
-
Set any options that apply to this item.
If the item is a gift certificate and you do not see a Gift Certificate field, click this field to set the recipient's name and email address (required for gift certificate sales). To expand the options, click the Set Options icon next to the field.
-
In the Expected Ship Date field, enter the date you expect this item to be shipped from the vendor. This date is used for demand planning calculations.
This defaults to show the transaction date.
-
If you use the legacy revenue recognition features Revenue Commitment and VSOE, four additional columns are included: Rev. Rec. Schedule, Rev. Rec. Start Date, Rev. Rec. End Date, and VSOE. Information for these columns is provided by revenue accountants. These columns are not included when your company uses the Advanced Revenue Management feature. For more information about the legacy features, see Using Revenue Commitments and Using the VSOE Feature.
-
Check the Exclude Item from Rate Request box if you want to exclude the item when calculating shipping. The shipping rate total will not include this item. This box is available only for inventory and assembly items.
-
Click Add or press Enter to add the item to the order.
Required Deposit Workflow
The Required Deposit Workflow feature lets you set a required deposit amount on a sales order. You can set the required deposit in a few different ways:
-
per item, in the Required Deposit Amount column
-
for the whole order, in the Required Deposit Amount field on the Items subtab
-
as a percentage of the whole order, in the Required Deposit Percentage field on the Items subtab
To enable the Required Deposit Workflow feature:
-
Go to Setup > Company > Enable Features.
-
On the Transactions subtab, check the Required Deposit Workflow box.
-
In the Custom Form sales order field, select the Standard Sales Order - Invoice form.
If you change one value, the others are recalculated automatically.
Example: Setting the Required Deposit Amount per item
For example, let's say you add two items priced at $20 each, and set the value of the Required Deposit Amount column to $10. The total order amount is now $40. The following fields will be updated automatically:
-
the Required Deposit Amount field value now shows 20
-
the Required Deposit Percentage field value now shows 50
If you then change the Required Deposit Percentage to 75%, here's what happens:
-
the Required Deposit Amount field updates to $30
-
the item lines are updated to $15 each
Normally, the whole unpaid amount is considered a deposit. With this feature, you can customize the required deposit to fit your needs.