Adding Accounting Books
Please contact your sales or account representative to find out how to get the Full Multi-Book Accounting feature. The assistance of NetSuite Professional Services or a Multi-Book authorized partner is required to implement this feature. You should consider contacting NetSuite Professional Services or a Multi-Book authorized partner for assistance in setting up the Adjustment-Only Books feature, even though it isn't required.
Multi-Book Accounting, including the Adjustment-Only Books feature, is available only in NetSuite OneWorld.
The Full Multi-Book Accounting feature must be implemented by NetSuite Professional Services. Implementation is a complex process and full documentation for implementation is available only to them. This topic is included in Help Center for customers who want to add secondary accounting books. Before you add an accounting book, you should contact your NetSuite account representative.
Primary books are automatically created when the Full Multi-Book Accounting feature is enabled. Additional books must be set up and configured. The maximum number of active accounting books including the primary book, is five.
To add an accounting book:
-
Go to Setup > Accounting > Multi-Book Accounting > Accounting Books > New to open an accounting book record.
-
Complete the required and optional fields as follows:
Name - (Required) Enter a unique name for the accounting book. This name appears in fields and lists when a choice of accounting book is available.
Is Primary - This box is for display purposes only. It can't be checked for secondary accounting books or cleared for the primary accounting book.
Subsidiary - (Required) Select one or more subsidiaries to associate with this accounting book. Any child subsidiaries of the subsidiaries you select are automatically associated with this accounting book.
Include Children - If this box is checked, any child subsidiaries of a subsidiary that you select are automatically associated with this accounting book, including newly created subsidiaries. This box is checked by default on the primary accounting book and can't be cleared.
-
If the Include Children and Enable Consolidation boxes are checked, secondary accounting books enabled for consolidation have access to all NetSuite OneWorld consolidation. See Enable Consolidation for additional details.
-
If the Include Children box isn't checked, there may be limitations in consolidating the secondary accounting book.
If there is a missing subsidiary in the middle of the subsidiary hierarchy, an error message appears indicating that the accounting book can't be saved for the subsidiary hierarchy. You should either clear the Enable Consolidation box or change the subsidiary hierarchy.
An error message also appears if you've checked the Enable Consolidation box and one subsidiary of the pair Parent-Elimination is missing.
-
Following are examples and an illustration of various Include Children and Enable Consolidation option states:
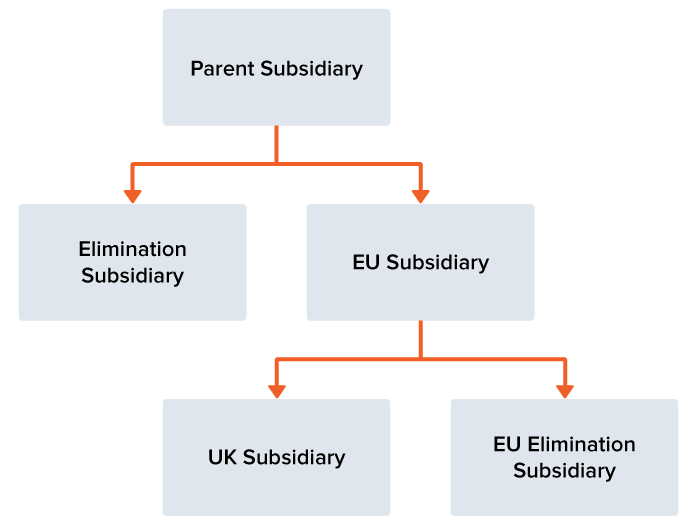
-
The Include Children box isn't checked but the Enable Consolidation box is checked. You select all of your subsidiaries except the EU subsidiary, which is located in the middle of the subsidiary hierarchy. When you attempt to save the accounting book an error message appears indicating that you can't consolidate the secondary book because you excluded a subsidiary that is located in the middle of the hierarchy for that secondary book.
-
The Include Children and the Enable Consolidation boxes aren't checked. You select all of your subsidiaries except the EU subsidiary. You can successfully save the accounting book because you don't want to consolidate that secondary book.
-
The Include Children box isn't checked but the Enable Consolidation box is checked. You select all of your subsidiaries except the UK subsidiary. You can successfully save the accounting book because the excluded subsidiary isn't located in the middle of the subsidiary hierarchy for that secondary book.
-
The Include Children box isn't checked but the Enable Consolidation box is checked. You select all of your subsidiaries except the Elimination subsidiary. When you attempt to save the accounting book an error message appears indicating that if consolidation is enabled and a Parent subsidiary is included in the secondary book hierarchy, the Elimination subsidiary must also be included in the secondary book hierarchy.
-
The Include Children and the Enable Consolidation boxes aren't checked. You select all of your subsidiaries except the Elimination subsidiary. You can successfully save the accounting book because you don't want to consolidate that secondary book.
-
Effective Period - (Required) Select the existing historical base period for this secondary accounting book. The accounting periods that appear in this list are those associated with the primary accounting book.
If there are no closed periods in your system, NetSuite lists only the first open accounting period.
You can change the effective period only on a secondary accounting book with a pending status. You can't, however, change the effective period on a secondary book with a pending status that has transactions, or when the book is in the process of deleting or processing historical transactions.
Important:You can't make general ledger impacting changes in an open accounting period that precedes the effective date of the secondary book. You also can't unapply a payment between two transactions of a closed accounting period prior to the accounting period effective date.
Note that if you've enabled the Extended Accounting Period Close Process feature, you can reopen this period and post book-specific transactions. You can't post book-generic transactions.
You can't reopen a closed period prior to the effective period of this secondary book.
Note:If you have the Inventory feature enabled, you can't have an inventory transaction prior to the effective period of secondary book.
Tip:Run a Trial Balance report on your chart of accounts (primary accounting book) in all subsidiaries as of the day before the Effective Period.
Translate the currency exchange rate to the primary book Trial Balance result to derive the beginning value of the pending secondary book.
Enable Consolidation - Check this box to enable this secondary accounting book for consolidation. Secondary books enabled for consolidation have access to all NetSuite OneWorld consolidation including all tasks on the period close check list, consolidated reporting, auto-elimination, and book-specific consolidated exchange rates. Primary accounting books are enabled for consolidation by default.
Important:The default Consolidated Exchange Rates in the secondary accounting book are created the same way they're created in the primary accounting book. They're independent from the Consolidated Exchange Rates created in the primary accounting book. Therefore, existing customers in historical periods can get different Consolidated Exchange Rates in the secondary accounting book than in the primary accounting book if the primary accounting book Consolidated Exchange Rates were previously edited from the default exchange rates. To ensure exchange rates are the same in secondary accounting book, you can either manually change them or export the primary accounting book exchange rates and then import them into the secondary accounting book while the book is in pending status.
Enable Contingent Revenue Handling - Check this box to add fields to item records and revenue elements for contingent revenue. For more information, see Contingent Revenue Handling.
Enable Two Step Revenue Allocation - This box is checked by default but can be cleared on a book-by-book basis. When checked, two-step allocation is used only when the Allocation Type is Software. When the conditions are met that trigger the residual method, the second step of allocation takes place. Two-step allocation can't be turned off unless Multi-Book Accounting is enabled. For more information, see Residual Method and Two-Step Allocation.
Arrangement Level Unbilled Receivable Reclassification Journal - Check this box to use the deferred revenue reclassification journal entries process to adjust deferred revenue after you post month-end revenue recognition journal entries. For more information, see Groupings for Unbilled Receivable Adjustment Journal Entries.
-
-
Complete the Adjustment Books fields as follows:
Adjustment Only - check this box to make the secondary book an adjustment-only book. For more information about adjustment-only books, see Adjustment-Only Books Overview.
Base Book - (appears when Adjustment Only is selected) select the accounting book which will be the base book for adjustments. Base books can be either the primary book or a standard secondary book, but not an adjustment-only book.
For more information about adjustment-only books, see Adjustment-Only Books Overview.
-
If you're using Foreign Currency Management, on the Subsidiaries subtab, set the Base Currency for each Subsidiary.
Important:When setting up elimination subsidiaries, you must set the currency to the same currency as the base currency of the parent subsidiary.
For each subsidiary, the system provides the following:
-
Base currency of the primary book
-
Exchange rate as of the last date prior to book effective period
This field is editable unless the base currency of the primary book and the base currency of the secondary book are same. In that case, the exchange rate is equal to 1 and isn't editable.
This field is also not editable if the Effective Period is the first base period of your system.
-
Status of the subsidiary
If you're using the Period End Journal Entries feature, you can enable secondary accounting books for feature use. Check the Enable Period End Journal Entries box next to each secondary accounting book approved to use the feature. The primary accounting book must be enabled through Subsidiary Settings Manager. For information about Subsidiary Settings Manager, see Subsidiary Settings Manager.
-
-
Click Save.
When an accounting book record is in view mode, a Validate button appears. Clicking this button displays the HTP Validation page. This page is used by NetSuite Professional Services to ensure that all historical transactions are successfully processed before activating the secondary accounting book.
Historical Transaction Processing
Historical transactions must be processed before a secondary accounting book can be activated.
Historical transactions can be processed for an existing subsidiary with transactions before the subsidiary is added to an active accounting book that includes active subsidiaries.
Processing historical transactions is performed by NetSuite Professional Services because it's a complex process and full documentation is available only to them. Please contact your NetSuite account representative.
Processing historical transactions distributes the accounting impact of transactions in the past across all accounting books. If processing isn't complete, all transactions are in the primary book with no general ledger impact on secondary accounting books.
If you added a new accounting book and plan to create item account mappings, make sure you create the mappings before processing historical transactions.
Following are the historical transaction processing options available to Professional Services:
-
Delete Transactions - This option removes the general ledger impact of historical transaction processing. This option is available for both pending and inactive subsidiaries in accounting books.
-
Process Accounts to be Revalued - This option processes transactions on accounts where the option Revalue Open Balance for Foreign Currency Transactions is enabled and the effective period is different from the first period in the system.
-
Process Extra Secondary Book Transactions - This option processes book-generic transactions that were created or updated in the primary book during the period of time in which historical transaction processing was running on the secondary accounting book. This option is available for both active and pending secondary accounting books. If Revenue and Expense Management is enabled, you can choose to create revenue recognition schedules in a secondary book as part of this process. If it isn't enabled, schedules are automatically created.
-
Process Open Transactions - This option processes all open transactions prior to the secondary accounting book effective period.
Note:If the Revenue and Expense Management feature is enabled, historical transaction processing excludes source transactions with a date before the secondary book's effective date with open revenue plans extending beyond that date.
-
Process Statistical Journals - This option copies the statistical journals in the primary book to the selected pending secondary accounting book, regardless of the statistical journal posting date. These values are then consistent across all of your accounting books in reports.
-
Process Transactions after Effective Date - This option enables you to process all transactions from the secondary book effective date onwards. Transactions are filtered based on the accounting period of the secondary accounting book. You can choose to overwrite previously processed historical transactions as part of this process. If Revenue and Expense Management is enabled, you can choose to create revenue recognition schedules in a secondary book. If it isn't enabled, schedules are automatically created. If you choose to create revenue recognition schedules in a secondary book, you can also choose to create revenue recognition and amortization journal entries. You can import the transactions to be processed from a CSV import file, access the transactions from a saved search, or process all transactions.
Important:If you're using a saved search to process the transactions, after you've processed all of the transactions, re-run Process Transactions after Effective Date for all transactions and clear the Overwrite Previous Processed box. Re-running processing ensures that all transactions are processed.
-
Process Transactions to be Eliminated - This option is available only if the Automated Intercompany Management feature is enabled and the effective period is different from the first period in the system. If there are transactions at balance sheet non-A/R and non-A/P accounts before the effective date, this process creates opening balances covering their elimination impact in the secondary accounting book.
Related Topics:
- Planning for Multi-Book Accounting
- Enabling Multi-Book Accounting Features
- Adding a New Subsidiary to an Active Book
- Roles and Data Access for Multi-Book Accounting
- Restricting Role Access to Accounting Books
- Chart of Accounts Mapping
- Accounting Book Period Close Management
- Foreign Currency Management
- Revenue and Expense Management
- Reports, KPIs, and Saved Searches in Multi-Book Accounting
- Book-Generic and Book-Specific Records
- Using Multi-Book Accounting
- Adjustment-Only Books Overview