CyberSource
If you use custom transaction forms for either cash sales or sales orders, don't hide the Credit Card Approved field on the forms. Hiding this field also hides other Address Verification System (AVS) related fields. For more information, see Configuring Fields or Screens.
When making payment requests that don't include an email address, NetSuite uses null@cybersource.com.
To add a new CyberSource credit card processing profile:
To enter profile information:
-
Go to Setup > Accounting > Financial Statements > Payment Processing Profiles > New. Then, click Add Profile next to CyberSource.
-
In the Primary section, enter the primary information for this profile. See Entering CyberSource Profile Primary Information.
-
In the Authentication Credentials section:
-
Enter the Merchant ID provided by CyberSource.
-
For the Security Key File, click Browse and select the account security key that was provided to you at the CyberSource Business Center. You can generate this security key file by logging in to your CyberSource Business Center. For more information, see CyberSource documentation or contact CyberSource support.
-
-
Under Payment Information, select the credit cards you accept with this processor.
CyberSource doesn't accept Switch, Solo, or Maestro cards.
-
Under Gateway Request Types, select requests you want this profile to support.
Warning:When you use a payment processing profile that doesn't support authorization to process credit card payments on sales orders, make sure you follow the card acceptance guidelines of the credit card issuer. For information about the Visa card acceptance guidelines, see Card Acceptance Guideline for Visa Merchants.
If your business involves shipping goods to your customers, you must process the sales order with a payment processing profile that supports authorization. Funds must be deposited only when goods have been fulfilled.
Use a payment processing profile that doesn't support the authorization request on a sales order only when you provide an immediate delivery of goods or services.
-
Click Save.
Entering CyberSource Profile Primary Information
On the CyberSource Credit Card Processing Profile page that you can find at Setup > Accounting > Payment Processing Profiles, you can enter the profile's primary information.
To enter CyberSource profile primary information:
-
If you use the Multiple Web Sites feature, select the site on which this credit card processing profile is used.
-
Enter a name for the credit card gateway.
-
If you use NetSuite OneWorld, select the subsidiary for this account.
-
Select the settlement currency for this processor.
-
In the Charge Currencies field, select the currencies you receive payment in with this processor.
-
Select the bank account to use when receiving settlement for transactions processed with this credit card gateway.
-
Check the Payer Authentication box to offer payer authentication for credit card payments on your Web site.
For more information, see Payer Authentication.
-
Check the Support Line-Level Data (previously known as Process Purchase Card Data) box to enable purchase card processing (also known as level II and level III cards).
This box is available only after your account is provisioned for the Purchase Card Data module. See Accepting Purchase Cards (Level II and Level III Credit Cards).
-
Check the Test Mode box to enter test transactions to test this processing profile.
-
Check the Allow Request ID to Meet Payment Card Field Requirements box to permit orders authorized through a third-party order entry system to be created and processed in NetSuite.
For more information, see Allow Request ID to Meet Payment Card Field Requirements.
-
Check the Inactive box to make the account inactive without deleting it.
-
Check the Ignore AVS Response on Stand Alone Cash Sales box to ignore the results of the Address Verification System (AVS) pre-authorization check. If you choose to ignore the AVS check, CyberSource will process payment requests when a customer's address information doesn't match the billing address of the credit card account.
-
Check the Ignore CSC Response on Stand Alone Cash Sales box to ignore the results of the CSC pre-authorization check.
If you check this box, CyberSource will process payment requests when the security code information entered for a card doesn't match the information about the credit card account.
-
Check the Disable Sending the Recurring Flag in Requests box if you want the Recurring Payment box cleared in all credit card authorization requests sent to this CyberSource processor.
Set Up Order Verification
For instructions on how to set up order verification rules for this gateway, see To set up order verification rules:.
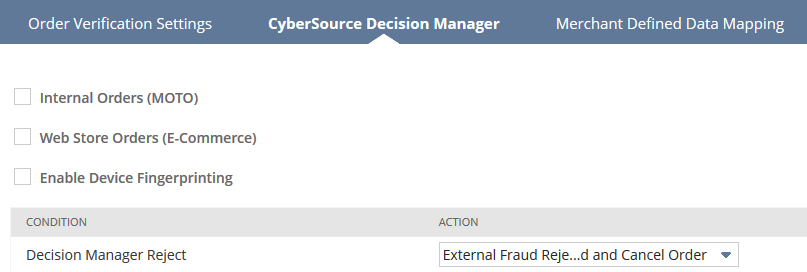
Set Up CyberSource Decision Manager
On the CyberSource Decision Manager subtab, determine how to use Decision Manager with NetSuite. You must subscribe to Decision Manager in your CyberSource account to enable it in NetSuite.
You can also use Decision Manager with web store orders that originate in a third party web store and are sent to NetSuite using SOAP web services. If you connect to NetSuite using SOAP web services, you can use Decision Manager only for Web store orders. For information, see Set Up Decision Manager for SOAP Web Services Orders.
To set up Decision Manager:
-
Click the CyberSource Decision Manager subtab.
-
Check the Internal Orders (MOTO) box to use Decision Manager with internal orders.
-
Check the Web Store Orders (E-Commerce) box to use Decision Manager with orders received through your Web store or through SOAP web services.
-
Check the Enable Device Fingerprinting box to collect and evaluate a device fingerprint for Web store orders. For more information, see Device Fingerprinting.
-
Click Save.
See Working with CyberSource Decision Manager in NetSuite for information about fraud management capabilities and Decision Manager.
Set Up Decision Manager for SOAP Web Services Orders
If you use SOAP web services to connect to NetSuite and transmit sales orders that originate from a third party Web store, you can set up Decision Manager rules for fraud management. The following sales order fields are available for SOAP web services, as of the 2012.1 endpoint. These fields can only be used with SOAP web services and are not visible on the sales order. Values passed for these fields are not stored.
-
shopperipaddress - If you use a third party Web store, use this field to capture the shopper's IP address and pass it using SOAP web services to NetSuite to create a new sales order. Shopperipaddress is then sent to CyberSource with the authorization request.
-
saveonauthdecline - Use this field to determine whether to save Web store orders that receive a credit card authorization decline. Saved orders are placed on Payment Hold for further review. Set to False if you don't want to save orders with an authorization decline. The shopper can retry submitting the order with a different payment method.
Orders from a NetSuite Web store and orders originating from SOAP web services that include a shopper IP address are considered ecommerce orders and follow the Decision Manager setting for Web store orders on your CyberSource payment processing profile.
To set up Decision Manager for Web store orders sent to NetSuite through SOAP web services:
-
Enable Decision Manager in you CyberSource payment processing profile.
-
Go to Setup > Accounting > Payment Processing Profiles.
-
Select your CyberSource profile.
-
On the CyberSource Decision Manager subtab, check the Web Store Orders (E-Commerce) box.
This setting applies to orders placed through the native NetSuite Web store as well as those received using SOAP web services.
-
-
Define rules in Decision Manager to evaluate fraud risk based on the shopper IP address.
-
Set up your Web store to capture the shopper IP address using the shopperipaddress field.
-
Determine whether you want to save orders that have an authorization decline and place them on payment hold.
-
Optionally, implement Device Fingerprinting on your Web store, create a custom transaction field, and configure mapping.
-
Set all necessary field values in the sales order SOAP web services request.
The shopperipaddress and saveonauthdecline fields for sales order records are not available in SOAP web services endpoints prior to 2012.1. You must upgrade to the 2012.1 endpoint or later to use this functionality. For a SOAP web services code sample, see CyberSource Decision Manager Fields for Web Store Orders in the SOAP web services help.
Setting up Merchant-Defined Data Mapping for CyberSource
You can map sales order fields to parameters you set up in Decision Manager if your CyberSource account includes this service. For more information about defining data fields, consult your CyberSource account.
To set up merchant-defined data mapping for CyberSource:
-
Click the Merchant Defined Data Mapping subtab.
-
Select a sales order field to map to each field you defined in your CyberSource account. You can map the following NetSuite fields:
Customer
Lead Source
Partner
Status
Created From
Location
Sales Effective Date
Subsidiary
Date
Memo
Sales Rep
Department
Opportunity
Source
End Date
Order Number
Start Date
Note:The fields that appear in the Sales Order Fields dropdown list be different if you use custom field names.
-
Click Save.
Setting up a CyberSource Processor to Support Tokens
You can set up a CyberSource processor to support tokens generated by third-party SOAP web services applications. These tokens are used for payment requests instead of primary account number (PAN), increasing the security of your payment processing. With tokens, you can also use the CyberSource Account Updater.
You can't generate tokens for PANs already stored in your NetSuite account.
To use tokens with a CyberSource processing profile, first set up tokenization by logging in to your merchant account. Then, create payment method in your NetSuite account for your processor, and check the Tokenized box.
NetSuite accepts only 16-digit tokens. Make sure your CyberSource account is configured for a 16-digit profile ID.
When a gateway request is sent using this processor the following fields are not included:
-
PAN
-
Expiration date
-
Valid from
-
Name on card
-
Card type
This information is instead encrypted in the token.
The Name on Card, Card Street, and Card Zip Code field values are preserved in the CyberSource credit card vault during the initial charge. Subsequent charges of the token from NetSuite don't require the mentioned fields.