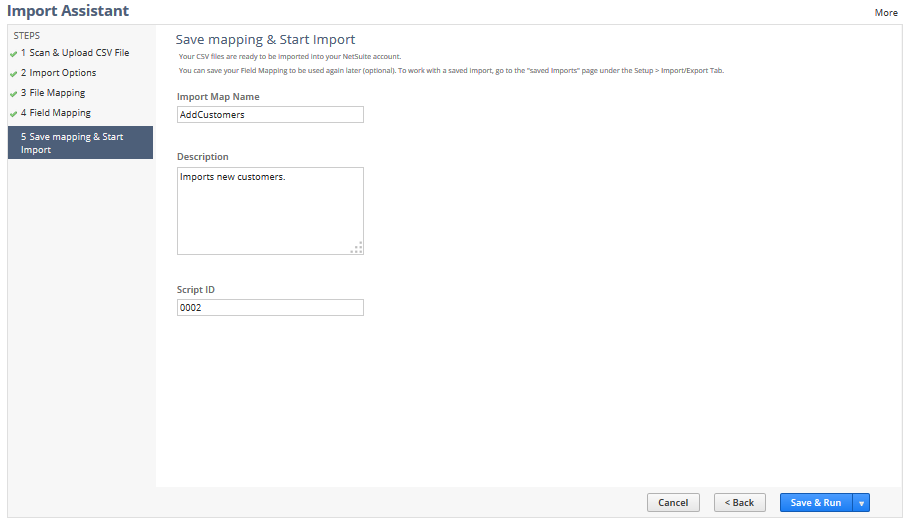
Step Five Save Mapping & Start Import
Complete the following tasks for step five of the Import Assistant:
-
In the Import Map Name field, enter a name you can use when tracking the import's progress, or if you want to rerun or edit the import later.
-
(Optional) Add a description for this import.
-
In the Script ID field, enter a unique ID that can be used to reference this saved import mapping in SuiteScript.
-
For example, you can run the SuiteScript API task.CsvImportTask to programmatically run a CSV import job. In this case, you will need to reference the import map by script ID when you create the nlobjCSVImport object.
-
Only numbers, letters, and underscores are allowed in this ID.
-
The characters you enter are checked for syntax, and then prefixed with CUSTIMPORT and checked for uniqueness. If an import mapping with the same script ID already exists, an error is returned and the mapping is not saved.
-
If you do not enter anything, the script ID is left blank. You can edit the import mapping later to add a script ID as needed.
-
If the Multi-Language feature is enabled in your account, a separate page is available to enter translations for the import name and description. If you change the import name or description here, translations need to be edited to match the new values. See Translating Import Map Name and Description.
-
Choose one of the following options. Click:
-
Save to save the settings without starting the Import Job.
-
Run to start the import job without saving any of the settings from the previous page.
-
Save & Run to save this import's settings (including field mappings) of this import for reuse and start the import job.
-
Save As to save these settings under a new name instead of overwriting the old import job.
-
Save As & Run to save these settings under another name and start the import job.
-
After you have clicked a button, the Finished page appears. On this page, you can:
-
Click Import Job Status to review the status of this and other imports. (Not available if you saved the import without running it.) For information, see Checking CSV Import Status.
-
Click View Saved Imports to review the list of saved imports or start an import job based on one of those imports. For information, see Working with Saved CSV Imports.
-
Click Share Import to open the Share Import dialog, where you can make the import available to other users. For information, see Sharing Imports.
-
Click Start Another Import to launch the Assistant and start another import.
As soon as you run an import, the job goes into a queue. Each company has its own queue for CSV imports. If nothing else is in the queue, your import runs right away. If there are other jobs ahead of it, your import will stay pending until they finish. You can cancel a job during the time that it's pending or processing. For more info, see Canceling a CSV Import.
To speed import processing time, break large jobs into smaller chunks. You can only import up to 25,000 records per file