Working with Email Templates
The email templates in this topic do not support email marketing campaigns. For information about email templates for campaigns, see Email Marketing Templates.
Email templates are HTML or text documents that you create to:
-
Send email from records
-
Send email from transactions
-
Send automatic notifications to those who submit online forms
-
Send notification email to sales reps when a lead, prospect, or customer submits an online form
-
Send bulk email with the mail merge feature
-
Perform mail merge operations
-
Send notification to customers who submit cases
-
Send notification to employees who have been assigned a case
Creating a New Email Template:
You can use an email template to generate personalized email messages to send to your business contacts.
Before you use an email template, you need to create a template record. You can prepare your template file outside of NetSuite using an HTML editor. You can also create it directly on the template record. These templates are available at Documents > Templates > Email Templates. For information, see Creating New Email Templates.
Modifying a System Email Template:
Users with the Set Up Company permission can modify the standard email templates for system-automated email used in case management and user notifications. These templates are available at Setup > Company > System Email Templates. For information, see Customizing Templates for System-Automated Email.
Composing Email Templates
Email templates can be scriptable templates that use FreeMarker language. Scriptable templates merge information from records in your NetSuite account into your template. You can then customize the messages you send for each recipient.
For example, you can list the company's name and address in the heading of a letter. To do this, insert the IDs (for scriptable templates) that correspond with each line in the address above the greeting. You can also include FreeMarker code in the subject of the email you send.
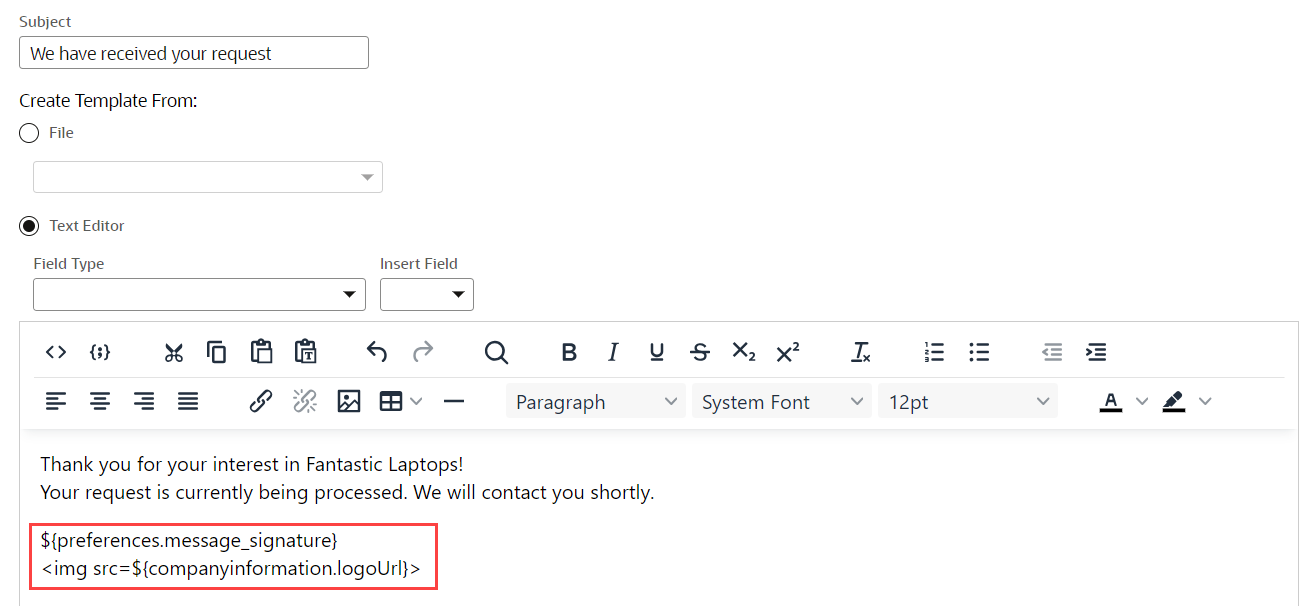
Adding a Signature and Logo file to Email Templates
If you set up an email signature in your user preferences, you can include this in your template. Insert the following FreeMarker text in the template markup: ${preferences.message_signature}. Go to Home > Set preferences to set up an email signature.
To add your company logo to your signature file, insert this markup: <img src=${companyinformation.logoUrl}>. This markup references the image in the Company Logo (pages) field on the Company Information page. Go to Setup > Company > Company Information. Best practice is to save your image file as either a GIF or JPEG.
Adding File Attachments to Email Templates
To add a file attachment to your email template, create a link to the document contained in the File Cabinet. Don't embed the file directly into the template. For example, you might create a template which contains links to a PDF instruction manual, terms and conditions, or even an instructional video. The procedure below refers specifically to email templates, but applies equally to all template types using the HTML editor.
To attach a download file link to a template:
-
Locate the file you want to link to in the File Cabinet.
-
Click Edit on the file.
-
Check the Available Without Login box.
-
Copy the file URL. If there are more than one, copy the URL beginning https://<accountID>.app.netsuite.com.
-
Go to Documents > Templates > Email Templates.
-
Edit an existing template or click New Template.
-
In the HTML editor highlight the text you want to make a link.
-
Click the chain icon in the UI.
-
Paste the URL into the link box.
-
Click OK.
Assigning an Email Template to a Transaction Type
You can select which transaction email template to use for each transaction type when NetSuite sends transaction emails with a PDF attachment.
You must have the Email Templates and Custom Transaction Forms permissions.
You can select transaction email templates for the following types of transactions:
-
Sales Orders
-
Invoices
-
Cash Sales
-
Purchase Orders
-
Estimates
-
Credit Memos
-
Return Authorizations
-
Cash Refunds
-
Opportunities
-
Purchase Contracts
-
Blanket Purchase Orders
-
Request for Quotes
To use a custom email template, you must first customize a transaction form. This feature doesn't support standard transaction forms, and all email sent from standard transaction forms use the NetSuite default email template. The standard email template can be defined at Setup > Company > Email > Email Preferences (Administrator). To use a custom template in your transaction emails, select Transaction in the Record Type field. You can also clear the Record Type field in the template form. Go to Documents > Templates > Email Templates > [select a template].
You can control access to email templates with permissions that control access to transaction types. Use the Email Template and Custom Transaction Forms permissions.
You can use SuiteScript to select which email templates to use with all supported transaction types, except GL Impact.
There are two ways to assign an email template to a transaction type.
To assign an email template from a transaction form:
-
Go to a transaction form for the transaction type for which you would like to select a template.
-
Go to Customize > Customize Form and select the template from the Email Message Template list.
-
Click Save.
To assign an email template from the Custom Transaction Forms page:
-
Go to Customization > Forms > Transaction Forms and then click the Customize link for the transaction type to add a template to.
-
Select the template from the Email Message Template list.
-
Click Save.
You can use the Custom Transaction form to email transactions that use the customized email template.
Inactivating and Deleting Email Templates
To remove an email template from template lists, but preserve it for the future, check the Inactivate box on the relevant template record page. Go to Documents > Templates > Email Templates. Click Edit next to the required template.
Alternatively, you can permanently delete a template. Select Delete from the Actions menu on the relevant template page.
For more information about scriptable templates, see Scriptable Templates.