Creating Merchandise Hierarchy Reports
You can create custom reports that include merchandise hierarchy elements using Report Builder.
For more information regarding customizing reports with the Report Builder, see Report Customization.
Internal Custom Fields for Merchandise Hierarchy Reports
To create customized sales reports that use your merchandise hierarchy structure, it is necessary to manually add the internal custom fields that have been created for the merchandise hierarchy in the Report Builder. Internal custom fields are created automatically for each level in your merchandise hierarchy when the Custom Segments feature is enabled. You can't access or edit these fields directly. For more information, see Enabling Merchandise Hierarchy Features.
You can use the custom merchandise hierarchy fields created by Custom Segments as columns or filters.
The custom merchandise hierarchy fields are located in the Add Fields list in the Report Builder. Each custom field appears under the label representing the record type where it was applied. For transactions, the custom merchandise hierarchy fields appear twice in the Add Fields list. One instance represents the custom field as a transaction column. The other represents the custom field that has been added to the item record.
When you only have one hierarchy version defined in your system, your merchandise hierarchy reports will only display the current hierarchy structure and item classification. These reports are also known as item-based reports because they use custom merchandise hierarchy fields that have been added to the item record. They only show the current classification of items in the hierarchy and can't show different classifications from different hierarchy versions.
To create reports that use the current merchandise hierarchy structure, you must select the internal custom fields that have been added to the item record. The location of these custom merchandise hierarchy fields varies depending on the type of report being customized. For more information, see Locating Custom Merchandise Hierarchy Fields for Reports.
Locating Custom Merchandise Hierarchy Fields for Reports
Custom merchandise hierarchy fields are located in the Add Fields list in the Report Builder.
The type of report you want to customize determines the location of the internal custom fields you need to add.
Don't use the internal custom fields described in this section for reports that use historical hierarchy data when your system includes multiple merchandise hierarchy versions. For more information, see Using Hierarchy Versions in Workbooks and Reports.
To locate the internal custom fields needed to create reports using the latest merchandise hierarchy structure, refer to the following table. Note that we have provided details of only the most common types of report that use merchandise hierarchy data.
Attribute fields are located in the same place as the custom merchandise hierarchy fields. Look for the name of the attribute, for example Fabric.
|
Report Type |
Report |
Custom Merchandise Hierarchy Fields Location |
Notes |
|---|---|---|---|
|
Purchases |
Purchase by Vendor |
Purchases > Item |
Select fields with the suffix (Custom Column) |
|
Purchase by Item |
Item Type |
Select fields with the suffix (Custom) |
|
|
Purchase Order Register |
Purchase Order Transactions > Item |
|
|
|
Open Purchase Orders |
Open Purchase Orders > Item |
|
|
|
Purchase Order History |
Purchase Order Transactions > Item |
Select fields with the suffix (Custom Column) |
|
|
Inventory/Items |
Inventory Profitability |
Item |
Select fields with the suffix (Custom) |
|
Current Inventory Snapshot |
Inventory Item |
Select fields with the suffix (Custom) |
|
|
Physical Inventory Worksheet |
Inventory Item |
Select fields with the suffix (Custom) |
|
|
Inventory Valuation |
Inventory Item |
Select fields with the suffix (Custom) |
|
|
Inventory Revenue |
Inventory Item |
Select fields with the suffix (Custom) |
|
|
Inventory Back Order Report |
Item Type |
Select fields with the suffix (Custom) |
|
|
Inventory Activity Detail |
Inventory Item |
Select fields with the suffix (Custom) |
|
|
Stock Ledger |
Item |
Select fields with the suffix (Custom) |
|
|
Items Pending Fulfillment |
Item Type |
Select fields with the suffix (Custom) |
|
|
Inventory Turnover |
Inventory Item |
Select fields with the suffix (Custom) |
|
|
Transfer Order Registry |
Transfer Order Transactions |
Select fields with the suffix (Custom) |
|
|
Sales |
Sales by Item |
Item Type |
Select fields with the suffix (Custom) |
|
Sales by Customer |
Sales > Item |
|
|
|
Sales by Sales Rep |
Sales > Item |
|
|
|
Sales by Sales Team |
Sales Team Sales > Item |
|
|
|
Sales by Partner |
Sales > Item |
|
|
|
Sales by Historical Team |
Historical Revenue > Item |
|
|
|
Sales by Historical Team (Transaction Date) |
Sales > Item |
|
|
|
Sales by Promotion |
Sales > Item |
|
|
|
New Customer Sales |
Sales > Item |
|
To customize reports for Merchandise Hierarchy:
-
Go to the report you want to customize in the Reports menu, and select the customize option (summary or detail).
-
In the Report Builder on the Edit Columns page, edit the name to identify it in the Saved Reports list.
-
Select the Item Type 1 row and clear the Group box.
-
Optional. Select the Item Type column and click Remove Column.
-
Next, add the custom merchandise hierarchy fields to your report:
Important:To create reports that use the current merchandise hierarchy structure, you must select the correct custom merchandise hierarchy fields. See Locating Custom Merchandise Hierarchy Fields for Reports.
-
Go to the correct custom merchandise hierarchy fields. For example, to add the internal custom fields to a Sales report:
-
In the Add Fields list on the left, expand the Item Type list.
-
Scroll down to the merchandise hierarchy internal custom fields. If you've prefixed the name of the hierarchy levels with [MH], it's to find them in the list.
-
-
Drag and drop the internal custom fields into the Report Preview panel.
-
-
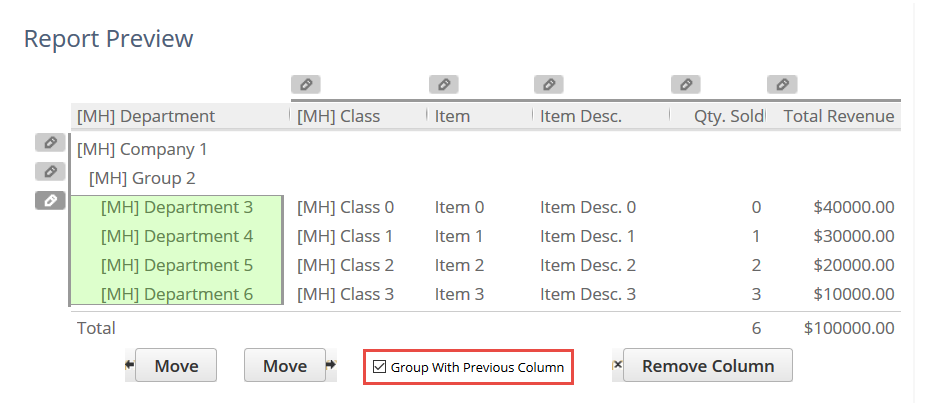
After you have added all the required fields, you can reorder the columns by clicking the Move buttons or by dragging the columns into position.
Tip:In the Column Label field, you can edit the name of the column. For example, you can remove any prefix you may have added to the level name.
-
Select the columns that you want to be able to collapse and expand as needed in the report and check the Group With Previous Column box for each of them.
-
After you have added the required columns, click Save.
Adding Filters to Customized Merchandise Hierarchy Reports
You can use the custom merchandise hierarchy fields created by Custom Segments as filters for your customized reports. Filters let you restrict the view in the report to a specific node or set of nodes.
To add merchandise hierarchy filters to your report:
-
Go to the report you want to customize in the Reports menu, and select the customize option (summary or detail).
-
Click Filters in the Report Builder menu to open the Filters page.
-
Now you need to add the custom merchandise hierarchy fields that you want to use as filters:
-
Go to the correct custom merchandise hierarchy fields. See Locating Custom Merchandise Hierarchy Fields for Reports. For example, to add merchandise hierarchy filters to a Sales report:
-
In the Add Fields list on the left, expand the Item Type list.
-
Scroll down to the merchandise hierarchy internal custom fields. If you have prefixed the name of the hierarchy levels with [MH] it is easier to locate them in the list.
-
-
Drag and drop the internal custom fields into the Report Preview panel.
-
-
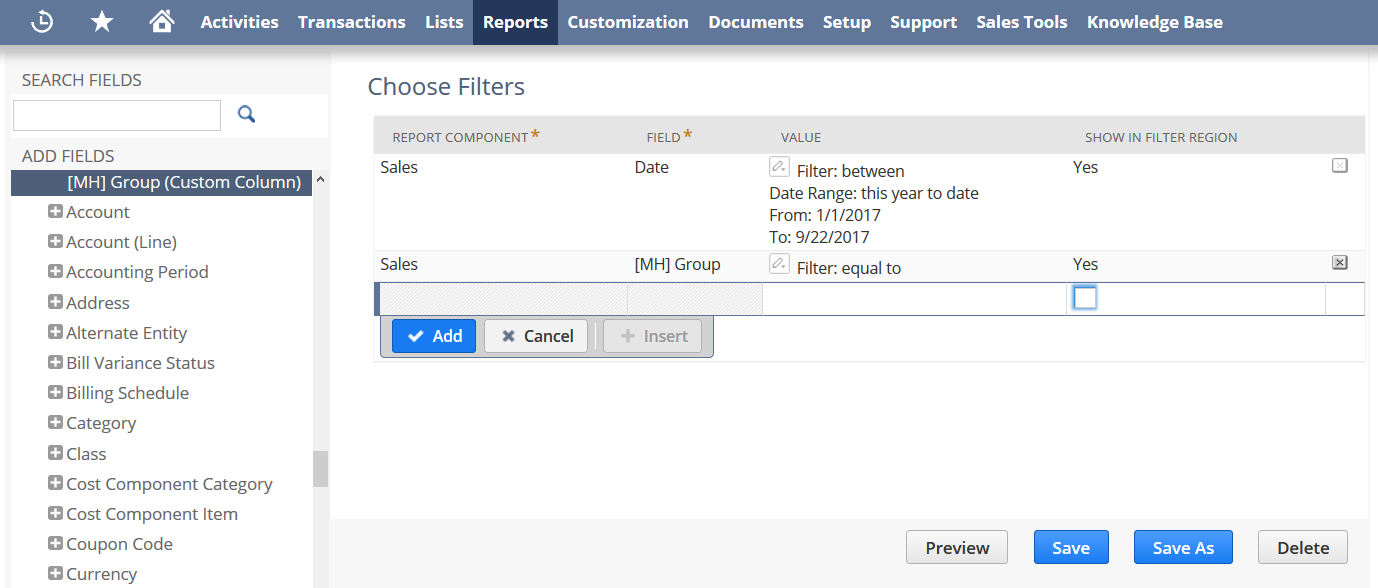
Select the field that represents the hierarchy level you want to filter on. Notice when you click on the custom field, the fields under the Report Component and Field columns in the Choose Filters panel are automatically pre-populated.
-
Check the box in the Show in Filter Region column for the new filter.
-
Click in the Value field and select Equal to and click Done.
-
After you have added the required filters click Save.
You can click Preview when you are customizing the report to visualize the report before you save it. Click Return to Customization to return to the Report Builder.
To view your customized reports, go to Reports > Saved Reports > All Saved reports (Administrator).
To view the custom filters in the finished report, click More to expand the options toolbar at the bottom of the report.
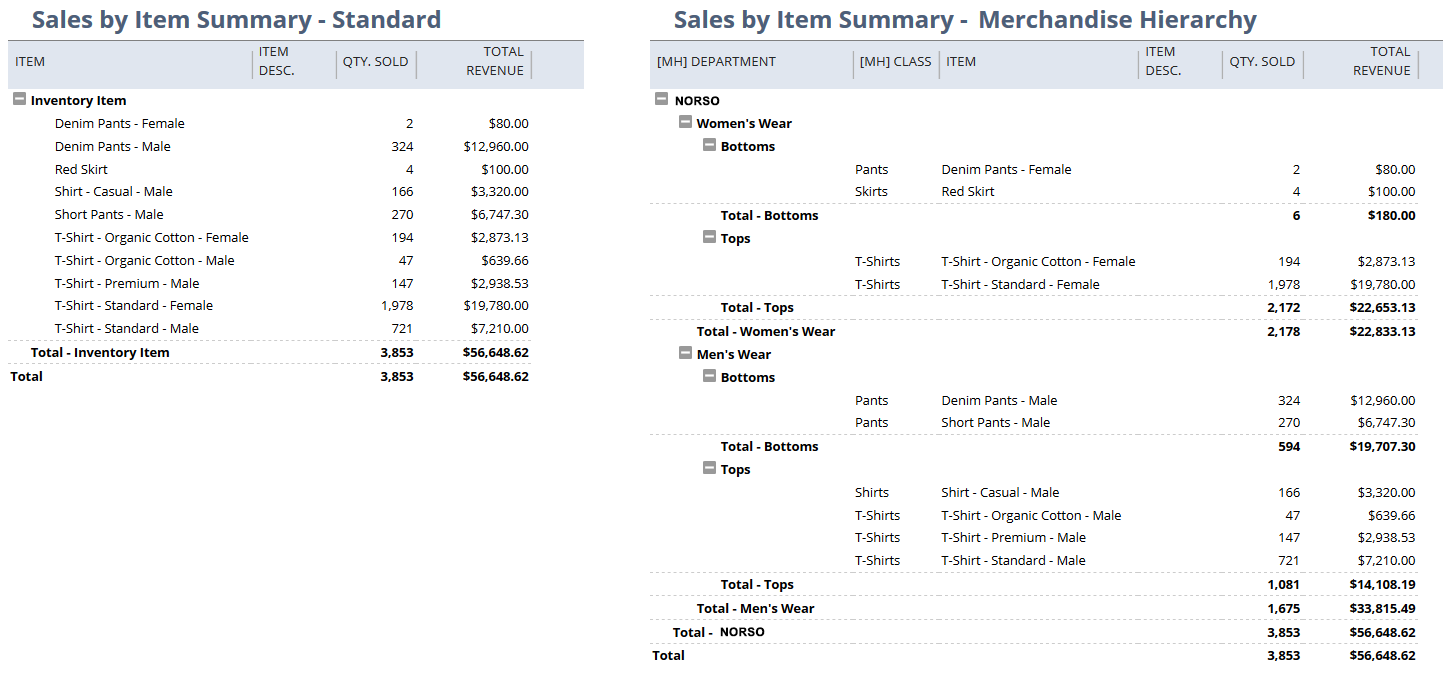
Example of a Customized Merchandise Hierarchy Report - Sales by Item Summary
In this section, we will show you how to customize the Sales by Item Summary report to show data from your current merchandise hierarchy item classification.
With a customized Sales by Item Summary report you can show an overview of your sales, not only organized by item, but also by the levels or nodes in your hierarchy version. In the following image you can see the standard Sales by Item Summary report on the left, and the same report including the merchandise hierarchy elements on the right. Levels can be grouped and then expanded or minimized as needed depending on the level of detail you need to show in the report.
To customize the Sales by Item Summary report for Merchandise Hierarchy:
-
Go to Reports > Sales > Sales by Item > Customize Summary (administrator).
-
In the Report Builder on the Edit Columns page, edit the name to identify it in the Saved Reports list. For example, Sales by Item Summary - Merchandise Hierarchy.
-
Select the Item Type 1 row and clear the Group box.
-
(Optional) Select the Item Type column and click Remove Column.
-
Now you need to add the custom merchandise hierarchy fields to your report:
Important:It is vital that you select the correct custom merchandise hierarchy fields in this step. Follow these instructions carefully.
-
Go to the correct custom merchandise hierarchy fields:
-
In the Add Fields list on the left, expand the Item Type list.
-
Scroll down to the merchandise hierarchy internal custom fields. If you have prefixed the name of the hierarchy levels with [MH], it is easier to locate the internal custom fields in the list.

-
-
Drag and drop the internal custom fields into the Report Preview panel.
-
-
After you have added all the required fields, you can reorder the columns as needed by clicking the Move buttons or by dragging the columns into position.
Tip:In the Column Label field you can remove the [MH] prefix so that it does not appear in the report.
-
Select the columns that you want to be able to collapse and expand as needed in the report and check the Group With Previous Column box for each of them.
-
Add filters as required to your report. For information regarding how to add filters, see Adding Filters to Customized Merchandise Hierarchy Reports.
-
After you have added the required columns and filters, click Save.