Managing Add-On Items on Subscriptions
The Add-On Items feature enables you to add subscription lines to a subscription using items that are not originally part of the subscription plan. You can add items upon creation, at the time of sale, or any time during the subscription term. This feature simplifies the workflow by reducing the number of steps required to create a new subscription or upsell an existing subscription. For information about enabling the Add-On Items feature, see Enabling SuiteBilling Features.
The Subscription Billing Enhanced UI SuiteApp includes support for add-on items on new or existing subscriptions.
For information about setting up the list of items that can be used as add-on items, see Setting Up the List of Available Add-On Items.
For information about adding items to a subscription using the enhanced UI provided by the SuiteApp, see Adding Items to a Subscription.
Setting Up the List of Available Add-On Items
By default, you can select any active service or non-fulfillable non-inventory items as add-on items. If you want to modify the list of items that can be added to a subscription, you can define a saved search for add-on items.
Subscription Billing Enhanced UI SuiteApp includes a predefined item saved search that you can use as a template to set up the add-on items list. After setting up the item saved search, you need to select it in the Add On Items Saved Search field on the General Preferences page for the company.
To set up the list of items that can be used as add-on items:
-
Go to Lists > Search > Saved Searches.
-
On the saved search list, look for the item saved search with the following details:
-
Title: TBP_AddOn_Items
-
ID: customsearch_tbp_add_on_items
Click the Edit link for the saved search.
-
-
In the Search Title field, enter a unique title for the saved search.
-
Make sure that the Public box is checked.
-
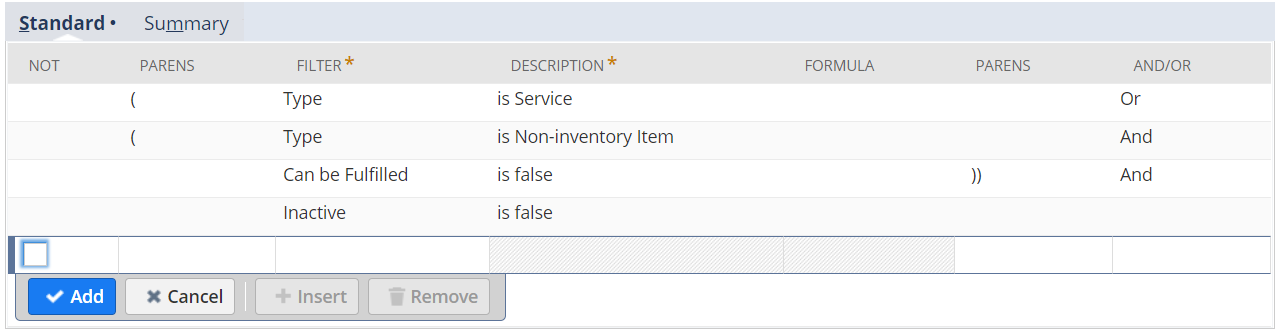
On the Criteria subtab, set the filters that you want to use for the add-on items saved search. The following filters are set by default.
 Important:
In addition, the SuiteApp automatically adds the following filters to the saved search that you specify in the Add On Items Saved Search preference:
-
Subsidiary filter based on the subscription subsidiary
-
Inactive filter to ensure that the list of options include only active records
To avoid any issues, do not include subsidiary and inactive filters in the saved search that you plan to use for this preference.
-
-
If you want to see the list of items that will be included based on your search criteria, click the Preview button. Click Return to Criteria to go back to the saved search definition page.
-
When you are done setting up the criteria for the add-on item saved search, click Save As.
-
After setting up the saved search, you need to select it in the Add On Items Saved Search field on the General Preferences page for the company.
-
Go to Setup > Company > General Preferences.
-
Go to the Custom Preferences subtab.
-
In the Add On Items Saved Search field under Subscription Billing Enhanced UI, select the add-on items saved search that you created.
-
Click Save.
-
Adding Items to a Subscription
If you enabled the Add-On Items feature, you can add subscription lines to new or existing subscriptions. When the Subscription Billing Enhanced UI SuiteApp is installed in your NetSuite account, the Add Item button is available on the top left corner of the Lines subtab when you edit a subscription.
Add-on items are optional, but the Include box is initially checked when you create the item. Additional items are marked as Add-On on the top left corner of the subscription line.

Add-on items have no predefined pricing, so you need to set the price of each item as you create it. Proration is permitted for recurring lines, but not permitted for one time and usage lines.
An add-on item in a subscription cannot be deleted after you saved the changes to the subscription. However, you can edit the item or add more items even after saving the subscription. If the add-on item is still in Draft status, you can change the status to Not Included by editing the subscription and clearing the Included box for the subscription line. After you add an add-on item to the subscription, that item follows the same workflow as any subscription line.
To add a new item to a subscription:
-
Open a subscription record in edit mode. To see the list of subscriptions, go to Transactions > Subscriptions > Create Subscriptions > List.
-
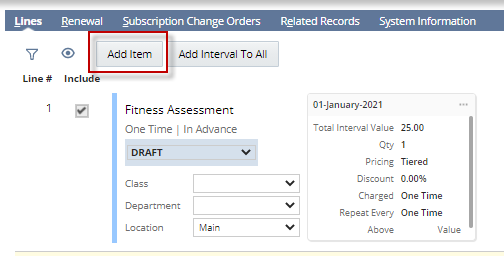
On the Lines subtab and click the Add Item button on the top of the subscription lines list.
-
On the new line for the add-on item, set up the details for the item that you want to add:
-
Item - Select the add-on item. By default, this field shows active service and non-fulfillable non-inventory items. If you defined a saved search in the Add On Items Saved Search field on General Preferences page, this field shows the search results based on the criteria that you set on the saved search. For more information, see Setting Up the List of Available Add-On Items.
-
Line Type - Select one of the following:
-
One Time - Items that incur a single charge, such as a setup or initialization fee.
-
Recurring - Items that incur charges throughout the subscription, such as recurring service.
-
Usage - Items that incur charges based upon how much or how often the customer uses them, such as minutes or data.
-
-
Billing Mode - Select when you want to bill the charges for the add-on item. One time or recurring amount charges can be billed in advance or in arrears. Usage charges are always billed in arrears.
-
Class, Department, Location - If you enabled per-line classifications, specify the class, department, and location for the add-on item. For information about setting classifications for subscription lines, see Class, Department, and Location Fields on Subscription Lines.
By default, these fields show all active classes, departments, and locations. You can also use public saved searches to define the list of options for these fields. For more information, see Setting Up the List of Class, Department, and Location Options for Subscription Lines.
-
Prorate Start Date and Prorate End Date - You can prorate the charges for recurring lines by keeping these boxes checked. Clear the boxes if you do not want to apply proration. Proration is not permitted for one time and usage lines.
-
Include in Renewal Subscription - Keep this box checked if you want to include the add-on item in the renewal subscription. Otherwise, clear this box to exclude the item from renewal.
Click the check icon on the top right corner to save the item settings.
-
-
Set up the pricing for the add-on item. To set the values for the first pricing interval, click anywhere on the pricing interval or click the ellipsis icon and select Edit. Then, specify values for the following fields:
-
Pricing Model - Select one of the following:
-
Tiered - This pricing model is based on the incremental quantity sold. It is commonly used for recurring items. Tiered pricing charges a specified rate for all items sold in the tier (for example, the first 10 items). When the quantity sold exceeds the upper limit for the tier, NetSuite charges the price specified for the next tier for the additional items.
-
Volume - This pricing model is based on the aggregate quantity sold. It is commonly used for usage pricing. For volume pricing, the total quantity sold defines the charge rate for all items in the order.
-
-
Charge Frequency and Repeat Every - For recurring and usage lines, set how often you want the charge to occur. You can set the values for these fields only on the first pricing interval.
In the Repeat Every field, you can enter any positive integer from 1 up to the maximum value, depending on the value set for Charge Frequency:
-
If Charge Frequency is set to Annually, maximum value for Repeat Every field is 10.
-
If Charge Frequency is set to Monthly or Weekly, maximum value for Repeat Every field is 120.
-
-
Total Interval Value - If you want to set the charge amount for the interval instead of using the price plan value, enter the charge amount in this field. This field is available only for recurring and one-time lines. You can set the value for this field only if the line status is Draft. In addition, for recurring lines, this field is editable only if the initial term for the subscription is not Evergreen.
Take note of the following when using the total interval value:
-
When you set a total interval value and confirm that you want to use it instead of the price plan value, the price plan value will be cleared. When you save the subscription, the price plan value will be calculated based on the total interval value that you set.
-
If you modify the price plan value after setting the total interval value, the total interval value will be cleared when you confirm that you want to use the price plan value. If total interval value is not set, its value will be calculated based on the price plan value when you save the subscription.
-
-
Prorate By - For recurring lines, select a proration option. You can set the value for this field only on the first pricing interval of a recurring line. The default setting is Prorate by Day. If the charge frequency is more than one month, you have the option to select Prorate by Day or Month.
-
Quantity - For recurring or one-time lines, enter a quantity that is greater than zero. Initial value for an existing pricing interval is 1. However, if you make a copy of an existing pricing interval or add a new interval, the Quantity field on the new pricing interval is set to blank.
-
Included Quantity - For usage lines, enter a value that is greater than zero for included quantity, if applicable.
-
Discount - Both percentage and flat rate discounts are supported. To enter a percentage discount, include the percentage sign (%) after the positive number that you enter in the Discount field. To enter a flat rate discount, enter the numeric value only.
-
Recurring Amount - For recurring lines, this field shows the recurring amount value based on the rate or fixed amount, quantity, and discount.
-
Price tiers - Set up the price for each tier by specifying values for the following fields:
-
Above Quantity (required) - Default value is zero for the first tier. For succeeding tiers, the value you specify in this field indicates the upper limit for the previous tier.
-
Pricing Option (optional) - Select one of the following options:
-
Rate (default) - Calculates the item amount as quantity multiplied by rate.
-
Fixed Amount - The defined charge amount for the item is not affected by its quantity.
-
-
Value (required) - Enter an amount to charge for the item.
-
Min Amount (optional) - Enter the minimum amount limit for the tier.
-
Max Amount (optional) - Enter the maximum amount limit for the tier.
Click the plus (+) icon on the right side of the tiers to create a new tier.
-
Click the check icon on the top right corner of the pricing interval to save the pricing information.
If you want to create additional pricing intervals, click the ellipsis icon on the top right corner of an existing pricing interval and select Make Copy. You can then edit the copied pricing interval to change the pricing or discount as needed. You can also create a new pricing interval by clicking the plus (+) icon on the right side of the last pricing interval.
One time lines cannot have more than one pricing interval.
-
-
If you want to add more items, click the Add Item button and repeat Steps 3 through 4.
-
When you are done adding items, click Save.