Lead-Time Variances Insights Overview
Enable automated monitoring of purchasing lead times and recommendations when there are variances from your Supplier Lead Time planning assumptions.
The planning advisor framework enables you to assess the impact, view insights, and act upon recommendations to change the lead time assumptions for the item and supplier site combinations you select. The charts and tabular analytics show the high and low areas of item and supplier site combinations that have variance. Using this, you can monitor the lead times to observe the increasing and decreasing trends.
Here’s a functional infographic that depicts how you get the lead-time variances insights and use them to improve your supply plans.
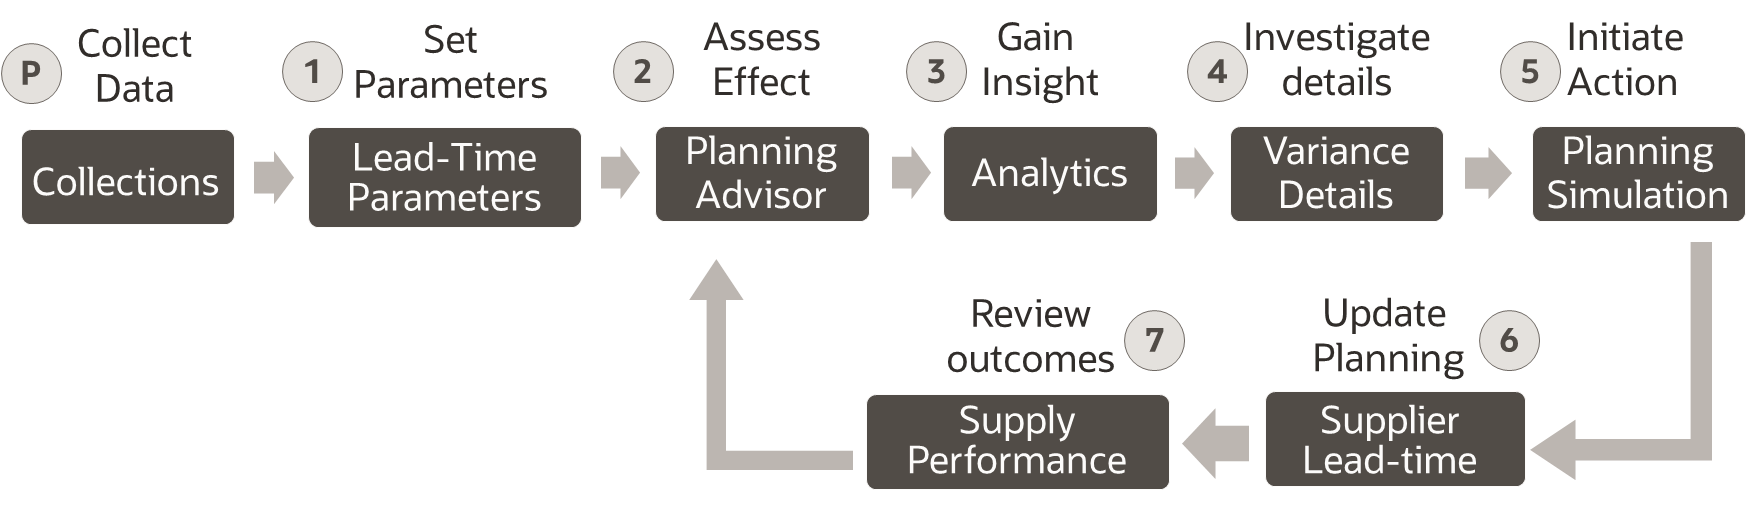
Data collection is a prerequisite to generating the necessary insights. All the other steps follow thereafter. So, after having your data collected, you:
- Configure the lead-time parameters to get accurate variances and generate insights.
- Assess the impact of purchase lead-time variances.
- Review the insights from the analytics.
- Investigate the variances compared to actuals and drill down into areas that need more attention.
- Adjust the supplier lead time according to your findings and copy it to the simulation set.
- Run the plan with the simulation to assess impact of recommendation.
- Review the outcomes and make supply planning decision with the impact of your changes.
You’ll be doing most part of it on the Oracle UIs. However, your approach to investigating the details in the analytics provided, making changes to your plan, and reviewing outcomes are all functional.
Prerequisite
Let’s begin with our prerequisite, data collection. All the information about how to collect the data, security privileges you need, and lot more is in the Planning Data Collections chapter of the Using Supply Planning guide. However, when collecting and contextualizing the purchase order receipts data, you need to choose specific business object and filters. Here are the particulars:
| UI | Setting | Value you need to select |
|---|---|---|
| Collect Planning Data | Collection Type | Targeted - If you want to perform an
initial or re-run of all the computations based on collected data.
Selecting this mode will run the computations based on the latest
collected data. See the Collect Data Using the Targeted Collection Type topic to learn
more about Targeted collection type. Net Refresh - If you want to compute only new insights based on net new data. |
| Collect Planning Data > Select Collection Filters | Items Filtered by Catalog | Select any product catalog. Ensure that you select the same catalog for Shipments Receipt History Filtered by Catalog. If you don't select any catalog here, you can select any catalog for Shipments Receipt History Filtered by Catalog. |
| Shipments Receipt History Filtered by Catalog | If you have selected a product catalog for Items Filtered by Catalog, select the same catalog here. | |
| Collect Planning Data > Supply Planning Data tab | Select Supply Entities for Supply Planning Data. | Select the Purchase Orders Shipments Receipts History business object and move it to Selected Entities. |
| Collect Planning Data | Date Range Type | Select Relative to Collection Run Date. If you select Fixed, enter a date range. |
| Collect Planning Data |
|
The Rolling Date Range option enables you
to collect the history data for the number of days that you specify.
For example, if you forecast weekly, specify 7 in the
Collection Window in Days field to
collect the shipment receipt history data once per week. The data
collections collect the shipment receipt history data for the latest
week. Select Roll off time periods automatically to truncate the history data by the number of days that you specify in the Number of days to keep field each time you run collections for the demand history data. For example, if you prefer to forecast each week based on the history data of 52 weeks, select the Roll off time periods automatically check box and specify Number of days to keep as 364 days. This setting ensures that as you collect data every week, you keep the most recent history of 52 weeks and automatically purge history data older than 52 weeks. |
After collecting the data, ensure that the Planning Advisor UI is enabled for the planners.
Next Steps for Viewing Insights
See these topics to learn more about the next steps in the functional flow:
- Enable Planning Advisor for Data Insights
- Configure Lead-Time Parameters
- Assess the Effect of Purchase Lead-Time Variances
- Gain Insights on Lead-Time Variances
- See the tree-map view, supplier, and order details shown in the analytics:
- Adjust Supplier Lead-Time Variances and Simulate Plan