4Forms
User-defined Forms, Diversity Forms, Documents
User-defined Forms
User-defined Form
A user-defined form is a block of information containing standard and/or custom fields that can be used in a specific context.
Default forms are provided to be used in Career Section application flows.These forms are used to specify the data fields your organization is capturing from candidates when they apply to a position on your Career Section.The application flow controls the sequence of pages and type of information the candidate or referrer has to provide.
You have the ability to modify the default forms that will be presented to candidates or referrers within the application flow. You also have the ability to create user-defined forms from scratch and configure the layout, field labels, and help text of the forms.
When you create a user-defined form, you select the type of form from a list and choose between creating the form from scratch versus using the template for the specific form type.Each type of form has a template that pre-populates the form with relevant fields.In both cases, it is possible to customize the layout of the form, field labels, etc. Fields appearing in a user-defined form can be removed provided that they are not mandatory (indicated by a red dot).
| User-defined Form | Description |
|---|---|
| Basic Profile | Gathers candidates' Basic Profile preferences such as job type, shift, schedule, travel, salary, or availability. The information collected via this form is displayed in the candidate file. A candidate cannot have more than one Basic Profile.Within the Profile, candidates can choose to receive invitations to apply to a job in the future if the job matches their preferences. |
| Background Check Consent - General | Gathers candidates' general information such as driver's license information, mother's maiden name, or place of birth for the purposes of performing a background check.Background Check forms are only presented to candidates who are asked to take a Background Check as a part of the candidate selection process designated by your organization. |
| Background Check Consent - Address History | Gathers candidates' address history if desired.This form is usually presented on the same page in the application flow as other Background Check forms. |
| Background Check Consent - Military Service | Gathers candidates' military service history if applicable.This form is usually presented on the same page in the application flow as other Background Check forms. |
| Candidate Personal Information | Allows candidates to provide and manage their personal information, such as their name, address, phone numbers, and any other fields related to their personal information.The information collected on this form is displayed in the candidate file. The information remains the same for each job submission. |
| Candidate Personal Information - Agency | Allows agents to provide and manage the personal information of candidates they refer via the agency portal, such as the candidates' name, address, phone numbers, etc.The information collected on this form is displayed in the candidate file. The information remains the same for each job submission. |
| Certifications | Collects information about the candidate's professional and industry certifications.This form includes fields such as issuing organization, issue date, and expiration date.You can use the certifications form on job-specific application flows or on the general profile flow.The information collected via this form is displayed in the candidate file. The information can change from one job submission to another because candidates can have different certification highlights for the different job submissions. |
| Education | Allows candidates to build the education part of their submission using a series of education-related fields such as institution, program, and degree.The information collected via this form is displayed in the candidate file. The information can change from one job submission to another because candidates can have different education highlights on different job submissions |
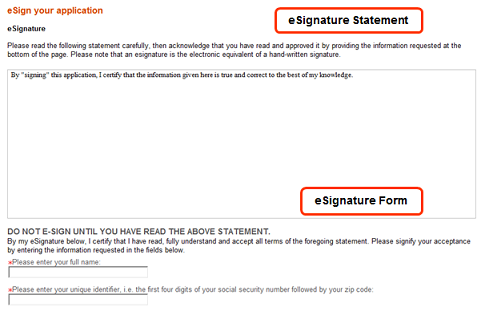
| eSignature | Uses the eSignature form if your organization wants candidates to sign their online job submission.The form collects the information your organization wants the candidate to fill out as they sign their online job submission, such as full name and/or unique signature (for example, Social Security Number + home zip code). This form is typically presented on a page in the application flow that is comprised of the eSignature form and the eSignature statement (which declares exactly what the candidates are agreeing to when they provide an eSignature). The form and the statement must be presented together. When this feature is activated, candidates must provide separate eSignatures for each job submission. See example below. |
| References | Gathers candidates' business or personal references (for example, the name(s), contact information and details about how they know the person).You can use the References form on a job-specific application flow or on a general profile flow. The information collected on this form is displayed in the candidate file. Candidates can have different references highlighted for different job submissions. |
| Referrer Personal Information | Referrers (agents and/or employees who are referring candidates) can provide their own personal information, such as their name, address, phone numbers, etc. |
| Work Conditions | Gathers candidates' work condition preferences such as hourly expected pay, hours and times willing to work, etc. for either job-specific applications or general profile applications.The information collected via this form is displayed in the candidate file. Candidates can only have one set of work conditions in their candidate file. |
| Work Experience | Candidates can build the Work Experience part of their resume using a series of work-related fields (such as employer, title, accomplishments, etc.).The information collected via the Work Experience form is displayed in the candidate file. Candidates can have different work experience highlights for different jobs to which they apply. |
Example of a eSignature statement and eSignature form.
Candidate Submission User-Defined Fields Available in Career Section
When candidate submission user-defined fields (UDFs) are made available to be used in career sections, they can be used in forms and flows.
Submission UDFs are available in the Basic Profile, Candidate Personal Information, Candidate Personal Information - Agency, and Submission form types. When administrators create user-defined forms using one of these form types, they can select submission UDFs to design their form. When administrators create application flows, Submission Information forms are available under the Basic Profile, Candidate Personal Information, and Submission Information blocks.
Creating User-defined Forms
The creation of a user-defined form consists of the following steps.
In the Recruiting Administration menu, specifying the fields that can be used in career sections.
Making a Field Available in Career Sections
Creating a User-defined Form
The Access the Career Section administration section user type permission is required.
Consider duplicating an existing user-defined form to save time.
Click Create.
Choose the type of form you wish to create.
-
Select the Use the default template option if you wish the form to be pre-populated with relevant fields.
Click Create.
Provide a code and a name.
-
Provide a description to facilitate future references.
Add rows, columns, and sections using the Toolbox features.
In the Field Chooser list, click a field, then drag and drop it in the desired section.
Edit the field properties by selecting a field and scrolling to the Selected Element Properties section at the bottom of the form.
Click Save.
The user-defined form is associated to a block that can be associated to an application flow provided the user-defined form is activated.
Activating a User-defined Form
The Access the Career Section administration section user type permission is required.
Click Activate next to the user-defined form.
The status of the user-defined form is changed to Active in the Status column of the User-defined Forms list. The user-defined form can be used when building an application flow.
User-defined Form - Other Configuration Tasks
Deleting a User-defined Form
The status of the user-defined form must be Inactive or draft.
The Access the Career Section administration section user type permission grants users access to this feature.
Click Delete next to the user-defined form.
Confirm the deletion.
The user-defined form no longer appears in the User-defined Forms list. The user-defined form can no longer be associated to a block.
Deactivating a User-defined Form
The user-defined form must be active.
The user-defined form must not be in use.
The Access the Career Section administration section user type permission is required.
Click Deactivate next to the user-defined form.
The status of the user-defined form is changed to Draft in the Status column of the User-defined Forms list. The user-defined form can no longer be associated to a block.
Adding Fields to a User-defined Form
The Access the Career Section administration section user type permission is required.
Click the name of a form.
In the Field Chooser list, click a field, then drag and drop it in the desired section.
Drag and drop the field into the desired section.
Edit the field properties by selecting a field and scrolling to the Selected Element Properties section at the bottom of the form.
Click Save.
Editing the Properties of a Field Included in a User-defined Form
The Access the Career Section administration section user type permission is required.
Click the name of a user-defined form.
In the Page Content section, click inside a field.
Scroll down at the bottom of the page.
-
In the Selected Element Properties section, located at the bottom of the form, modify the properties of the field.
Click Save.
Previewing a User-defined Form
The Access the Career Section administration section user type permission is required.
Click Preview next to the user-defined form.
The page containing the form is displayed without having to login to the Taleo application.
Viewing the Application Flows Associated to a User-defined Form
The Access the Career Section administration section and the Access Administration user type permissions are required.
Click View Associated Flows next to a user-defined form.
The list of all application flows using this user-defined form is displayed. This allows system administrators to view in which part of the Career Section a change made to the user-defined form has an impact.
User-defined Forms Selected Element Properties
Available properties depend on the type of field. Not all properties are available for all elements or for all products.
| Property Option | Description |
|---|---|
| Access (Editable/ Read Only) | Indicates if the field is read-only or editable. When read-only is selected, a user is unable to modify the field. Default value is Editable. |
| Binding field | Data source to which the element is bound. The value displayed in the Binding field represents the data value (available in the first list of the Field Chooser) to which the element is associated. For example, the Annual Bonus field is bound to the AssignmentOfferForForm/AnnualBonus. The value in the Binding field is not editable. |
| Columns | Number of columns. Administrator can determine how many columns of fields to display in each area of each page of the forms. |
| CSS Style | The desired visual style for displaying the value within an input field. Use styles as defined in the Cascading Style Sheets 2.0 standard: ww3.org reference. This style will override the main style that is used when the form is displayed to assignees and viewers. If no style information is entered, the default visual presentation will be used for that page. |
| CSS Style Label | This is used to control the formatting of the label above the input field that is displayed to the assignee and form viewer. |
| CSS Style Instructions | This style will override the style defined in the career section theme. If no information is entered, the style defined in the career section theme will be used. |
| Default Value | Default value of the input field |
| Field Label | Input Field Label |
| Field Size | Indicates the number of elements displayed in a list. Field Size is used for multiple-selection fields. Default value is 1. For example, if the field size is 2, the list will display 2 values. |
| Field Type | This property should not be used for fields that are filled by candidates in career sections because RTF input is not supported. Field type is mainly used for requisition content.
|
| Help Callout | Similar to instructions, but this is displayed as a help bubble on the form and can provide information about a field to the user. |
| Input Mask | Format of the input value. The following syntax must be used:9=any number, a = any letter, n=any letter or number, |=logical, or\9=the 9 character, \a=the a character, \n=the n character, \|=the, | character, Any other symbol=the symbol (including a space). Possible formats for SSN and Zip/Postal codes: SSN: 999-99-9999ZIP Code United States: 99999|99999-9999Postal Code Canada: a9a9a9|a9a 9a9|a9a-9a9Note: Make sure to not add a space before and after the | operator. For example, do not enter 99999 | 99999-9999 |
| Instructions | This can be used to provide any special instructions necessary to explain what is being requested for the field. The instructions will appear just below the field. |
| Mandatory | Indicates, by selecting the Yes or No option, if the field must be completed. When a field is mandatory, a red square appears in front of the field. This can be useful for preventing an assignee from submitting a form with the value 'Not Specified' in a user-defined selection. Marking the field as Mandatory will require the assignee to specify a value. |
| Rows | Number of rows available in a text area. |
| Save Literals | If Input Mask is used for a field, it may require that specific numbers or letters appear within the field when the assignee fills it out at runtime. Save Literals determines if specific characters in the input mask will be saved in this field, or if they are simply required for the user to type in but removed from the saved value. This is useful for helping assignees to recognize the right information to type in, while removing the redundant characters for later use. |
| Status (Deactivated/Activated) | Indicates if the field is activated or deactivated (that is, grayed out or not). The use of this field depends on the value selected in the Access field. Editable access + Activated status=field can be modified Read-only access + Activated status=field not editable Read-only access + Deactivated status=field not editable Editable access + Deactivated status=field not editable |
| Tooltip | Displays the text entered in the input field as a tooltip when the assignee/viewer hovers over the field in the form. |
| Value | Area where user input should be entered or where the information saved in a field is displayed. |
Diversity Forms
Diversity Form
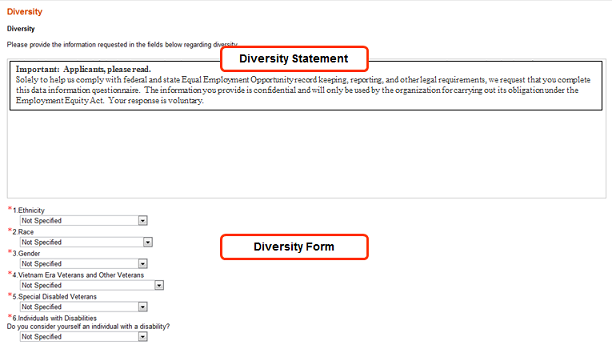
The Diversity form is used to collect diversity data such as gender or ethnicity from candidates during the application process.
One information block that can be included in a career section is the Diversity block. The Diversity block is comprised of a Diversity statement and a Diversity form. The Diversity statement consists of text that the candidate reads regarding your organization's Diversity policy. While the Diversity form includes the diversity questions. Each of these components is created separately.
Example of a diversity form with a diversity statement.
Standard US and Canadian Diversity forms are provided to address regulatory needs and compliance regardless of location. These forms are the EEO1, EEO2a, EEO2b, and EE diversity forms. You can configure these standard forms, and you can also create custom diversity forms. You can configure Diversity statements and Diversity forms for each country where your organization does business, which means that candidates are presented the appropriate content and questions based on the location of the job to which they are applying. It is also possible to have a generic Diversity form for all locations.
For standard US and Canadian Diversity forms:
It is not possible to create a new question. Only the available answers can be changed.
It is not possible to create a new answer for a question, only the label of the answer can be changed.
It is not possible to change the answer type of an answer.
Organizations do not always include the Diversity form upon a candidate's initial application in a career section. For U.S. EEO collection specifically, you can choose when you want to collect the diversity data. It can be during the time the candidate applies in the career section or later on in the selection process. A setting allows you to specify when in the process you want to collect EEO data.
| Setting | Description | Default Value | Location |
|---|---|---|---|
| Threshold to Collect EEO information (USA) | Collect the EEO/Affirmative Action information (United States) when a candidate reaches the selected status. | New | Configuration > [Recruiting] Settings |
When the Threshold to Collect EEO information (USA) setting is set to Never, the Diversity block containing the Diversity form will not appear. In the case of Pipeline requisitions, the Pipeline reference model is before the NEW status. If the setting is set to Never, it means that there is no threshold applied and the Diversity block will display.
Key benefits of the Diversity form:
Provides a standard method to address regulatory and compliance issues regardless of location.
Questions and instructions can be tailored for each country of operation.
Diversity data is collected based on the location of requisitions, allowing for data collection for multiple countries from a single career section.
Configurable standard questions are available, in addition to creating up to ten user-defined questions.
Standard forms are provided with a set of standard questions. Configurable standard questions are available, allowing for the reporting of individual data points (for example, gender) across all countries. All information is presented in a standard format with no confusion on location and formatting differences.
Optional Disability Form Questions and Fields
The PDF forms feature and the Disability form prescribed by the Office of Federal Contract Compliance Programs (OFCCP) for use in the United States discussed in this guide precede this current version of Oracle Taleo Enterprise.
Career Section administrators can specify for individual questions on a Diversity form whether providing an answer is mandatory or optional. When candidates applying for a job or completing a general profile access a PDF form containing any of these questions, the questions will be mandatory or optional as configured on the Diversity form. Candidates have the option of skipping any or all of the optional questions and are still able to advance to the next step in the submission flow. User-defined fields on the PDF form can also be made mandatory or optional.
Career Section administrators can designate individual questions on a Diversity form as mandatory or optional and these designations are reflected in PDF forms (most often disability PDF forms) after the latter are associated with a Diversity form. There are two steps then:
Making Diversity form answers mandatory or optional
Associating disability form answers and user-defined fields with the corresponding Diversity form answers and user-defined fields
At time of upgrade, all questions on the Diversity form receive the same property (mandatory or optional) as the property of the entire form. Administrators can then modify the mandatory/optional property for individual questions if so desired.
Disability Form Supports Data Masking
The "Masking Diversity Question Answers" setting is extended to the PDF Forms block in the job submission flow. If the setting is enabled and candidates have made submissions in the past, that information is not displayed on a PDF form in a new submission flow. If the setting is enabled, any values provided during previous submissions for the full name and date user-defined fields are also masked.
Creating Diversity Forms
The creation of a Diversity form consists of the following steps.
Creating a Diversity Form
The Access the Career Section administration section user type permission is required.
Click Create.
Indicate if you want to create a generic form corresponding to all locations, or a specific form corresponding to a particular location.
Click Continue.
Enter a name and a code. The code must be unique among all diversity forms.
Enter the desired information in the Description field.
Click Finish.
Creating a Question for a Diversity Form
The Access the Career Section administration section user type permission is required.
The Diversity form must have Draft or Inactive status.
The number of questions is unlimited provided none of them have the same question type. For example, a Diversity form cannot include two questions whose type is Disability.
-
Click the code of a Diversity form.
-
Click Create next to Questions.
-
Enter a code.
-
Select the type of question you want to create.
-
Select the format of the answer, that is Single Answer or Multiple Answers.
-
Make a selection from the Display list, that is Radio Buttons, Dropdown List, or Check Boxes.
-
To make it mandatory to provide an answer to the question, select the check box next to Answers mandatory. Otherwise, candidates will have the option of answering or skipping the question before proceeding to the next question or step in the submission process.
-
Type the question in the Question box.
-
Click Continue.
-
In the first Answer field, type an answer.
-
In the second Answer field, type a different answer.
-
If you need more Answer fields, click Create next to Answers.
-
For each answer, select the type of answer.
-
Click Finish.
Before a question can be enabled (Active status), "Not Specified" must be specified as one of the possible answers, except in the case of Radio Button and Checkbox format questions. Also, if your organization enabled other languages in addition to the base language, translations must be entered for the question and all answers for each language.
Ordering Questions in a Diversity Form
The Access the Career Section administration section user type permission is required.
Click the code of a Diversity form.
Click Reorder next to Questions.
Use the arrows to reorder the questions.
Click Save.
Activating a Diversity Form
The Access the Career Section administration section user type permission is required.
Set up questions carefully before activating the Diversity form. While a diversity form is in Draft status, it is possible to create, define, and delete questions and the Diversity form itself can also be deleted. Once the Diversity form is given Active status, modifications are limited and the form cannot be deleted.
Only one Diversity form version can be activated per location.
-
Click the name of a form.
-
Click Activate.
When a Diversity block is used in an application flow, the activated Diversity form is displayed. If location was specified, the block is only displayed if the location matches the location of the Career Section.
Diversity Form - Other Configuration Tasks
Deleting a Diversity Form
The Access the Career Section administration section user type permission is required.
Click Delete next to a Diversity form.
Click Yes to confirm the deletion.
The Diversity form is no longer displayed in the application flow. Questions and answers related to this form will also be deleted.
Deactivating a Diversity Form
The Access the Career Section administration section user type permission is required.
Click the code of a Diversity form.
Click Deactivate.
Click Yes to confirm the deactivation.
The Diversity form is no longer displayed in the application flow.
Associating a Diversity Form to a Location
The Access the Career Section administration section user type permission is required.
The Diversity form must not be draft.
Click the code of a Diversity form.
Click Edit.
Click Add next to Location.
Select one or more locations.
Click Select.
Editing a Question in a Diversity Form
The Access the Career Section administration section user type permission is required.
Only the status and the question can be edited.
Click the code of a Diversity form.
Click the code of a question.
Click Edit next to Properties.
Make changes.
Click Save.
Deleting a Question in a Diversity Form
The Access the Career Section administration section user type permission is required.
Click the code of a Diversity form.
Click Delete next to the question.
The question is no longer included in the Diversity form.
Making Answers Mandatory or Optional on a Diversity Form
The Access the Career Section administration section user type permission is required.
Click a Diversity form code.
Click the code of the Diversity form question whose answer you want to make mandatory or optional on a disability PDF form.
Click Edit.
Make it mandatory to answer the question by selecting the Answers mandatory check box or make it optional by ensuring the check box is not selected.
Click Save.
Depending on the selection you made, candidates will be required to answer the question on the Diversity form or they will have the option of answering or skipping the question before continuing to another question or step in the application flow.
Editing the Answer of a Question in a Diversity Form
The Access the Career Section administration section user type permission is required.
The question type of an answer cannot be changed once the question has been created.
Click the code of a Diversity form.
Click the code of a question.
Click Edit next to Answers.
Make changes.
Click Save.
Ordering Answers of a Question in a Diversity Form
The Access the Career Section administration section user type permission is required.
Click the code of a Diversity form.
Click the code of a question.
Click Reorder next to Answers.
Use the arrows to reorder the answers.
Click Save.
Deleting the Answer of a Question in a Diversity Form
The Access the Career Section administration section user type permission is required.
The question must have Draft status.
Click the code of a Diversity form.
Click the code of a question.
Click Delete next to the answer.
Click Yes to confirm the deletion.
The answer is permanently deleted.
Disabling the Answer of a Question in a Diversity Form
The Access the Career Section administration section user type permission is required.
The question must have Draft status.
Click the code of a Diversity form.
Click the code of a question.
Click Disable next to the answer.
Click Yes to confirm deletion.
The answer is disable for the question but remains available in the database.
Enabling the Answer of a Question in a Diversity Form
The Access the Career Section administration section user type permission is required.
This type of answer is only available for standard diversity forms.
Click the name of a standard US or Canadian Diversity form.
Click the code of a question.
Click Enable.
Candidates are required to provide information on questions included in the standard US and Canadian Diversity forms.
Creating a Question Type
You cannot create a question type from scratch, the existing ones must be modified.
Deleting a Question Type
Question types cannot be deleted, they can only be disabled.
Activating a Question Type
The Access the Career Section administration section user type permission is required.
Click the code of a question type.
Click Activate.
The question type is now available when creating a question for a Diversity form.
Editing a Question Type
The Access the Career Section administration section user type permission is required.
Only the code and name of the question can be edited.
Click the code of a question type.
Click Edit next to Properties.
Make changes.
Click Save.
Creating an Answer Type for a Question Type
The Access the Career Section administration section user type permission is required.
Question type must be draft or inactive.
Click the code of a question type.
Click Create next to Possible Answer Types.
Complete the fields.
Click Save.
Editing the Answer Type of a Question Type
The Access the Career Section administration section user type permission is required.
Diversity form must be draft.
Click the code of a question type.
Click the name of the answer type.
Click Edit next to Properties.
Change the name.
Click Save.
Click Finish.
Diversity Question Answer Masking
Answers that candidates provide for diversity questions while completing a job submission or general profile can be masked after the candidates save the corresponding page.
A setting can be configured such that if candidates provide answers to diversity questions and save the corresponding page, the answers are no longer displayed on the page and asterisks are displayed in place of the answers on the Summary page.
If candidates edit their candidate profile or the job-specific application after saving a page containing answers configured for masking, they have to reenter their answers because the existing values will have been cleared. If candidates neglect to reenter the answers, a warning message lists the unanswered questions and invites the candidates to reenter answers.
Similarly, if candidates fill out other job-specific applications on the same career section and the corresponding application workflows contain diversity questions with answer masking enabled, the candidates have to reenter the values if they want to include them in the job submission. If candidates neglect to reenter the answers, a warning message lists the unanswered questions and invites the candidates to reenter answers.
Because candidates are obliged to reenter answers to diversity questions (provided the masking feature is enabled) each time they edit their general profile or apply for jobs, enabling this feature can have a negative impact on the candidate experience. The inclusion of diversity questions with answers masking enabled in "primary" flows is therefore not recommended. Diversity questions, if configured for masking, are more suitable for "secondary" flows such as Invitation to Self-Identify and Request More Info.
Masking Answers for a Question in a Diversity Form
-
Click Masking Diversity Question Answers.
-
Click Edit.
-
In the Value section, click the radio button next to Yes.
-
Click Save.
Answers that candidates provide for diversity questions while completing a job submission or general profile will be masked after the candidates save the corresponding page.
Documents
Documents
The Documents section of the Career Section Administration menu stores PDF files loaded into the Taleo system.
The PDF document includes fields and questions already configured. That alone, however, is not enough for application flows to be able to use the document. The fields and questions still need to be connected to fields and a diversity question using the Field Binding capability. In turn, when the document is presented to candidates via a PDF Form block in Career Section application flows, candidates populate the data fields in this document. Documents cannot be used for other purposes such as data output. The only documents available are two instances of the Voluntary Self-Identification of Disability (Exp. 31-01-2020) form. Customers can neither modify the documents, nor upload additional documents. The PDF Forms block can only exist on its own as a page; it cannot be on a page with other blocks.
Documents work in a complementary fashion with the Diversity block in an application flow; they do not replace it. The Career Section administrator can associate the document with a Diversity form. This enables the administrator to then associate questions on the PDF form with questions on the Diversity form. This action also ensures that the questions on the PDF form are not displayed a second time on the Diversity block in the application flow, even though the questions are included in the configuration of that Diversity form. The PDF form block in an application flow will inherit the location contextualization from the associated Diversity form. Because the functionality is only relevant for a United States-specific document provided in the Taleo system, the associated Diversity form will be contextualized to the United States. As such, the PDF form block will only be displayed to candidates who are applying for requisitions whose locations are in the United States.
System administrators bind the fields on the form with the corresponding Diversity answers and candidate user-defined fields in the Taleo system. Administrators can configure the form such that it is displayed to candidates as part of a profile submission or job-specific application flow. The supplied forms are available in English only, and will render in English on application flows in other languages. Because administrators bind the data fields to preexisting Diversity questions in the Taleo system, reports referencing Diversity questions should not require any changes to accommodate this feature.
When the document is presented to candidates in the career section, the width of the document is modified automatically so it does not exceed the width of the content window thereby avoiding horizontal scrolling. The size of the content window is determined by the customer's branding file or other web design constraints. The candidate has a "View Actual Size" option to render the document in the size of the original PDF.
Infrastructure is in place to track the documents and the data submitted each time a document is submitted by candidates. Future features may use this link.
The PDF Forms block in the application flow is compatible with the "Diversity Question Answer Masking" feature. If masking is enabled, the responses are not displayed on the Summary page of the submission. If candidates return to edit a form or there is data from past submissions, the information is not displayed on the form. Finally, masking extends to two user-defined fields, full name and date.
OFCCP Disability Form
Two copies of the Voluntary Self-Identification of Disability (Exp. 31-01-2020) form are preloaded in the Taleo system.
Except for naming conventions, the two forms are identical. One form can be used for pre-offer situations while the other one can be used for post-offer situations. The Disability form is rendered as an image overlaid with fields that are completed by candidates after they have read the content of the form. Neither candidates nor system administrators need any Adobe Acrobat products to configure the form or enter data in the career section.
System administrators can display the Voluntary Self-Identification of Disability (Exp. 31-01-2020) form issued by the OFCCP to candidates as part of application flows.
When releasing this document, the OFCCP offered some guidelines about how the form is to be presented.
The document should be a facsimile of the form delivered by the OFCCP.
Text font and size specifications.
Candidates are required to enter the current day's date and their full name.
For this reason, Oracle is delivering the exact form into customers' zones.
Please note that Oracle does not confirm that the functionality and configuration described in this document will ensure regulatory compliance. Customers are advised to seek guidance from their legal counsel.
The Voluntary Self-Identification of Disability (Exp. 31-01-2020) form is available in Taleo Enterprise 13A.6.13, 13B.6.6, 13B.7.1, 13C.3.3, 13C.4.1 and later versions.
Configuring the OFCCP Disability Form
The OFCCP Voluntary Self-Identification of Disability (Exp. 31-01-2020) form has been pre-loaded in the Taleo system.
In order to use the OFCCP Disability form, system administrators must perform specific configuration tasks.
Editing the disability question and its answers. It is suggested that the disability question and answers in the Taleo system are relabeled. Relabeling the question and answers will drive the display of this data on the Summary Page of the career section application flow.
Creating a user-defined field for the candidate's name. The Candidate user-defined field will be linked to the Your Name field embedded in the Disability form.
Creating a user-defined field for the date. The Date user-defined field will be linked to the Today's Date field embedded in the Disability form.
Binding the disability question and the UDFs. The disability answers, the candidate name and the date embedded in the Disability form are linked to the disability question and UDFs created in the Taleo system.
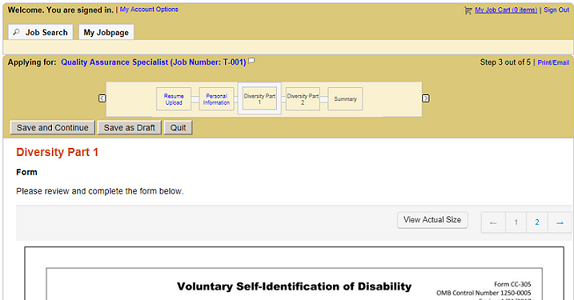
Positioning the Diversity block in the application flow. The Diversity block contains the diversity statement which provides instructions on how to complete the Diversity form as well as the OFCCP Disability form which contains fields that candidates must complete.
Example of a career section application flow with the OFCCP Disability Form in the Diversity block.
Editing the Disability Question and its Answers
Click the EEO1 form.
Under Questions, click the EEO1 Disability question.
Click Edit next to Properties.
To make it mandatory to provide an answer to the question, select the check box next to Answers mandatory. Otherwise, candidates will have the option of answering or skipping the question before proceeding to the next question or step in the flow.
In the Question field, replace the existing text. For example: Please check one of the boxes below:
Click Save.
Click Edit next to Answers.
Modify the existing answers. For example:
Answer: Not Specified
Answer: YES, I HAVE A DISABILITY
Answer: NO, I DON'T HAVE A DISABILITY
Answer: I DON'T WISH TO ANSWER
Click Save.
The new labels for the disability question and its answers will be rendered on the Summary page of the career section application flow.
Creating a User-Defined Field for the Candidate's Name
Click Create User-defined Field.
In the Type list, select Text.
In the Name field, type a name for the candidate name field. For example: USA_DISABILITY_FULLNAME.
In the Label field, type Your Name.
In the Attributes section, enter the following values:
Max. Num. Chars.: 40
Width: 25
Num. of lines: 1
Translate the field into all available languages. Languages are available at the upper right of the page.
Click Save.
Configure the properties of the field as follows:
In the Candidate Fields list, click Show User-defined Fields.
Click the Your Name field.
Click Edit Field Availability.
Under Show Standard Fields, select Taleo Recruiting and Career Section.
Under Content Required, select Not Required.
Under Security Level, it is suggested to select Confidential.
Click Save.
The field is available in the Candidate Fields list and can be linked to the Your Name field embedded in the OFCCP Voluntary Self-Identification of Disability (Exp. 31-01-2020) form.
Creating a User-Defined Field for the Date
Click Create User-defined Field.
In the Type list, select Date.
In the Name field, type a name for the date field. For example: USA_DISABILITY_DATE.
In the Label field, type Today's Date.
In the Attributes section, enter the following values:
First Year in Range: This year
Last Year in Range: +1
Display Order: Ascending
Day Displayed: Yes
Translate the field into all available languages. Languages are available at the upper right of the page.
Click Save.
Configure the properties of the field as follows:
In the Candidate Fields list, click Show User-defined Fields.
Click the Today's Date field.
Click Edit Field Availability.
Under Show Standard Fields, select Taleo Recruiting and Career Section.
Under Content Required, select Not Required.
Under Security Level, it is suggested to select Confidential.
Click Save.
The field is available in the Candidate Fields list and can be linked to the Today's Date field embedded in the OFCCP Voluntary Self-Identification of Disability (Exp. 31-01-2020) form.
Binding the Disability Question and the UDFs
The moment the disability document is enabled (Active status), the diversity question used in the field binding is excluded from the Diversity block. It is therefore recommended to disable the career section where the OFCCP Disability form is available.
The Active document can now be used in application flows. Once a document's status is Active, the Properties and Field Binding sections of the document can no longer be modified. Also note that a document can only be disabled while it is not referenced by any application flow.
Positioning the Diversity Block in the Application Flow
Open an application flow.
Make sure the status of the application flow is Draft or Inactive.
You may choose to display the PDF Form block on its own page, or combine the PDF Form block with the Diversity block (or any other block) on one page. The procedure below describes the first option. Add the pages where the PDF Form and Diversity blocks will appear.
In the Add a Page field, type the name of the page. For example, Diversity Part 1.
Click Create a Page. The page appears in the Flow section.
In the Add a Page field, type the name of the page. For example, Diversity Part 2.
Click Create a Page. The page appears in the Flow section.
Add the Diversity blocks in the pages.
In the Available Blocks section, select the Diversity block which contains the diversity statement.
Drag and drop the block in the Diversity Part 1 page.
In the Available Blocks section, select the PDF Form block which contains the disability form.
Drag and drop the block in the Diversity Part 2 page.
Click Save.
Select the disability form.
In the Page Ordering section of the application flow, click the PDF Form link.
Click Edit next to Properties.
Select the proper disability form.
Click Save.
Activate the application flow.
You can now put the application flow on the career section, and activate the career section.