Zone Picking
Zone Picking is a method of order picking that divides items into multiple zones, where each employee is trained to pick within an assigned zone.
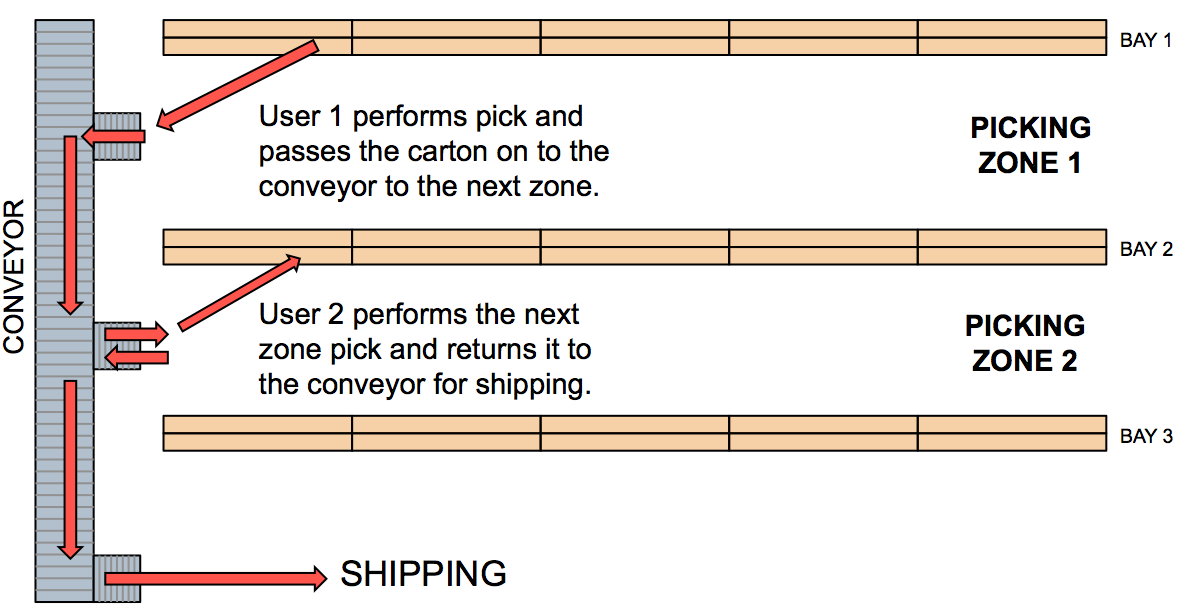
The following figure shows an example of Zone Picking:
Zone Picking Configuration
There are several items tied to configuring WMS for zone picking:
- Setting up the Zone Picking RF module
- Creating the Task and Wave Templates
- Setting up Pick Zones for locations
Step 1: Setting up the Zone Picking RF Module
- Go to the “Screen Configuration” screen.
- Click on “Generate Screens” and select the module entitled “RF-Text: Pack NC Active {order}”.
- Select the module and click on its details.
- In the screen name field, add “Zone Picking”.
- Click Save.
For details on the Zone Picking-related parameters, see the table below:
| Parameter Name | Value | Behavior |
|---|---|---|
| Zone Picking | Default Behavior | Zone Picking is not performed and existing behavior holds well. System creates multiple Outbound LPN’s if Break by Order or Container is set. |
| Zone Picking with Drop | Zone picking logic kicks in and the drop location prompt is displayed if the task contains picks from multiple zones. Works with only Single Outbound LPN. This parameter overrides the setting done on Break Picks by Parameter. | |
| Zone Picking without Drop Location | Zone picking logic kicks in and the drop location scan screen is not displayed if the task contains picks from multiple zones. Works with only Single Outbound LPN. This parameter overrides the break picks by parameter. | |
| Zone Picking with Suggested Drop | Zone picking logic kicks in system displays the drop location relevant for the next pick zone | |
| Break Picks By | 1- None | While picking, the system does not break the picks by Order or by Destination. |
| 2- Destination (default/current status) |
While picking, the system prompts for a new Outbound Container when the picked order points to different destination. When the ‘Zone Picking’ parameter is set, then the ‘break picks by destination’ will not be considered and you continue with the same Outbound LPN. |
|
| 3- Order |
While picking, the system prompts for a new Outbound Container when picking a different order. When the ‘Zone Picking’ parameter is set, then ‘break picks by Order’ will not be considered and you continue with the same Outbound LPN. |
|
| Retain Close LPN on Task | Yes |
When this parameter is set to ‘Yes’, as soon as you close the LPN by using CTRL-E, WMS does not prompt for drop location and does not remove the LPN from the task. To perform zone picking without moving the LPN’s on the conveyor or if Zone picking is not done, it is advisable to set this parameter to Yes. |
| No |
When this parameter is set as soon as the user closes the LPN by using CTRL-E, WMS prompts for a drop location and removes the LPN from the task. Setting this parameter to ‘No’ ensures that Zone Picking is done with Single Outbound LPN being moved across different pick zones. If the LPN reaches its capacity, select CTRL-E and the system will prompt for a drop location. |
Configure Zone Picking for Active Unit Picking
- Now that the Pick Zone module is configured, it needs to be enabled for the desired Task Type. Go to the “Task Type” screen.
- To configure zone picking for Active Unit picking, select Task Type ‘NC-ACTIVE-PICK’. To configure zone picking for Reserve Unit picking, select Task Type ‘LPNUNITS’.[1]
- Click the Detail button to view Zone Picking details.
- To change the RF program to the one configured in steps 2-4, select module “Pack NC Active {order}” and click Edit. Choose the Zone Picking RF program from the drop-down list:
- Click “Save”.
Step 2: Creating the Task and Wave Templates
Once the Zone Picking Task Types are defined, you must now add them to the Task Template and eventually to the Wave Template.
- Go to the “Task Template” screen.
- Create a new Task Template with the Create button. Once created, select the record and click on its details.
- Create new Task Type records with the Create button. In the Task Type drop-down, select the Zone Picking Task Types from Step 1.
- Set up additional Selection and Ordering criteria as needed.
- Now that the Task Template is complete, use this template in the Wave Template. In the Wave Template, make sure it uses an allocation mode that has the UOM “Units” created.
See Creating Wave Templates for details on selection and ordering criteria.
Step 3: Adding Pick Zones to Locations
Locations must be assigned Pick Zones in order to be considered in the zone-picking task. To add “Pick Zones” to locations, you must use the location interface (“LOC” file).
- Open the “LOC” excel file.
- For every location that requires a pick zone, scroll over to the “pick_zone” field (column AI) and assign a pick zone to the location. Note that the pick zone order is defined by the location’s pick sequence.
- Once all the pick zones are defined, save the file and return to WMS. Go to the “Input Interfaces” screen.
- Select the “Location” from the drop-down and upload the file. Click “Run Interface” to process the file.
Executing Pick Zone Tasks in the RF
Pick Zone tasks behave very similarly to normal tasks. The only difference is that at the end of every zone pick, the RF will automatically prompt you to leave the picked LPN at an intermediate drop location (eg. a conveyor). The second picker will then intercept this LPN and continue the picking process until the task is complete.
- Enter the “Execute Task” RF module and enter the pick zone task.
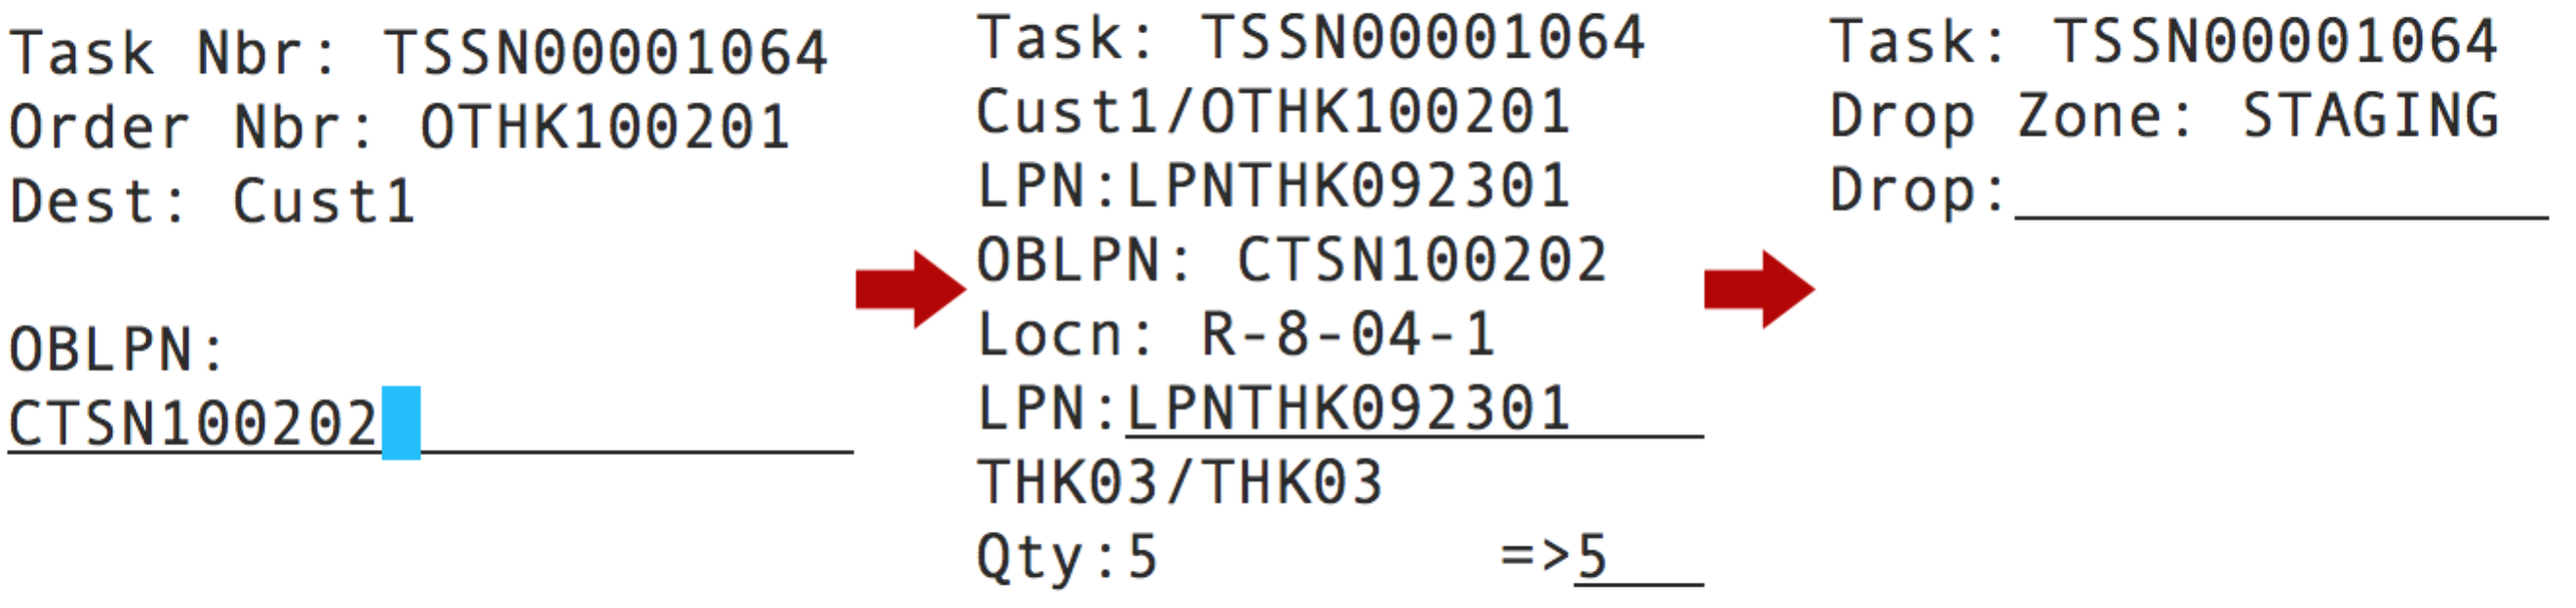
- To begin picking, the RF will prompt you with an OBLPN to pack the merchandise to.
- One the OBLPN is initiated, the picking process will begin. The RF will direct you to a pick location and ask you to scan the IBLPN and quantity.
- When all the picks for the first zone are complete, the RF will prompt you for the intermediate drop location. You must scan the drop location to confirm that the OBLPN is dropped off.
- When the second operator arrives to continue the pick, you must press Ctrl-P within the “Execute Task” module. This will prompt you to scan a Task or Container number. Scan the OBLPN.
- At this point, the picking process will repeat itself until the LPN reaches the
last pick zone and all of the units are picked. When the last pick is complete,
the RF will prompt you for a destination zone (if configured).
- When the task is complete, the RF will return to the Task list.