Creating Wave Templates
Wave Templates require the following configuration pieces:
- Wave Search Template
- Allocation Mode
- Task Creation Template
- Allocation Method
Step 1: Create a Wave Template Search
Wave Template Searches are used as filters for selecting specific Orders during a wave. Each search template has a set of fields that are configurable.
To view existing Template Searches, click the “Wave Template Searches” button from the “Wave Template” screen.
From Wave Template Searches, click Create to create a new Search Template. Here, you can define the filtering parameters.
Examples:
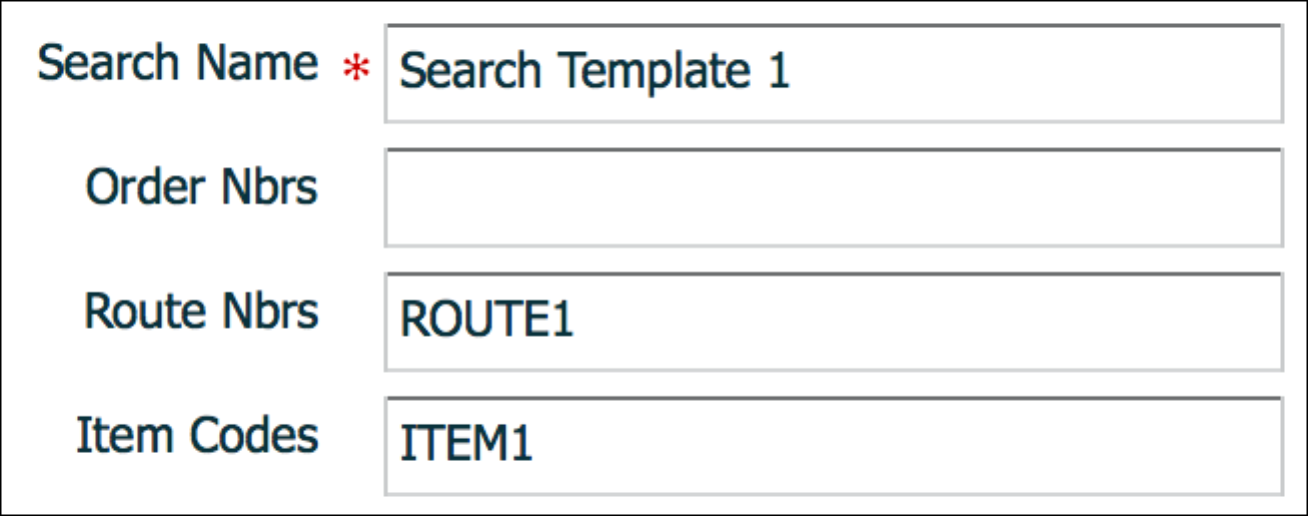
In example 1, “Search Template 1” will filter all orders with route number “ROUTE1” and that only contain SKU “ITEM1”.
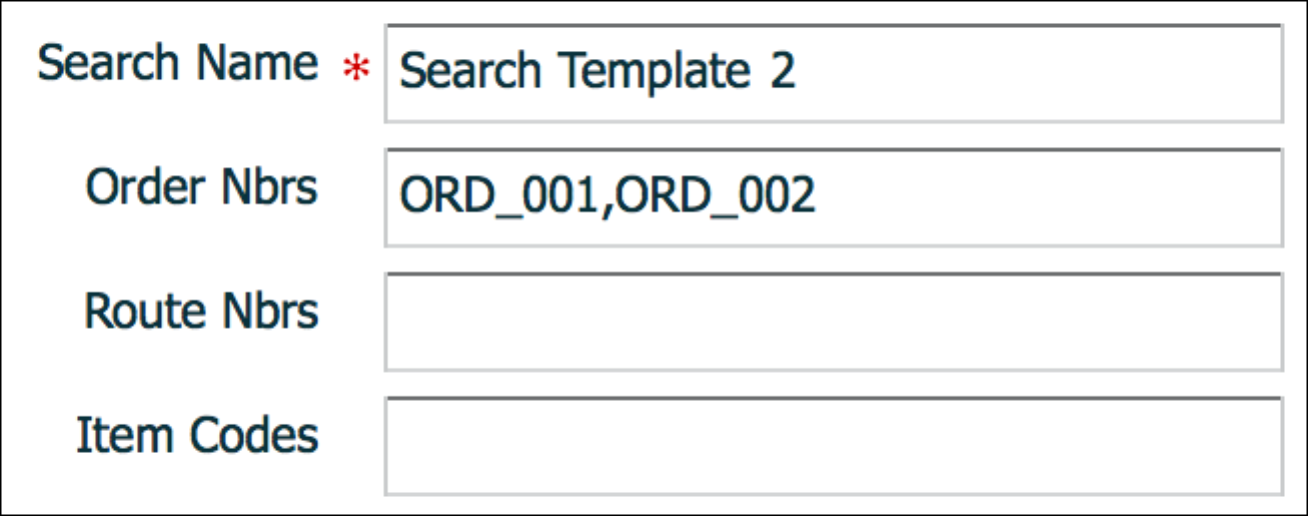
In example 2, “Search Template 2” will filter orders that have order numbers “ORD_001” and “ORD_002”. In other words, Wave Templates with this search template selected will only attempt to allocate these two orders.
Users can also define Order Types as additional filtering criteria:
- Select the Search Template and click the Details button ().
- Click the Create (+) button to add Order Types for this Wave Search record. If there are no Order Types defined, it will not filter by Order Type.
Step 2: Create an Allocation Mode
Allocation Modes are used to define how the inventory should be allocated in terms of the different allocation UOMs.
- Create a new Allocation Mode with the Create button.
- Enter its details with the Details button.
- Create the sequence of allocation UOMs desired for the Wave Template. See example below.

Extra Configuration Parameters
- Sequence Nbr: The order in which the system will look for allocations.
- Location Type: The locations that will be used for allocation – Reserve or Active.
- Restrict Area: If populated, the WMS will search for allocations in this area only.
- Restrict Alloc Zone: If populated, the WMS will search for allocations in this allocation zone only.
- Cartonize UOM: If populated, the WMS will automatically create a new
carton per UOM defined.
- Example: If Cartonize UOM = Units, the system will create a new carton number for every unit allocated in the wave.
- Alloc Distribution Mode: This field is used to enable/disable the
distribution (Put to Store) functionality. If using distribution, you must
choose one of the following parameters:
- Distribution Residuals OK: This is the first distribution
option that is used in distribute to store. The “Residuals OK”
implies that when allocating orders to available LPNs in the
inventory, the system allows LPNs to be partially allocated and have
unallocated units left over (ie. ‘residuals’). Depending on the
order quantity and the available inventory, this allocation type can
allocate both LPNs and units. Distribution Residuals OK only allows
you to select units, packs, or cases from the Allocation UOM
drop-down. Note: If you plan on allocating less than full LPNs from reserve, you must make sure the location flag "Allow reserve partial pick" is enabled. For more details, see Allow Reserve Partial Pick in the Location Master section.Note: The system is not currently handling the Allow reserve partial pick flag during replenishments.
- Distribution No Residuals: This distribution mode will only allocate LPNs with no residuals. In other words, every time an LPN is allocated for distribution, all of its contents must be allocated to one or more orders (ie. LPNs cannot be “Partly Allocated”). Distribution No Residuals only allows you to pick units, packs, or cases from the Allocation UOM drop-down.
- Consolidate and Distribute: This distribution mod allows you
to pick allocation from Reserve or Active. Consolidate and
Distribute only allows you to pick units, packs, or cases from the
Allocation UOM drop-down.Note: This option allows you to pick
inventories for multiple stores to a temporary LPN, place it in a
consolidated location, and distribute inventories based on the
stores.Note: The partial allocation flag (on the Order Type UI) is not honored and it will always have a default of yes.
- No Distribution: No Distribution turns the distribution off,
and it will create non-cubed picks based on the allocation UOM. This
mod allows you to pick units, packs, cases, or LPNs from the
allocation UOM drop-down.Note: Distribution Residuals OK, Distribution No Residuals, and Consolidate and Distribute do not allow the user to set the Allocation UOM as LPNs. If you try to save this setting, you will see the following error: “Alloc UOM LPN invalid for distribution modes”
- mhe_sytem: Input the MHE system needed for this allocation, if configured. If picking is happening from MHE, then the MHE system has to be populated on the allocation mode sequence.
- Distribution Residuals OK: This is the first distribution
option that is used in distribute to store. The “Residuals OK”
implies that when allocating orders to available LPNs in the
inventory, the system allows LPNs to be partially allocated and have
unallocated units left over (ie. ‘residuals’). Depending on the
order quantity and the available inventory, this allocation type can
allocate both LPNs and units. Distribution Residuals OK only allows
you to select units, packs, or cases from the Allocation UOM
drop-down.
-
Ignore Attribute A, B, C to O: You can select one or multi-select relevant inventory attribute to ignore the inventory attributes in the Order Header. Even if the order has corresponding inventory attribute populated, ignoring the inventory attribute on allocation mode sequence will prevent the wave from honoring the order’s attribute.
Step 3: Create a Task Creation Template
Task Templates are used to determine the Task Types that will be used for the wave. Similar to allocation UOMs, Task Types are records that create Tasks based on the UOMs defined in the Allocation Mode. Therefore, to correctly configure a Wave Template, the selected Allocation Mode’s UOMs must match the Task Template’s Task Types.
If the Wave Template has Allocation Mode Sequence 1 of “LPNs”, the complementary Task Template must have a Task Type that matches the LPN allocation, which in this case is “Distribute LPN”, “Full LPN Pull” or “LPN Move”.
Task Types
The 'Task Type' UI Module will display all task types used in WMS. The task type details will display all RF Modules used within a task type.
The table below displays a list of Task Types and their uses.
| Task type | Description | Explanation | RF Modules Used with Task Type |
|---|---|---|---|
| CONSOL_REPLEN | Consolidate Replenish | Used for a type of replenishment that allows you to pull multiple cases from multiple locations and replenish to one more location. Requires Task Zone movements. |
|
| DISTRIBUTE-LPN | Distribute LPN | Used for LPN picking tasks with distribution. |
|
| FULL-CONTAINER | Full LPN Pull | Used for LPN picking tasks. This task type is enabled when the quantity ordered matches the exact LPN quantity in the inventory. |
|
| INTERNAL-PICK | Internal Picking Task | Tasks relevant to internal unit movements, such as directed putaway. |
|
| LPNCASES | Reserve Cases | Used for Case picking tasks with no distribution. |
|
| LPNMOVE | LPN Movement | Used for movement of intermediate LPNs during distribution and replenishment. |
|
| LPNPACKS | Reserve Inner Packs | Used for Pack picking tasks with no distribution. |
|
| LPNUNITS | Reserve Units | Used for Unit picking tasks with no distribution. |
|
| NC-ACTIVE-PICK | Noncubed Active Picking Task | Used for internal non-cubed active picking tasks. |
|
| PICK_CART | Pick Cart | Used for creating Pick Cart tasks. |
|
| PICKLPN-INTERNL | Pick LPN Internal | Tasks relevant to internal LPN movements, such as directed putaway. |
|
| PLTMV_AUTOPK | Plt Move Auto-Pack | Used for pallet picking tasks. To enable this task type, the order detail must specify that the pallet that will be allocated in inventory in the "Pallet Nbr" field. |
|
| REPLEN-CASES | Cases Replenishment | Used for LPN replenishment tasks. This task type is enabled when cases from a given LPN are being replenished (as opposed to replenishing the entire LPN). |
|
| REPLEN-LPN | Full LPN Replenishment | Used for LPN replenishment tasks. This task type is enabled when entire LPNs are being replenished. |
|
| CC-LOCATION | Cycle Count Location | Used for Cycle Count Location tasks. |
|
| CC-LOCATION-DTL | Cycle Count Location Detail |
Manual CC by Item Detail
|
|
| CC-LOCN-LPN-CNT | Cycle Count Location LPN Count | Count the LPNs in a Cycle Count Location. |
|
| CUBEDSINGLEUNIT | Cubed Single Unit | Pick and Pack cubed single LPNs that were generated by the wave. |
|
| FULL-LPN-PALLET | Full LPN | Pick and Pack full LPNs that were generated by the wave. |
|
| CUBED SINGLE CASE | Cubed Single Case | Pick and pack cubed single cases. |
|
| CUBED SINGLE PACK | Cubed Single Pack | Pick and pack cubed single packs. |
|
| MULTILPNMOVE | Multi LPN Move | Movement of multiple intermediate LPNs during distribution and replenishment. |
|
To create a Task Creation template:
- From the Task Creation Template screen, create a new Task Template and add a description.
- Set “Template Type” to “Regular”.
- Click the Detail button to inspect the Task Template’s details.
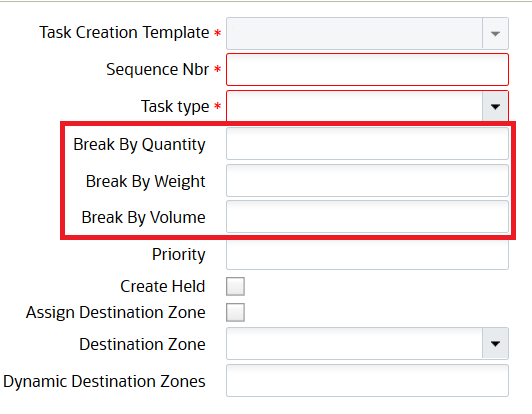
- Create new Task Types for the template by populating the sequence, Task Type, and Destination Zone.
Task Creation Template Details
| Fields | Description |
|---|---|
| Task Creation Template | Displays the task creation template |
| Sequence Nbr* | Determines the sequence of each Task Type |
| Task Type* | Select the task type from the drop-down |
| Break By Quantity | Specify the break by value in Quantity. The user configured break by value will be considered for grouping the tasks based on the allocation mode and task template configured for the wave. Users can now break the tasks by configuring break by quantity value in task creation template. |
| Break By Weight | Specify the break by value in Weights. Users can now break the tasks by configuring the break by weight value in the task creation template. |
| Break By Volume | Specify the break by value in Volume. Users can now break the tasks by configuring the break by volume value in the task creation template. |
| Priority | Determines the priority of the Task Type. The priority can override the record’s sequence number. |
| Create Held | This flag determines whether the Task will be ‘held’ when created. When a Task is held, it will not be visible to the picking operator in the RF gun. The operator will only be able to view this task once the superuser ‘releases’ this task in the “Tasks” screen, via the “Release Task” button. |
| Assign Destination Zone |
Enable this flag to configure the Dynamic Destination Zone.
Note: On enabling, the Destination Zone field will be
disabled. |
| Destination Zone |
When you reach the end of a Task, this configuration determines whether or not the RF will prompt you to move the picked boxes into a Destination Zone. Destination Zones are essentially locations that have Task Zones configured. Additionally, the system checks if there is a matching Task zone movement configured with the Start and End zone (Start zone is based on pick location and end zone is based on the zone configured in "Destination Zone"). If a match is found, the picker can execute task zone movement after reaching end of their task. |
| Dynamic Destination Zone |
You can specify multiple destination zones separated by comma. This field checks the destination zone for pending tasks or uncancelled inventory. If the destination zone doesn't have any incomplete/uncancelled tasks nor uncancelled inventory, tasks for that task creation sequence will take the specified Destination Zone. Else, it will evaluate the next destination zone in the list. For example, if Dynamic destination zones are configured with
Dest01,Dest02,Dest03. Dest01 will be evaluated first, then
Dest02, and finally Dest03 will be evaluated.
Note: If all
the destination zones configured have pending tasks or
inventory not in cancelled status, the tasks will not be
created but allocations will be generated for the
wave. |
Break the Task via Break By Parameter
The allocations in a wave are added to a task until one of the value - quantity, weight, and volume mentioned in break by parameter has reached the value. Once the condition is satisfied, the system creates a new task for the next allocation in sequence and continues to verify the tasks are created for all allocations in a wave.
For example, If break by quantity is configured as 80, and there are three allocations in sequence with Qty: 50, 60 and 40, the first two allocations with Qty 50 and 60 are added to the first task and then the third allocation with Qty 40 is created as a second task.
To configure the break by value, do the following:
- From the Task Creation template UI. Select the template and click details icon.
- The Details page opens > Click Create (+) icon.
- Enter the break by values in the respective field. By default, these fields are set
with value 0 or blank, and supports decimal values greater than or equal to
zero”.Note: For Template Type = Regular, you can save the record by populating numeric values in the new fields. While creating, the entered "Break By Weight" & "Break By Volume" rounds-off based on the max weight, volume and dimension decimal precision value configured in Decimal settings for the user logged in company.
- Click Save.
Task Creation Templates with Break by Quantity/Weight/Volume for Picking, Replenishment, and Work order.
As a part of task creation, allocations are grouped into the same task until any of the break by conditions among break by quantity, weight, and volume is satisfied. When allocation satisfies break by condition, new task will be created for the next allocation in sequence.
For example: If break by quantity, weight, volume all is configured, if any one condition is satisfied (break by weight), a new task will be created for the next allocation in sequence.
Weight and Volume Calculation Considerations
The weight and volume compared against the break by weight and break by volume will also be computed at allocation level. The considerations for calculated weight and calculated volume will vary, for example when the user does a full LPN allocation, weight/volume of the inbound LPN is considered as calculated weight and calculated volume. However, when the user does allocation by units, the item's unit weight/volume and allocated quantity is considered for calculated weight and calculated volume.
| Allocation | How Weight and Volume is Calculated |
|---|---|
| In Units | Weight is calculated as a product of the item unit weight and allocated quantity and volume is calculated as product of item unit volume and allocated quantity. |
| In Full LPNs | Weight/volume is calculated based on IBLPN weight/volume, if IBLPN weight /volume is zero, weight/volume is calculated as product of item unit weight/volume and allocated quantity. |
| For full LPN/case replenishment and for picking with distribution (tasks with Move LPN as a first program) | The complete LPN is picked, irrespective of allocation quantity, so the total weight/volume of LPN must always be considered. Weight/volume is calculated based on IBLPN weight/volume, if IBLPN weight /volume is zero, weight/volume is calculated as product of item unit weight/volume and the current quantity. |
| Cubed and cubing mode is ‘Use Predetermined OBLPN Type’ or ’Calculate OBLPN type and cube with wave’ | Weight/volume is calculated based on OBLPN weight/volume. |
| In Packs | If the allocated inventory pack quantity matches the item's standard pack quantity and the standard pack weight/volume is greater than zero, weight/volume is calculated as a product of standard pack weight/volume and number of packs, or else, weight/volume is calculated as a product of the item unit weight/volume and the allocated quantity. |
| In Cases | If the allocated inventory case quantity matches the item's standard case quantity and the standard case weight/volume is greater than zero, weight/volume is calculated as a product of the standard case weight/volume and number of cases, or else, weight/volume is calculated as product of the item unit weight/volume and the allocated quantity. |
Task Breaks by Quantity, Weight, Volume
The following use case provides an outline on how the tasks are broken based on break by values:
Break by Quantity
Use Case - 1: If you have a allocation with allocated quantity 20 in task creation template. The Break By Quantity =10, and Break By Weight/Break By Volume = null/empty, the task is created as follows:
| LPN | Item | Location | Order | Allocated Qty | Task |
|---|---|---|---|---|---|
| LPN10 | Item10 | Loc10 | Ord2 | 20 | Task0005 |
Even though the allocated Qquantity is twice as that of Break by Quantity, the system creates only one task as the allocation cannot be broken further into multiple tasks.
Use Case - 2: If you have three allocations with allocated Qquantity as 4,4, and 3 and in task creation template, the Break By Quantity = 5, and Break By Weight/ Break By Volume = null/empty, the tasks is created as follows:
| LPN | Item | Location | Order | Allocated Qty | Task |
|---|---|---|---|---|---|
| LPN11 | Item11 | Loc1 | Ord3 | 4 | Task0010 |
| LPN21 | Item11 | Loc2 | Ord3 | 4 | Task0010 |
| LPN31 | Item11 | Loc3 | Ord3 | 3 | Task0011 |
The Task0010 can accommodate only 5 units (break by Qty =5), but the first allocation does not exceed the break by value and on including the second allocation, the total quantity for task exceeds break by quantity. Because, the system does not split the allocation further, the second allocation is included in Task0010 and the total quantity in Task0010 = 8 (4+4).
Break by Weight and Volume
| LPN | Item | Quantity | Weight | Volume |
|---|---|---|---|---|
| LPN1 | Item1 | 10 | 1000 | 10000 |
| LPN2 | Item1 | 10 | 1000 | 10000 |
| LPN | Order | Allocated Quantity | Task |
|---|---|---|---|
| LPN1 | Order1 | 10 | Task00001 |
| LPN2 | Order1 | 10 | Task00001 |
| LPN | Order | Allocated Quantity | Weight | Task |
|---|---|---|---|---|
| LPN1 | Order1 | 10 | 1000 | Task00002 |
| LPN2 | Order2 | 10 | 1000 | Task00003 |
To add a Task Zone to a location:
- Go to the Task Zone screen and create a new Task Zone.
- Go to the Locations screen, select the desired location and click edit.
- In the “Task Zone” field, select the Task Zone that you added in step 1.
For example, if there is a Drop Zone location “DZ1” with Destination Zone “ATZ1”, there will be the following Task Template configuration:
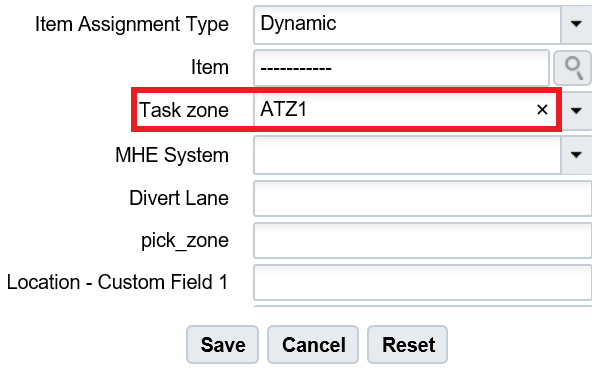
This means that at the end of every “Reserve Units” Task, you are prompted to move the picked LPNs into a “DOOR_DROP” location – which in this case is location “DZ1”.
Once all the necessary Task Types are created, you will now have to configure the selection and breaking criteria for each Task Type.
Ordering Criteria
The Ordering Criteria allows you to determine the break logic for each Task. For example, if there is a criteria for “Break by Order Nbr = 1”, WMS will create a new Task for every unique Order number in this Task Type.
- Select the Task Type record and click “Ordering Criteria”.
- Create a new breaking rule for this Task Type by clicking the Create () button.
- Enter the sequence number, select the logic criteria and the ‘break by’ value.
- Click Save.
Example:
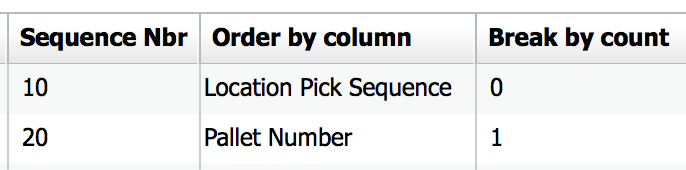 screen
- Location Pick Sequence, Break by count = 0
This will sort the creation of Tasks in order of the allocation’s Location Pick Sequence.
- Pallet Number, Break by count = 1
This will create a new Task for every Pallet that is allocated. This may be used in cases where the picking equipment does not allow users to pick multiple pallets at a time.
Selection Criteria
You can use Selection Criteria to configure Task Type conditions.
- Select the Task Type record and click “Selection Criteria”.
- In this new window, you will see a folder icon; this is a “Complex Operation”. Within this folder, there can be many nodes with criteria specified; these are “Basic Operations”.
- To create a new basic operation, select the folder icon and click on the “Insert Basic Operation” button.
- Select the SQL Operator, column name and column value.
- Click “Save”.
Example:

This configuration translates to the following:
- If the allocation’s SKU has a Putaway Type of LAPTOPS or TABLETS, create a Task under the current Task Type.
- Once every Task Type has Ordering Criteria and/or Selection Criteria set up, the Task Template is complete.
Step 4: Combine all Configuration Pieces Together
Once the Wave Search, Allocation Mode and Task Templates are created, the user can now combine everything to create a Wave Template.
- Go to the Wave Template screen and click the Create (+) button.
- Enter a name for the template and select the previously created configurations from the drop-down.
- Once everything is selected, click the “Save” button.
Choosing an Allocation Method
You can choose different ways of ordering inventory for picking from Active or Reserve location:
- FIFO: First in First Out – Allocates inventory based on ascending order of the inventory’s “Create timestamp” or ascending order of LPN’s create time stamp for allocating from reserve
- LIFO: Last in First Out – Allocates inventory based on descending order of the inventory’s “Create timestamp” or ” or descending order of LPN’s create time stamp for allocating from reserve.
- FEFO: First Expiry First Out – Allocates inventory based on ascending order of the inventory’s “Priority Date” field.
- LEFO: Last Expiry First Out – Allocates inventory based on descending order
of the inventory’s “Priority Date” field. Note: We consider Priority date for FEFO or LEFO (expiry date captured during receiving is copied over to priority date field, if priority date field is not passed in shipment detail.). For item’s which are not tracking expiry, the received date is considered in Priority date of the LPN.
- Quantity Ascending: Allocates inventory with the smallest quantity first.
- Quantity Descending: Allocates inventory with the largest quantity first.
- Location Ascending: Allocate inventory in the ascending order of the location pick sequence.
- Location Descending: Allocates inventory in the descending order of the location pick sequence.
- FIFO (default)
- LIFO
- Location pick sequence Ascending
- Location pick sequence Descending
- FEFO
- LEFO
- Quantity Ascending
- Quantity Descending
Optional Step: Additional Configuration Parameters
You can configure additional parameters in the Wave Template depending on how you will use it:
- Reuse LPN Nbr: determines whether or not the IBLPN number can be reused as the outbound LPN number during packing.
- Cubing Mode: (see Cubed Pickingfor more info)
- Cubing Rule: (see Cubed Picking for more info)
- OB LPN Type: (see Cubed Picking for more info)
- Location Size Type: if populated, the wave template will search for allocations specifically from locations with the defined Location Size Type.
- Cancel Unallocated: used as cancellation waves. If yes, all orders unallocated from this wave will be cancelled.
- Routing Mode: defines the routing logic for parcel manifest orders.
- Column Ordering: if populated, WMS will automatically print labels according to the selected Column Order when a wave is completed.
- Auto release MHE message: generates a custom MHE message when a wave is run.
- Max Units/Weight/Volume/Orders: defines the maximum value that the wave can allocate. For example, if “Max Units” is set to 1000, the wave can only allocate up to 1000 units at a time.
- Tolerance_percentage: The value populated here defines a tolerance with respect to the maximum defined in the “Max Units/Weight/Volume/Orders” field. For example, if the “Tolerance Percentage” field is defined as 5% and the “Max Units” field is set to 1000, the tolerance will allow WMS to allocate up to 50 more (1050 units total).