Configure Essbase on Windows

You can configure Essbase on Windows using the Configuration Tool after installation.

Prerequisites and Notes

  • Fusion Middleware must already be installed, and Oracle Essbase must be installed in the same Oracle Home directory. See Install Fusion Middleware.
  • Supported relational database must be installed, as mentioned in the installation prerequisites. See Install a Relational Database.
  • If you are using EPM Shared Services authentication, you must already have a supported version of EPM installed, with EPM users Shared Services created and configured, and know your Oracle Home and EPM instance details.
    • If using EPM Shared Services authentication, it should be running during Essbase configuration. If EPM Shared Services is not running, some port numbers must be manually configured to avoid port conflicts. When you configure Essbase, you must be cautious and aware of parts that are already in use by any EPM services on this host, and to only choose and use valid ports that are not used by a service or application on this host. You must also set these unused port numbers accordingly in the user interface or in the response file.
    • If you are using Essbase 21c versions prior to 21.2.1, use an empty EPM Foundation Services instance that is separate from your production EPM instance. EPM Server must run while you configure and run Essbase. You can connect your user management directory service to both Foundation Shared Services deployments, and must maintain application provisioning in both Shared Services instances.
    • For versions prior to Essbase 21.2.1, you needed to install a separate EPM Foundation.
    • For versions of Essbase 21.2.1 and later, install or reuse an existing EPM 11.2.x (including 11.2.x Essbase), to be configured with 21.2.x.
  • If using Microsoft SQL Server (MSSQL) in configuration, you must run the process to alter database and apply the correct collate, and address schema considerations. See Configure Microsoft SQL Server Database for Metadata Services Schema.
  • Pre-create RCU Schemas for Essbase explains the process if you choose to pre-create RCU schemas before configuration rather then have Configuration Tool create them for you. One use case to pre-create schemas is if you're employing a secure HTTPS connection using a wallet.
  • In Windows Control Panel > Clock and Region > Region, select Administrative tab. Click Change System Locale and select check box Beta: Use Unicode UTF-8 for worldwide language support.
  • Essbase on Windows cannot have multiple configurations or instances on the same host.
  • You must apply the following patches on Oracle Home before creating RCU schemas, whether or not you use pre-created schemas. Check the latest patches in the Essbase Release Notes section for Independent Deployment, or contact Support, to verify appropriate patch versions.

    • 28186730 - latest version of OPatch 13.9.4.2.x for FMW/WLS
    • 31676526 - patch 12.2.1.4.0 for TNS_ADMIN RCU warning
    • 30540494 - patch 12.2.1.4.0 for RAC RCU bug
    • 30754186 - patch 12.2.1.4.0 for RAC RCU bug
  • All ports should not be within the ephemeral ports range, nor in use by other running software. See Avoid Port Conflicts.
  • Each managed server must be assigned to a machine, the logical representation of the computer that hosts one or more server instances. The machine name must be unique in relation to other configurable resources in the domain.
  • If you plan to install and configure more than one Essbase On-Premise instance, to support failover, you need a front-end load balancer, and the instances must be configured on different hosts. As mentioned, Essbase on Windows cannot have multiple configurations or instances on the same host. See Configure a Load Balancer to Support Failover.
  • If Essbase service is to be configured or available as Essbase Windows service, to start and stop Essbase service, PowerShell must be in the environment PATH variable. You must also enable Essbase Windows Service during configuration, to install Windows service.
  • If you're connecting through Smart View, using the URL /aps/SmartView, you need to change the URL. See Redirect to New Essbase Smart View Connection URL. Alternatively, you can configure redirection to the new URL on the web server. If you're using Oracle HTTP Server (OHS) or HTTPD Server, redirect the URL while modifying the Oracle HTTP Server configuration, as noted in the previous bullet.
  • For access to the response file, and use it, you must set TEMP and TMP environment variables for the user, as follows:
    1. On the Windows task bar, right-click the Windows icon and select System.
    2. In the Settings page, under Related Settings header on the right, click Systems info and then Advanced System settings.
    3. Select Environment Variables.
    4. Either click New to create new environment variables TEMP and TMP or click Edit to modify existing environment variables TEMP and TMP, with your user variable values. You can use the same value for both.
    5. After you set, open a new cmd or command prompt to reflect the new variable set.

Run Configuration Tool

  1. If you didn't continue with configuration at the end of installation, launch the Configuration Tool.
    1. In the Oracle Home directory, where Essbase and Fusion Middleware are installed, open a terminal in \essbase\bin. For example, open a terminal in <Oracle_Home>\essbase\bin.
    2. Launch the Configuration Tool using the config.cmd command script.
      config.cmd
      The script can be run with parameters (such as -mode, -log, -log priority, -responseFile). If you use the responseFile parameter, all fields are filled with previous configuration entries, except for passwords. To learn about configuration script options, run: config.cmd -help.
  2. On the Welcome page, click Next.
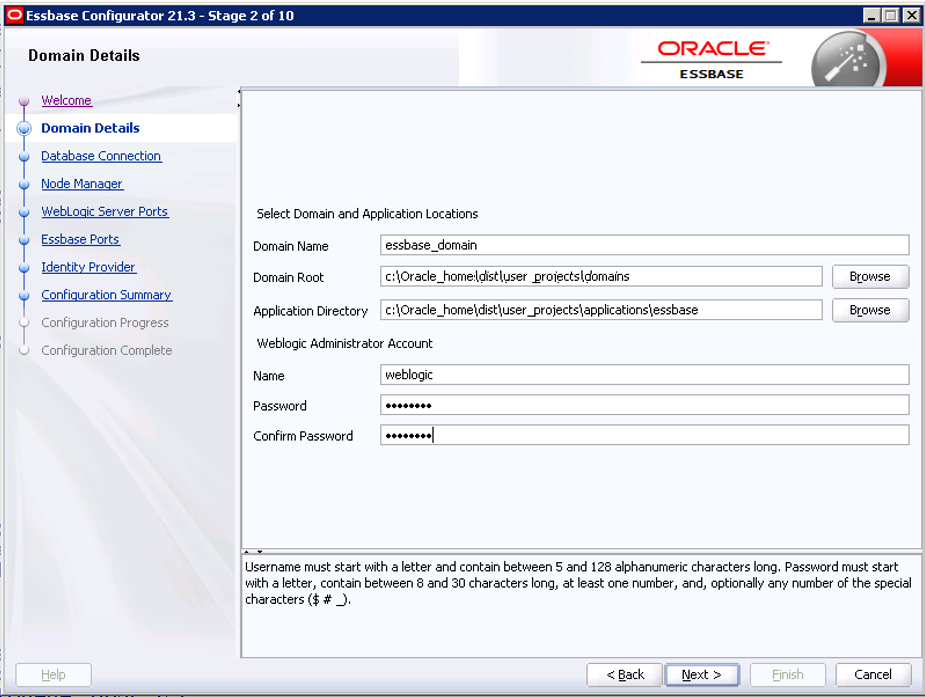
  3. On the Domain Details page, do the following.
    Domain details page

    1. Accept the default (if correct) or enter your domain name, for example, essbase_domain.
    2. Accept the default (if correct) or enter your domain root path, for example,
      C:\Oracle_home\dist\user_projects\domains
      If you're installing additional Essbase instances, use a different domain root for each.
    3. Accept the default or enter your application directory, for example,
      C:\Oracle_home\dist\user_projects\applications\essbase
      It's recommended that the applications directory be separate from the configuration files.
    4. Enter the name and password of a WebLogic administrator account that you'll use for managing Essbase and middleware servers.
      • If you use WebLogic Embedded LDAP, this administrator is also given an Essbase service administrator role.
      • If you use EPM Shared Services, this administrator is only for the Essbase domain WebLogic instance. The EPM Shared Services admin user will be provisioned with Essbase user role: Service Administrator.
    5. Click Next.
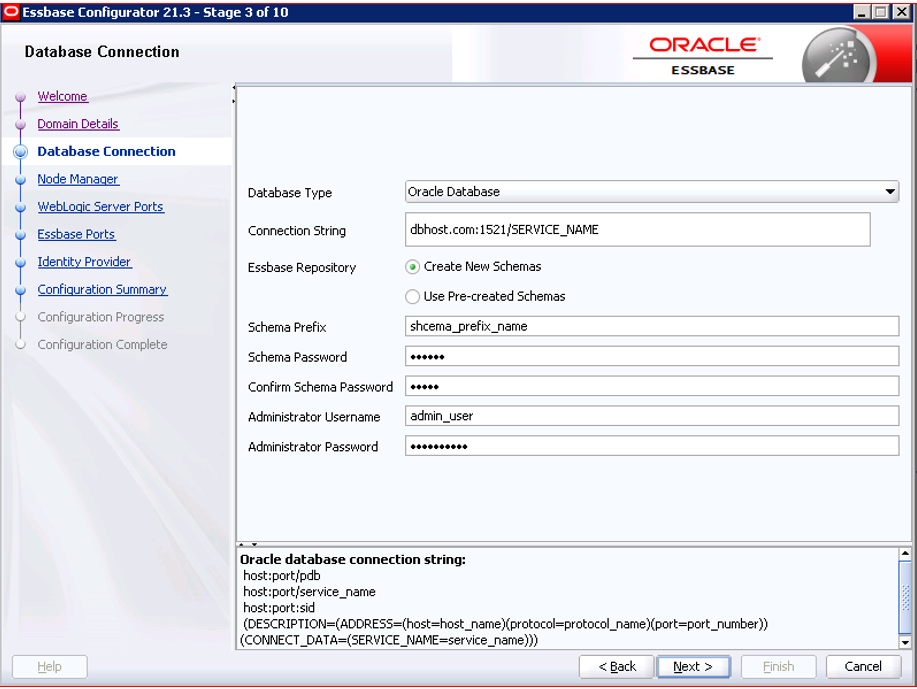
  4. On the Database connection page, do the following.
    Database connection page

    1. Accept the default, or enter the database type. This is the supported relational database, for example, Oracle Database.
    2. Enter the connection string, for example,
      myhost.example.com:1521/orcl
      See Connection String Formats.
    3. Choose whether to create new schemas now, or use pre-created schemas that you built using Fusion Middleware RCU utility in Pre-create RCU Schemas for Essbase, as a pre-configuration workflow task. If using Microsoft SQL Server (MSSQL) in configuration, see related prerequisite above.
    4. Enter a schema prefix, for example, ESS21C. This must be a new, unique string, containing 1-12 alphanumeric characters, and starting with a letter.
    5. Enter a schema password that will be shared for all of the new schemas.
    6. For the administrator username and password, enter the credentials of any user granted a sysdba role for your Oracle Database. This can be the default sys user; or Microsoft database administrator. Username must start with a letter and contain between 5 and 128 alphanumeric characters long. Password must start with a letter, contain between 8 and 30 characters long, at least one number, and, optionally any number of the special characters ($ # _).
    7. Click Next.
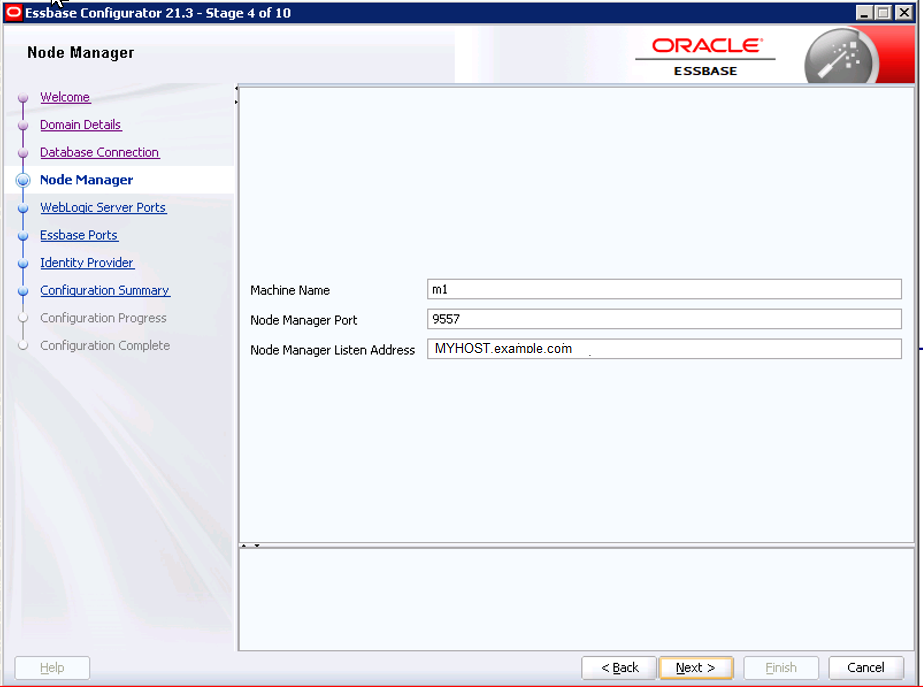
  5. On the Node Manager Configuration page, do the following.
    Node manager page

    1. Accept the defaults, or enter the string for the Node Manager machine name, which handles clusters. All ports should not be within the ephemeral ports range, nor in use by other running software. See Avoid Port Conflicts.
    2. For Node Manager Listen Address, you can enter or select your fully qualified host name (where WebLogic is installed along with your Fusion Middleware installation). It can also be an operating system address. For reference, see Configure Listen Addresses.
    3. Click Next.
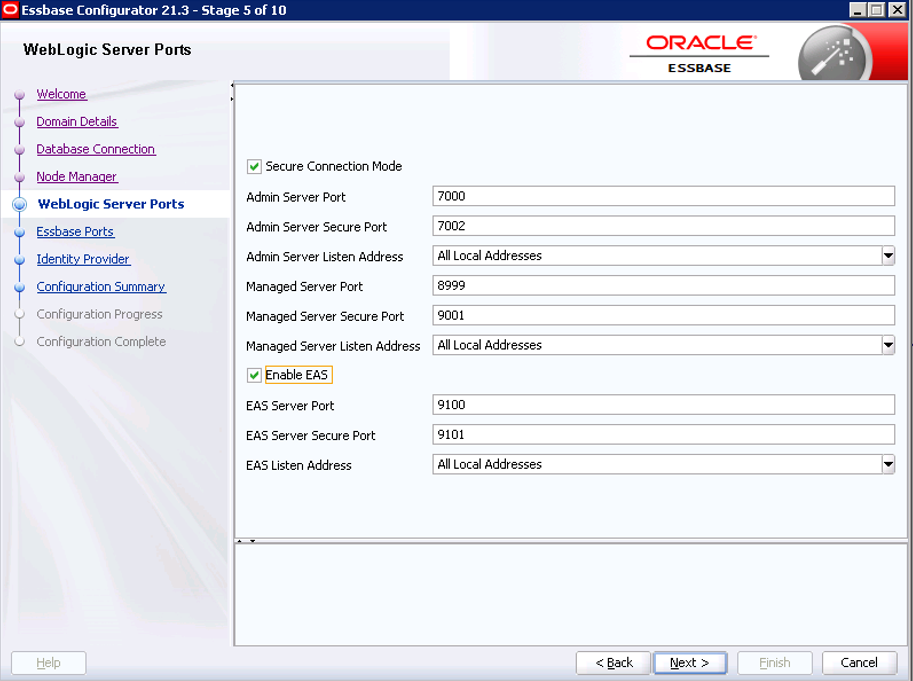
  6. On the WebLogic Server Ports Configuration page, configure according to the choices you made during installation.
    WebLogic server ports page with EAS enabled

    Accept the defaults or enter values. Values in the above screen are only examples. Specify clear and secure ports for each of the servers. See Server Configuration Options. All ports should not be within the ephemeral ports range, nor in use by other running software. See Avoid Port Conflicts.
    1. To secure connections using Transport Layer Security (TLS Everywhere), select the Secure Connection Mode check box; your self-signed certificate is then recognized. If you didn't already, review this topic: About Securing Your Communication and Network. If TLS security is deployed, the default port is the Managed Server Secure port. Default port value is 9000 for non-secured, and 9001 for secured. It is recommended to use secured (9001).
    2. To manage applications using Essbase Administration Services, select Enable EAS. Defaults are: EAS Server Port: 9100, and EAS Server Secure Port: 9101. EAS input fields are available when Enable EAS is selected.
    3. [Optional] To limit access to specific hosts (for multi-home environment), specify or select a domain, for example, localhost, in the listen address fields. If you don't select/enter listen addresses values, the listen addresses apply to all interfaces and addresses, and all mapped hosts are accessible.
    4. Click Next.
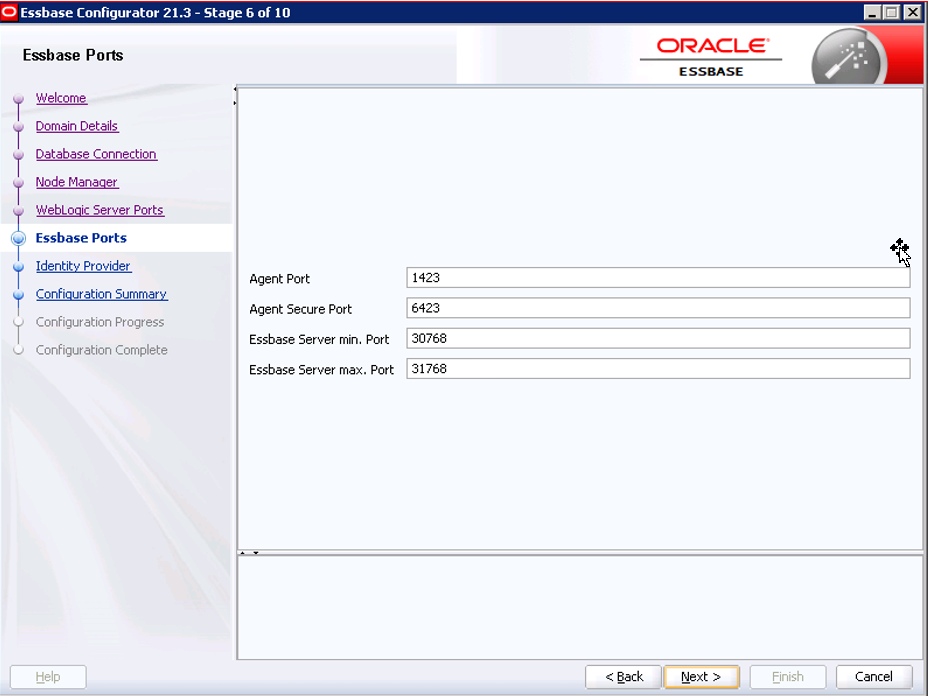
  7. On the Essbase Ports Configuration page, do the following.
    Essbase ports page

    1. Accept the defaults or enter values for the Agent Port, Agent Secure Port (used for secure communication using TLS), and min and max ports for Essbase application servers.
      • Agent Port specifies the port for the Essbase Agent - default is 1423.
      • Agent Secure Port specifies the port that the Essbase Agent uses for secure communication when in secure connection mode with Transport Layer Security (TLS) - default is 6423.
      • When multiple instances of Essbase Server are installed on one host, you must specify a unique port number for each instance.
      • All ports should not be within the ephemeral ports range, nor in use by another running software. See Avoid Port Conflicts.
      • The range between Min and Max ports must be at least 1000, depending on the amount used.
    2. Click Next.
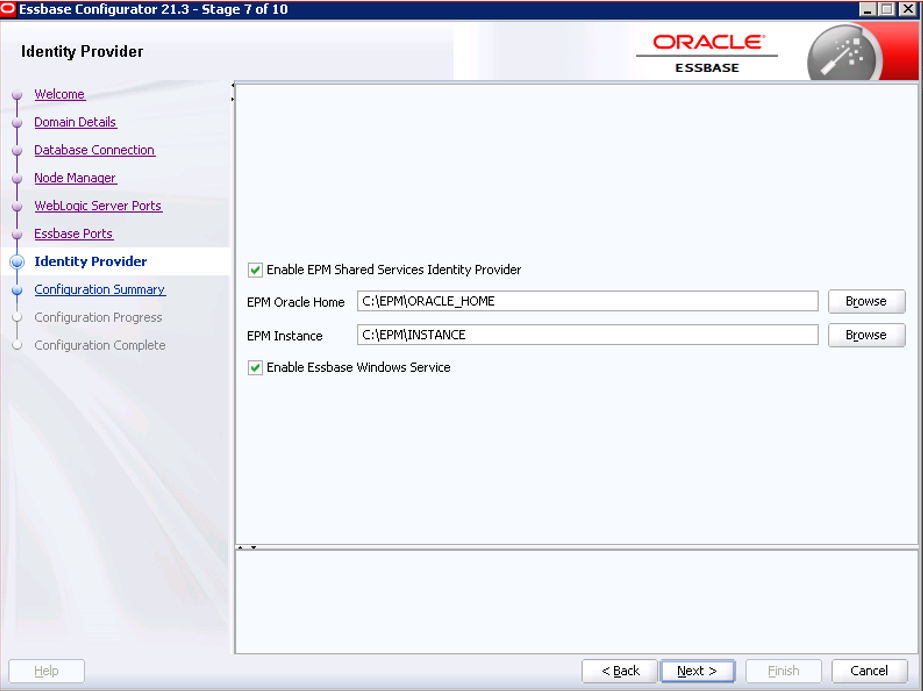
  8. On the Identity Provider configuration page, do the following.
    Identity Provider page with EPM Identity Provider and Essbase Windows service enabled

    1. If you didn't already, review Select Authentication Provider topic.
    2. WebLogic is the default. If you currently use EPM Shared Services, and want to continue, select the Enable EPM Shared Services Identity Provider check box. The window example shows EPM provider selected. When enabled, EPM fields are available for you to confirm or specify EPM Oracle Home and Oracle Instance locations. For details on these, see About Middleware Home, EPM Oracle Home, and EPM Oracle Instance.
    3. For Essbase Windows service to be configured or available, to start and stop Essbase service, PowerShell must be in environment variable PATH. You must also enable Essbase Windows Service during configuration, to install Windows service. To use this feature, you must select Enable Essbase Windows Service, on this page, to install Windows service. Start and stop of the Essbase Windows Service is done using Windows SCM.
    4. Click Next.
  9. Review the Configuration Summary page. Note the log file location (if shown) and response file location. This window example may vary from your selected entries or values.
    Configuration summary page

    You can use the response file (.rsp) to save your configuration choices and fill in the same field values (excluding passwords) in a future UI-based or Silent mode configuration. If you want to run a future configuration using an .rsp file, you can also run configuration until the summary page, and click Cancel instead of Configure, and reuse the response file later. The .rsp file is saved at the temp location listed in the summary as Response File Location. If you plan to use it for automating a future configuration, be sure to save it somewhere more permanent, as tmp directories may be routinely cleaned out. See Sample Response File and Parameters.
  10. Click Configure. On the Configuration Progress page, near the end of Configuration Tool processing, Essbase platform components are started. When progress reaches 100%, click Next.
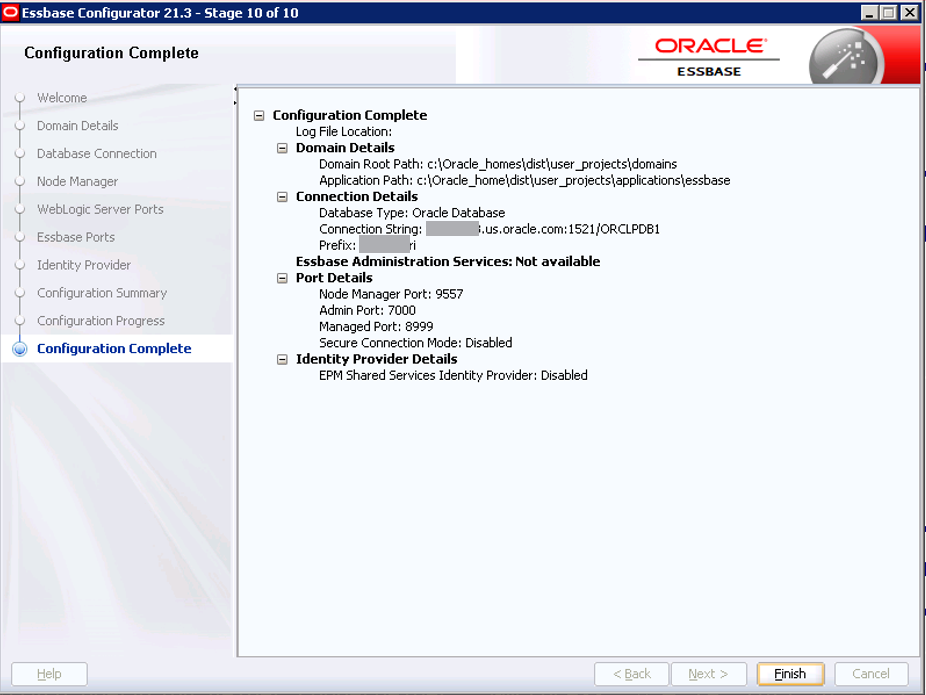
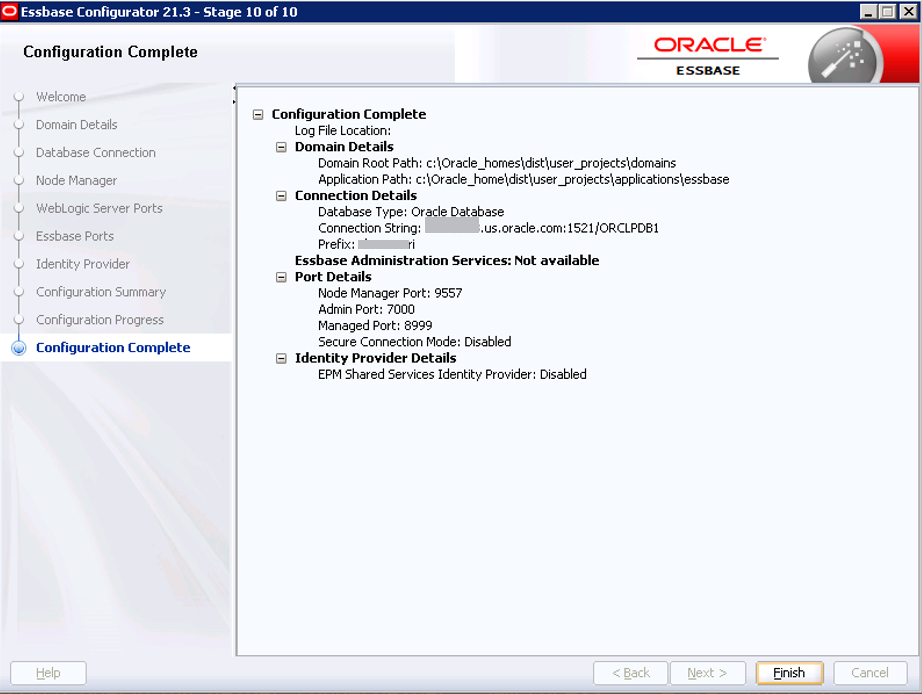
  11. On the Configuration Complete page, review the details, and click Finish. Note that this window example doesn't necessarily reflect your selected entries or values. You can now log into Essbase. For login URLs, see Essbase, REST, and Smart View Client URLs.
    Configuration complete page

    Note:

    If you configured Essbase securely with an external database using a TNS_ADMIN alias, for example, adwsql_low?TNS_ADMIN=C:/Users/opc/Documents/EssbaseADWS, you must do the following so that the connection can be processed by the Essbase server:

    1. Edit:
      <DOMAIN_HOME>\bin\setStartupEnv.cmd
    2. Add the following line to the startup script, before -DODBC_URL= usage:
      set TNS_ADMIN=C:/Users/opc/Documents/EssbaseADWS
    3. Change the following line:
      -DODBC_URL='OCI;SERVICE=adwsql_low?TNS_ADMIN=C:/Users/opc/Documents/EssbaseADWS'

      to

      -DODBC_URL='OCI;SERVICE='adwsql_low'
Advanced and post-configuration options and tasks can be reviewed in Advanced Configuration Topics. This includes topics on deleting RCU schemas, configuring Essbase and Oracle HTTP server, and more.