1 Introduction
This manual contains information you need to configure the LSMS. Topics include integrating LSMS into your network, configuring and starting connections with NPACs and network elements, and configuring optional features.
Overview
This manual contains information you need to configure the LSMS. Topics include integrating LSMS into your network, configuring and starting connections with NPACs and network elements, and configuring optional features.
Scope and Audience
This manual is written for system administrators and persons responsible for configuring the LSMS. The manual provides routine operating procedures and guidance in the tasks of integrating the platform with the network and configuring and starting up LSMS and connections.
The manual assumes the system administrator is familiar with the Linux operating system.
Documentation Admonishments
Admonishments are icons and text throughout this manual that alert the reader to assure personal safety, to minimize possible service interruptions, and to warn of the potential for equipment damage.
Table 1-1 Admonishments
| Icon | Description |
|---|---|
 |
Danger: (This icon and text indicate the possibility of personal injury.) |
 |
Warning: (This icon and text indicate the possibility of equipment damage.) |
 |
Caution: (This icon and text indicate the possibility of service interruption.) |
 |
Topple: (This icon and text indicate the possibility of personal injury and equipment damage.) |
Manual Organization
The manual contains the following chapters:
-
Introduction contains general information about the organization of the manual, description of the LSMS document suite, and a list of acronyms and abbreviations.
-
Integrating EAGLE Application B Card (E5-APP-B) into the LSMS Network provides guidance for integrating an Oracle Communications EAGLE Application B Card (E5-APP-B) LSMS into your internal and external local area network or wide area network.
-
Completing Configuration and Starting Connections describes how to configure components, use key lists, and work with NPAC associations.
-
Configuring the NAS explains how to configure the Oracle Communications LSMS Network Attached Storage (NAS).
-
Configuring Optional Features explains how to configure the various optional features.
-
Configuring the Query Server provides overview information as well as detailed, step-by-step configuration procedures to get the query server up-and-running.
My Oracle Support (MOS)
MOS (https://support.oracle.com) is your initial point of contact for all product support and training needs. A representative at Customer Access Support (CAS) can assist you with MOS registration.
- Select 2 for New Service Request
- Select 3 for Hardware, Networking and Solaris Operating System Support
- Select one of the following options:
- For Technical issues such as creating a new Service Request (SR), Select 1
- For Non-technical issues such as registration or assistance with MOS, Select 2
You will be connected to a live agent who can assist you with MOS registration and opening a support ticket.
MOS is available 24 hours a day, 7 days a week, 365 days a year.
Emergency Response
In the event of a critical service situation, emergency response is offered by the Customer Access Support (CAS) main number at 1-800-223-1711 (toll-free in the US), or by calling the Oracle Support hotline for your local country from the list at http://www.oracle.com/us/support/contact/index.html. The emergency response provides immediate coverage, automatic escalation, and other features to ensure that the critical situation is resolved as rapidly as possible.
A critical situation is defined as a problem with the installed equipment that severely affects service, traffic, or maintenance capabilities, and requires immediate corrective action. Critical situations affect service and/or system operation resulting in one or several of these situations:
- A total system failure that results in loss of all transaction processing capability
- Significant reduction in system capacity or traffic handling capability
- Loss of the system’s ability to perform automatic system reconfiguration
- Inability to restart a processor or the system
- Corruption of system databases that requires service affecting corrective actions
- Loss of access for maintenance or recovery operations
- Loss of the system ability to provide any required critical or major trouble notification
Any other problem severely affecting service, capacity/traffic, billing, and maintenance capabilities may be defined as critical by prior discussion and agreement with Oracle.
Related Publications
For information about additional publications related to this document, refer to the Oracle Help Center site. See Locate Product Documentation on the Oracle Help Center Site for more information on related product publications.
Customer Training
Oracle University offers training for service providers and enterprises. Visit our web site to view, and register for, Oracle Communications training:
http://education.oracle.com/communication
To obtain contact phone numbers for countries or regions, visit the Oracle University Education web site:
Locate Product Documentation on the Oracle Help Center Site
Using Login Sessions
Login sessions are used for the following user functions:
-
To use the command line for any of the following functions:
-
To access the
lsmsmgrtext interface, which is used for configuring and maintaining the LSMS system. -
To enter LSMS commands (generally used for managing LSMS applications). For more information, refer to appendices in Alarms and Maintenance Guide.
-
To start the optional Command Line Administration Capability feature (the
lsmsclaautility); for more information, see Command Line Interface Utility.
-
Note:
For procedures on logging in to sessions, see "Using Login Sessions" in the Alarms and Maintenance Guide.Support of Multiple Users
The LSMS allows, as a standard feature, a maximum of eight simultaneous users. The Support for Additional Users optional feature enables you to have a maximum of 25 simultaneous users. A user is defined to be any of the following:
-
lsmsmgruser (a user who logs in as thelsmsmgruser to start thelsmsmgrtext interface). -
Server-side GUI user (a user who has logged into the command line of a server and started a GUI with the
start_mguicommand). -
GUI user (a user who has logged into the active server GUI over the web.
-
lsmsclaauser (a user who is using the optional LSMS Command Class Management optional feature).
Establishing Login Sessions
From any network-connected terminal, you can establish a variety of sessions with the active server or with a specific server in one of the following ways:
-
Display the
lsmsmgrtext interface of either the active server or of a specific server -
Display the command line of either the active server or a specific server for entering commands; see Logging In to LSMS Server Command Line.
From the displayed command line, you can start a server-side GUI, as described in "Starting a Server-Side LSMS GUI Session" in Alarms and Maintenance Guide.
-
Display the GUI by using a web browser; see "Starting an LSMS GUI Session" in Alarms and Maintenance Guide.
Logging In to LSMS Server Command Line
You can log in to the LSMS active server or in to a specific server from any terminal that has an SSH client installed.
Note:
If your terminal does not already have ssh installed, PuTTY (Oracle Communications does not make any representations or warranties about this product) is an open source ssh utility for Windows that you can download from the web.
You must have a user ID and password before you can log in to LSMS.
- You can now continue with any of the following functions:
- If you entered
lsmsmgras the username, thelsmsmgrtext interface displays, as shown in the following Figure.You can use any of the
lsmsmgrfunctions, described also in the Alarms and Maintenance Guide.Figure 1-1 lsmsmgr Text Interface Main Menu
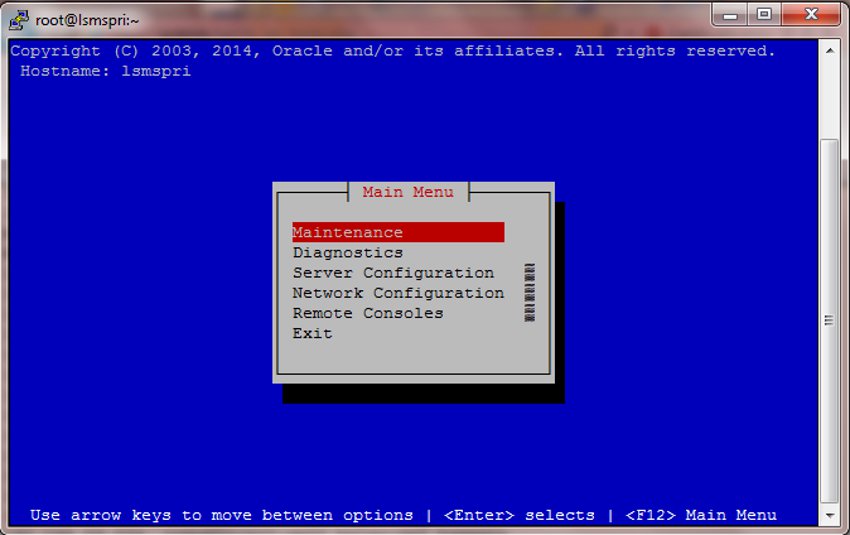
Note:
Selections in the
lsmsmgrtext interface are made either by using the Up and Down Arrow keys on your keyboard or by typing the first letter of your menu choice to change which menu item is highlighted. When the desired menu item is highlighted, press the Enter key.In this manual, menu selections are indicated as a series; for example, select Maintenance > Start Node indicates that you should highlight the Maintenance item on the main menu, press Enter, then highlight the Start Node item on the next menu, and press Enter again.
- If you entered
syscheckas the username, the command line window displays the System Health Check output.For more information about
syscheck, refer to the Alarms and Maintenance Guide. - If you entered any other username the command line prompt displays a prompt that shows the username and host name, similar to the following example (in this example, the user logged in as the
lsmsadmuser to the server whose host name islsmspri):[lsmsadm@lsmspri lsmsadm]$At this prompt, you can do any of the following:Note:
In this manual, the prompt will be indicated simply by $.
- Enter LSMS commands.
- Start the
lsmsclaautility if you have the LSMSCommand Class Management optional feature installed. - If you need to start an LSMS graphical user interface (GUI), see "Starting a Server-Side LSMS GUI Session" in the Alarms and Maintenance Guide.
- If you entered
Logging in from One Server to the Mate’s Command Line
Sometimes it may be necessary to have access to the command line interfaces for both servers. You can log into each server separately using ssh, or you can use ssh to go back and forth between servers.
To log in from one server’s command line to the mate server’s command line, use the following procedure:
Inactivity Timeout
The Automatic Inactivity Logout (inactivity timeout) feature, when activated, logs out LSMS GUI and command line users after a preset period of inactivity occurs. For more information, refer to the topic “Inactivity Timeout Submenu”.
Modifying Title Bar in LSMS Console Window
After you successfully log in to LSMS, the console window appears. If the /usr/TKLC/lsms/config/LSMSname file exists and contains a (0–30 character) unique LSMS name, the name (in this example, “Oracle - Morrisville”) is displayed in the title bar along with the SPID and user name (see Figure 1-2).
If the /usr/TKLC/lsms/config/LSMSname file does not exist or is empty (null), no name is displayed and the title bar will display only the SPID and user name.
Figure 1-2 LSMS Console Window with Modified Title Bar

Command Line Interface Utility
To use the command line interface, use the following procedures to start and exit the command line interface utility.
Starting the Command Line Interface
You can use the command line interface utility, lsmsclaa, to manage some functions that can also be managed from the LSMS graphical user interface. Once the command line interface is running, you can enter as many of its allowed actions as are required to fulfill a task.
For detailed information about the using the command line interface utility, including error situations, refer to “Using lsmsclaa Commands” in Appendix A of Alarms and Maintenance Guide.
Use the following procedure to start the command line interface utility:
GUI Function Access
Access to the various LSMS GUI functions is determined by the permission group assigned by the system administrator. For more information, refer to “Managing User Accounts” in Alarms and Maintenance Guide.
The following tables show the configuration functions each permission group can access. Inaccessible functions are deselected (grayed-out) on the actual menus.
Table 1-4 Admin GUI Access by Permission Group
| Admin GUI Functions | Admin GUI Access by Permission Group X = This GUI function is accessible to the indicated permission group. | ||||
|---|---|---|---|---|---|
| Default Permission Groups | |||||
| lsmsadm | lsmsuser | lsmsview | lsmsall | lsmsuext | |
|
Admin |
X |
X |
|||
|
Users |
X |
X |
|||
|
Modify |
X |
X |
|||
|
View |
X |
X |
|||
|
Permission Groups |
X |
X |
|||
|
Create |
X |
X |
|||
|
Modify |
X |
X |
|||
|
View |
X |
X |
|||
|
Delete |
X |
X |
|||
|
Inactivity Timeout |
X |
X |
|||
|
System Inactivity Timeout |
X |
X |
|||
|
View |
X |
X |
|||
|
Modify |
X |
X |
|||
|
User Inactivity Timeout |
X |
X |
|||
|
View |
X |
X |
|||
|
Modify |
X |
X |
|||
|
Password Timeout |
X |
X |
|||
|
System Level |
X |
X |
|||
|
View |
X |
X |
|||
|
Modify |
X |
X |
|||
|
User Level |
X |
X |
|||
|
View |
X |
X |
|||
|
Modify |
X |
X |
|||
|
Alarm Filter |
X |
X |
|||
|
MySQL port |
X |
X |
|||
|
QS MySQL port |
X |
X |
|||
|
LNP Threshold |
X |
X |
|||
Table 1-5 Configure GUI Access by Permission Group
| Configure GUI Functions | Configure GUI Access by Permission Group X = This GUI function is accessible to indicated permission group. | ||||
|---|---|---|---|---|---|
| Default Permission Groups | |||||
| lsmsadm | lsmsuser | lsmsview | lsmsall | lsmsuext | |
|
Configure |
X |
X |
X |
X |
X |
|
LNP System |
X |
X |
X |
X |
X |
|
NPAC |
X |
X |
X |
X |
X |
|
Modify |
X |
X |
|||
|
View |
X |
X |
X |
X |
X |
|
LSMS |
X |
X |
X |
X |
X |
|
Modify |
X |
X |
|||
|
View |
X |
X |
X |
X |
X |
|
EMS |
X |
X |
X |
X |
X |
|
Create |
X |
X |
|||
|
Modify |
X |
X |
|||
|
View |
X |
X |
X |
X |
X |
|
Delete |
X |
X |
|||
|
Service Provider |
X |
X |
X |
X |
|
|
Create |
X |
X |
|||
|
Modify |
X |
X |
|||
|
View |
X |
X |
X |
X |
|
|
Delete |
X |
X |
|||
|
TT/SSN Values |
X |
X |
X 1 |
||
| 1 Users belonging to the lsmsuext permission group are authorized to access Default TT/SSN values only for GTT groups assigned to the login SPID. | |||||
Table 1-6 Keys GUI Access by Permission Group
| Keys GUI Functions | Keys GUI Access by Permission Group X = This GUI function is accessible to the indicated permission group. | ||||
|---|---|---|---|---|---|
| Default Permission Groups | |||||
| lsmsadm | lsmsuser | lsmsview | lsmsall | lsmsuext | |
|
Keys |
X |
X |
|||
|
NPAC |
X |
X |
|||
|
LSMS |
X |
X |
|||
- When there is a change in the data and OK is clicked:
- GUI updates the value in the database
- GUI displays a message that the update is successful
- GUI closes the Menu/Window
- When there is no change in the existing data and OK is clicked:
- GUI returns an error that there is nothing to update
- GUI does not close the Menu/Window
- When there is no data entered and OK is clicked the GUI returns an error.
- When there is a change in the data and Apply is clicked:
- GUI updates the value in the database
- GUI displays a message that the update is successful
- GUI does not close the Menu/Window
- When there is no change in the existing data and Apply is clicked:
- GUI returns an error that there is nothing to update
- GUI does not close the Menu/Window
- If Cancel is clicked the open Menu/Window is closed.