- Installer Property File Creation
- Create Property File for Oracle FLEXCUBE Installer
- Create Property File
2.1 Create Property File
This topic explains the property file creation using the installer.
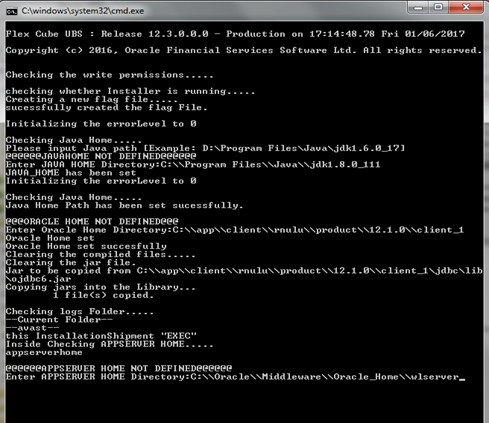
- Launch the Oracle FLEXCUBE Installer, i.e., FCUBSInstaller.bat (for Windows) and FCUBSInstaller.sh (for Linux, bash shell recommended). These files are available in
INSTALLER/SOFT/GUI.FCUBSInstaller.bat cmd window is launched. - On the FCUBSInstaller.bat cmd screen, provide the following details:
- JAVA HOME PATH: Provide the JDK home path with the latest version.
- ORACLE HOME PATH: Provide the Oracle 12C Client Path.
- APPSERVER HOME PATH: Provide the app server home path.
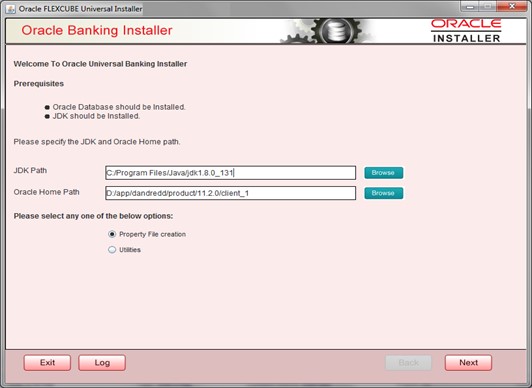
- After providing the path details in the cmd, the INSTALLER-GUI gets started. And follow the below details.Oracle FLEXCUBE Universal Installer window is displayed.
Figure 2-2 Oracle FLEXCUBE Universal Installer
- On the Oracle FLEXCUBE Universal Banking Installer, specify the fields.
Table 2-1 Oracle FLEXCUBE Universal Installer - Field Description
Fields Description JDK Path Maintain the Home folder path of JDK. The JAVA HOME path given in the previous screen gets defaulted. Oracle Home Maintain the Home folder path of JDK. The JAVA HOME path given in the previous screen gets defaulted. - Select one of the radio buttons.
- Property File creation
- Utilities
- Based on the selection, the Next screen will be shown. Click the Property File creation for the current case.
- Click Next and the following screen is displayed.
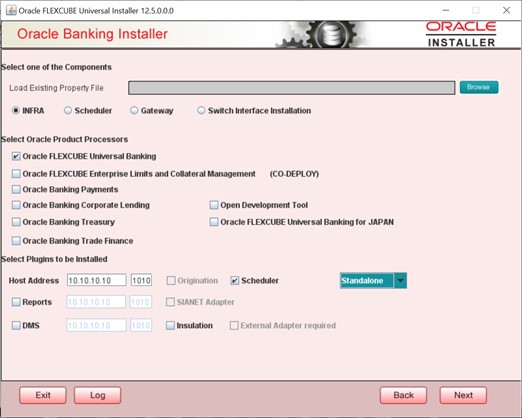
Figure 2-3 Oracle FLEXCUBE Universal Installer - Components
- Select the component for which property file is to be created.
- INFRA is for FCUBS property file creation. To create a property file for Scheduler or Gateway, or Switch Interface Installation, please refer to the respective property file creation document.
- Select the required Product Processors to make respective property files.
- Oracle Financial Universal Banking product processor contains the Rest of Flexcube other than Payments, ELCM and OBCL, etc.
- Oracle FLEXCUBE Enterprise Limits and Collateral Management (ELCM) has three types. They are Embedded, CO-Deploy, and Standalone (ELCM Adapter). Please choose a proper option. Oracle FLEXCUBE Enterprise Limits and Collateral Management can be selected as an individual application or along with Oracle Financial Universal Banking. Also, ELCM Adapter required checkbox is available.
- Oracle Banking Payments can be selected as an individual application or along with Oracle Financial Universal Banking.
- Oracle Banking Corporate Lending can be selected as an individual application or along with Oracle Financial Universal Banking.
- Open Development Tool (ODT) can be selected to install ODT, which allows end-user to design ODT screens.
- Oracle Banking Treasury can be selected as an individual application or along with Oracle Financial Universal Banking.
- Oracle Banking Trade Finance can be selected as an individual application or along with Oracle Financial Universal Banking.
- Oracle FLEXCUBE Universal Banking for Japan can be selected as an individual application.
- Select the Plugins to be included in the application.
- If you need to modify an existing property file, load it using the respective Browse button. You can load existing property-file to make any modifications
- These are the plugins available:
- Scheduler
- Reports
- DMS(Document Management System)
- Insulation
- Click Next again, and the following screen is displayed:
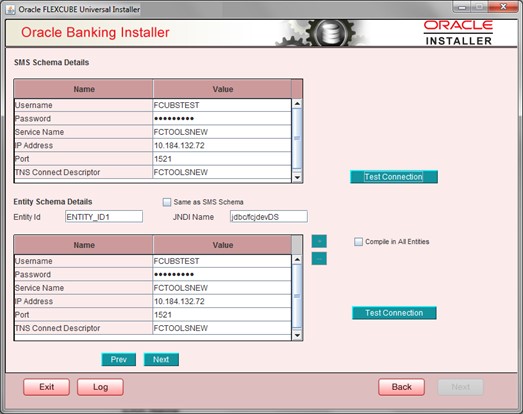
Figure 2-4 Oracle FLEXCUBE Universal Installer - SMS Schema Details
- Provide the SMS schema details to capture the credentials which will be used for DB Compilation.
Note:
IP Address should be same as mentioned in the TNSnames.ora - Once the connection is successful the env.properties file present in path
/INSTALLER/SOFT/GUI/logs/env.propertieswill get updated with schema details in an encrypted format. - For Single Entity:
- Here Entity Schema is mandatory, atleast a minimum of one entry should be provided.
- Entity Id value is default, i.e. ‘ENTITY_ID1’ for the first entry.
- Provide the JNDI Name for the ENTITY_ID1. By default the JNDI name is jdbc/fcjdevDS.
- Give the Schema Details for the Entity1.
- Here Compile In All Entities Field is ‘N’. (As using the Single Entity Concept).
- For more than One Entity, i.e. Multi Entity:
- After providing the Single Entity details, click on + to add the rows.
- Now give the details for Entity_ID2. Here the field is mandatory.
- Provide the schema details and the JNDI name.
- The next and Prev button is to traverse for entity screens.
- Can also add the entites and delete the entities.
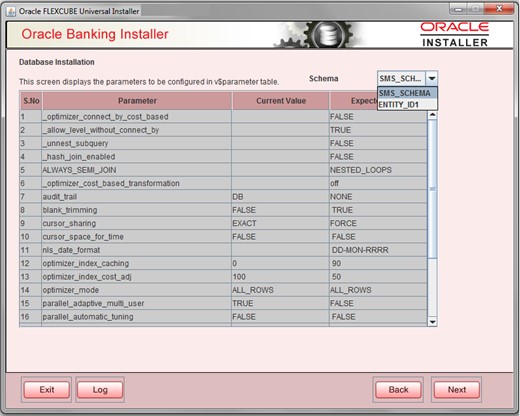
- Click on the Test Connection button. After a successful connection, click on the Next button to proceed, and the below screen occurs. This Screen displays database parameters listed in the v$parameter table.
- This page is Read only used as a reference to know the database parameters.
- The Schema drop down list is provided to verify parameters of SMS and Entity Schemas.
Figure 2-5 Oracle FLEXCUBE Universal Installer - Database Installation
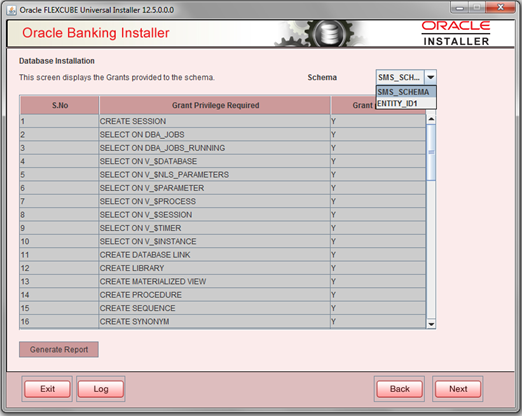
- Click on the Next Button. This screen displays the grants provided to the schema. If object compilation is required and the privilege is not given, then you can find that out from this screen.
- Schema drop down lists SMS and Entity Schemas. Select Schema and proceed further.
Figure 2-6 Oracle FLEXCUBE Universal Installer - Database Installation_Schema
- Click the Generate Report button, the installer creates an SQL file ‘grantScript.sql’ containing the script for granting the privileges in the ‘Logs’ folder, and the following screen is displayed.
- You can use this file to get the access.
Note:
Only the sys user can execute the file ‘grantScript.sql’ for granting privileges.Only the sys user can execute the file ‘grantScript.sql’ for granting privileges. - Click Next button again.Oracle FLEXCUBE Universal Installer - Environment Details screen is displayed.
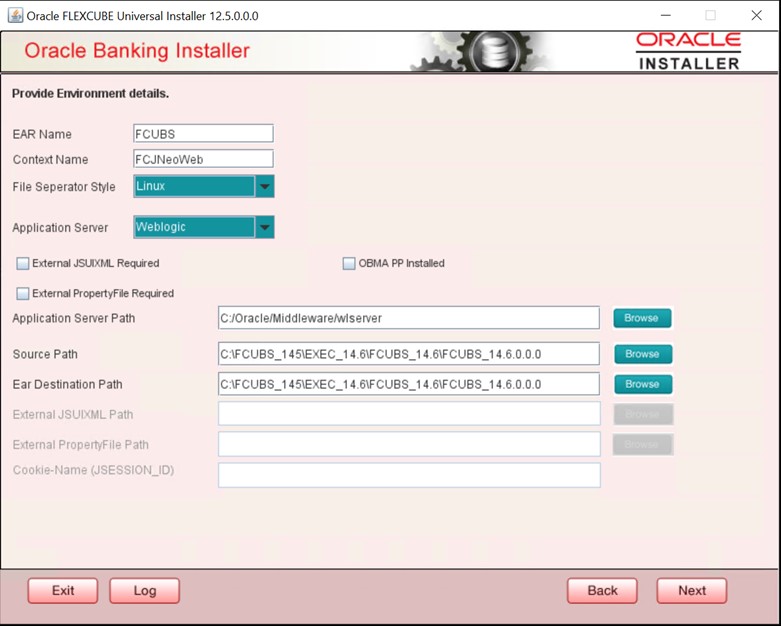
Figure 2-7 Oracle FLEXCUBE Universal Installer - Environment Details
- On the Oracle FLEXCUBE Universal Installer - Environment Details, specify the fields.
Table 2-2 Oracle FLEXCUBE Universal Installer - Environment Details
Fields Description EAR Name Specify the name of the Application to be deployed.
Note:
You cannot use special characters such as ‘.’ (Dot), ‘,’ (comma), ‘$’ etc. However, you may use ‘_’ (underscore). – Applicable for both Windows and Linux.Context Name Based on the Application type selected, the Installer displays the application context. However, you may modify the default value.
This information will be updated in ‘application.xml’. In case of a WebLogic server, this will be updated in ‘weblogic.xml’.
File Separator Style Specify the type of file separator (For example, Linux or Windows). Select the appropriate one from the drop-down list. You also need to specify the version of the selected operating system. Application Server Specify the application server in which you are creating the property file. Select the appropriate one from the adjoining drop-down list. External JSUIXML Required Specify whether screen changes will be deployed as External JSUIXML for the application. EXTERNAL_JSUIXML_REQUIRED=Y/N: Depending on requirement
EXTERNAL_JSUIXML_REQUIRED=Y: JS and UIXML, and HELP files are kept in an external path in the application server.Note:
EXTERNAL_JSUIXML_REQUIRED=N: JS and UIXML files are included inside the application EAR.External PropertyFile Required Specify whether screen changes will be deployed as External fcubs.properties for the application. EXTERNAL_PROPERTY_PATH_REQUIRED =Y/N: Depending on requirement
Note:
- EXTERNAL_PROPERTY_PATH_REQUIRED =N: fcubs.properties file is included inside the application EAR.
- EXTERNAL_PROPERTY_PATH_REQUIRED =Y: fcubs.properties file is kept in an external path in the application server.
Note:
External property file path should have the property file name also with it. For example:C:\App\fcubs.properties.Application Server Path Provide the Application Server Path. Server Path Provide the source path of the console exec directory. (Mention exact folder name after unzipping the source) Ear Destination Path Specify the path where Ear needs to be copied after building it using SOFT Installer. External JSUIXML Path In case External JSUIXML Required option is checked, External JSUIXML path on the application server machine has to be specified here. External JSUIXML required option is supported only for Weblogic Application Server. EXTERNAL_JSUIXML_PATH: ex:- /scratch/work_area/DEV/FC124_UBS/JS_UIXML_HELP. This can be any path in the Application server.External PropertyFile Path In case External Property File required option is checked, the External PropertyFile path on the application server machine has to be specified here. - Click Next button again.Oracle FLEXCUBE Universal Installer - Property File Creation screen is displayed.
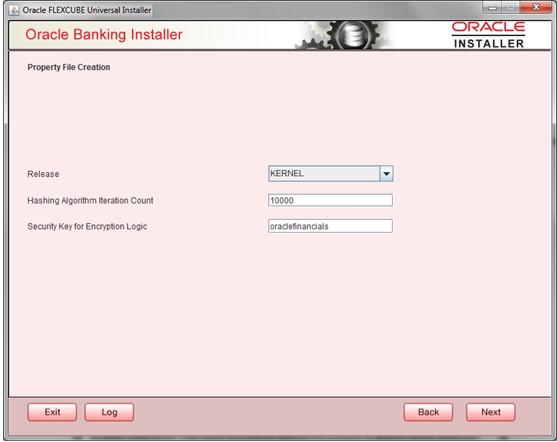
Figure 2-8 Oracle FLEXCUBE Universal Installer - Property File Creation
- On the Oracle FLEXCUBE Universal Installer - Property File Creation, specify the fields.
Table 2-3 Oracle FLEXCUBE Universal Installer - Property File Creation
Fields Description Release Specify the release in which you are creating the property file. By default, the option would be KERNEL.The list of options available from the dropdown list are: - KERNEL
- MX Cluster
Hashing Algorithm Iteration Count Specify the Hashing algorithm iteration count. By default, it is 1000. Security Key for Encryption Logic Security Key for Encryption Logic is the key (exact 16 characters) for all encryption logic. By default, it is oraclefinancials. OBMA PP Installed.
- Custom Installation
This topic explains the systematic instructions for custom installation. - Set General Properties
This topic explains the process of setting common properties of Oracle FLEXCUBE Payments. - Set Single Sign on
This topic explains the systematic instructions of setting single sign on. - Property File Creation - SMTPS/DMS
This topic explains the method to configure Email details and SMTPS/DMS properties whichever is required. - Configure Scheduler
This topic explains the systematic instructions to configure scheduler data source. - Set Scheduler EMS Properties
This topic explains the Scheduler EMS Properties for the property file creation. - Set EMS FTP/FTPS Properties
This topic explains the EMS FTP/FTPS properties. - Set Scheduler BIP/GI Upload Queue Properties
This topic explains the BIP/GI Upload Queue properties. - Set Reports details
This topic explains the BI Publisher properties. - Save Property File
This topic explains to save the property file.
Parent topic: Create Property File for Oracle FLEXCUBE Installer
