Creating a Format
Introduction
Format is crucial for presenting data in a user-friendly manner. It allows you to customize the way the data appears in your communications, without altering the actual values. Format configuration modifies the data provided to it and returns it with the appropriate modification. The Field configuration represents the raw data and Format configuration can be applied to data of the appropriate type. You can define custom formats unique to your business processing. Once defined, these formats can be used across fields in multiple communications through Content Components.
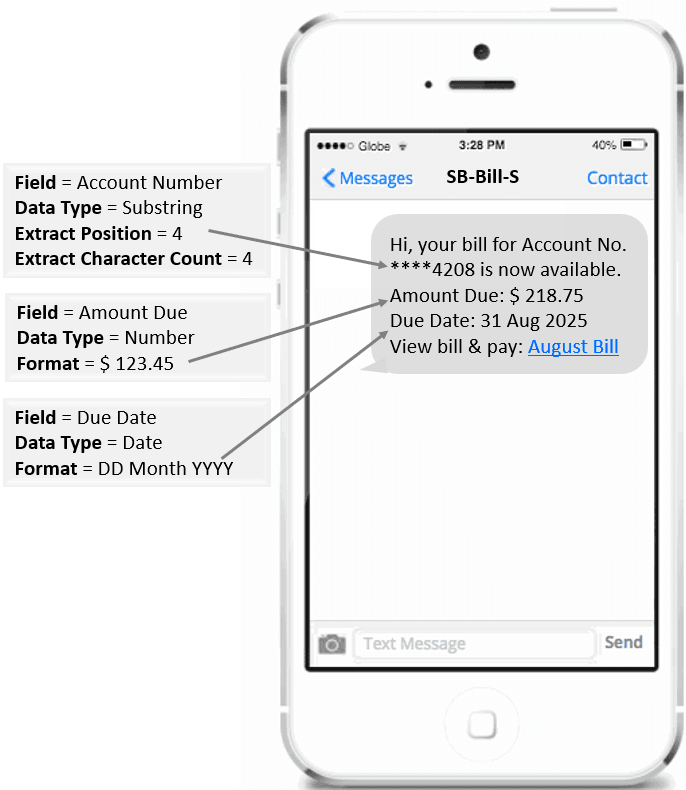
For example, your organization or business sends a Bill Payment SMS to all registered customers. The SMS contains customer's Account Number, Amount Due, Due Date and link to view and pay bill online. You can use Format configurations for each Field captured in the SMS, to create the desired output for your customers.
The following image illustrates an example of a Bill Payment SMS to a customer:
Prerequisites
Following are the prerequisites to consider before creating a Format configuration in Communication Cloud Service:
Note:
Ensure that you complete the prerequisites before proceeding.| Prerequisites | Details |
|---|---|
| Set the Config ID |
Config ID must be Active.
Ensure that all dependent configurations and associations are part of the same open Config ID. See Creating Config ID for creating a Config ID. |
| Configure Entitlements | Ensure that you have the required entitlements to create a Format.
|
| Create User Defined Data configuration | Ensure that you have created the User Defined Data configuration that needs to be associated to the Format configuration.
See Creating a User Defined Data for more details. |
Creating a Format
- Access the Oracle Financial Services Cloud application.
- From Menu, select Configuration.
- Under Configuration, select Data and then select Format.
- On the Format landing page, select Create.
- In Basic Information section, enter the Name, Long Name and Description (optional), to identify the Format.
- In User Defined Data section, select Add User Defined Data and then Select the User Defined Data that you want to associate to the Format.
- In Data Format section, select a Type of Data Format. This identifies and defines the behavior of the Data Format Type. Based on the Type selected, more data fields are displayed as stated below:
- If Date is selected, enter the Format. Example - To consistently display date in a specific format, you can enter Format as MM DD YYYY
- If Number is selected, enter the Format. Example - For transaction in US Dollars you can enter Format as $ 12,345.00
- If Substring is selected, enter or select a number in the Extract Position and Extract Characters Count. Extract Position indicates where the substring extraction should begin within the original string. Extract Characters Count indicates the number of characters to be extracted from the Extract Position. Example - If only last 5 digits of a 10 digit Account Number should be displayed in customer communication, then you can enter Extract Position as 6 and Extract Character Count as 5.
- If Trim is selected, it is optional to select Starts With and Ends With, they are set to False by default. If Boolean value True is selected, it indicates whether the Start/End of the original string should be trimmed. Also, enter Trim Characters that indicate the string of characters to be removed. Example - If you want commas to be removed from the currency value, enter "," as Trim Characters.
- If DateTime is selected, enter the Format and select the required Time Zone. Example - You can enter Format as MM/DD/YYYY HH:MM:SS AM/PM and Time Zone as America/Mexico_City.
- In Status section, the Active Date is set to the current date when the Format is created. You can change it to a future date if required, but you cannot leave it blank.
- Select Save to save the details and stay on this page. Or select Save & Exit to save the details and return to Format landing page.