5.6.3 Using Customer Tab
The Customer tab allows you to perform detailed analysis of customers associated with the case to determine the case resolution.
Follow these steps to navigate to the Customer tab:
- From the homepage, click Enterprise Case Investigation.
- Click Search Cases. Case Search page is displayed.
- Open the Case List.
- Click the Entities tab.
- Click Customer tab. Customer List displays.
Figure 5-44 Customer List screen

About Customer Tab
A customer is an entity, it can be an individual or an organization. This tab provides a list of customers associated with the selected case and their complete details.
Both, Primary and Secondary customers can be part of the customer tab.
- Customer List: details the list of customers associated with the selected case.
- Customer Details: furnishes complete information of the selected customer.
- Associate new customers with the case
- Disassociate or modify existing customers
- View and analyze complete details of each customer
- Designate as an involved party
- Retrieve the latest customer details in the Current Information window
- Add, modify, and remove account, online account, contact information, and anticipatory profile associated with the customer
- View and analyze the risk information and watch lists associated with the customer
- Initiate a negative news report by selecting one or more customer from the customer list
Note:
The following activities are recorded in Audit History when user:- Accesses the Customer Tab
- Views Customer Details
- Views Customer Edit Information
- Modifies Customer Information
- Views Current Information of Customer
- Views Quantifind Details
- Views Customer Edit History
- Searches Case Entities for Customer
- Searches Current Business Entities for Customer
- Accesses Customer Contact Information
For more information, see the Using Audit History.
Managing Customer List
The Customer List section allows you to view the list of customers associated with the selected case. You can also perform the following activities:
- Adding, modifying, and removing customers. For more information, see Managing Business Entity List. Click the History link to view a historical record of changes made to the customer records. This link displays only for records which have been edited.
- Designating customers as an involved party. For more information, see Designating as Involved Party.
- Viewing current information of customers. For more information, see Viewing Current Information.
Managing Customer Details
This section allows you to view and analyze the complete details of the selected customer.
To view the Customer Details tabs, follow these steps:
- Select a customer in the Customer List using the check box.
- Click View Customer Details. The tabs are displayed.
Figure 5-45 Customer Details tabs

Viewing Customer Details
This section displays the detailed information of the selected customer such as customer ID, customer type, occupation, and so on. You can modify customer details.
For more information, see the Managing Business Entity List section.
Viewing Related Parties
The Related Parties section displays details of the parties (customer and non-customer) which are considered related to this customer, as specified in the Party-to-Party Relationship data. You can filter the Related Parties by Relationship Type using the drop-down list.
To add or edit or delete a related party, follow these steps:
- Select a customer in the Customer List using the check box.
- Click View Customer Details icon.
The tabs are displayed.
- Go to Related Parties tab.
- In the Related Parties grid, click the Add icon.
The Add Related Parties page is displayed.
- Select the related party from the Related Party ID drop-down.
The Customer Yes or No drop-down is auto populated based on the selected related party.
You can define the relationship type by selecting the type from the Relationship Type drop-down.
- Click Save to add the related party.
- Click the Edit icon, make the required changes, and click Save.
The add and edit actions are recorded in the Audit History.
- Select a record, click the Delete icon, and click OK.
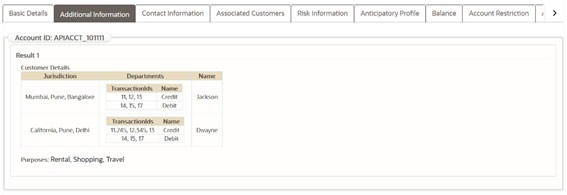
Viewing Additional Information
This section displays additional information about the customer provided in the Add Customer API. Multiple levels of information is displayed in simplified manner. You cannot modify the information displayed on this tab.
Figure 5-46 Viewing Additional Information

Managing Customer Account
This section displays the list of all accounts that are associated with the customer. This provides the details of the accounts - account name, type, account open and closed date. You can associate additional accounts to the customer and modify or remove the existing accounts.
Note:
Only those accounts that are part of the case and are available in the Account tab of the case can be associated to the customer. To associate new accounts to the customer for the current case, add the accounts to the case through the Add action in the list of business entities section of the Account tab. Only accounts where the customer has one of the defined roles configured by your administrator are added to the Customer Account section on the Customer tab. For more information, see the Managing Business Entity List sectionTo add, modify, and remove accounts, see Managing Business Entity Records. Click the History link to view a historical record of changes made to the customer records, the Edit History. This link displays only for records which have been edited.
To add a new account, select the Account ID and the role the customer plays with this account in the Account window.
Managing Customer Online Account
This section displays the list of all online accounts associated with accounts linked to the case. You can map additional online accounts to the existing accounts associated with the customer and modify or remove the existing online accounts.
Adding New Online Account to the Customer
To add a new online account, follow these steps:
- Navigate to the Customer tab.
- Select the required Customer ID. The Customer Details section displays.
- Go to the Online Accounts section and click Add. The Online Accounts window displays.
- Enter the following information in the relevant fields as described in the
following table.
Table 5-22 Online Accounts
Fields Description Online Account ID This is an online account of customers associated with the case who are accessing their internal accounts using the internet or other telebanking channels. Online Account User ID Enter the online account user ID. Account ID Select the account ID.
Only those accounts that are part of the case and are available in the Account tab of the case can be associated.
Relationship Date Select the date on which the online account and internal account are associated. - Click Save. A confirmation message displays.
- Click Cancel. The window closes and navigates you to the refreshed list of Customer Online Account and the newly added online account displays. Also, corresponding audit entries are recorded on the case.
- To modify or remove existing online accounts in the customer records, see the Managing Business Entity Records section.
- Click the History link to view a historical record of changes made to the customer records. This link displays only for records which have been edited.
Viewing Customer Identification Documents
This section displays the documents related to customer identification. You can view details such as Customer ID, Document Number, Document Name, Document Type, Issuing State (editable field), Issued By, Issued Date, Expiration Date, and Edit History.
To edit the Issuing State field of a particular record, select the Customer ID, click the Edit button, select from the Country and Issuing State drop-down options, and then click Save.
The History link under the Edit History column records the changes made to the Country and Issuing State fields.
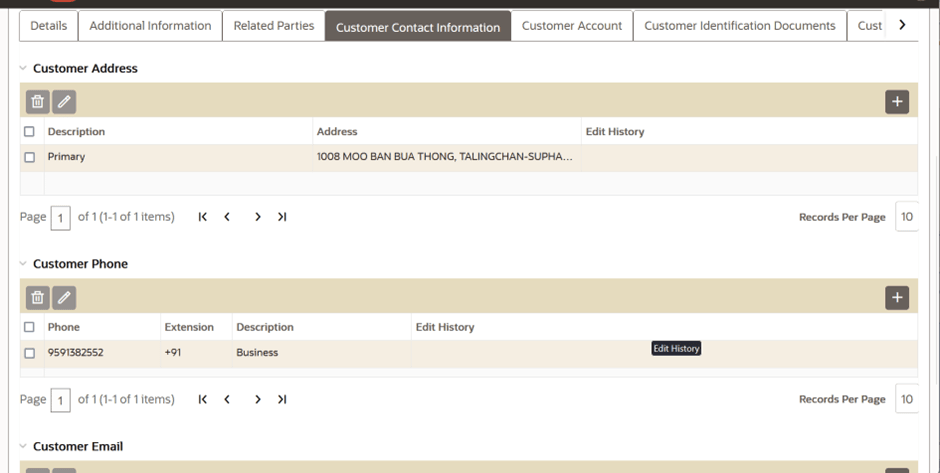
Managing Customer Contact Information
This section displays the contact information such as an address, phone number, and email of the selected customer. You can map additional contact information to the customer and modify or remove the existing contact information.
To add, modify, or remove existing contact information in the customer records, see the Managing Business Entity Records section. Click the Historylink to view a historical record of changes made to the customer records. This link displays only for records which have been edited.
Viewing Customer Risk Information
This section displays the value of various risks associated with the selected customer. You can view details such as effective risk, business risk, and geographical risk.
Viewing Customer Risk List Memberships
This section displays watch lists associated with the selected customer. You can view details such as list name, list type, rating, public or private.
Managing Customer Anticipatory Profile
The anticipated profile of all customers that are associated with a case is collected at the time of inception of customer relationships in order to understand the sources of funds and the expected transactions for these entities.
This section displays the list of all anticipatory profiles associated with the selected customer. You can map additional anticipatory profiles to the customer and modify or remove the existing anticipatory profiles.
Adding New Anticipatory Profile to the Customer
- Navigate to the Customer tab.
- Select the required Customer ID. The Customer Details section displays.
- Go to the Anticipatory Profile section and click Add. The Anticipatory Profile window displays.
- Enter the following information in the relevant fields as described in the
following table.
Table 5-23 Customer Anticipatory Profile
Fields Description Profile Metric Select the one or more metrics measured by this anticipatory profile record from the multi-selector list. For example, cash, domestic wire, or traveler's check. Debit/Credit Select whether this anticipatory profile represents credits to the customer or debits from this customer. Period Type Select the period of time from the multi-selector list that this anticipatory profile represents. For example, Monthly, Quarterly, or Annually. Average Transaction Count Enter the anticipated average transaction count that the customer is expected to do. Average Transaction Amount Enter the anticipated average transaction amount that customer is expected to do. Total Amount Enter the anticipated total amount that customer is expected to receive. Source of Fund Country This is the country from which the customer is anticipated to receive the fund. Source of Fund Institution ID This is the financial institution from which the customer is anticipated to receive the fund. - Click Save. A confirmation message displays.
- Click Cancel. The window closes and navigates you to the refreshed list of Customer Anticipatory Profile, and the newly added anticipatory profile displays. Also, corresponding audit entries are recorded on the case.
- To modify or remove existing anticipatory profiles in the customer records, see the Managing Business Entity Records section.
- Click the History link to view a historical record of changes made to the customer records. This link displays only for records which have been edited.
Viewing Quantifind Information
Quantifind is a third-party company which provides risk information about entities. A contract with Quantifind is required to use this feature. Their product is integrated within FCCM Enterprise Case Management to allow users to retrieve and view the risk scores of a customer. Investigators can check old or new transaction status and take actions considering Customer's risk level using Risk Cards. Only Supervisors have access to Quantifind results. Past records of existing users will be stored in the database. You can view Risk Card details and request latest Risk Card with current and past Customer records.
To view the Quantifind Information, follow these steps:
- Navigate to the Customer tab.
- Select Customer details.
- Click Get Latest Quantifind Information link.
- Click Detailslink for the requested Customer.
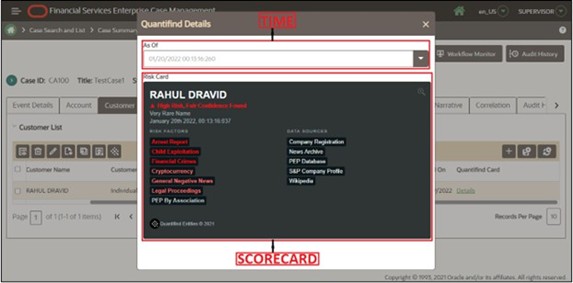
The time and scorecard received from Quantifind displays in Quantified Details window.
Figure 5-47 Quantified Details

Quantifind Batch Processing
The Quantifind batch process submits customer entities to an ECM processing layer where they are then submitted in batch to Quantifind. ECM users do have the ability to request Quantifind risk cards in an ad-hoc manner through the ECM UI but the Quantifind batch process allows for bulk processing of customers which are extracted from the events created by the Behavior Detection Framework. This can provide great efficiency as cards are automatically available to the ECM users.
To run the Quantifind batch process, follow these steps:
- Login to the application with Supervisor credentials.
- Search the Case.
- Click the Customer Tab to view the list of customer details.
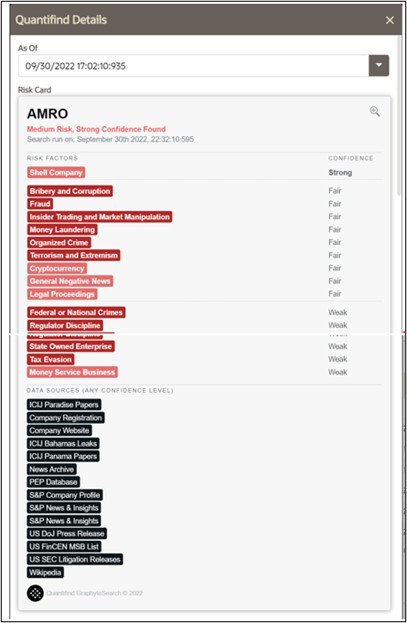
- Click the required Quantifind Card Details to view the 'Quantifind Details' with the current score andthe request time.
Figure 5-48 Quantifind Details window

Viewing Summary
- A summary of transactions for the selected customer
- Summary types such as deposits, trades, and disbursement
- A summary of customer's transactions on a monthly basis for the thirteen months previous to the date of last transaction performed from the selected account. By default, transaction amounts are displayed in Base Currency. Select the Functional check box to also display transaction amounts in Functional Currency.