Using the Patient Selection List on the Home Page
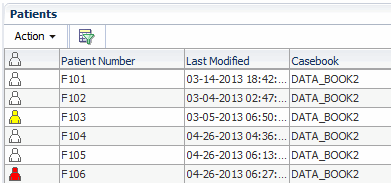
When you open the Home page, the Patient Selection List displays all the patients for the current site in the study. The Patient Selection List has two major components:
- The Patient Search pane
- The Patients list
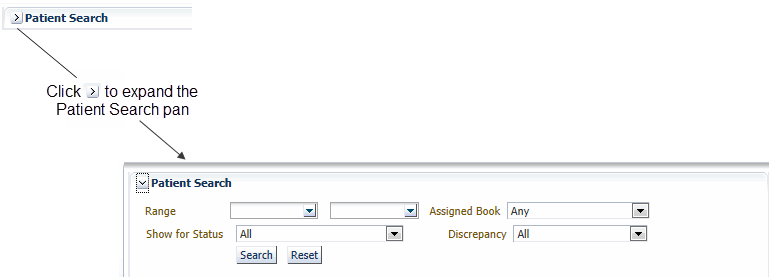
By default, the Patient Search pane is collapsed. You can click the ![]() button to expand the Patient Search pane. You can then specify criteria to search for and display a subset of patients.
button to expand the Patient Search pane. You can then specify criteria to search for and display a subset of patients.

The Patients list provides:
- Several ways that you can select one or more patients. See Action.
- Colored icons that indicate the status of the data already entered. See Patient Icon.
- Information about each patient, such as patient number, date when patient data was last modified, and the assigned casebook.
- If configured for your installation, clicking the patient number opens the Single Patient Casebooks page for the patient. See Patient Number.
- Options for the task you want to complete from the Action menu once you select one or more patients. See Action.

Action
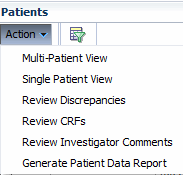
The Action menu lists the actions available to execute on the selected patients. For example, you can:
- Open the casebooks for the selected patients and enter new data
- Review CRFs already entered for the selected patients
- Review discrepancies or investigators comments for the selected patients
- Generate a Patient Data Report for the selected patients
The first two options in the Action menu are Multi-Patient View and Single Patient View. They both open the Patient Casebooks page for the patient or patients selected. Single Patient View provides a way to view a single patient's casebook CRFs across visits. See Single Patient View, or Multiple Patient View for more information about these pages.
Patient Icon
The icon column displays a patient icon that resembles a human figure. The color of the icon is significant and provides valuable information about the patient data. The following table defines the meaning of the color of each icon.
| Icon | Color | Description |
|---|---|---|
|
|
Gray with a question mark |
No data has been entered for this patient number. You can use the patient number to enter data for a new patient. |
|
|
White |
The patient data has no open discrepancies. |
|
|
Red |
The patient data has one or more active discrepancies. An active discrepancy requires attention by you or a member of your user group. |
|
|
Yellow |
The patient data has one or more other discrepancies. An other discrepancy requires attention from another user or user group. |
Patient Number
The Patient Number column displays the system-assigned unique number for each patient.
If the single patient view of the Patient Casebooks page is available and patient links are active in your installation, the patient number is a link that opens the Single Patient Casebooks page for the patient.
Last Modified
The Last Modified column displays the date of the latest modification to the patient's data. A modification can be any of the following actions:
- Updating data
- Routing or resolving discrepancies
- Verifying, approving, locking, or unlocking a CRF
Casebook
The Casebook column displays the name of the casebook to which the patient is assigned, or displays Unassigned if the patient is not assigned to any casebook.
For more information, see:
- Selecting Patients and CRFs
- Selecting Your Task
- Sorting the Entries in a List
- Examples of Sorting Columns
- Unique Sort on the Patient Number
Parent topic: Learning the Common Tools
Selecting Patients and CRFs
On many pages in RDC Onsite, you select one or more rows for processing. Depending upon the page, this could be patients or CRFs.
On the Home page, for example, you first select the patients and then you select the action you want to perform. You may want to open casebooks to update CRFs, review discrepancies, review investigator comments, or generate reports.
Your options for selecting patients are as follows:
- To select one patient or CRF, click the respective row.
- To select several patients or CRFs displayed on contiguous rows, hold down the Shift key, and click the row for the first and the last row for the patients in the group you want to select.
- To select patients or CRFs that are displayed on non-contiguous rows, hold down the Ctrl key, and click the rows that you want to select.
- To select all patients or CRFs displayed on the current page, click one row and then press Ctrl + A. Alternatively, you can click on the table header for the patient icon.
Note:
You can use combinations of keys including Ctrl on all supported devices except for iPad.Parent topic: Using the Patient Selection List on the Home Page
Selecting Your Task
Once you select the patients or CRFs that you want to process, you select the task you want to perform.
The Action drop-down menu displays a list of actions you can take on the selected patients or CRFs. The options available in the list depend on the page and on your user role.
To select your next task:
- Select one or more patients that you want to process.
-
Click the Action menu in the toolbar and then select the action you want to perform from the list.

Parent topic: Using the Patient Selection List on the Home Page
Sorting the Entries in a List
RDC Onsite displays information in rows and columns. You can sort the data by certain columns in ascending or descending order. For example, on the Home page, you can click any of the following column headers to sort the list based on the contents in that column:
- Patient Number
- Last Modified
- Casebook
When you initially open the Home page for a session, RDC Onsite automatically sorts the patient list in alphanumeric order by patient number. For example, A1, A2, A11, A12, A40, G6, J1, J2, J11. Note that the column headers do not indicate the initial sort:
To sort the list in another order, click a column header. An up arrow indicates the list is sorted in ascending order; a down arrow indicates the list is sorted in descending order. You can click the same column heading to toggle between an ascending and a descending sort.
Parent topic: Using the Patient Selection List on the Home Page
Examples of Sorting Columns
Because clinical studies tend to have many patients, sorting a list can help you find information quickly and efficiently. Sorting has many benefits.
For more information, see:
- Sorting to Find Available Patient Numbers
- Sorting to Find Patients with Recently Modified Data
- Sorting to Find Patients by Casebook
Parent topic: Using the Patient Selection List on the Home Page
Sorting to Find Available Patient Numbers
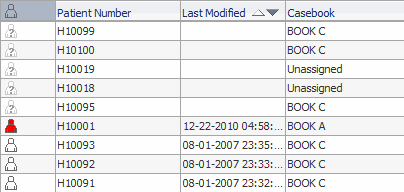
When you sort the Last Modified column in descending order, RDC Onsite displays the blank entries at the top of the list. A blank entry indicates that no modifications have been made, and therefore, the associated patient number has not yet been used. This sort provides an alternate way for you to locate available patients numbers when you need to enter data for a new patient.

Parent topic: Examples of Sorting Columns
Sorting to Find Patients with Recently Modified Data
As you enter and modify data for a set of patients, you may also find it useful to sort the patient list by the Last Modified column. The ascending sort places those patients with the oldest date of modification at the top of the list, followed by the most recently modified and the blank entries (no data yet entered so no modifications).
Parent topic: Examples of Sorting Columns
Sorting to Find Patients by Casebook
If your patients all belong to the same casebook, sort on the Casebook column to group patients within the list regardless of patient number or modification date. You can then easily see the status of each patient and determine which CRFs require your attention.
Parent topic: Examples of Sorting Columns
Unique Sort on the Patient Number
Upon initial entry to the Home page or any of the Review pages, RDC Onsite sorts the entries numerically by patient number (ID). However, when you select the Patient Number column header to re-sort the list, RDC Onsite sorts the entries alphabetically.
Parent topic: Using the Patient Selection List on the Home Page