Creating a Coupon Promotion
There are a few choices available to start the process of creating a promotion. The Create Promotion button is available in both the Promotion Home window as well as the Promotion Search window.
Note:
You will need the Promotion Home role to access the Promotion Home window.
-
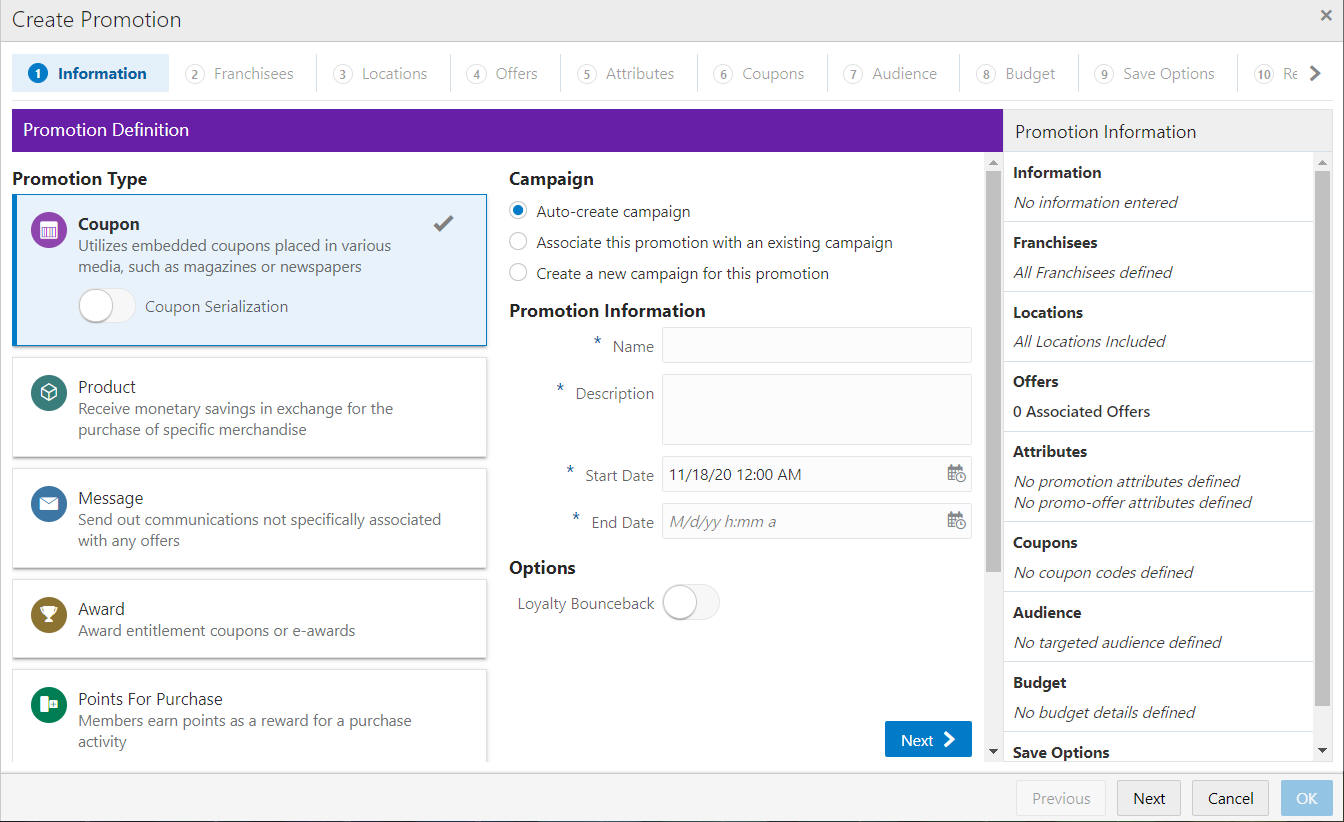
Click Create Promotion, which opens up the Promotion wizard to the Information tab.
Figure 5-11 Information Tab - Coupon
-
Select the Promotion Type: Coupon
Note:
Contact your administrator if you do not see the Promotion Types needed for your promotion
-
There are two options for a Coupon Promotion - Serialized and Non-Serialized. The selection you make will display different options on the Coupon tab. A Serialized Coupon promotion will generate coupons, each with a unique serial number, generally for a one-time use. A Non-Serialized Coupon promotion will generate a unique coupon code for the promotion, for example, a SHOE20 may represent a code a customer can use, multiple times, to receive 20% off a shoe purchase. If you wish to create a Serialized Coupon promotion, use the Coupon Serialization switch in the Coupon type box to activate that option. This Switch is only available if the Serialized Coupon Enabled Flag configuration is set to Yes. See the Oracle Retail Customer Engagement Cloud Service Implementation Guide for more information about the Serialized Coupon Enabled Flag configuration.
-
Select one of the choices for the Campaign.
-
Auto-create Campaign – The campaign is automatically created and will use the same name and description from the promotion name and description.
-
Associate this promotion with an existing campaign – Uses existing campaigns in the system.
-
Click the list arrow and select an existing campaign.
Note:
The Start Date and End Date display underneath the Existing Campaign list.
-
-
Create a new campaign for this promotion – A new campaign is created with this promotion being the first added.
-
-
Enter the following information:
-
Enter a Campaign Name (for new Campaigns only).
-
Enter a Description (for new Campaigns only).
-
Enter a Name.
-
Enter a Description.
-
Select a Start Date.
-
Select an End Date.
-
-
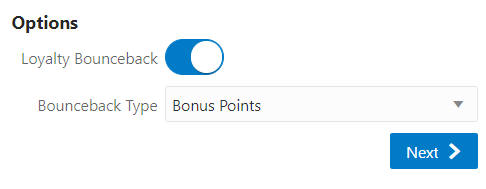
Optional - Slide the Loyalty Bounceback toggle to ON to activate.
Figure 5-12 Loyalty Bounceback - Activated
-
Select a Bounceback Type.
-
Bonus Points
-
Entitlements
-
Note:
Loyalty Bounceback configuration occurs in Step 12, the Offers tab.
-
-
When finished entering the Campaign and Promotion information, click Next to continue to the Franchisees tab.
Note:
This tab will only display if the
EnableFranchiseSupportconfiguration is enabled, and Franchisees have been created. -
By default, all franchisees are assigned to the promotion. To make changes to those assignments, do the following:
Figure 5-13 Franchisees Tab

Assigning a Franchisee
-
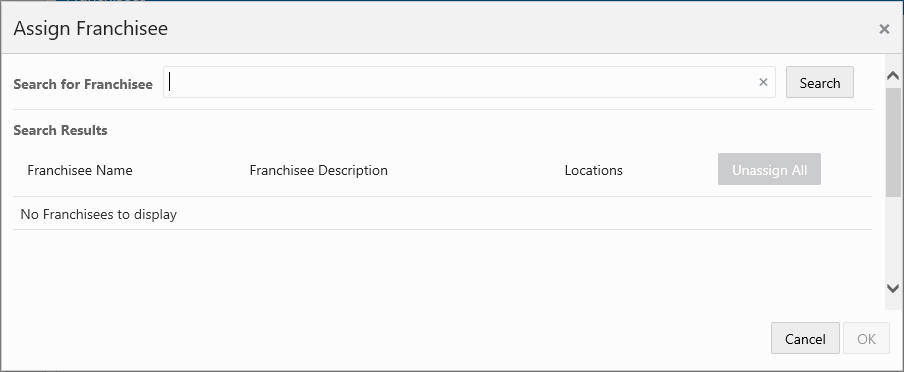
Click the Actions Menu, then, click Assign, or click the Add (+) icon. This opens the Add Franchisee window.
Figure 5-14 Assign Franchisee
-
In the Search for franchisee search box, enter part or all of the Name, ID, or Description, then click Search.
Note:
You can also leave blank and click Search to return all Franchisees.
-
To change the assignment from ALL (which is defaulted) click Assign on just the specific franchisees you wish to assign for this promotion. Only Franchisees associated with the user are displayed in the list.
-
Click OK to accept the changes or Cancel to close the window without saving.
Figure 5-15 Confirmation Notification

Note:
A confirmation notification appears to confirm the franchisee has been assigned.
Deleting a Franchisee
-
In the included Franchisees window, highlight the desired row.
-
Click the Action Menu, and click Delete, or click the X icon.
Note:
A confirmation notification appears to confirm the franchisee has been deleted.
-
-
When finished entering the Franchisees information, click Next to continue to the Locations tab.
-
Enter the following for the Locations tab:
Figure 5-16 Locations Tab
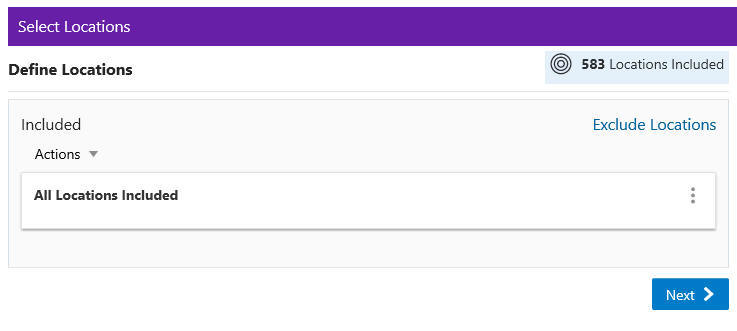
Define Locations
Note:
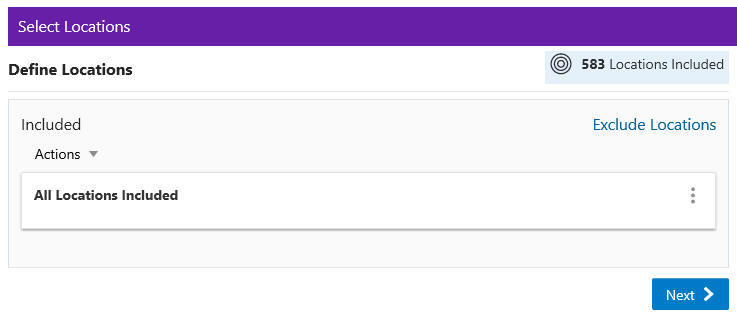
By default, ALL locations are added to the promotion. You can select the Overflow Menu to edit the list of locations to include.
-
Included
-
If you wish to change the Locations assigned to this Promotion, click the Overflow Menu, then click Edit. This opens the Edit Location Rule window.
Figure 5-17 Edit Location Rule (Include)
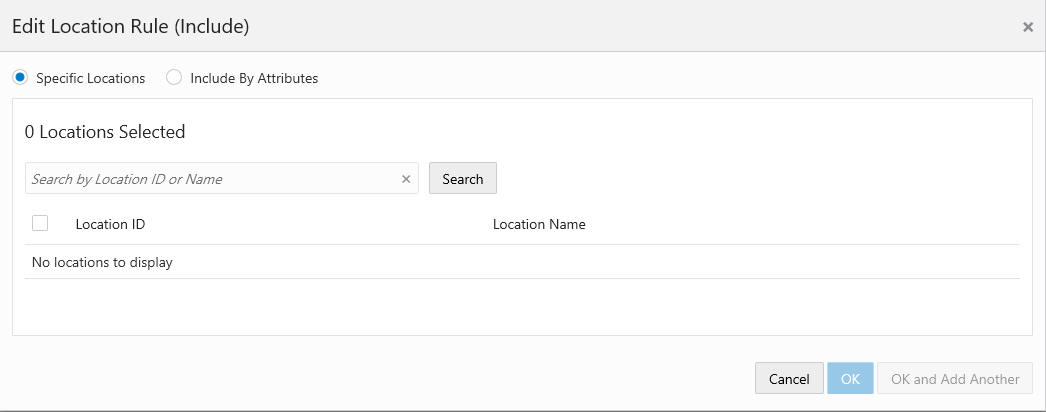
Specific Locations
-
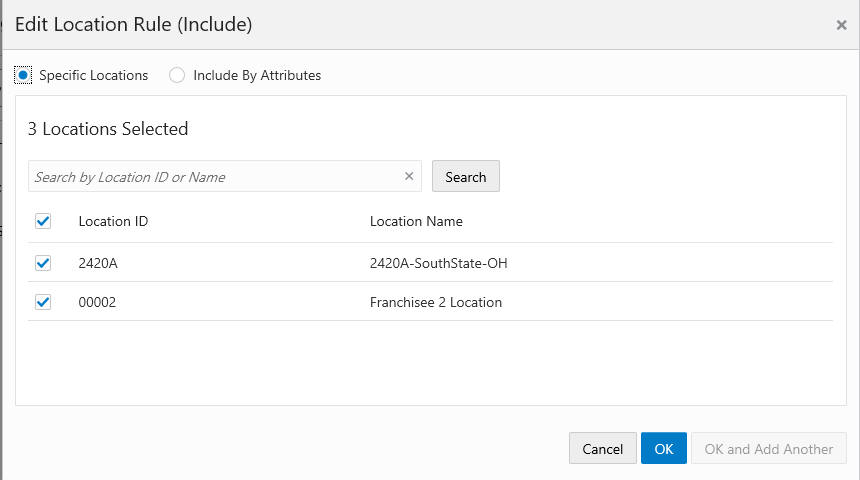
Click the Specific Location option.
Figure 5-18 Edit Location Rule (Include) - Specific Locations
Note:
The Location ID check box at the top of the list enables you to deselect or select all locations. If you deselect all the locations, then you can scroll through the list or search for a specific location.
-
Enter part or all of a Location ID or Name.
-
Click Search.
-
Click Add to select a location.
-
Click Add for another location means you are using the condition AND. Both conditions must be met.
-
Click OK and Add Another to keep you in the same search results and use the condition OR. One or more of the conditions must be met when you click Add for another location.
-
Click Ok to close the window, or click Cancel to close the window without saving.
Include by Attributes
-
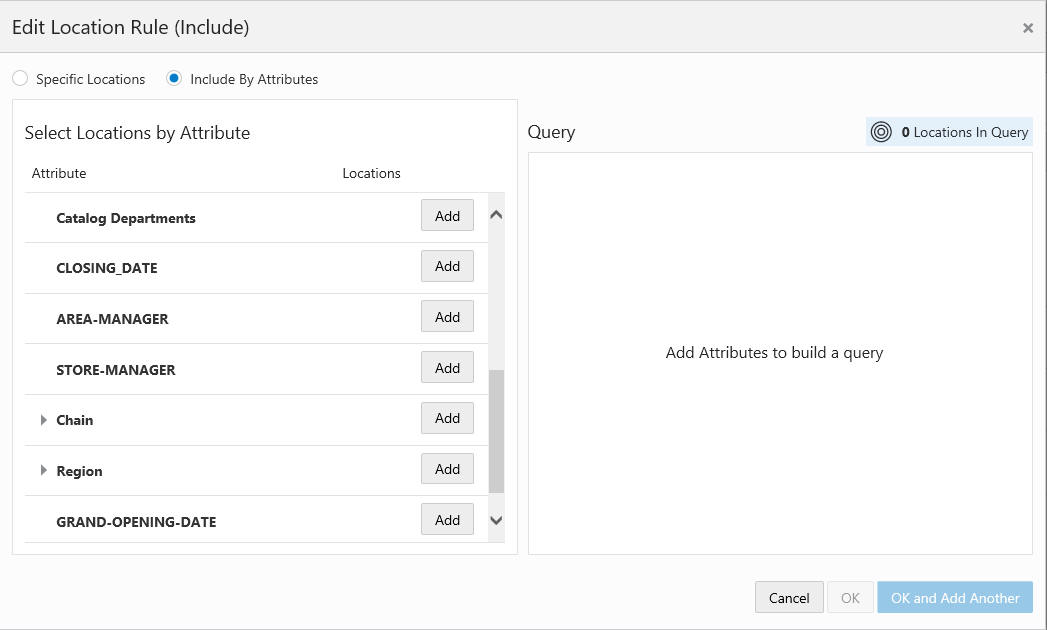
Click the Include by Attributes option.
Figure 5-19 Edit Location Rule (Include) - Include by Attributes
Note:
A list of attributes enables you to add one more attributes in order to create a query to select only the locations that fit the requirements.
-
Click Add to select an attribute. Some Location Attributes can be collapsed or expanded. They will default to collapsed to allow you to scroll thru the list easier and expand the attributes they you to add.
-
Click Add for another attribute means you are using the condition AND. Both conditions must be met.
-
Click OK and Add Another to keep you in the same window and use the condition OR. One or more of the conditions must be met when you click the Add button for another attribute.
-
Click OK to close the window, or click Cancel to close the window without saving.
-
-
Excluded Locations - This option allows you to select specific locations to exclude from the promotion.
-
Click the Exclude Locations link.
Figure 5-20 Select Locations
Specific Locations
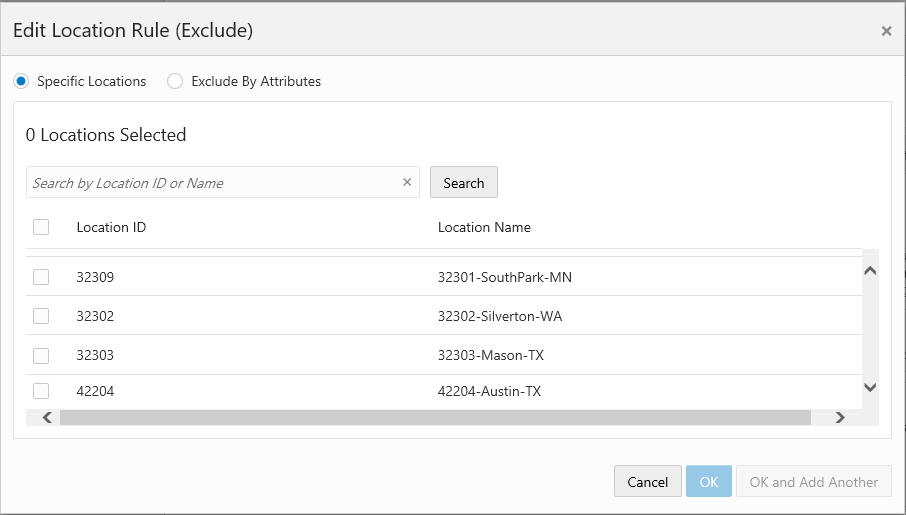
Figure 5-21 Edit Location Rule (Exclude) - Specific Locations
-
Click the Specific Location option.
Note:
The Location ID check box at the top of the list enables you to deselect or select all locations. If you deselect all the locations, then you can scroll through the list or search for a specific location.
-
Enter part or all of a Location ID or Name.
-
Click Search.
-
Click Add to select a location.
-
Click Add for another location means you are using the condition AND. Both conditions must be met.
-
Click OK and Add Another to keep you in the same search results and use the condition OR. One or more of the conditions must be met when you click Add for another location.
-
Click OK to close the window, or click Cancel to close the window without saving.
Exclude by Attributes
-
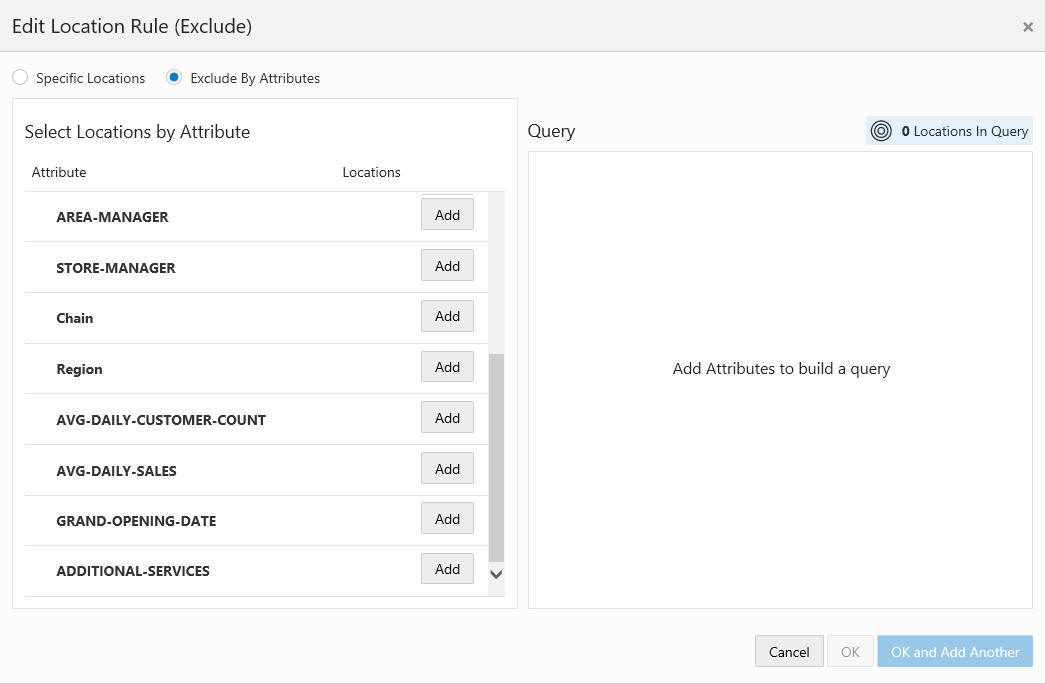
Click the Exclude by Attributes option.
Figure 5-22 Edit Location Rule (Exclude) - Exclude By Attributes
-
Click Add to select an attribute. Some Location Attributes can be collapsed or expanded. They will default to collapsed to allow you to scroll thru the list easier and expand the attributes they you to add.
-
Click Add for another attribute means you are using the condition AND. Both conditions must be met.
-
Click OK and Add Another to keep you in the same window and use the condition OR. One or more of the conditions must be met when you click Add for another attribute.
-
Click OK to close the window, or click Cancel to close the window without saving.
-
-
When finished entering Locations for the Promotion, click Next to continue to the Offers tab.
-
To begin the Offers tab, take the following actions:
There are two methods to add offers, either:
-
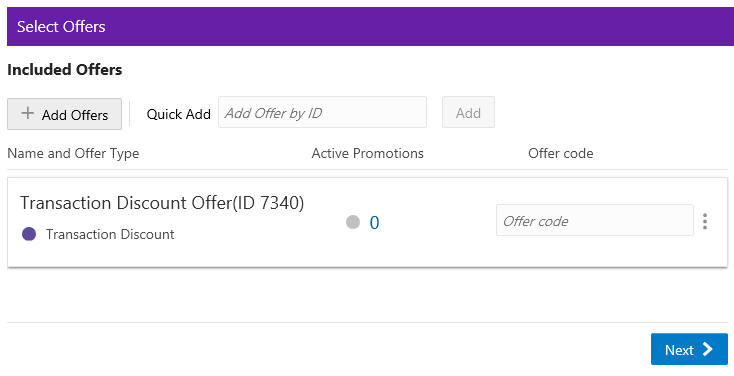
Select the Quick Add option to search for a known Offer ID.
-
Click +Add Offers for an Advanced Offer Search.
Figure 5-23 Offers Tab
Note:
Refer to Figure 5-23 to enter the Offer Code field. A retailer can use it to qualify or track a particular offer.
-
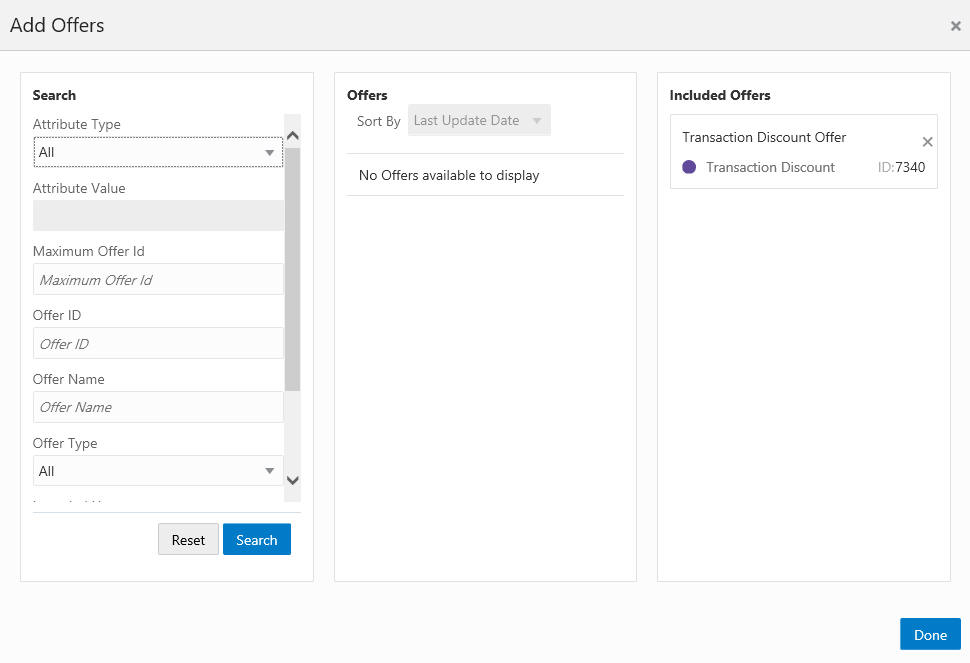
Click + Add Offers. The Add Offers window enables you to search for offers to include in the promotion. Once you receive the results of the search you can sort the results, if desired for easier selection, before adding them to the promotion. Those offers appear in the Included Offers panel.
Figure 5-24 Add Offers
-
In the Search section, enter any or all of the following information:
-
Attribute Type – Search for an Offer by the Attribute assigned to the Offer. The default is ALL.
-
Attributes Value - Type-ahead search according to the Attribute Type selected.
-
Maximum Offer ID – Highest Offer ID number you wish to limit the search to. This will return that offer ID and all others with a lower number.
-
Offer ID – This Text Field searches all the Offers currently present in the application. The default is an empty field.
-
Offer Name – Name of the Offer.
-
Offer Type – Search the Offer by Offer Type (Single Select). Depending on the Parameter value set in System Configuration (Offer Types), the value is populated in the list of options. The following list shows the Possible Offer Types:
All (Default)
Buy X Get X
Buy X Get Y
Fixed Quantity/Price
Gift with Purchase
Kit
Line Item Discount
Tiered Discount
Transaction Discount
-
Intended Use – The type of Promotion associated with the Offer you are searching for.
-
-
Click Search.
Note:
Note: To retrieve all the offers in the system, select Search without entering any search criteria. All offers are returned to the Offers results section. From there, you can scroll through the list to choose which offers to add.
To clear the search fields and restore default selections in the search page, click Reset.
-
Upon selecting Search, the results display in the Offers section. Use the Sort by list to sort by the following options:
-
Last Update Date
-
Offer Name
-
Offer Type
-
Intended Use
-
Offer ID
-
-
In the Add Offers window, you can select any of the offers in the Include Offers section and remove them by selecting the X in the top right corner of the Offer. Click Add to include the offers in the promotion.
-
When finished selecting offers to add to the Promotion, select Done, which returns you to the Select Offers window.
-
On the Select Offers window, you can select the Remove option from the Overflow Menu to remove an offer from the promotion.
-
Enter the Offer ID in the Quick Add field and then click Add to also add offers to a promotion.
Figure 5-25 Select Offers Quick Add

Note:
The following two configuration options only appear when Loyalty Bounceback is activated in the Information tab.
Bonus Points - Points Bounceback options appear when Bonus Points is selected in the Information tab. From the Points Bounceback drop-down list, select one of the following options:
Figure 5-26 Points Bounceback - Fixed

-
Fixed - Identifies the amount awarded as loyalty incentive points to the user's account upon meeting the promotion requirements. Define the amount of points added by entering a value or using the up and down arrows to increase/decrease the number of points awarded.
Figure 5-27 Points Bounceback - Multiplier

-
Multiplier - Multiplies the number provided by the user by the dollar amount of the item to award the correct Loyalty Bounceback point amount upon meeting the promotion requirements.
-
None - No bonus points are assigned.
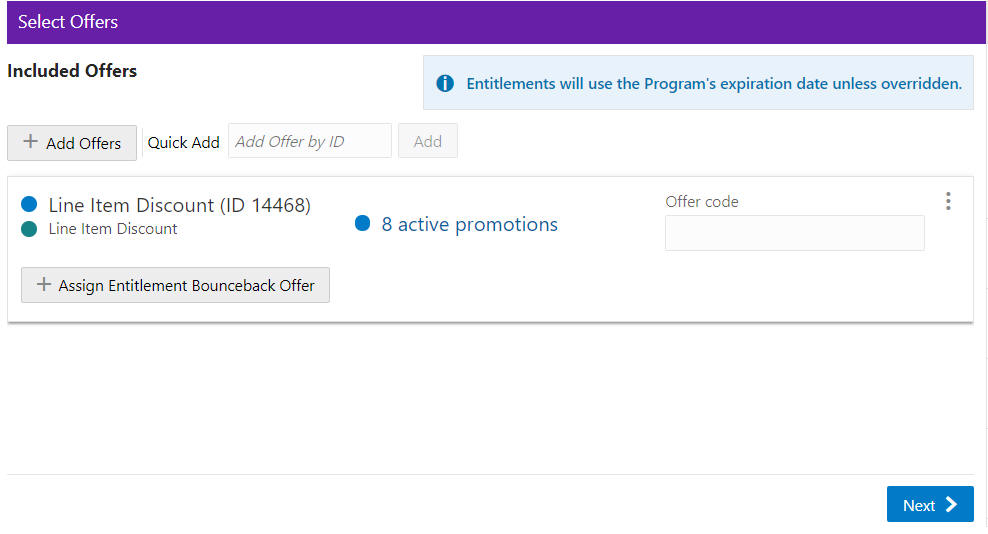
Entitlements - Entitlement configuration options appear when Entitlements is selected in the Information tab.
Figure 5-28 Offers Tab - Assigning Entitlements
-
Click the + Assign Entitlement Bounceback Offer button.
-
Assign an Entitlement Offer in the same way you assigned an Offer as shown within in this step.
Note:
The available Intended Use type for an Entitlement Bounceback is Entitlement. All other Intended Uses are disabled.
Figure 5-29 Expiration Types (Optional)
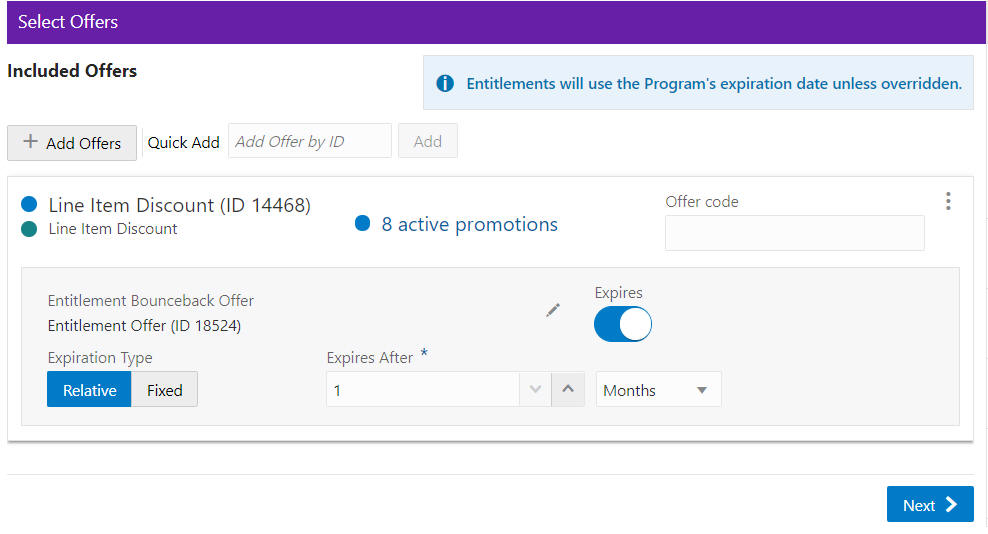
Optional: Configure the Offer Expires options. Click the Expires slider shown in Figure 5-29 to activate the following expiration types:
-
Expiration Type: Relative (default)
-
Enter a Value or click the Up/Down arrows to increase/decrease the value in the Expires After field.
-
Click the drop-down list to indicate Days, Months (default), or Years.
-
-
Expiration Type: Fixed
-
Click the Start Date field to use the Date Editor (required).
-
Click the End Date field to use the Date Editor (required).
-
-
The Overflow Menu for Entitlement Bounceback Offers include the following options:
-
Copy Bounceback Entitlement to all other Offers - Copies the expirations rules to all other entitlement bounceback offers selected. They will take the exact same rules from the selected entitlement bounceback. Doing this will overwrite any existing bounceback details selected.
-
Remove - Removes the offer and the bounceback entitlement offer.
-
Remove the Bounceback Entitlement - Removes the bounceback entitlement offer only. The offer remains available to add an entitlement bounceback offer.
-
-
-
When finished entering Offers for the Promotion, click Next to continue to the Attributes tab.
-
Enter the following for the Attributes tab.
Figure 5-30 Select Attributes
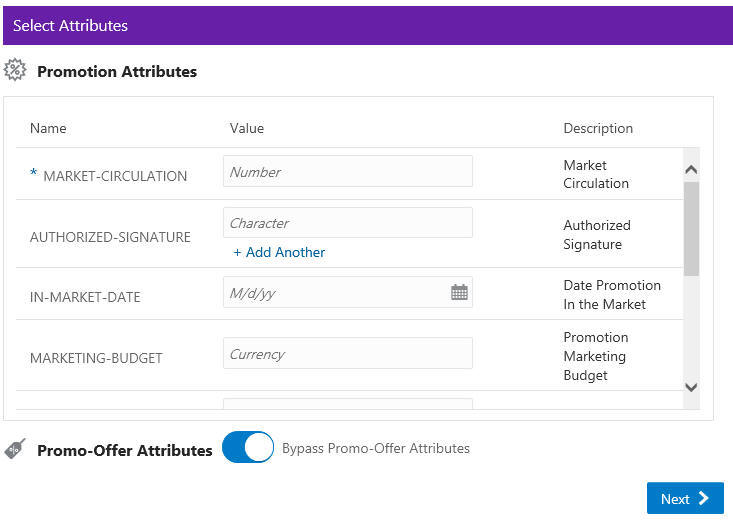
Complete values for any Promotion Attributes and Promo-Offer Attributes you want added to the promotion. Fields marked with an asterisk are required.
-
Promo-Offer Attributes Switch – Determines whether Promo-Offer attributes are used for this Promotion event:
-
On – The Promo-Offer Attributes switch defaults to ON, which means the step is bypassed and values for any defined Promo-Offer Attributes will not be required or added to the Promotion.
-
Off – When the Promo-Offer Attributes switch is set to OFF, it means that values for Promo-Offer Attributes will need to be defined and added to the Promotion.
-
-
-
When finished adding Attributes for the Promotion, click Next.
-
If the Promotion Type is Coupon, go to Step 16 to continue to the Coupons tab.
-
If the Promotion Type is Product, go to Step 21 to continue to the Audience tab.
-
If the Promotion Type is Message, go to Step 21 to continue to the Audience tab.
-
If the Promotion Type is Award, go to Step 33 to continue to the Budget tab.
-
-
Enter the following for the Coupons Tab.
-
If you did not select the Serialized Coupon switch in Step 3, proceed to Step 17.
-
If you did select the Serialized Coupon switch in Step 3, proceed to Step 19.
Coupon Serialization - Disabled
The following graphic depicts the options when Coupon Serialization is Disabled:
Figure 5-31 Coupon Codes Tab: Serialization - OFF

-
-
For each Offer that was added to the Promotion, as separate section will appear to complete these fields listed below.
-
Coupon Code - Enter a 6 digit code to be used for the coupon.
Note:
Values may be generated systematically, provided the PromoCouponCodeManagement configuration is enabled. Contact your system administrator regarding configurations.
-
Media Description – Description of the Media for the Coupon
-
Estimated Distribution – Estimated Distribution specified for Media for the Coupon
-
Click + Add Coupon Code to add another coupon to the Offer for Promotion.
-
To delete Coupons from an Offer, click X for that row.
-
-
When finished adding Coupon information for the Promotion, click Next to continue to the Audience tab. Proceed to Step 21.
Coupon Serialization - Enabled
Figure 5-32 depicts the options when Coupon Serialization is Enabled.
Figure 5-32 Coupon Codes Tab: Coupon Serialization - ON

-
For each Offer that was added to the Promotion, as separate section will appear to complete these fields listed below.
-
Coupon Prefix - Enter a 6 digit prefix to be used for the coupon.
Note:
Values may be generated systematically, provided the PromoCouponCodeManagement configuration is enabled. Contact your system administrator regarding configurations.
-
Media Description – Description of the Media for the Coupon
-
Click + Add Coupon Code to add another coupon to the Offer for Promotion.
-
To delete Coupons from an Offer, click X for that row.
-
-
When finished adding Coupon information for the Promotion, click Next to continue to the Audience tab.
-
Take the following actions for the Audience tab.
Figure 5-33 Audience Tab
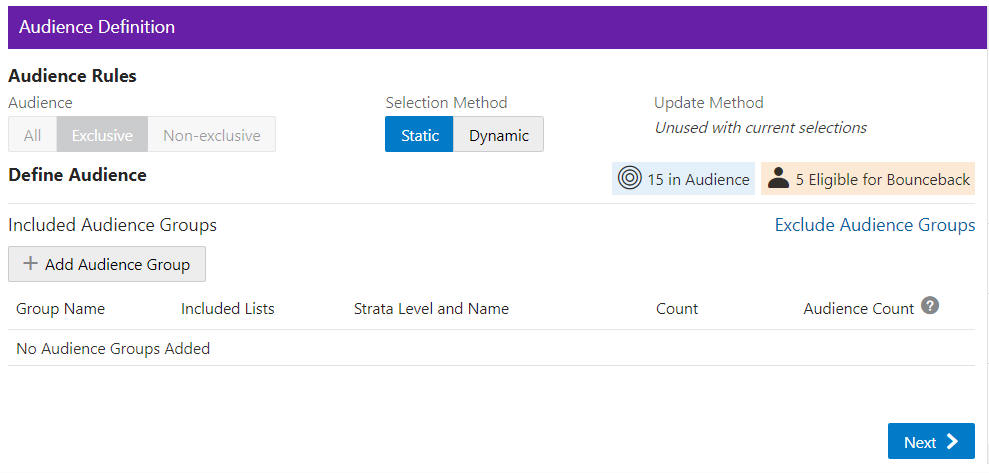
Audience Rules – Select All, Exclusive, or Non-Exclusive to define the audience.
-
If you select ALL, it means this promotion is open to anyone who responds to the sale – everyone who buys items on the promotion get the Offer.
-
The category All is defaulted when you open the Audience Window. Make no changes and advance to the next tab to add all customers to be targeted for this promotion.
Exclusive Targeting - If you create an exclusive targeted promotion, this means that only the customers you've identified in your target group are eligible to receive the promotion at the point of sale.
Non-Exclusive Targeting - If you create a non-exclusive targeted promotion, all customers are eligible for the promotion.
-
The Exclusive and Non-Exclusive options operate the same - the difference is only if the Promotion is exclusive to just those customers or non-exclusive for the groups selected. The Static and Dynamic selections apply to both.
-
Static – Only customers defined at this time are considered eligible for the promotion.
-
Dynamic – Dynamic can not only add customers but also remove customers that no longer apply. When Dynamic is selected, Update Method is available.
New audience members will be added – When the Dynamic Promotions job runs, any new customers found that meet the criteria, are added to the audience. All customers currently in the audience will remain in the audience.
Audience members can be added and removed – When the Dynamic Promotions job runs, any new customers found that meet the criteria, are added to the audience. Additionally, only the customers that meet the criteria will be included in the audience. If the customer is in the audience before the job runs, but no longer meets the criteria, the customer will be removed from the audience.
-
Define Audience - Included Audience Groups
-
Click + Add Audience Group.
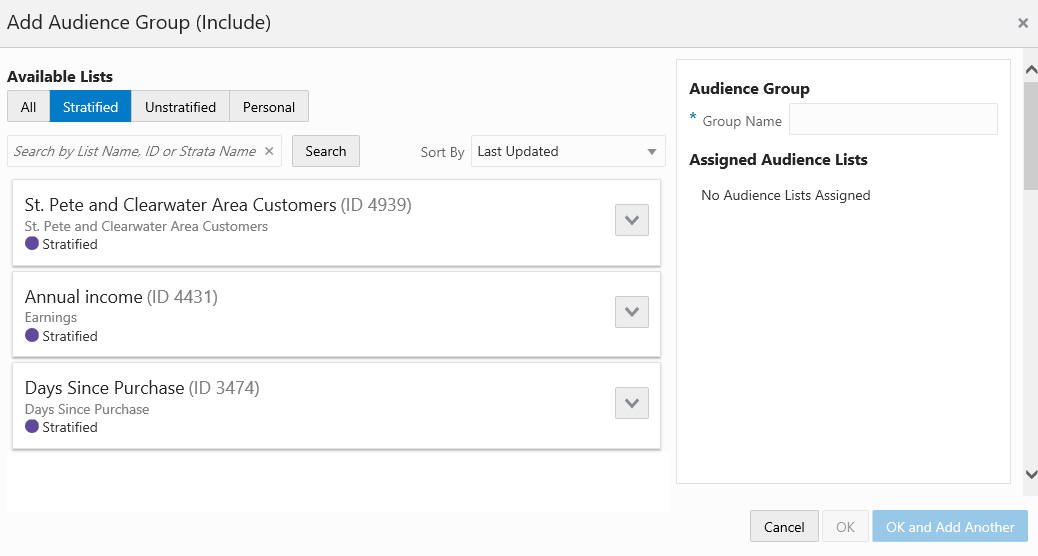
Figure 5-34 Add Audience Group (Include)

-
Select an Available List type
All - Default
Stratified - The Customers within a Stratified list are divided into levels.
Unstratified - Customers maintained by the user.
Personal - Customers maintained by the user.
-
In the Search field, enter some or all of the List Name, ID, or Strata Name.
-
Click Search. The results can be sorted by using the Sort by list menu with the following options:
Last Updated
Name
Customer Count
-
Enter a Group Name.
When lists are added from the Available Lists area, they appear in the Audience Groups section of the window. The Audience Group section Group Name automatically defaults to the name of the first list added. You can change the Group Name to something more meaningful to describe the group of customers, if desired.
Figure 5-35 Add Audience Group (Include)
-
Click Add to add the selection Assigned Audience Lists.
-
Click Add for another list means you are using the condition AND. Both conditions must be met.
-
Click OK and Add Another to keep you in the same window and use the condition OR. One or more of the conditions must be met when you click Add for another Audience Group.
Figure 5-36 Audience Definition
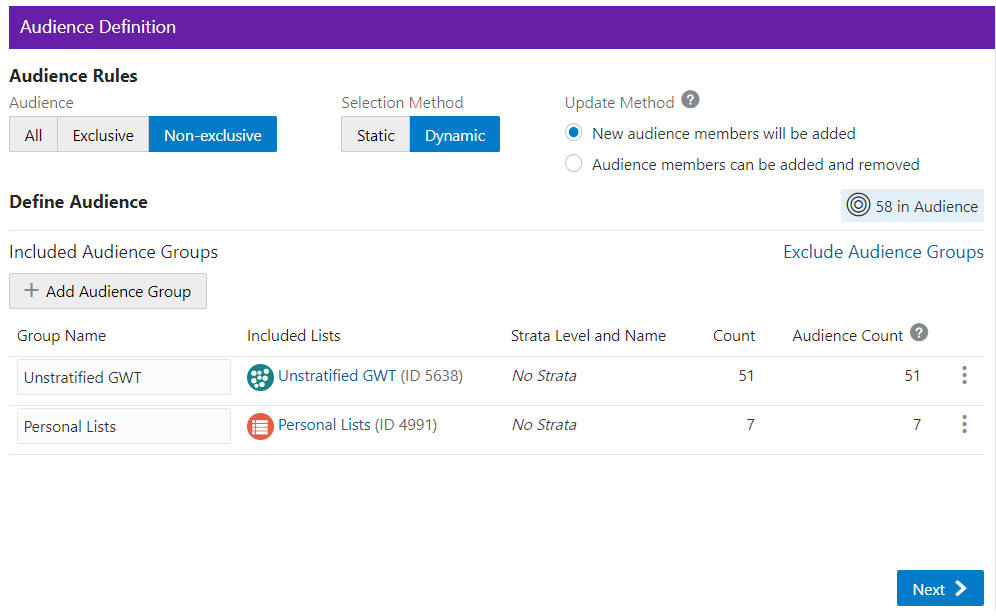
As shown in Figure 5-36 the Count is shown for each audience group. In the Audience Rules section the Audience Count is provided on the right hand side.
Columns include the following details:
-
Group Name
-
Included Lists
-
Strata Name and Level (if applicable)
-
Count
-
Audience Count
Each Group Name has an Overflow Menu Icon where you can Edit or Remove the Audience Group from the list.
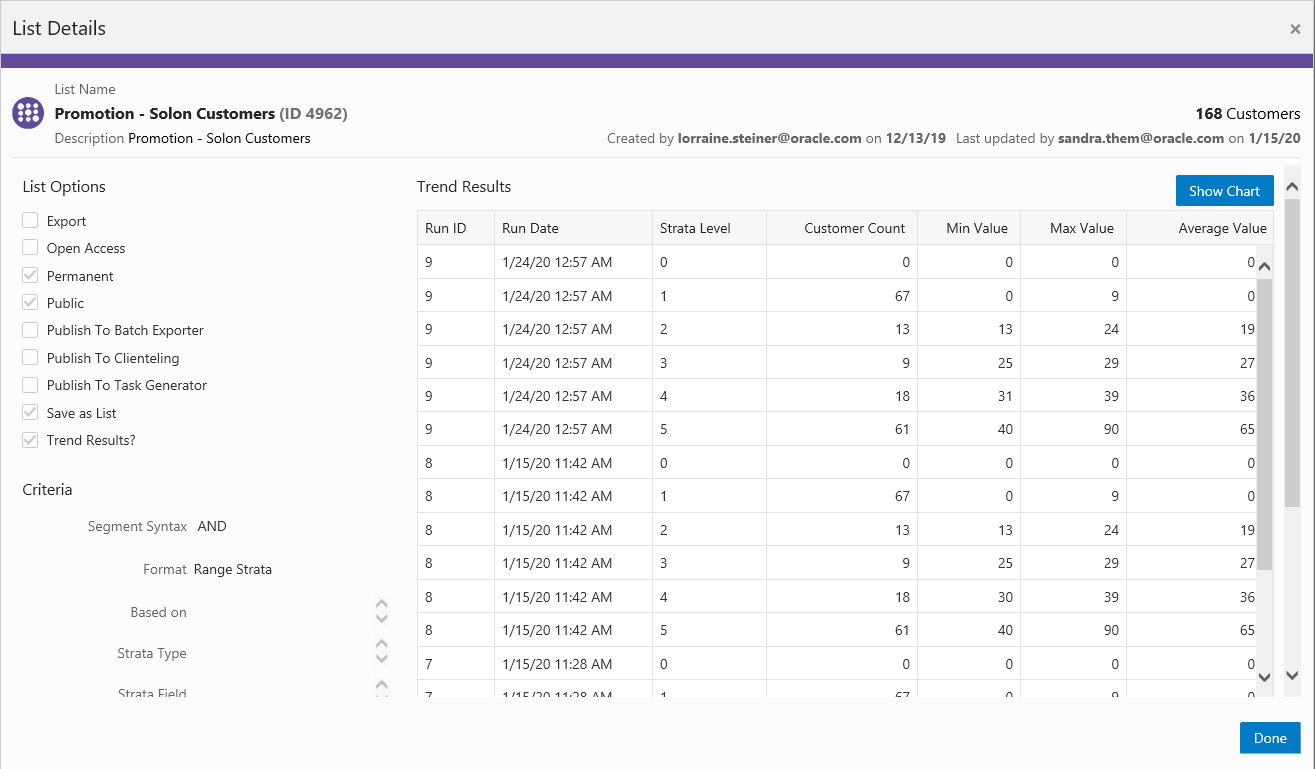
The Included Lists column displays a link on that list (also known as a segment) and that link will open to the Audience List Details window.
In this window, the following sections may display, depending on the type of list and which of the options were selected when the list was created:
-
List Options section
-
Criteria section
-
Trend Results section
-
Strata Levels section
-
Attributes section
-
Franchisees section
-
Message section
-
Scheduled Jobs section
Figure 5-37 List Details
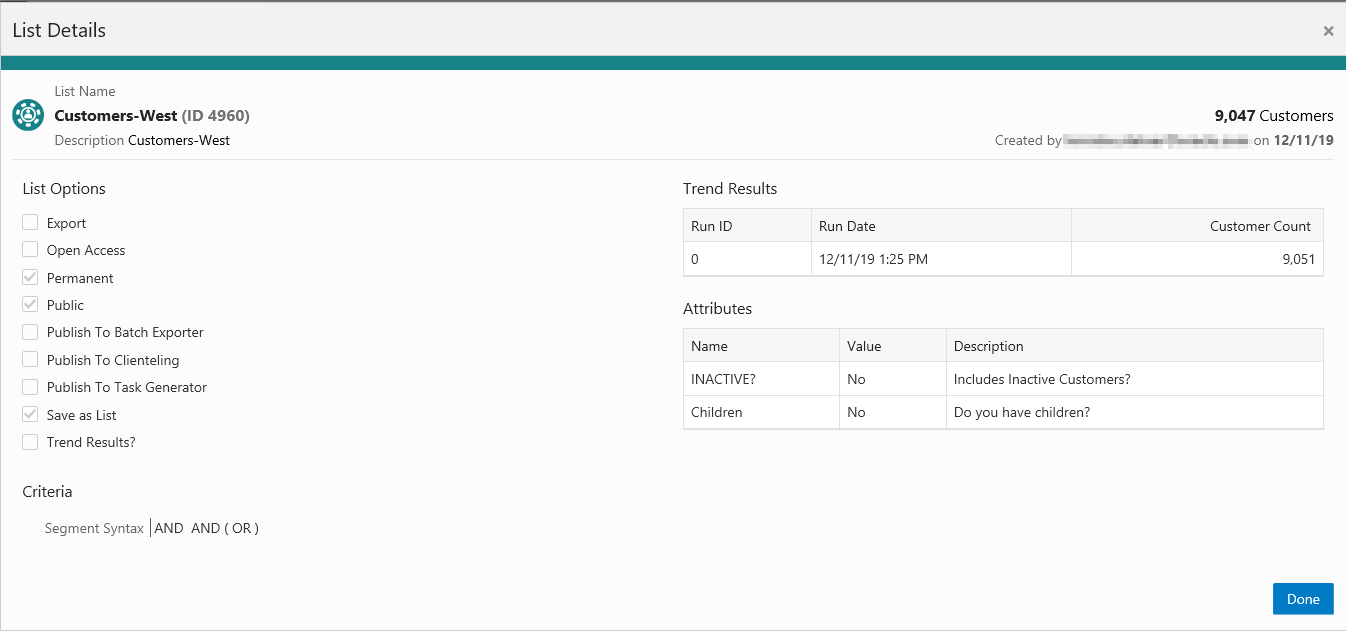
The checked List Options vary by the selections made when the list was created, and may include the following fields:
-
Export – Indicates whether the Segment list is automatically exported after the Segment Query is run.
-
Open Access – Indicates whether the Segment has Open Access.
-
Permanent – Indicates whether the Segment is kept in the system, even if it meets the criteria for deletion by the housekeeping job.
-
Public – Indicates whether the Segment is Public.
-
Publish to Batch Exporter – Indicates whether the Segment has been made available for export to a Marketing system.
-
Publish to Clienteling – Indicates whether the Segment has been made available to the Clienteling module.
-
Publish to Task Generator – Indicates whether the Segment has been made available to the Task Generator Job.
-
Save as List – Indicates whether a list of matching Customer IDs is created when the Segment is created.
-
Trend Results – Indicates whether the results of the Segment run are kept to provide trend information about the Segment.
Figure 5-38 displays the Trend Results in a chart. A user can scroll down to see a table as shown in Figure 5-39, which for this segment shows the Strata Levels Against Customer Age and displays the strata that are shown in the graph.
Figure 5-38 List Details Trend Results - Chart
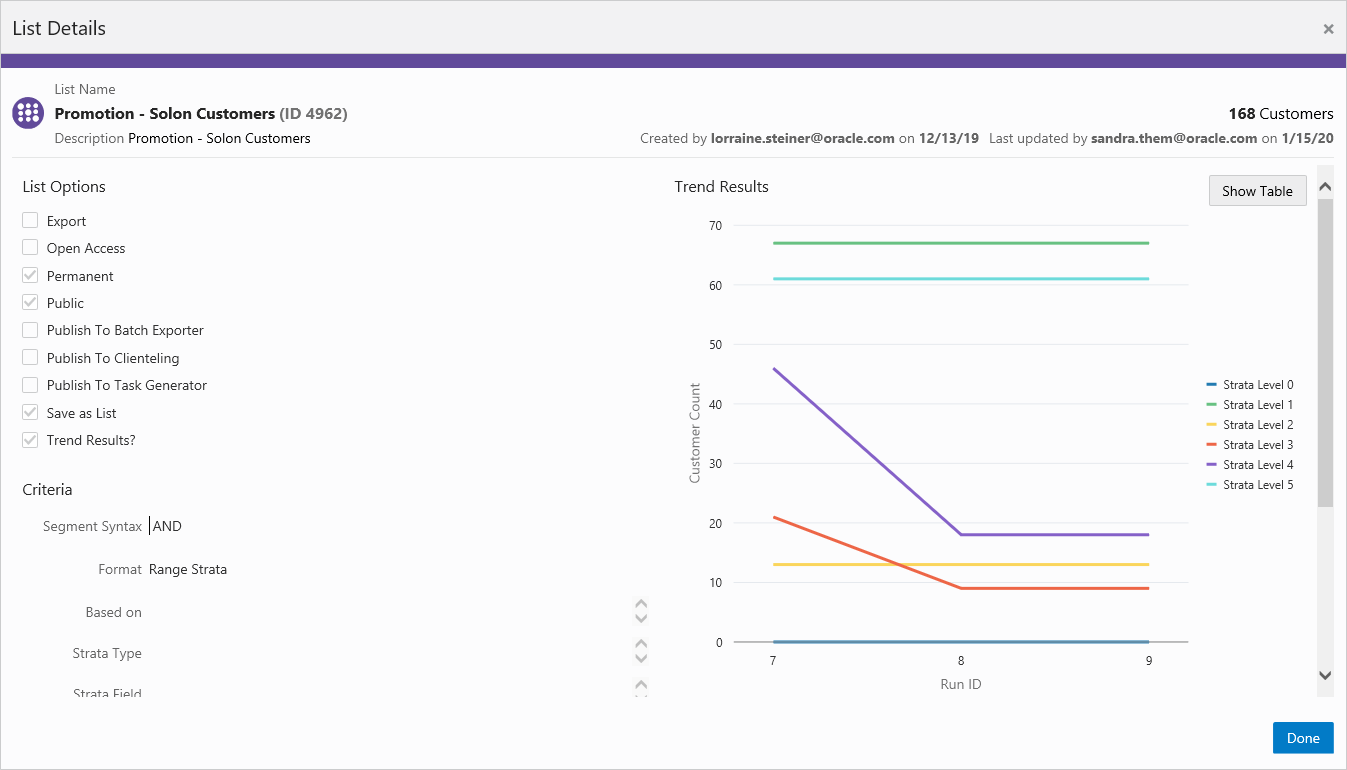
Figure 5-39 Trend Results Graph - Table
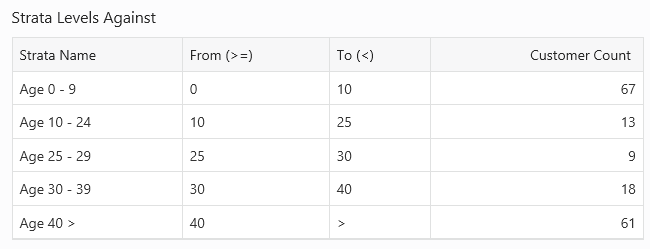
Figure 5-40 List Details Trend Results - Table
-
Click Done to close the Audience List Details window.
Figure 5-41 Audience Definition - Exclude Audience Groups
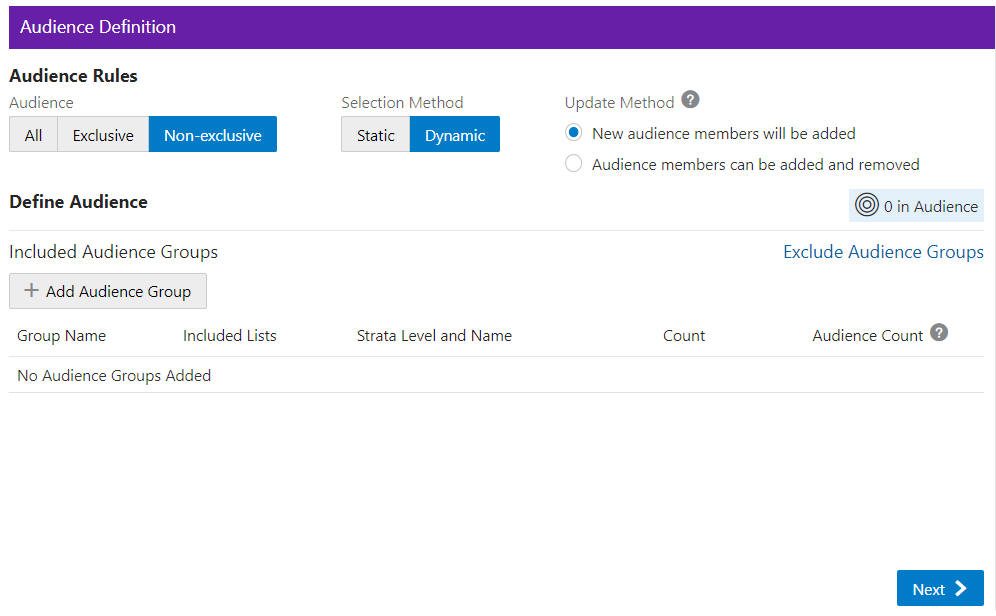
Exclude Audience Groups - If you wish to exclude certain groups of customers that may also be a part of the Included Group, you can do that by selecting the Exclude Audience Groups link, which opens a new section in the Audience Definition window
-
Select the Exclude Audience Groups link.
-
Click + Add Audience Group.
-
Select an Available List type.
-
-
All – Default group listing.
-
Stratified – The Customers within a Stratified list are divided into levels.
-
Unstratified – The Customers within an Unstratified list are not differentiated into separate groups.
-
Personal – User created groups.
-
-
In the Search field, enter some or all of the List Name, ID, or Strata Name.
-
Click Search.
-
The results can be sorted by using the Sort by list menu with the following options:
-
Last Updated
-
Name
-
Customer Count
-
-
Enter a Group Name.
-
Click Add to add the selection Assigned Audience Lists.
-
Click Add for another list means you are using the condition AND. Both conditions must be met.
-
Click OK and Add Another to keep you in the same window and use the condition OR. One or more of the conditions must be met when you click Add for another Audience Group.
-
-
When finished entering all Audience Groups for the Promotion, click Next.
-
Enter the following for the Filtering Audience tab.
Figure 5-42 Filtering Audience Tab
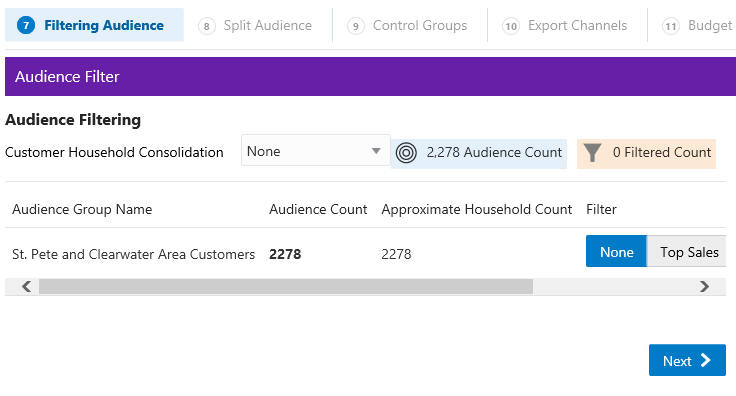
Use the Customer Household Consolidation Selection Menu to indicate whether the Promotion will use household consolidation, and the rule for determining the Customer who is the head of household.
-
None – Do not perform household filtering.
-
LT Sales – Select head of household based on amount purchased over the lifetime of their account.
-
LT Transaction Count – Select head of household based on lifetime number of transactions.
-
Last Transaction Date – Select head of household based on the Customer who performed the most recent transaction.
-
Customer Attributes – Select head of household based on the Customer's numeric attributes.
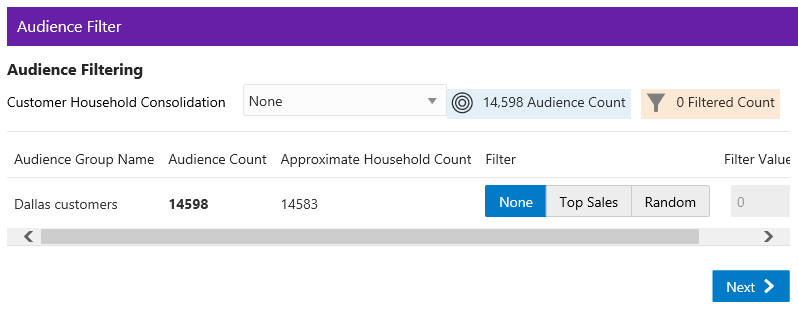
Select the Filter Type for each Audience:
Figure 5-43 Select Desired Filtering
-
None - [DEFAULT] All Customers in the Audience Group are eligible.
-
Top Sales - Customers from the Audience Group will be chosen for eligibility by the greatest total amount of purchases.
-
Random - Customers from the Audience Group will be chosen randomly for eligibility.
Enter a filter value to indicate the number of customers eligible for the promotion.
-
-
When finished entering any household filtering for the Audience Groups for the Promotion, click Next to continue to the Split Audience tab.
-
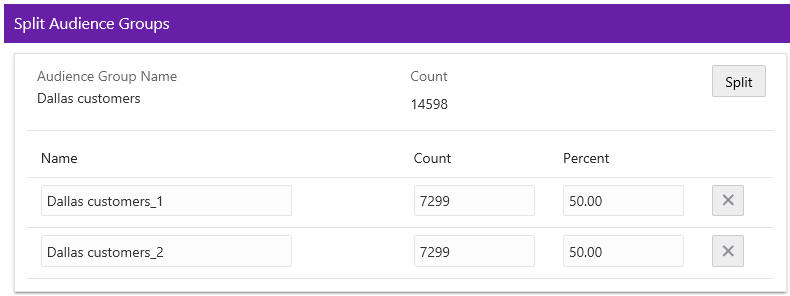
In the Split Audience tab, filtered audiences can, optionally, be split into smaller, separate audiences. If desired, create splits for the filtered audiences on the promotion.
-
Click Split.
Figure 5-44 Split Audience Groups
-
The Split Name field is automatically populated from the name of the Audience Group Name. If desired, you can change the name of the splits in this step.
-
Select Split to automatically divide the Audience Group into equal portions and percentages. If you desire different portions or percentages for the splits, enter either a count or a percentage, and the corresponding field will update.
-
-
When finished entering any Audience Group splits for the Promotion, click Next to continue to the Control Groups tab.
-
Enter the following information for the Control Groups tab.
Figure 5-45 Define Control Groups
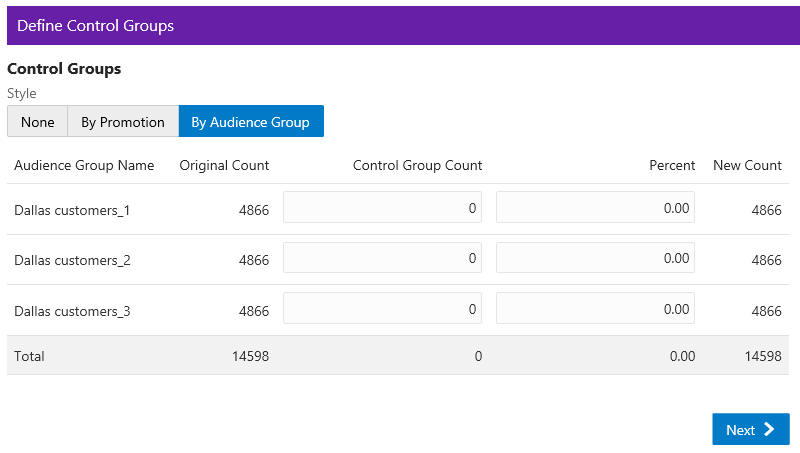
The control group is a statistically identical group that doesn't receive the offer. Following the promotional period, the results of the two groups are compared and you can determine if the offer generated incremental revenue. Options include:
-
None – No Control Group
-
By Promotion – Enter either a New Count or Percent. The corresponding field will update automatically to determine the size of the control group.
-
By Audience Group – Enter either a Control Group count or percentage for each split created earlier. The corresponding field will update automatically.
-
-
When finished entering any Control Groups for the Promotion, click Next to continue to the Export Channels tab.
-
Enter the following information for the Export Channels tab. The options include:
Figure 5-46 Export Channels Tab
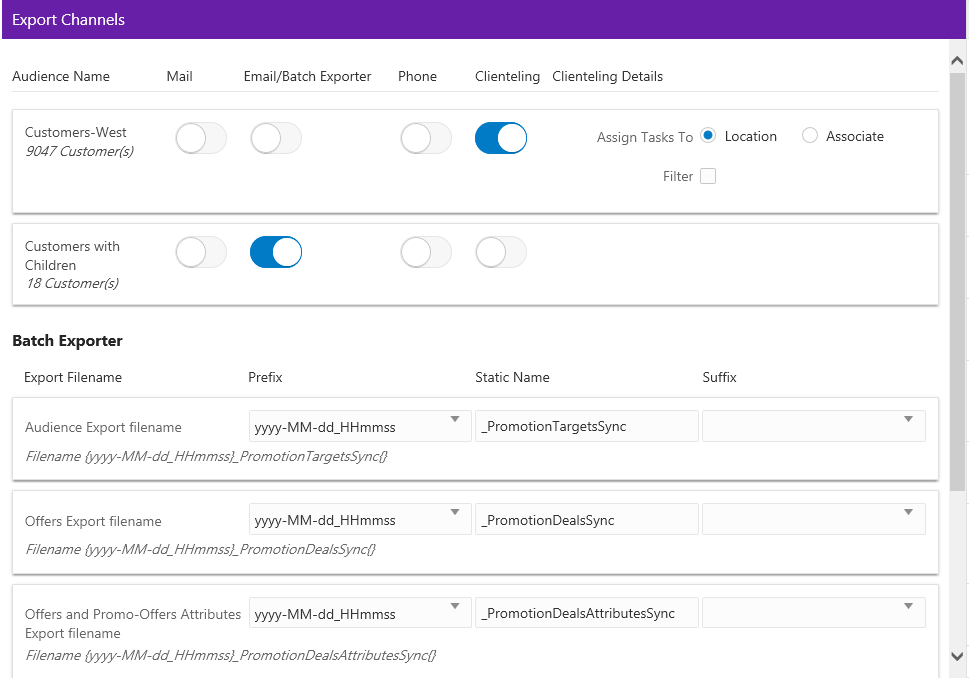
Mail - Determines whether the Customers in the Split/Control Group will be contacted by Mail.
EMail / Batch Exporter - Determines whether the Customers in the Split/Control Group will be contacted by Email.
Note:
The system configuration setting SupportedBatchExporters determines if the Batch Exporter section is displayed.
-
Export Filename – Name of the file.
-
Prefix – Indicates the format of the datetime stamp used as a prefix the filename. Optional. Possible settings are yyyyMMdd_HHmmss, yyyy-MMdd_HHmmss, or none.
-
Static Name – The identifying filename.
-
Suffix – Indicates the format of the datetime stamp used as a suffix the filename. Optional. Possible settings are yyyyMMdd_HHmmss, yyyy-MMdd_HHmmss, or none.
-
Filename – Displays an example of the export file name with the prefix and suffix format, if any.
Phone - Determines whether the Customers are contacted by phone.
Clienteling – When the Clienteling switch is turned on, tasks will be created based on the assigned associates or locations for the defined target audience when the promotion is generated.
Figure 5-47 Clienteling Details
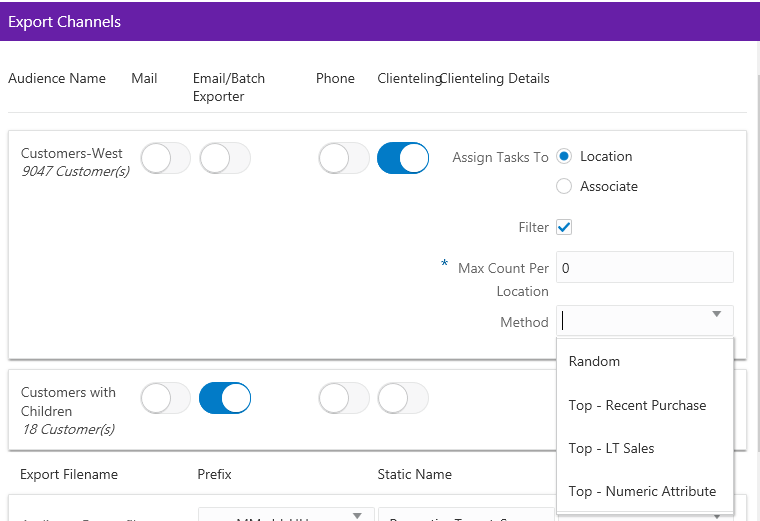
Assign Tasks to:
-
Location Channel – Tasks are assigned to a Location.
-
Associate Channel – Tasks are assigned to an associate in a location.
The following fields are enabled if the Filter option is selected:
-
Max Count Per <type> - Determines the maximum number of target Customers that will be contacted through the channel.
-
Method - Method used to select the Customers contacted. Options include:
-
Random - Select Customers Randomly (Default).
-
Top - Recent Purchase - Filter the Customers based on the most recent purchases.
-
Top - LT Sales - Filter the Customers based on the largest amount purchased over the lifetime of their account.
-
Top - Numeric Attribute - Filter the Customers based on the highest attribute value for a selected numeric attribute. If this option is selected, an additional Channel Filter option, Attribute, displays. Attribute is the numeric attribute used to determine the customers contacted
-
-
-
When finished entering any Export Channels for the Promotion, click Next to continue to the Event Definition tab.
-
Enter the following information on the Event Definition tab.
Note:
The Event Definition Tab displays only when the Promotion uses the Clienteling Channel.
Figure 5-48 Event Definitions Tab
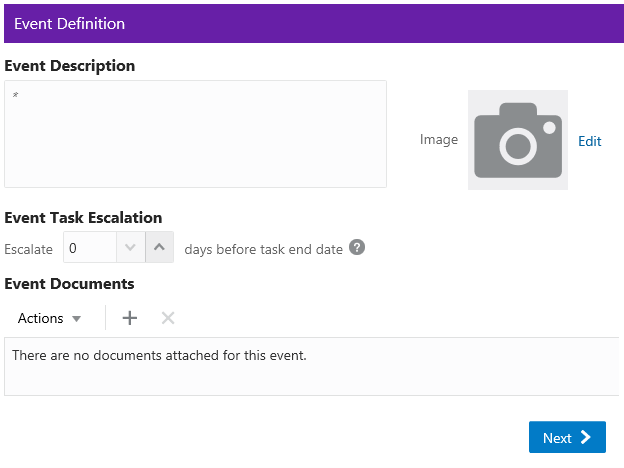
Enter a description of the Event in the Event Description field (required).
Select the Edit option to add an image to the Event.
-
Perform one of the following actions:
Click Drop a new image here or click to upload to add the image and continue to Step 31.b.
Enter a URL in Or Via URL and click Upload and continue to Step 31.b.
Click Remove Image to remove the image and continue to Step 31.b.
-
Click Done to save the changes and close the window, or click Cancel to close the window without saving any changes.
Event Task Escalation – This option will flag an Event Task for the promotion as high priority on the Day Planner Task panel based on the number days before the end date of the promotion event task.
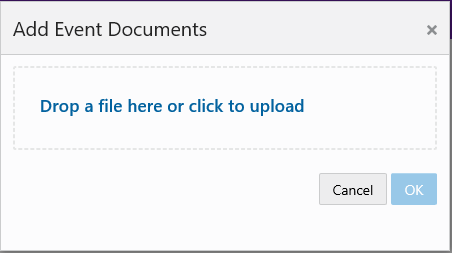
Event Documents – Click the Action Menu, and click Add, or click the Add icon (+) to open the Add Event Documents window.
Figure 5-49 Add Event Documents
-
Use the Drop a file here or click to upload area to add an event document.
-
Click OK to save the changes and close the window, or click Cancel to close the window without saving any changes.
-
-
When finished entering any Event Definitions for the Promotion, click Next to continue to the Budget tab.
-
Enter the following information on the Budget tab.
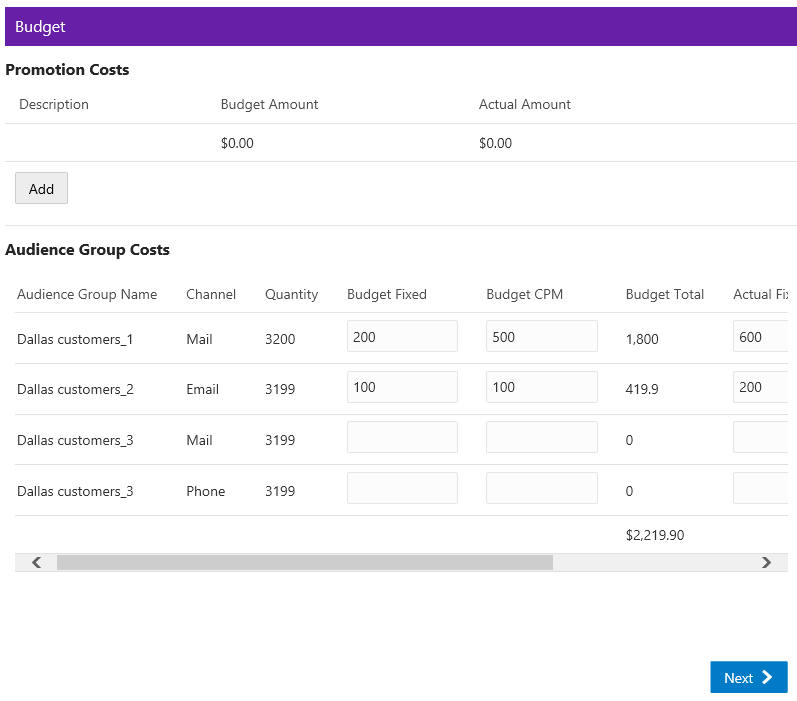
Figure 5-50 Budget Tab
-
Click Add to enter the Promotion Costs. Enter values in any field is optional.
-
Enter a Description of the cost item.
-
Enter the budgeted amount for the Promotion in the Budget Amount field.
-
Enter the actual amount for the Promotion in the Actual Amount field.
-
Click Add if you wish to enter another budget line for the promotion, then follow steps a-d to complete the fields.
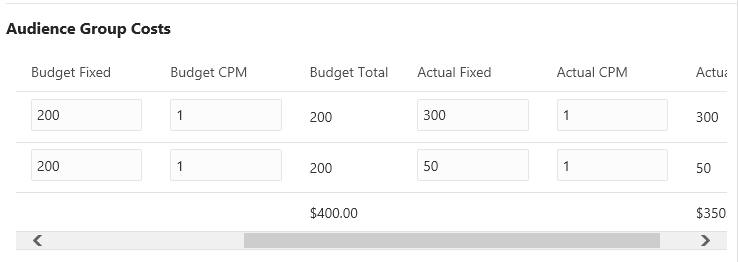
If Export Channels were selected for the audience group, the Audience Groups Costs section appears. Entering values in any field is optional.
Figure 5-51 Audience Group Costs
-
In the Budget-Fixed field, enter the fixed cost budgeted for the audience.
-
In the Budget-CPM field, enter the cost budgeted for the Channel for each 1,000 Customers.
-
In the Actual-Fixed field, enter the actual fixed cost of the Channel.
-
In the Actual-CPM field, enter the actual cost of the Channel for each 1,000 Customers.
-
Repeat steps f-i for each Target Channel in the Promotion.
-
-
When finished entering any Budget Costs for the Promotion, click Next to continue to the Save Options tab.
-
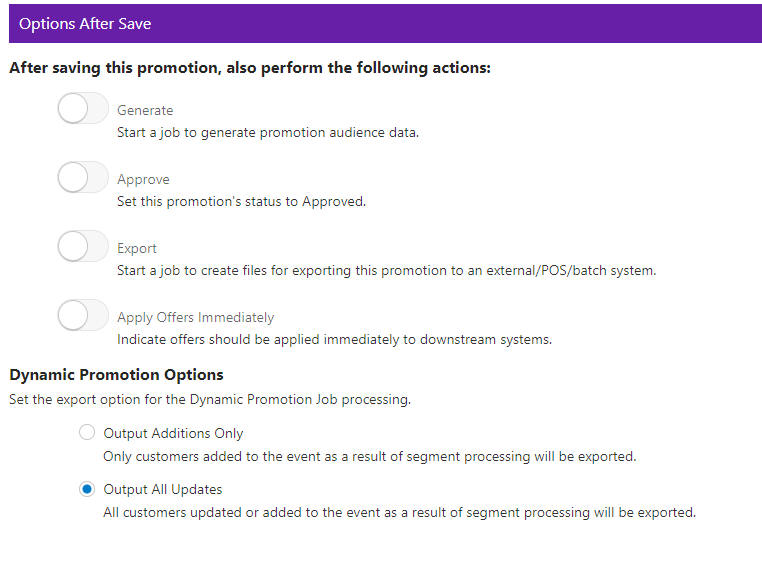
Enter the following information in the Save Options tab. You can enter more than one choice.
Figure 5-52 Options After Save Tab
-
Generate – Start a job to generate promotion audience data.
-
Approve – Set this promotion's status to Approved.
-
Export – Start a job to create files for exporting this promotion to an external/POS/batch system. This option automatically approves the Promotion.
-
Apply Offers Immediately – Indicates that offers should be applied immediately to downstream systems. This option is configurable.
-
Dynamic Promotion Options – Select one of the two export options for processing when using the Dynamic selection method on the Audience tab.
Note:
Depending on the type of promotion that you created, different Options After Save are available.
-
-
When finished entering any Save Options for the Promotion, click Next.
-
If the Promotion Type is Coupon go to Step 37 to continue to the Coupon Type Promotion Review tab.
-
If the Promotion Type is Product, go to Step 7 to continue in the Creating a Product Promotion Review tab.
-
If the Promotion Type is Message, go to Step 6 to continue in the Creating a Message Promotion Review tab.
-
If the Promotion Type is Award, go to Step 8 to continue in the Creating an Award Promotion Review tab.
-
-
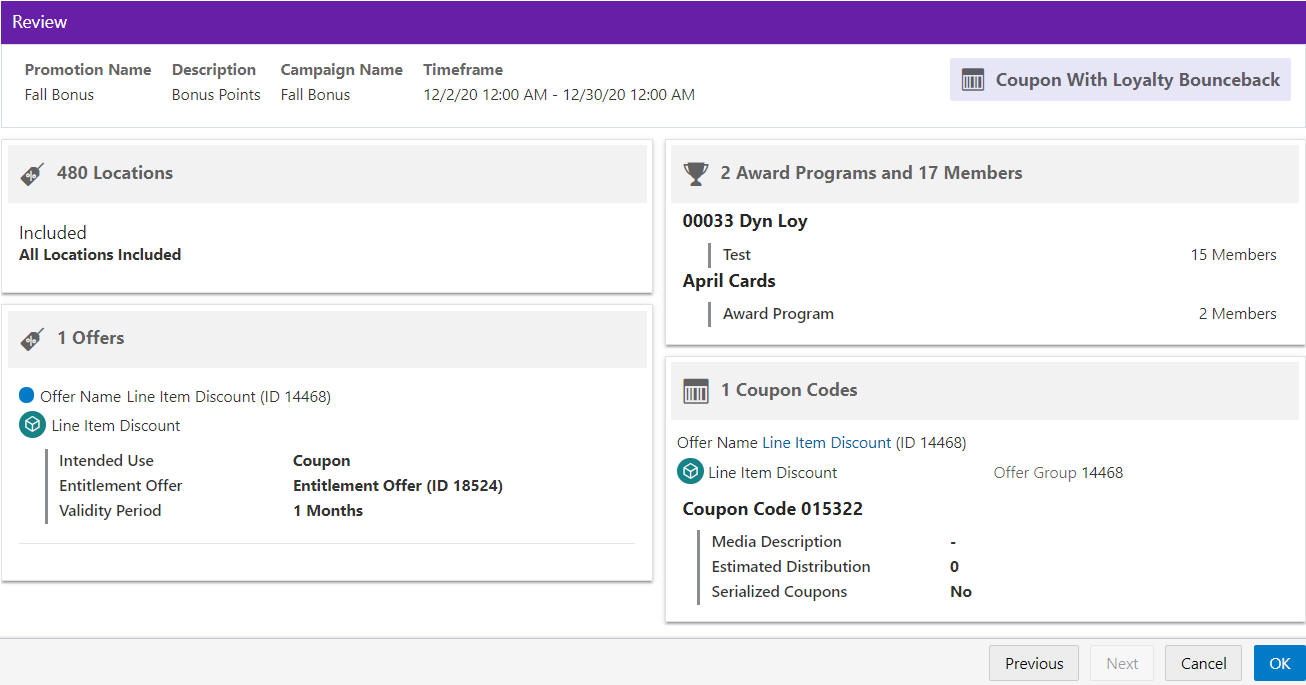
The Review tab displays the key elements in the Promotion Setup.
Figure 5-53 Review Tab

Figure 5-54 Review Tab - Loyalty Bounceback
-
Click OK to save the Promotion, or click Cancel to close the promotion without saving. Click Previous or any Tab to return to any point of the Create Promotion process.
Working with Coupon Promotions
Creating Additional Coupons
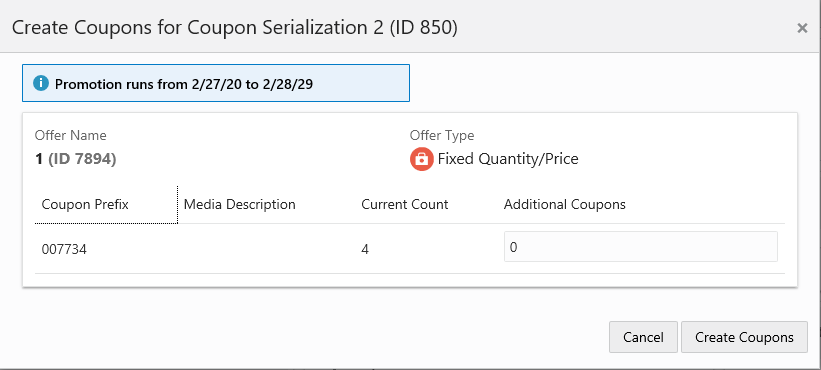
Users have the ability to create additional coupons for a Coupon Promotion with Serialized Coupons, so that you are not limited to only the coupons generated at the time of saving the promotion. To create an additional coupon do the following steps:
-
View a Coupon Promotion (for more information on how to view a promotion see Viewing a Promotion).
-
Click the Overflow Menu.
-
Click Create Coupons.
Note:
Some Coupon Promotions cannot be edited once saved.
Figure 5-55 Create Coupons
-
Enter the number of Additional Coupons.
-
Click Create Coupons to create additional coupons, or click Cancel to return to the View Promotion window without saving any changes.