Customer Information
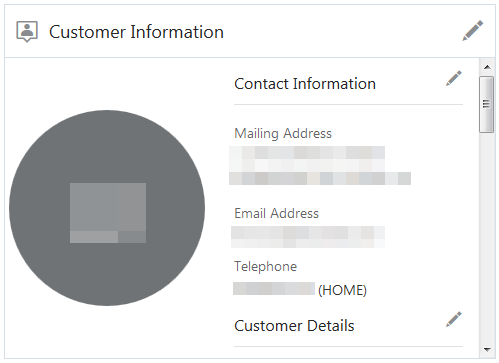
The Customer Information area of the Customer Dashboard includes contact information and other details about the customer.
Figure 4-5 Customer Information
-
Use the scroll bar or up and down arrow keys to move through the information.
-
If the user has read-only access, the View icon is displayed instead of the Edit icon.
Emailing a Customer
Click the Email Address link in the customer information panel to send a message to a customer. This link uses the client email server. After you send the message, you are returned to the Customer Information panel.
Editing Customer Details
To edit Customer Details, click the Edit icon at the top of the panel next to Customer Information, or next to Customer Details. This opens an editable Customer Details panel.
Figure 4-6 Customer Details Editing
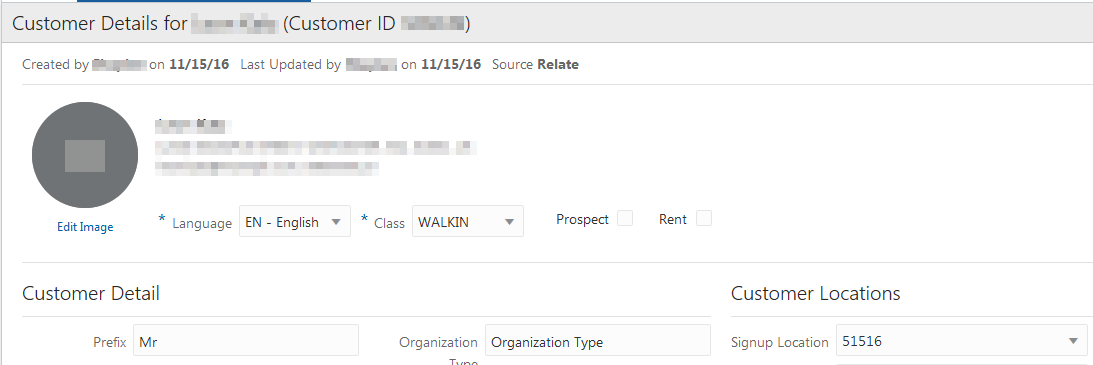
A customer image, if provided, is displayed in the top left of this panel.
To edit the customer image:
-
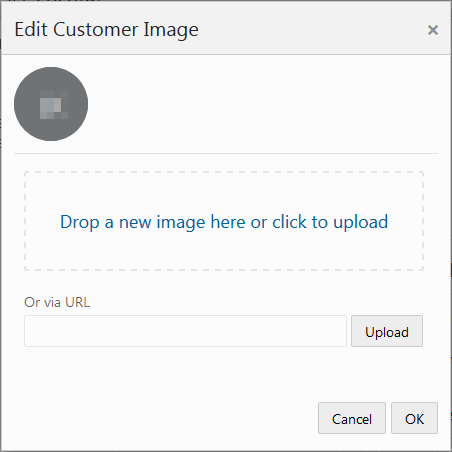
Under the customer image, click Edit Image. This displays a dialog for uploading an image.
Figure 4-7 Edit Customer Image
-
Select an image and drag it into the top box. Alternatively, you can enter a URL for the image file in the or via URL field, and click Upload.
-
When you have selected the new image file, click OK.
-
For all other items, enter the information in the fields that need updating and click OK.
Customer Detail information includes the following:
Customer Details
-
Language – The customer's preferred language (required).
-
Class – The class to which the customer belongs (required).
-
Prospect – Indicates whether the customer is a prospect.
-
Rent – Indicates whether the customer name can be rented to other companies for prospecting efforts.
-
Prefix – Prefix to the customer name.
-
First Name – First name for the customer.
-
Second First Name – A second first name for the customer, if provided.
-
Middle Name – Middle name or middle initial for the customer.
-
Last Name – Last name for the customer.
-
Second Last Name – A second last name for the customer, if provided.
-
Suffix – Suffix to the customer name.
-
Business Name – Name of the business associated with the customer.
-
Organization Name – Name of the organization associated with the customer.
-
Organization Type – Type of organization associated with the customer.
-
Owner ID - Used to control the associate able to assign one or more security groups to a customer. Do the following to add an Owner ID:
-
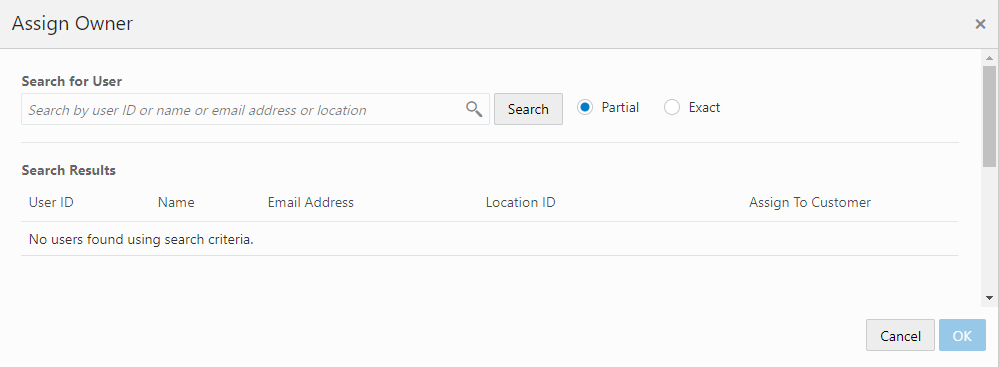
Click the Owner ID Assign Owner Add icon. Result: The Assing Owner window appears.
Figure 4-8 Assign Owner
-
In the Search for User field, enter the User ID, Name, Email Address, or Location of the user you want to search for. Click Partial to search for users that partially match the search text, or click Exact, to search for an exact match.
-
Click Assign for the user you wish to assign to the customer.
-
When you are finished assigning a user, you can either click OK to close the window and save the changes or click Cancel to close the window without saving the changes.
Note:
Click Unassign to remove an existing user assigned to a customer. This enables you to assign a new user. Each customer can only have one user assigned as an owner.
-
-
Birth Date – Date of birth of the customer.
-
Gender – Customer gender.
-
Education Level – Highest level of education completed by the customer.
-
Marital Status – Current marital status of the customer.
-
Anniversary – Customer anniversary date.
-
Ethnicity – Customer ethnicity.
-
Annual Income – Customer's annual income.
-
Net Worth – Net worth of the customer.
-
Signup Location – Location where the customer signed up.
-
Home Location – Home location for the customer.
-
Contact Permissions – The methods by which the customer has given permission to be contacted. Check the box next to each allowed method.
-
Card Detail – Details on card associated with the customer
Editing Customer Contact Information
To edit the customer's contact information, click the Edit icon next to Contact Information. This opens an editable Contact Information panel.
Figure 4-9 Edit Customer Contact Information
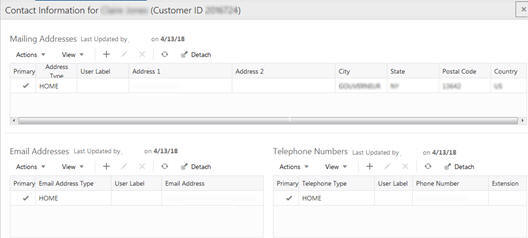
Customer Contact information includes the following:
-
Mailing Addresses - All mailing addresses of the customer.
-
Email Addresses - All email addresses of the customer.
-
Telephone Numbers - All telephone numbers of the customer.
Add, Edit, or Delete a Mailing Address:
To create a new mailing address:
-
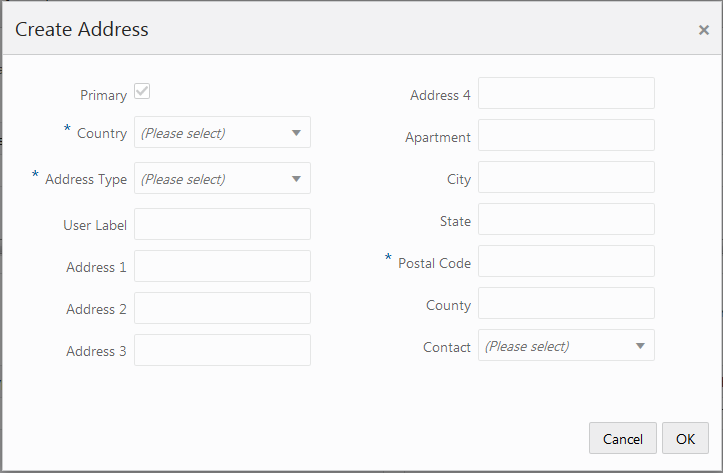
In the Contact Information editing panel under Mailing Addresses, choose Create Address from the Actions menu, or click the Add (+) icon. This opens a Create Address dialog.
Figure 4-10 Create Address Dialog
-
Enter the information for the new address (see Step 2 in Editing a Mailing Address) and click OK. The new address is displayed at the top of the Mailing Address list, because the Primary flag is automatically defaulted when adding a new mailing address.
The Primary field for any address that was previously the primary address is de-selected.
To delete a mailing address:
-
In the Contact Information editing panel under Mailing Addresses, select the address you want to delete.
-
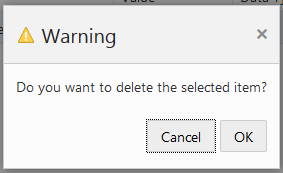
Choose Delete Address from the Actions menu, or click the Delete icon. This displays a Warning message:
Figure 4-11 Warning
-
In the Warning message, click OK. The address is deleted from the Mailing Addresses list.
To edit a mailing address:
-
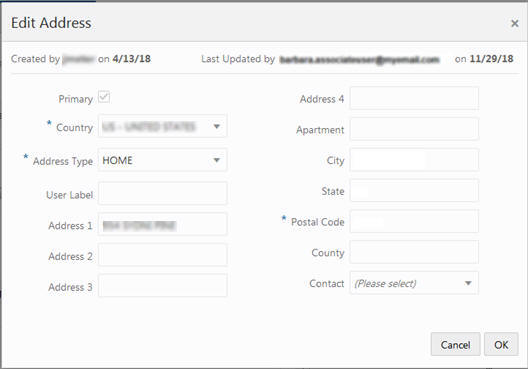
In the Contact Information editing panel under Mailing Addresses, choose Edit Address from the Actions menu, or click the Edit icon. This opens an Edit Address dialog:
Figure 4-12 Edit Address Dialog
-
Edit the information for the address (see Step 2 in Editing a Mailing Address) and click OK. The edited information is displayed in the Mailing Addresses list.
If the Primary check box for the address that you are editing was selected, the Primary check box is disabled in the Edit Address dialog. If the Primary check box for the address that you are editing was not selected, the Primary check box is enabled in the Edit Address dialog. To set an address as the new Primary address, select the Primary check box when editing.
The Create and Edit Mailing Address dialogs display the following information:
-
Primary – Indicates whether this is the primary address for the customer.
-
Country – The country for the customer address. Select a country from the drop-down list (required).
-
Address Type – Indicates the type of address, such as Home or Business. Select a type from the drop-down list (required).
-
User Label – User label for the address.
-
Address 1-4 – The street number in the address. You can enter up to four addresses, for example, suite or office number.
-
Apartment – The apartment number, if applicable.
-
City – The city for the customer address.
-
State – The state for the customer address.
-
Postal Code – The postal code for the customer address (required).
-
County – The County for the customer address.
-
Contact – The contact rule for the address. Select a contact preference from the drop-down list.
-
Add, Edit, or Delete an Email Address:
To create a new email address
-
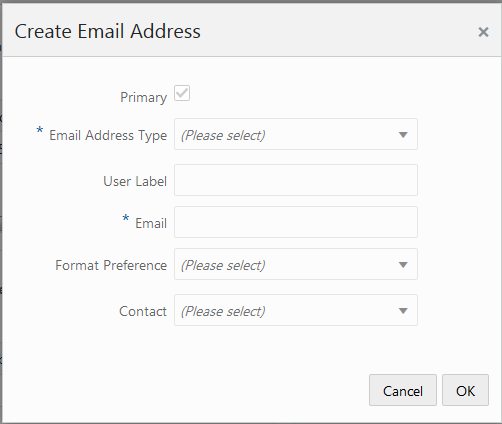
In the Contact Information editing panel under Email Addresses, choose Create Email Address from the Actions menu, or click the Add icon. This displays a Create Email Address dialog:
Figure 4-13 Create Email Address Dialog
-
Enter the information for the new email address (see Step 2 in Editing an Email Address) and click OK. The Primary flag is automatically defaulted when adding a new email address, so the new email is displayed at the top of the Email Addresses list.
The Primary field for any email that was previously the primary email is de-selected.
To delete an email address:
-
In the Contact Information editing panel under Email Addresses, select the email you want to delete.
-
Choose Delete Email Address from the Actions menu, or click the Delete icon. This displays a Warning message:
Figure 4-14 Warning

-
In the Warning message, click OK. The email is deleted from the Email Addresses list.
To edit an email address:
-
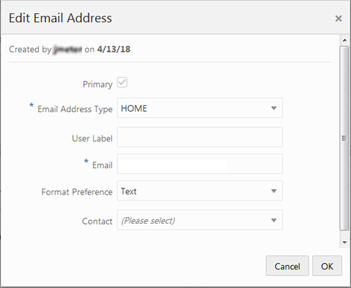
In the Contact Information editing panel under Email Addresses, select the email address you want to edit, and choose Edit Email Address from the Actions menu, or click the Edit icon. This opens an Edit Email dialog.
Figure 4-15 Edit Email Address Dialog
-
Edit the information for the email address (see Step 2 in Editing an Email Address)) and click OK. The edited information is displayed in the Email Addresses list.
If the Primary check box is selected for the email address being edited, the Primary check box is disabled in the Edit Email Address dialog. If the Primary check box is not selected for the email address being edited, the Primary check box is enabled in the Edit Email Address dialog. To set an email address as the new primary email address, select the Primary check box when editing.
The Create and Edit Email Address dialogs display the following information:
-
Primary – Indicates whether this is the primary email address for the customer.
-
Email Address Type – The type of email address, for example, Home or Business. Select a type from the drop-down list (required).
-
User Label – User label for the email address (required).
-
Email – The email address (required).
-
Format Preference – The preferred file format for receiving email messages. Select a format from the drop-down list.
-
Contact – The contact rule for the email address. Select a contact preference from the drop-down list.
Add, Edit, or Delete a Telephone Number
To create a new telephone number:
-
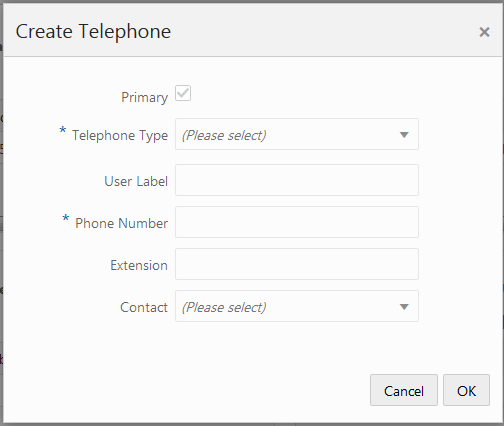
In the Contact Information editing panel under Telephone Numbers, choose Create Telephone from the Actions menu, or click the Add icon. This opens a Create Telephone dialog.
Figure 4-16 Create Telephone Dialog
-
Enter the information for the new number (see Step 2 in Editing a Telephone Number) and click OK. The Primary flag is automatically defaulted when adding a new telephone number, so the new number is displayed at the top of the Telephone Numbers list.
The Primary field for any number that was previously the primary number is de-selected.
To delete a telephone number:
-
In the Contact Information editing panel under Telephone Numbers, select the number you want to delete.
-
Choose Delete Telephone from the Actions menu, or click the Delete icon. This displays a Warning message.
Figure 4-17 Warning

-
In the Warning message, click OK. The number is deleted from the Telephone Numbers list.
To edit a telephone number:
-
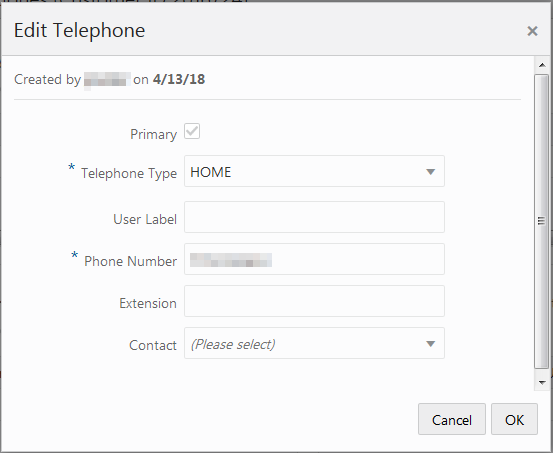
In the Contact Information editing panel under Telephone Number, select the telephone number you want to edit, and choose Edit Telephone from the Actions menu, or click the Edit icon. This opens an Edit Telephone dialog.
Figure 4-18 Edit Telephone Dialog
-
Edit the information for the number (see Step 2 in Editing a Telephone Number) and click OK. The edited information is displayed in the Telephone Numbers list.
If the Primary check box is selected for the telephone number being edited, the Primary check box is disabled in the Edit Telephone dialog. If the Primary check box is not selected for the telephone number being edited, the Primary check box is enabled in the Edit Telephone dialog. To set a telephone number as the new Primary telephone number, select the Primary check box when editing.
The Create and Edit Telephone dialogs display the following information:
-
Primary – Indicates whether this is the primary telephone number for the customer.
-
Telephone Type – The type of telephone number, for example, Home or Business. Select a type from the drop-down list (required).
-
User Label – User label for the telephone number.
-
Phone Number – The telephone number, including area code (required).
-
Extension – The telephone number extension, if applicable.
-
Contact – The contact rule for the telephone number. Select a contact preference from the drop-down list.
-
Viewing Customer Details and Contact Information
If you have read-only access, you will see the View icon in the Customer Information panel instead of the Edit icon.
-
To view both customer details and contact information, click the View icon at the top of the Customer Information panel.
-
To view just customer contact information, click the View icon at the top of the Contact Information section.
-
To view just customer details, click the View icon at the top of the Customer Details section.
See the previous sections for more information on the fields displayed in View mode.