Editing a Registry
If you need to edit a Registry, click the Edit Icon in the View Registry window (see Figure 8-13) or, in the Registries Found list, (see Figure 8-2), or click the Actions menu in the row of the registry you want to edit, and choose the Edit option from the menu. Each action displays the registry in an editable window:
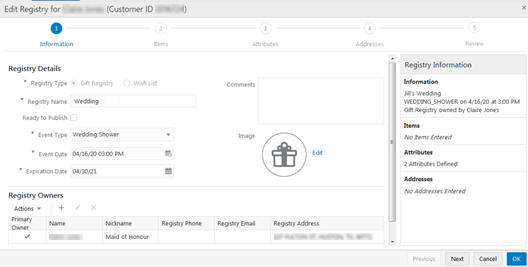
Figure 8-17 Edit Registry

You can review registry details and edit fields that are editable. Click Next to progress through the Edit Registry windows, or click the Step Icons located in the top bar. Use Previous to return to the previous window.
The Edit Registry window displays the same information as that in the Create Registry window, although not all fields are editable. For more information about entering the fields in a registry, see Creating a Registry.
Information in the Edit Registry windows includes that displayed in the Create Registry windows with these variations:
Information
-
Title Bar
-
Title (Edit Registry for)
-
-
Registry Details
-
Registry Type – this is not editable
-
The rest of the fields are editable
-
-
Items
-
The Purchased Quantity for this registry is displayed on the right of the Desired Quantity field. This field is not editable
-
The rest of the fields are editable
-
-
Attributes
-
All fields are editable
-
-
Addresses
-
All fields are editable
-
Review
-
Header Information
-
Displays Edit Registry for Customer name (Customer ID)
-
The Create User ID, Create Date, Update User ID, and Update Date are displayed next to the Registry Name
-
When you are done editing the Registry, click OK to save the changes.
For more information about entering the fields in a registry, see Creating a Registry.