8 System Preferences
General preferences can be set for the Configuration Tools at the workbench level, which refers to the entire tool. This includes the application type and general preference settings.
Solution ID
A taskflow that includes multiple solutions creates the possibility for information in the taskflow of one configuration to collide with the information in the taskflow of another. For example, two different configurations could each contain an activity named Activity1. Because it is not possible at solution configuration time to know the full set of solutions that might be combined using a multi-solution taskflow, it is not possible to prevent such conflicts through configuration validation.
In order to prevent collisions between the taskflow information of multiple configurations, the solution ID is used. It is a property of the configuration. Each configuration can have a different Solution ID which defaults to the name of the configuration.
When generating taskflow resources, the solution ID for the configuration is used as a prefix to all keys. In addition, every task generated out of the Configuration Tools as part of the taskflow resources used by the RPASCE Client has a solution ID attribute used to identify to which solution the task is applicable. Note that multi-solution taskflow implementations that contain multiple instances of a solution are required to specify unique Solution IDs for each instance of that solution to prevent collisions.
For users upgrading to 14.0, the default value of solution name is used for the solution ID so that no additional configuration work is required for users not implementing a multi-solution taskflow.
Term Plan Labeling
There are many places in the RPASCE Client where labeling is used to identify RPASCE workbooks, tasks, and so on. Initial applications released on the RPASCE platform were planning applications and so these labels used the term “Plan", “plan", “planning", or “Plans" to describe the workspaces where users performed their activities.
As RPASCE supports additional applications that are not planning applications, such as the IPOCS-Demand Forecasting application, it is now necessary to allow these labels to be modified as part of the application configuration. This is achieved via Term Plan labeling, which lets the user configure labels for the term “Plan" and its variants to align with the functional concepts of the application; if explicit labeling is not provided, the default term is used. For example, term Plans can be configured to have the label “Forecasts" in the IPOCS-Demand Forecasting application so that the Most Recently Used list is referred to as “Recent Forecasts" instead of “Recent Plans".
The configured labels are added into both the server and the client translation resources and must be translated accordingly.
Note:
Configuration Tools updates the taskflowBundle.properties and r_msglabel.ovr.english files with the configured labels. Both files must be translated since the PDS is multi-lingual.
The five configuration identifiers show up in taskflowBundle.properties as follows:
<<SolutionIDValue>>.Plan.Label=<<configured label>>
<<SolutionIDValue>>.Plans.Label=<<configured label>>
<<SolutionIDValue>>.plan.Label=<<configured label>>
<<SolutionIDValue>>.Planning.Label=<<configured label>> <<SolutionIDValue>>.WP.Label=<<configured label>>
Only two messages in the file r_msglabel.ovr.english contain configurable term. When the term “plan" is configured to have the label “workbook", for example, these two messages show up in file as:
R_WB_WRKCALCINPROGRESS english_us The workbook is Calculating. Try to open your '%1' again after a few minutes. If the problem persists, contact your administrator.
R_WB_WRKREFINPROGRESS english_us The workbook is Refreshing. Try to open your '%1' again after a few minutes. If the problem persists, contact your administrator.
Customizing Dashboard Labels
You can customize dashboard labels via the MultiSolutionBundle. Labels can be customized for the primary measure label, the variance measures labels, and the main chart title.
The highlighted areas in the following tile types can use a translated string and override the default:
-
Exception tile
-
Metric tile
-
Variance tile
In the content area, the highlighted areas use a translated string and override the default.
In all but the variance plan, the default behavior is to use the value in the settings file if the value is not found as a key in the MultiSolutionBundle.
Profiles
To add translation for a profile, an entry must be added to MultiSolutionBundle in the following format: <<SolutionIDValue>>. dashboard.profile.<<name>>=<<configured label>>
Tiles (metric or exception)
To add custom translatable labels for tiles, an entry must be added to MultiSolutionBundle in the following format<<SolutionIDValue>>. <<key>>=<<configured label>>
Keys
The keys must be unique within each solution. Most of these settings default to the measure-related or application-related attribute; however, it can be changed to help abbreviate it so that it fits the dashboard.
Here is the list of tile settings that can be customized.
| Tile Setting | By Default |
|---|---|
|
title |
Uses the measure label. |
|
description |
Uses measure label. |
|
unitOfMeasure |
Empty in metric profiles, in exception profiles it is the dimension labels of the top /by. |
|
contentTitle |
The metric tile label. |
|
yAxisLabel |
Empty. |
|
dualY yAxisLabel |
Empty. |
|
left / right (variances)plan |
If not found it uses the first word of the chartMeasure label. |
Fact Prefix Override
Optional property. By default, the fact name prefix of a non-shared measure is the application configuration name. Users may override it by specifying a unique identifier for the Fact Prefix Override property within the Configuration Properties window. The value of the Fact Prefix Override property must be less than or equal to seven characters; it is used to prefix fact names.
Note:
Since the Fact Prefix Override affects the fact name construction, its value is not patchable. If the application is going to share the PDS instance with other applications, the Fact Prefix Override value must be unique across the shared applications.
Setting Workbench Preferences
Complete the following steps to set workbench preferences.
Navigate: From the File menu, select Tools Preferences. The Workbench Preferences window opens.
-
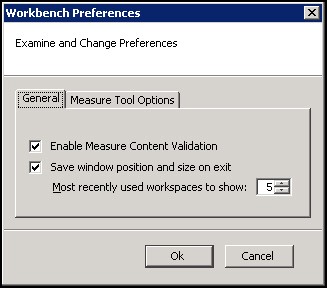
Select the General tab and select the appropriate options.
Figure 8-1 Workbench Preferences Window– General Tab

Description of "Figure 8-1 Workbench Preferences Window– General Tab"The fields for the General tab include:
-
The main file menu lists configurations that were recently opened. The number of configurations is displayed in this menu. To set the number of configurations, set the Most recently used workspaces to show field by using the up and down arrows.
-
Select the Measure Content Validation check box to enable measure content validation. Clear the check box to disable measure content validation. A change to the properties of a measure can affect the validity of many components both within the Rule Tool and the Workbook Tool. Whenever a measure editing session is completed (for instance, upon exiting the Measure Manager and entering a different tool), the workbench will evaluate the effects of the edits made upon the measures. This process can be time consuming. When the Measure Content Validation option is unchecked, the automatic validation of measure property edits is unavailable. This allows for rapid transitioning between tools when working on a large configuration, because it will not be necessary to await the completion of the automatic validity checking. When automatic validation is unavailable, a manual check of measure validity can be enabled from the Rule Tool. This allows you to manually update the measure content validation of the Rule and Workbook Tools (see Measure Validation within the Measure Manager for more information).
-
-
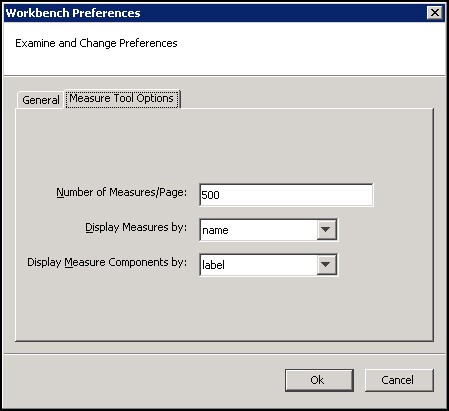
Select the Measure Tool Options tab and adjust the fields as needed.
Figure 8-2 Workbench Preferences Window– Measure Tool Options Tab

Description of "Figure 8-2 Workbench Preferences Window– Measure Tool Options Tab"The fields for the Measure Tool Options tab include:
-
Number of Measures/Page – The Measure Manager display only a certain number of measures per page in the Measure tab. This option determines the number of measures that display on a page.
-
Display Measures by – This list provides two options, name and label, and determines whether measures are displayed using their name or label in the Configuration Tools. For example, in the Workbook Tool when selecting viewable measures, the name or the label will be displayed depending on the selection here.
-
Display Measure components by – This list provides two options, name and label. Your selection determines how measure components in the Measure Manager are displayed.
-
-
Click OK to save any changes and close the window.
Setting Configuration Properties
Complete the following steps to set Configuration Properties.
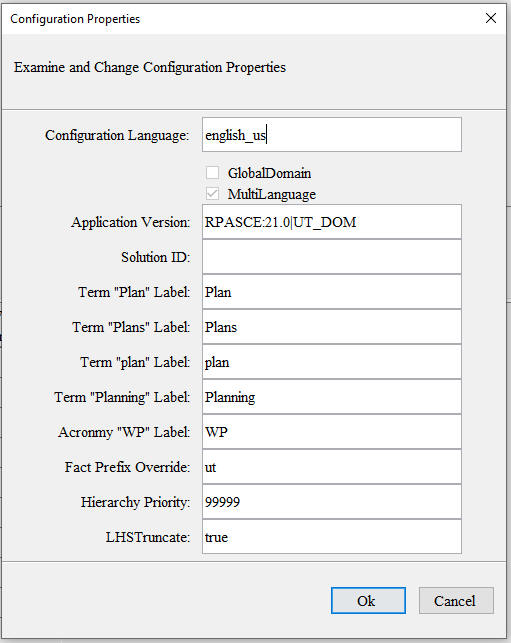
Navigate: From the File menu, select Configuration Properties. The Figure 8-3 opens.
Figure 8-3 Configuration Properties Window

Description of "Figure 8-3 Configuration Properties Window"
The Configuration Language field is unavailable by default and displays English, because currently configurations can only be in English.
-
Select the following options as necessary:
-
Global Domain– Deprecated. Since all data is stored in PDS, the sandbox is only created and used in the PDS building and patching steps and is always a simple domain. The global domain setting is not configurable. ConfigTools always treats it as true.
-
MultiLanguage – Deprecated. Since the PDS instance is always multi-language, this setting cannot be set to false. ConfigTools always treats it as true.
-
-
Enter the following properties as necessary:
-
Application Version – Enter the application version in the format ApplicationName:ApplicationVersion.
-
Solution ID – Enter a unique identifier for the configuration. The default is the name of the configuration. The solution ID is used to help integrate multiple applications using a combined taskflow.
-
Term Plan Labelling – For the term “Plan” and its variants, enter the desired labels that are displayed in RPASCE client.
-
Fact Prefix Override – Enter a unique identifier for the fact name prefix.
-
Hierarchy Priority – Enter an integer for the priority of this application’s hierarchies. This property defaults to 99999. During the PDS build/patching, the hierarchies from multiple applications are merged. The higher this number, the more weight this application’s hierarchies have when determining the hierarchy order of the merged PDS hierarchies. See Multi-Application Support section for more information.
-
LHSTruncate –This property defaults to false. If the configurator knows that all or most of the data (for example,, more than half) of the LHS measures of all batch rules within this application change in the weekly or daily batch, enter true so that the optimal SQL statements are generated for all the batch rules of this application. Configurator can turn off this optimization for a specific rule by setting its rule property LHSTruncate to FALSE in the Rule Properties window. Reference the section of “Edit Properties of a Rule” for how to add or edit a new rule property.
-
-
Click OK to save any changes and close the window.