Modifying a Gift Registry
-
With a gift registry displayed (Figure 3-4 and Figure 3-7), add or modify the registry information as needed.
-
to add an item, refer to Adding Items
-
to change the quantity, refer to Changing the Quantity
-
to delete an item, refer to Deleting an Item
-
to view/modify details, refer to Viewing and Modifying Details
-
to view/modify owners, refer to Viewing and Modifying Owners
-
to view/modify attributes, refer to Viewing and Modifying Attributes
-
to view/modify addresses, refer to Viewing and Modifying Addresses
-
Adding Items
-
From the Gift Registry screen, scan or enter the UPC to add items to the gift registry.
-
If prompted, enter the quantity in the Enter Quantity field and press Enter.
Figure 3-8 Enter Quantity

-
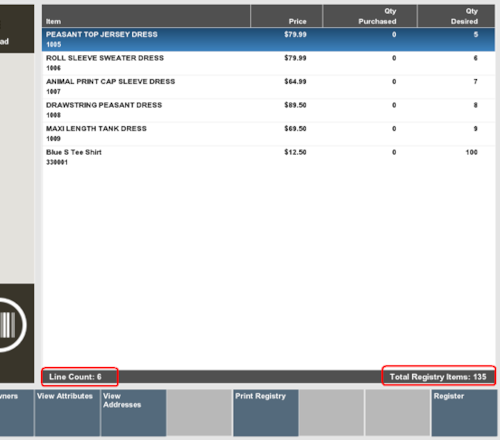
As you add items to the gift registry, the line count and number of items on the registry are updated accordingly.
Figure 3-9 View Port - Line Count and Item Quantity
Changing the Quantity
-
From the Gift Registry screen, select the Change Qty Desired button menu option.
-
Select the item you wish to modify, and press Enter.
-
Enter the Quantity and press Enter. The change displays in the View Port.
Deleting an Item
-
From the Gift Registry screen, select the Delete Item menu button.
-
Select the item you wish to delete, and press Enter. The item no longer appears in the view port.
Viewing and Modifying Details
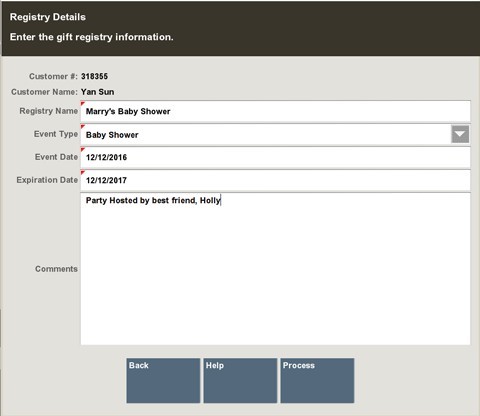
The View Details option displays the information that was initially entered when setting up the registry.
-
From the Gift Registry screen, select the View Details menu option.
-
Modify the information as needed and select Process.
Figure 3-10 View and Modify Registry Details
Viewing and Modifying Owners
-
From the Back Office Gift Registry screen, select the View Owners menu option.
-
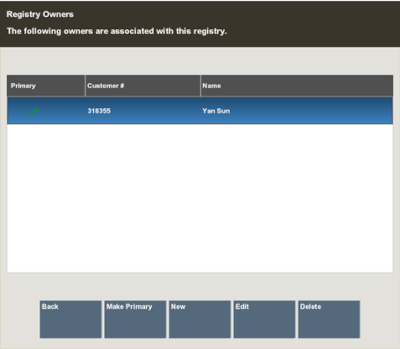
The Registry Owners list displays. The check mark next to the Customer # indicates the primary owner.
Figure 3-11 Registry Owners List
To Modify the Primary Owner
If the registry has more than one owner, perform the following steps to change the primary owner.
-
From the Registry Owners list, select the owner you wish to change to the primary.
-
Select the Make Primary button.
-
When prompted, press Y to confirm the change.
-
The new primary owner is moved to the top of the list and has a green check mark by the name.
To Create a New Owner
Perform the following steps to create a new owner.
-
From the Registry Owners list, select New (see Figure 3-11).
-
The customer search screen displays. Enter your search criteria for the person you wish to add as an owner. Select Process.
Note:
If the customer is not listed, create a new customer record by selecting New. See step 3 for more information.
-
If more than one customer matches your search criteria, select the customer from the retrieved list.
-
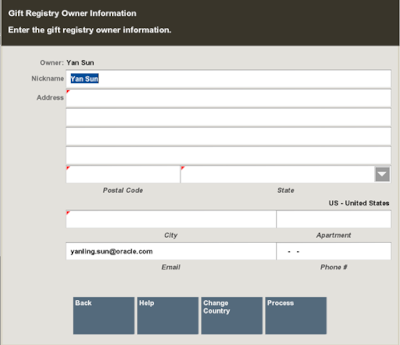
Verify the address, modify if needed, and select Save Changes.
Figure 3-12 Gift Registry Owner Information
Note:
The address information will be saved in the Customer Maintenance Screen Addresses Tab with the address type of Gift Registry. Any modifications you make to the address will not change the primary customer address information.
-
Repeat steps until all owners are listed.
-
To modify the primary owner, see To Modify the Primary Owner.
To Edit Registry Owner Information
-
From the Registry Owners list, select the owner you wish to edit. (See Figure 3-11).
-
Select Edit.
-
At the Gift Registry Owner Information window, make your edits as needed.
Figure 3-13 Gift Registry Owner Information - Edit Mode

-
Select Save Changes.
To Delete an Owner
-
From the Registry Owners list, select the owner you wish to remove.
Note:
You cannot delete a primary owner. Press Esc to close the prompt: the primary registry owner cannot be deleted.
Designate a different primary owner prior to deletion. See To Modify the Primary Owner.
-
Select Delete.
-
When prompted, press Y to confirm the deletion.
-
The Registry owner screen displays without the deleted owner. Select Back to return to the gift registry. To modify the primary owner, see To Modify the Primary Owner.
Viewing and Modifying Attributes
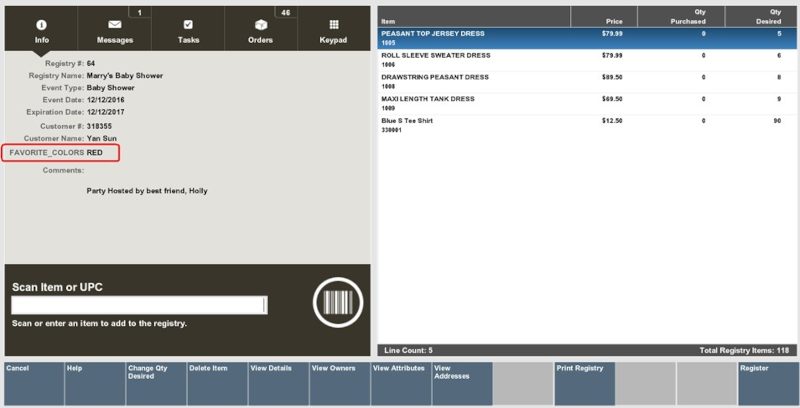
The message window of the Gift Registry screen displays only three attributes. To see additional attributes, or to modify an attribute, select View Attributes.
Figure 3-14 Gift Registry Screen - Attributes Area Display
To Create a New Attribute
-
From the Gift Registry screen, select the View Attributes menu button.
-
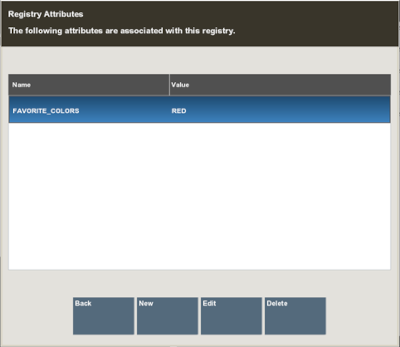
From the Registry Attributes list, select New.
Figure 3-15 Registry Attributes List
-
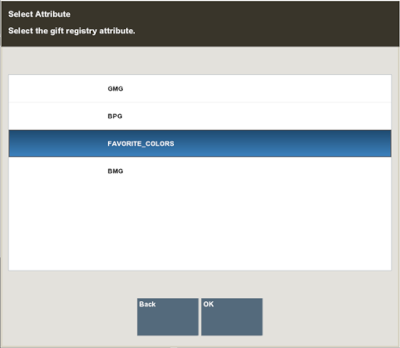
Select the attribute you wish to add and then select OK.
Figure 3-16 Select Attribute List
-
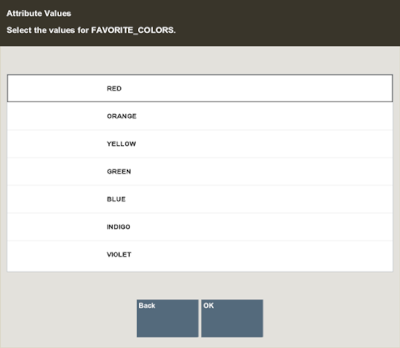
When prompted, enter the Attribute value and press Enter. The new attribute will be associated with this gift registry.
Figure 3-17 Select Attribute Value
-
Select Back to return to the Gift Registry screen.
To Edit an Attribute
-
From the Gift Registry screen, select the View Attributes menu button.
-
From the Registry Attributes list (Figure 3-15), select the attribute you wish to edit.
-
Select Edit.
-
Depending on the type of attribute, you may need to add a value to the attribute value focus bar or select from a list of values then press Enter. The attribute value is updated accordingly.
To Delete an Attribute
-
From the Gift Registry screen, select the View Attributes menu button.
-
From the Registry Attributes list (Figure 3-15), select the attribute you wish to delete.
-
Select Delete. The attribute is removed.
Viewing and Modifying Addresses
-
From the Gift Registry screen, select the View Addresses menu option.
-
View address information:
-
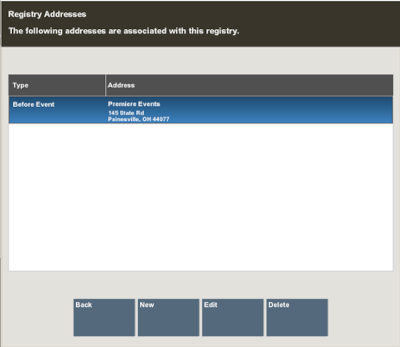
If addresses are associated with the gift registry they are displayed.
Figure 3-18 Gift Registry Address List
-
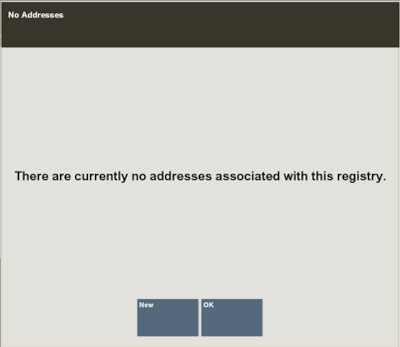
If no addresses are associated with the gift registry, this message displays. Press Enter to close the message prompt or select New to add an address for this registry.
Figure 3-19 No Address Prompt
-
To Create a New Address
-
From the Gift Registry screen, select the View Addresses menu option.
-
From the Gift Registry address list (Figure 3-18) or the No Address on file prompt (Figure 3-19), select New.
-
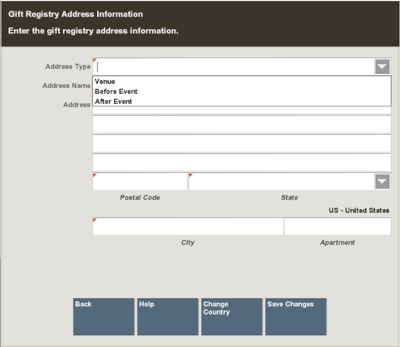
When prompted, enter the required fields:
Figure 3-20 Address Information Form
-
Select Save Changes.
To Edit an Existing Address
-
From the Gift Registry screen, select the View Addresses menu option.
-
From the Gift Registry address list (Figure 3-18), select the address you wish to edit.
-
Select Edit.
-
Modify the information and then select Save Changes.
To Delete an Existing Address
-
From the Gift Registry screen, select the View Addresses menu option.
-
From the Gift Registry address list (Figure 3-18), select the address you wish to delete.
-
Select Delete.
-
When prompted, press Y to confirm that you want to delete the address.