Entering Items
You can enter items in several ways. To enter items into a transaction:
Figure 3-9 Scan Item Prompt

-
Scan the item.
-
Enter the item ID or UPC code and press Enter.
-
Choose the item from the Quick Pick screen.
-
Use Item Lookup to find an item and add it to the sales transaction.
Oracle Retail Xstore Point of Service looks up item and displays it in the View Port.
After entering an item, other prompts may open.
Barcodes with Properties
This section describes all possible barcodes with properties.
Weight in Barcode
If you scan the barcode below, the system converts the data in the given order and sells the weight of the barcode item.
Example 3-1 Weight in Barcode
2150101020006
(21) Weight prefix, (50101) Item number, (02000) weight in grams = 2,0 kg, (6) Check sum

Note:
If the store has a service or self-service scale, creating barcodes with encoded weight, the system decodes the label and sells the item (coded in the barcode) with the calculated price.
Calculated Price = Item price x Weight from the barcode
Quantity in Barcode
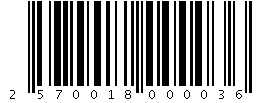
If you scan the barcode below, the system converts the data in the given order and sells the quantity of the barcode item.
Example 3-2 Quantity in Barcode
2570018000036
(25) Quantity prefix, (70018) Item number, (00003) Quantity number, (6) Check sum

Note:
If the store has a service or self-service scale, creating barcodes where the quantity is coded, the system decodes the label and sells the item (coded in the barcode) with the calculated price.
Calculated Price = Item price x Quantity from the barcode.
Price in Barcode
If you scan the barcode below, the system converts the data in the given order and sells for the price of the barcode item.
Example 3-3 Price in Barcode
2250102003005
(22) Price prefix, (50102) Item number, (00300) price (3,00 $), (5) Check sum

Note:
If the store has a service or self-service scale, creating barcodes where the price is coded, the system decodes the label and sells the item with the price from the barcode.
Press Barcode with Age Verification
If you scan the barcode below, the system converts the data in the given order and sells the press product barcode with the age verification.
Example 3-4 Press Barcode with Age Verification
4343000105396
(43) Prefix with age verification, (4) full VAT, (30001) item number, (0539) price 5,39 $, (6) Check sum

Manual GS1 Entry
If you cannot scan a barcode, use the Manual GS1 Entry menu button to enter the barcode, for example, (01) 02570016000052.
-
Select Find Item. Press the Manual GS1 Entry menu button.
-
You are prompted for the AI. Enter the application identifier (AI) - the number shown in brackets, for example, (01) and press Enter.
Figure 3-10 Manual GS1 Entry - AI

-
You are prompted for the value. Enter the digits after the AI - number in brackets, for example, 02570016000052 and press Enter.
Figure 3-11 Manual GS1 Entry - Value

-
The system shows the following prompt.
Figure 3-12 Manual GS1 Input

-
Repeat the process until you have entered the entire barcode. Press Finish to complete he Manual GS1 Entry. The item is shown on the Sales Display Panel. Complete the transaction as usual.
Note:
To cancel the Manual GS1 Entry, press Back.
RFID
To support RFID (radio-frequency) scanning, Xstore POS can be integrated to the Motorola Zebra DS9808-R Scanner. This scanner scans both the product ID and RFID Tag Reference Number simultaneously.
Scan the RFID tag on the item.
Xstore Classic reads the RFID Electronic Product Code (EPC) tag whilst the product barcode provides the product ID, and the RFID tag extracts the unique reference number of the product.
If the scanner is not working, manually enter the product ID.
Style
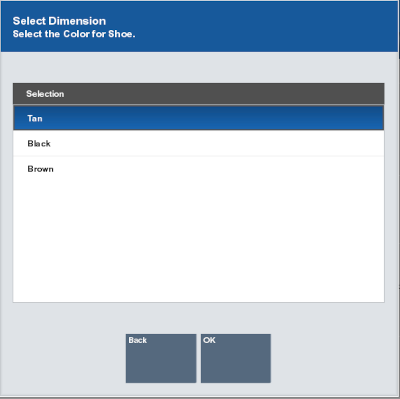
A style is an entry in the Item database that has properties such as size, color, and width.
Figure 3-13 Select Dimension

To select a style:
-
Click the style in the list.
-
Click OK.
Attached Item
When an item with an associated attached item is added to a sale, you may be prompted whether or not this additional item should be added to the sale.
Note:
In some cases, the item will be added automatically without prompting the user.
-
Click Yes to add the item.
-
Click No to not include the attached item.
-
If multiple attached items are available:
-
Click the items to be added to the transaction.
-
Click OK.
-
Note:
Attached items are shown with a Link icon next to them.
Kit
When a Kit is added to a sale, the component items are automatically shown in rows below the parent Kit line. Each component item in the Kit shows the quantity included in the Kit, along with the component's description. The component items that make up a Kit cannot be changed using the change item function in Oracle Retail Xstore Point of Service, only the parent Kit can be changed using the change item function.
If all kit components cannot be shown on the View Port due to limited space, the last component row displays an ellipsis (...) to indicate there are additional items in the kit. However, the receipt shows all items that are part of the kit.