Entering Pre-Sale Information
Depending on your store configuration, one or more of the following actions may be required when beginning a sale transaction:
Select Commissioned Associates
If your store tracks the associates' sales for commissions and sales goals, you may be prompted to select a commissioned associate (or associates) to be linked to the items in a sale transaction.
Oracle Retail Xstore Point of Service awards commissions on a per-item basis, either automatically based on the associates selected at the start of a retail transaction, or by prompting for the commissioned associate (or associates) each time an item is added to the transaction.
Note:
If your system is not set up for automatic commissioned associate prompting, you also have the option to link an associate (or associates) to individual items in a sale transaction.
Figure 3-3 List of Commissioned Associates
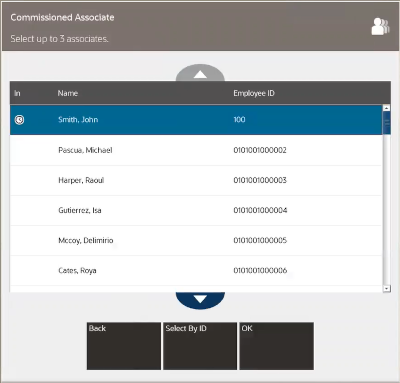
Use one of the following procedures to select commissioned associates for the transaction:
Enter an Associate ID
To select an associate by ID:
-
Click Select By Associate ID.
-
Figure 3-4 Commissioned Associate Prompt

-
Enter the associate ID.
-
Press Enter.
Select Associates from a List
-
Use the up and down arrow keys to highlight an associate.
Note:
The clock icon in the “In" column indicates the Associate has clocked in (see Clock In and Clock Out).
-
Press the Spacebar.
-
Repeat Steps 1 to 2 for each associate to add to the transaction.
Note:
To remove an associate from a transaction, highlight the associate in the list and press the Spacebar.
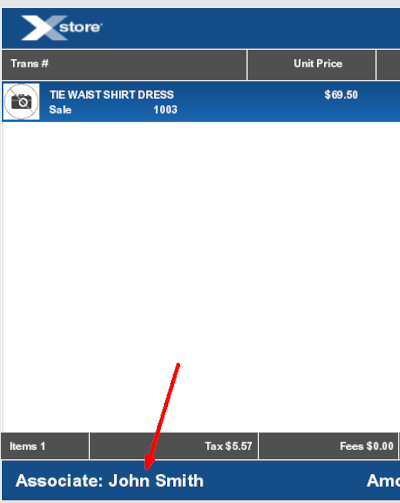
The system adds the associates to the sale transaction and displays the associates' names on the view port.
Figure 3-5 Associate Name in View Port
Note:
You also have the option to link an associate (or associates) to individual items in a sale transaction. See Change the Commissioned Associate for more information about associating a commissioned associate with a specific item in a transaction
Associate a Customer with a Transaction
Depending upon your system's configuration, you may be prompted for customer information so that a customer may be assigned to the transaction.
Note:
If a customer is not required for this transaction, you may click Skip to continue with the sale process.
To associate a customer with a transaction, do one of the following:
Search for Customer
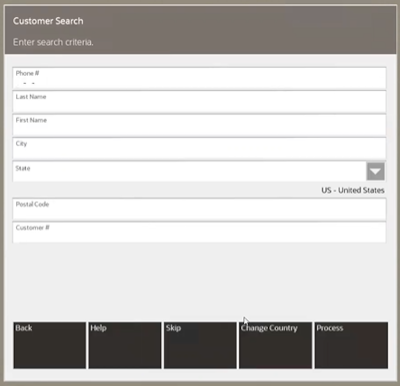
Do the following at the Customer Search screen:
Figure 3-6 Customer Search Form
-
Enter the customer search criteria.
-
Click Process.
Note:
The maximum number of returned records is configurable. If your search results exceed that number, you may see a message indicating there are too many results.
You should enter as much information as possible in the Customer Search form. This will limit the number of customer records that are returned. If your search results exceed that number, you may see a message indicating there are too many results.
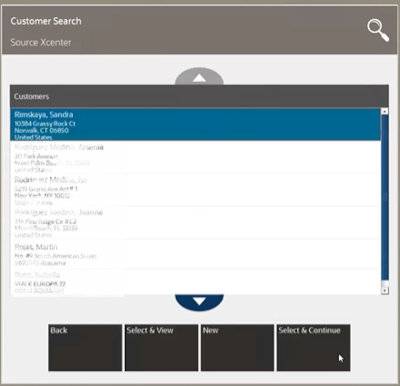
Oracle Retail Xstore Point of Service displays a list of customers matching the search criteria.
-
Figure 3-7 Customer Search Multiple Results
-
Click to select a customer.
-
Click to select a customer and cl
-
-
Do one of the following:
-
Click Select & Continue to assign the customer and continue the transaction.
-
Click Select & View to view the customer record.
-
Click New to create a new customer record.
-
Click Back to return to the Customer Search screen.
-
Tax Exemption
If the customer has a tax exemption on file, you will be prompted whether to apply the exemption. Do one o the following:
-
Click Yes to select a tax exemption:
-
Click a tax exemption in the list.
-
Do one of the following:
-
Click Select & Continue to select the tax exemption and continue the transaction.
-
Click Select & View to select view the details of the tax exemption.
-
-
-
Click No to continue the transaction.
Enter Loyalty Information
If your store has a loyalty program there are several possible scenarios that may occur after assigning a customer to the sale:
Enroll Customer
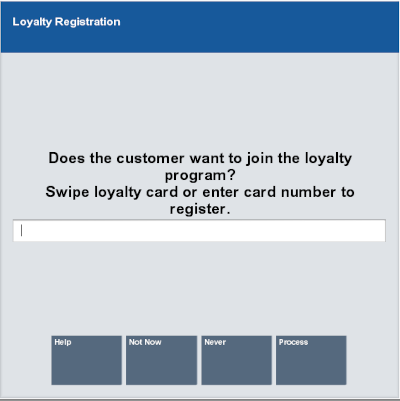
The system prompts you whether to enroll the customer:
Figure 3-8 Loyalty Registration Prompt
-
Click Not Now to continue the transaction without enrolling the customer.
-
Click Never to continue the transaction without enrolling the customer and never display the enrollment prompt again.
-
To enroll the customer:
-
If necessary, swipe or scan a new loyalty card.
-
Click Process to enroll the customer.
-
Note:
If the customer agrees to join the loyalty program and then decides not to sign up during the transaction, void the loyalty card line item (Void an Item) or cancel the sale (Cancel a Transaction). If you have completed the sale and the customer decides not to enroll in the loyalty program, you will need to post void the sale (Post Void) to disassociate the customer.
Customer Has Multiple Loyalty Cards
If the customer is associated with more than one loyalty account:
-
Click the proper account in the list.
-
Click OK.
Expired Loyalty Card
If the customer's loyalty card has expired:
-
Click Yes to renew the card.
A confirmation prompt displays with the new expiration date.
-
Click No to keep the card expired.
A message prints on the receipt indicating that the loyalty card has expired. The card expiration information also displays on the Customer Maintenance Activity Stream Contact Information Tab.