Return Tenders
To select a return tender for a refund transaction:
-
Click Add Tenders when you are ready to complete the transaction.
Xstore Classic displays a list of return tender types:
Figure 5-40 Return Tender List - Cash Option

The list of return tenders available for issuing refunds will be determined by type of return (verified or unverified / blind return) and the Xstore Classic configurations for return tenders.
To tender a refund, select the tender required, and refer to the section for the appropriate tender type:
Currency Rules
Verified returns always are processed in the local currency.
If the originating currency is different than your local currency, the refund amount is automatically converted into your local base currency, using the current currency exchange rate stored in the system.
These exchanged values are used as the refund amount for the return transaction.
Cash
To tender a return transaction in cash:
-
Select Cash in the menu of tenders. See Selecting Tenders.
Figure 5-41 Cash Refund Amount Prompt

-
Enter the amount of cash to be returned to the customer:
-
Enter the amount.
-
Click the amount in the Menu Buttons (also known as Quick Cash buttons).
-
-
Press Enter.
-
If prompted to complete the transaction:
-
Click Yes to complete the transaction.
The transaction completion process begins. Continue with Step 5.
-
Click No to return to the tender selection screen. See Selecting Tenders.
-
-
If prompted, scan the cash drawer you are using.
The cash drawer opens. If configured, a prompt displays reminding you to close the cash drawer.
-
Take the cash from the cash drawer and return it to the customer.
-
Close the cash drawer.
After the cash drawer has been closed, the sale receipt prints, and the system is ready for the next transaction.
Credit/Debit Card
The procedure for tendering a return on a credit/debit card will change depending upon whether the card is selected from the Selecting Tenders list, or if it is automatically selected by a verified return:
Select from the List of Tenders
To tender a return with a Credit Card selected from the Selecting Tenders list:
Figure 5-42 Return Tender Options

-
Select Credit/Debit in the menu of tenders. See Selecting Tenders.
-
Confirm the amount to be refunded (usually the full transaction amount) or key a different amount.
-
Press Enter.
-
The tender amount is displayed onto the Payment Terminal.
Figure 5-43 Payment Terminal

-
The customer will present the payment card using the desired method.
-
It’s possible that the Payment Terminal will sometimes request a "manual authorization" from the cashier on the POS.
Figure 5-44 Manual Authorization

-
Call the authorizing agent to request and receive an authorization code.
-
Enter the authorization code.
-
Click OK.
The Manual Authorization code is transmitted to the Payment Terminal for approval.
-
-
The customer may be prompted by the Payment Terminal to authenticate the card payment:
-
If necessary, wait for the customer to enter their PIN.
-
If necessary, wait for the customer to sign the signature capture device.
-
If necessary, verify the customer signature.
Figure 5-45 Customer Signature

-
-
If necessary, ask the customer to sign the receipt.
-
The Payment Terminal either Approves or Rejects the refund.
-
If there is still an outstanding balance to refund, then the Return Tender Options screen is re-displayed for the cashier to select another tender.
-
The Sale Complete prompt is displayed, and the cashier is prompted to select a receipt method.
-
The cashier can select to email or to print the receipts as the Xstore Classic configuration dictates.
Xstore Classic completes the transaction.
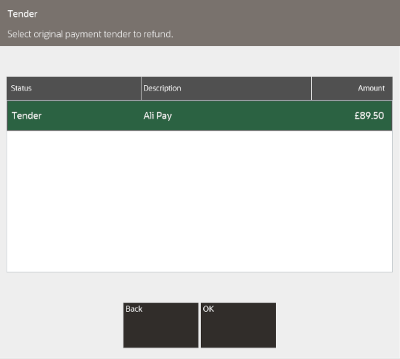
Automatically Selected Credit Card
Xstore Point of Service automatically displays the credit card information for the original transaction when you tender a verified return. To tender the return:
Figure 5-46 Automatically Selected Credit Card

-
Select the return tender:
-
Click OK to apply the tender to the card used in the original transaction. This is called a tokenized refund and uses the saved transaction token on Xstore from the original card payment, and thus the customer does not need to re-present the card. Continue with Step 2.
-
If the original card is not suitable to be used, for example it has expired, or a different card or tender is required, click Back to change tenders. Continue with Selecting Tenders.
-
-
Confirm the amount to be refunded or key a different amount (cannot refund a higher amount that was originally tendered on this card).
Figure 5-47 Refund Amount Prompt

-
If necessary, ask the customer to sign the receipt.
-
The Payment Terminal either Approves or Rejects the refund for the verified refund.
-
If there is still an outstanding balance to be refunded, then the Return Tender Options screen is re-displayed for the cashier to select another tender.
-
The Sale Complete prompt is displayed, and the cashier is prompted to select a receipt method.
-
The cashier can select to email or to print the receipts as the Xstore Classic configuration dictates.
Xstore Classic completes the transaction.
eWallet
The procedure for tendering a return on an eWallet tender is like that with a Credit / Debit card, that was used as payment on the original sale transaction. It is not possible to perform a blind return to an eWallet tender, it can only be selected from the original tenders on a verified return.
Automatically Selected eWallet Tender
Xstore Point of Service automatically displays the eWallet information for the original transaction when you tender a verified return. To tender the return:
Figure 5-48
-
Select the return tender:
-
Click OK to apply the tender to the eWallet used in the original transaction. This is called a tokenized refund and uses the saved transaction token on Xstore Classic from the original eWallet payment, in order to refund to the original eWallet account. Continue with Step 2.
-
If the original eWallet is not suitable to be used, for example it has expired, or a different tender is required, click Back to change tenders. Continue with Selecting Tenders.
-
-
Confirm the amount to be refunded or key a different amount (cannot refund a higher amount that was originally tendered on this card).
Figure 5-49 Refund Amount Prompt
-
If necessary, ask the customer to sign the receipt.
-
The Payment Terminal either Approves or Rejects the refund for the verified refund.
-
If there is still an outstanding balance to be refunded, then the Return Tender Options screen is re-displayed for the cashier to select another tender.
-
The Sale Complete prompt is displayed, and the cashier is prompted to select a receipt method.
-
The cashier can select to email or to print the receipts as the Xstore Classic configuration dictates.
Xstore Classic completes the transaction.
Gift Card
To issue or reload a gift card:
-
Select Issue Gift Card or Reload Gift Card in the menu of tenders. See Selecting Tenders.
Note:
Select the Issue Gift Card option to issue a new gift card. Select the Reload Gift Card option to put the refund value onto the customer's current gift card.
Figure 5-50 Return Gift Card Number Prompt

-
Enter the gift card number:
-
Scan the gift card.
-
Enter the gift card number and press Enter.
Figure 5-51 Return Gift Card Amount Prompt

-
-
If necessary, change the amount to refund.
-
Press Enter.
-
If prompted to complete the transaction:
-
Click Yes to complete the transaction.
The transaction completion process begins.
-
Click No to return to the tender selection screen. See Selecting Tenders.
-
Store Credit
To issue store credit:
-
Select Issue Store Credit in the menu of tenders. See Selecting Tenders.
Figure 5-52 Issue Store Credit Amount Prompt

-
If necessary, change the amount of store credit to issue.
Note:
If the total return amount is greater than the maximum allowed value of store credit to issue, Xstore Point of Service will show the maximum allowed value of store credit.
-
Press Enter.
-
Click OK if prompted sign the store credit voucher.
-
If prompted to complete the transaction:
-
Click Yes to complete the transaction.
The transaction completion process begins.
-
Click No to return to the tender selection screen. See Selecting Tenders.
Figure 5-53 Store Credit Voucher Signature Prompt

-
-
If necessary, sign the store credit voucher.
-
Give the customer the store credit voucher along with the receipt.
Merchandise Credit Card
To issue or reload a merchandise credit card:
-
Select Issue Merch Credit Card or Reload Merch Credit Card in the menu of tenders. See Selecting Tenders.
Note:
Select the Issue Merch Credit Card option to issue a new merchandise credit card. Select the Reload Merch Credit Card option to put the refund value onto the customer's current merchandise credit card.
Figure 5-54 Merchandise Credit Card Number Prompt

-
Enter the merchandise credit card number:
-
Scan the merchandise credit card.
-
Enter the merchandise credit card number and press Enter.
-
-
If necessary, change the amount to refund.
-
Press Enter.
-
If prompted to complete the transaction:
-
Click Yes to complete the transaction.
The transaction completion process begins.
-
Click No to return to the tender selection screen. See Selecting Tenders.
-
Mail Check Refund - Home Office Check
A mail check refund may be used when a customer returns an item that was paid with a personal check, but the waiting period has not yet elapsed for the check to clear the bank. After the check has cleared, a refund check is mailed to the customer.
To tender a return transaction with a home office check:
-
Select Home Office Check in the menu of tenders. See Selecting Tenders.
Xstore Point of Service prompts to confirm recipient information.
-
If necessary, make changes to the recipient information.
-
Press Save Changes.
Figure 5-55 Home Office Check Amount Prompt

-
If necessary, change the tender amount.
-
Press Enter.
-
If prompted to complete the transaction:
-
Click Yes to complete the transaction.
The transaction completion process begins.
-
Click No to return to the tender selection screen. See Selecting Tenders.
-
House Account
To tender a transaction with a house account:
-
Select House Account in the menu of tenders. See Selecting Tenders.
-
If there is no customer assigned to the transaction, you are prompted to add one. Click Yes if prompted.
-
If the customer does not have an active house account set up, this tender will not be available.
-
If a house account payment is part of the sales transaction, the House Account tender option will not be available.
-
If the customer's house account has been closed, this tender is not available.
-
If the customer's house account is on hold, this tender is not available.
Xstore Point of Service displays a list of authorized buyers associated with this house account.
Figure 5-56 Return House Account

-
-
Select the authorized buyer from the list:
-
Click the buyer.
-
Use the up and down arrows to highlight the correct buyer, then press Spacebar.
-
-
If necessary, change the amount to return on the house account.
Figure 5-57 Refund House Account Prompt

-
Press Enter.
-
If the amount to tender exceeds the account limit:
-
If the amount is within the override limit, Xstore Point of Service opens a prompt:
-
Click Yes to use the house account tender and continue the transaction.
-
Click No to either use a different tender or apply a smaller amount to the house account and use a different tender for the remainder.
-
-
If the amount exceeds the account limit and is greater than the override limit, the transaction cannot be tendered for the full amount using the house account.
Click OK to close the prompt and change the amount to apply to the house account.
-
-
If prompted, ask the customer to sign on the PIN pad device.
-
Verify the customer's signature.
-
Press Enter.
-
If prompted to complete the transaction:
-
Click Yes to complete the transaction.
The transaction completion process begins. Continue with Step 10
-
Click No to return to the tender selection screen. See Selecting Tenders.
-
-
If prompted, ask the customer to sign the receipt.
Room Charge
A room charge is a tender type used in hotels. Select the Room Charge tender option to remove the total of the transaction from the guest's room bill.
-
Select Room Charge in the menu of tenders. See Selecting Tenders.
A Guest Lookup form opens.
-
Enter lookup information in any one of the fields:
Note:
Any additional information you enter in to another field is ignored.
-
Room #: Guest room number.
-
Guest Name: Full name of the guest.
-
Guest #: ID number for the guest.
-
-
Click Process.
Xstore Point of Service displays a list of customers matching the search information.
-
Select the guest's name in the list:
-
Click the customer.
-
Use the up and down arrows to highlight the correct customer, then press Spacebar.
-
-
Click OK.
-
If necessary, change the amount to the charged to the guest's room bill.
-
Press Enter.
-
If prompted to complete the transaction:
-
Click Yes to complete the transaction.
The transaction completion process begins. Continue with Step 9.
-
Click No to return to the tender selection screen. See Selecting Tenders.
-
-
When prompted, ask the customer to sign the receipt for the room charge.
Customer Not Present
There are times when customers require a refund but are not present in the store and are likely to be on the phone with the cashier arranging the return/refund.
This can occur in several scenarios, such as:
The refund to a Credit/Debit card may then be required, if for example:
-
The verified refund to the original payment card used on the sale, is failing for some reason, such as the payment card having expired, or the time duration since the payment is longer than that accepted by the payment provider
-
The original sale perhaps did not use a Credit/Debit card, but another form of payment such as cash, check or Gift Card
Credit/Debit (Card Not Present)
-
Select Credit/Debit (Card Not Present) in the menu of tenders.
Figure 5-58 Return Customer Not Present

-
Select a reason as to why the customer is not present.
-
Confirm the amount to be refunded (usually the full transaction amount) or key a different amount.
-
Xstore sends a card refund request to EFTLink, indicating that the cardholder is not present.
-
The tender amount is displayed onto the Payment Terminal.
-
The payment terminal prompts the cashier to key the required data such as Card Number, Expiry Date and CVV on the payment terminals keypad.
-
Note that the required data could be different dependent on the payment provider and the region / country
-
-
Request the required data from the customer over the phone.
-
Key the requested data into the payment terminal.
The Payment Terminal either Approves or Rejects the refund.
The Sale Complete prompt is displayed, and the cashier is prompted to select a receipt method.
The cashier can select to email or to print the receipts as the Xstore configuration dictates.
Xstore completes the transaction.
Saved Payment Card
-
If customer has payment card details saved against their customer account, then these payment cards can be used
-
The customer must be attached to the transaction in order for this refund payment method to be available
-
This method is quicker and more secure than the previous method
-
Select Saved Payment Card in the menu of tenders.
Note that this tender may require supervisor security privilege.
-
Xstore displays a list of Saved Payment Cards and cashier asks customer if they want the refund to one of these cards.
Only the Card Type and last four digits of the card number will be displayed.
-
Select the required Saved Payment Card from the list displayed.
-
Select a reason as to why the customer is not present.
-
Confirm the amount to be refunded (usually the full transaction amount) or key a different amount.
-
Xstore sends a card refund request to EFTLink, indicating the Card Token of the selected saved payment card.
-
The Payment Terminal either Approves or Rejects the refund.
The Sale Complete prompt is displayed and the cashier is prompted to select a receipt method.
The cashier can select to email or to print the receipts as the Xstore configuration dictates.
Xstore completes the transaction.