Employees
Use this feature to create and modify employee records for your organization.
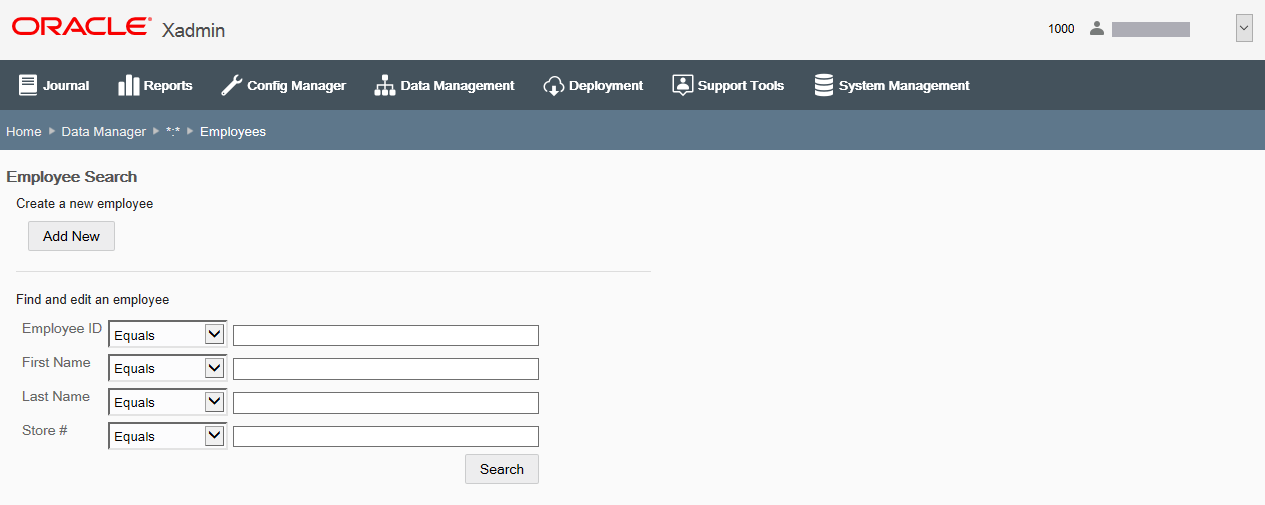
Figure 6-26 Employee Maintenance Page

If adding a new employee record:
At the Employee Maintenance page, click Add New to create a new employee record.
If editing an existing employee record:
Enter search criteria and click Search to find/edit an existing employee record in your organization. If you do not enter any criteria before selecting Search, all employee records in your organization will be returned in the search. To edit information for an existing employee record, select the row from the search results list and click Edit at the employee information screen.
Note:
To delete an existing employee record, click the Delete icon associated with the record at the search results list.
See step 6 for additional procedural information.
The following Employee Record Maintenance fields are available:
Table 6-19 Basic Employee Attributes
| Field | Description |
|---|---|
|
Employee ID [REQUIRED] |
Enter the unique number used to identify a store employee. This field cannot be changed in edit mode. |
|
Login ID |
If used, enter the employee's user ID for logging in to the system. (Only displayed if Oracle Retail Xstore Point of Service is configured to use a Login ID.) |
|
First Name [REQUIRED] |
Enter the employee's first name. |
|
Middle Name |
Enter the employee's middle name. |
|
Last Name [REQUIRED] |
Enter the employee's last name. Note: Select a suffix from the drop-down list if applicable. |
|
Language |
Select the employee's preferred language. |
|
Gender |
Select the employee's gender, Male or Female. |
|
Employment Status |
Select the employee's status: Active, Inactive, Terminated. Note: If Terminated status is selected, the termination date is required. Enter the termination date in the Termination Date field. |
|
Activation Date |
Enter the date on which the employee became active. |
Table 6-20 Detailed HR Information Attributes
| Field | Description |
|---|---|
|
Job Title |
Enter the employee's job title. |
|
Birth Date |
Enter the employee's date of birth. |
|
Base Pay |
Enter the employee's base pay. |
|
Pay Status |
Select the employee's pay status; hourly or salaried. |
|
Hire Date |
Enter the date the employee was hired. |
|
Last Review |
Enter the date of the employee's last review. |
|
Next Review |
Enter the date of the employee's next review. |
|
Extra Withholding check box |
Select this option if the employee wants to have extra money withheld from his/her pay. Type the dollar amount to be withheld in the Amount field. |
|
Overtime Eligible check box |
Select this option if the employee is eligible for overtime. |
|
Clock In Required check box |
Select this option if the employee is required to clock in and out. |
Table 6-21 Contact Information
| Field | Description |
|---|---|
|
Address 1 |
Enter the first line of the mailing address. |
|
Address 2 |
Enter the second line of the mailing address. |
|
City |
Enter the city component of the mailing address. |
|
State |
Enter the State/Province component of the mailing address. |
|
Postal Code |
Enter the Postal or ZIP code component of the mailing address. |
|
Country |
Enter the country component of the address. |
|
Primary Phone |
Enter the employee's primary phone number. |
|
Other Phone |
Enter the employee's alternate phone number. |
|
|
Enter the employee's email address. |
|
Emergency Contact |
Enter the name of an emergency contact for the employee. |
|
Emergency Phone |
Enter the phone number of the emergency contact for the employee. |
Table 6-22 Oracle Retail Xstore Point of Service Security Attributes
| Field | Description |
|---|---|
|
Primary Security Group [REQUIRED] |
Select the fundamental security group to which this employee belongs. |
|
Security Groups check box |
Select any other security groups to which this employee belongs: Trainee, Cashier, Keyholder, Manager. Select all that apply. By default, the "Everyone" security group is required for all employees. This value cannot be changed. |
|
Customer Groups check box |
Select the customer groups to which this employee belongs. Select all that apply. |
Table 6-23 Assigned Stores Attributes
| Field | Description |
|---|---|
|
Store # |
Enter the specific retail store within the organization the employee is assigned to. |
|
Start Date |
Enter the date the employee assignment begins at the store. Click Add Store to assign the employee to this store on the start date. Add as many stores/start dates as needed. Note: Click Add All Stores to assign the employee to all stores in the organization. The store information is added to the screen. Repeat until all stores where the employee works are listed. If needed, click Delete to remove an assigned store.. |
|
Temporary Assignment check box |
Select this option if the assignment is temporary. Enter the ending date for this temporary assignment. |