Items
Use this feature to manage different types of items and item features for your organization.
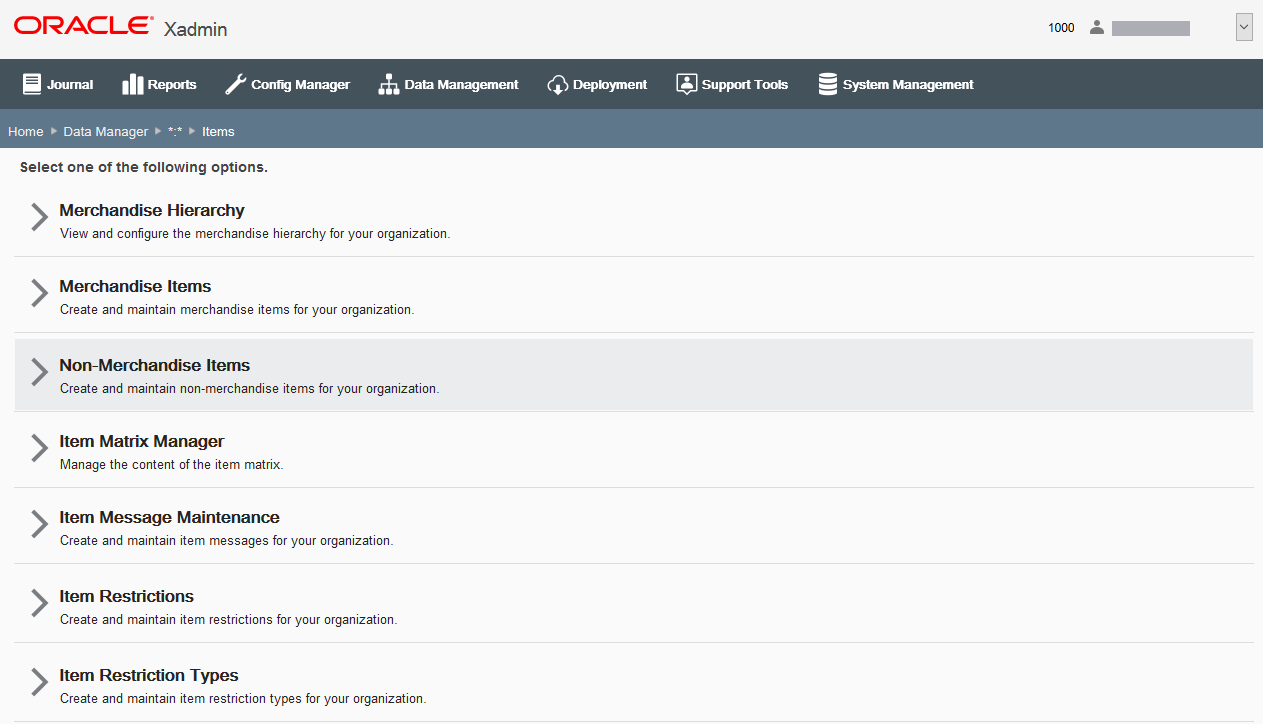
Figure 6-3 Data Manager - Items Page
-
To manage the merchandise hierarchy, click Merchandise Hierarchy. See Merchandise Hierarchy.
-
To create and manage merchandise items (including prices and attached items), click Merchandise Items. See Merchandise Items.
-
To create and manage non-merchandise items (including prices), click Non-Merchandise Items. See Non-Merchandise Items.
-
To manage the item matrix settings, click Item Matrix Manager. See Item Matrix Manager.
-
To create and maintain item messages, click Item Message Maintenance. See Item Message Maintenance.
-
To create and maintain item restrictions, click Item Restrictions. See Item Restrictions.
-
To create and maintain item restrictions, click Item Restriction Types. See Item Restriction Types.
Merchandise Items
...continued from Items
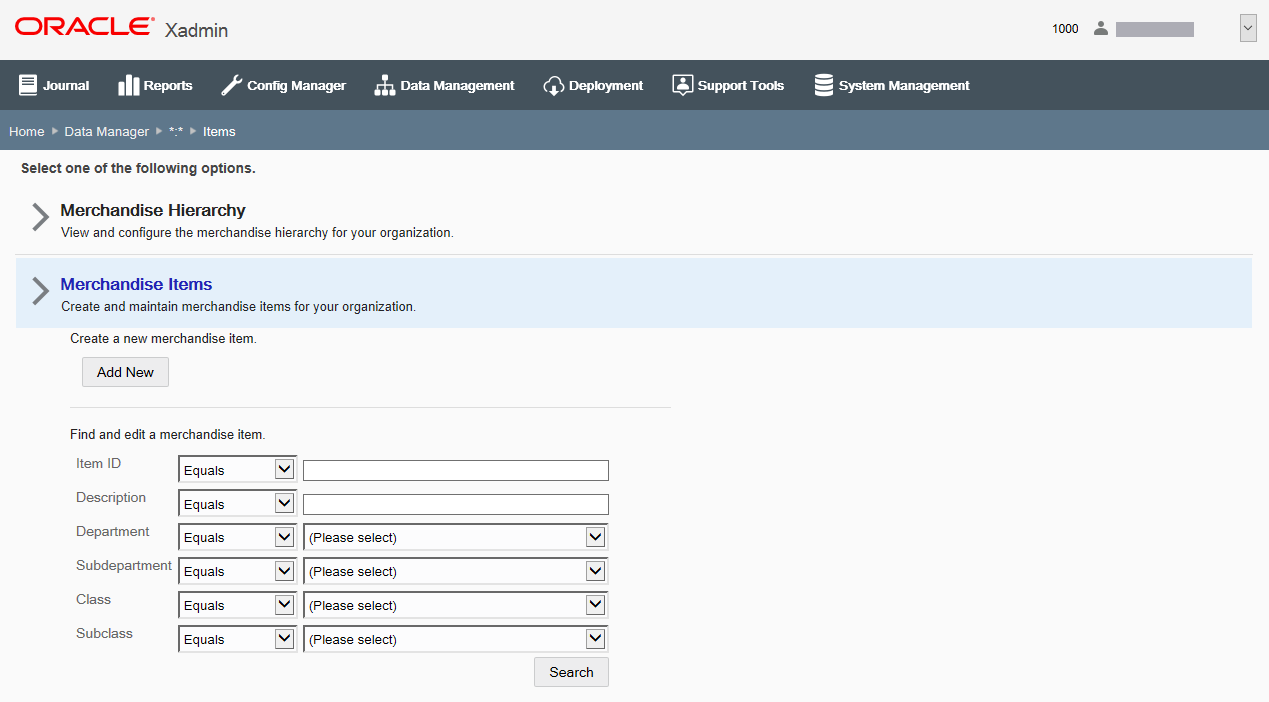
Figure 6-4 Items Page
If adding a new item:
At the Item Maintenance page, click Add New to create a new item.
If editing an existing item:
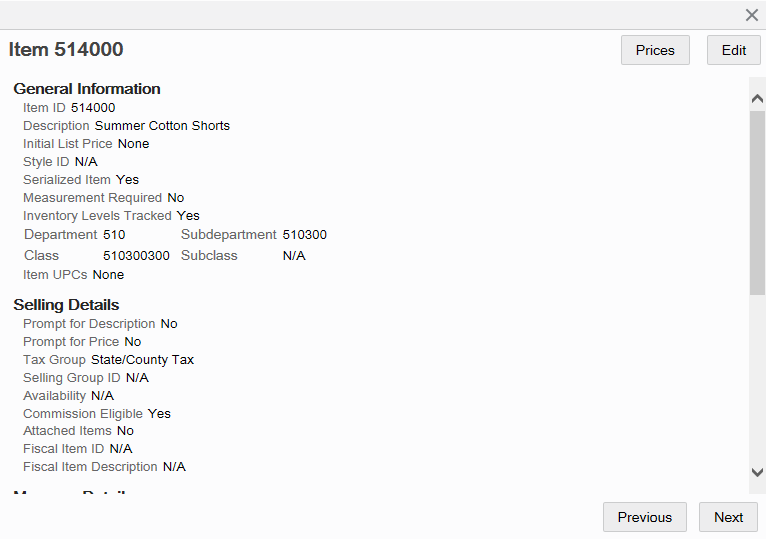
At the Item Maintenance page, enter search criteria and click Search to find/edit an existing item in your organization. If you do not enter any criteria before selecting Search, all items in your organization will be returned in the search. To edit information for an existing item, select the row from the search results list and click Edit at the Item Information window (Figure 6-5).
Note:
To view and/or edit item prices, refer to Item Prices for procedural information.
See step 6 for additional procedural information.
The following Item Maintenance fields are available:
Table 6-1 Basic Merchandise Information
| Field | Description |
|---|---|
|
Item ID [REQUIRED] |
Enter the item identifier. This field cannot be edited for existing items. |
|
Description [REQUIRED] |
Enter the item description. |
|
Prompt for Description check box |
Select this check box if the item description must be manually entered when this item is sold. |
|
Tax Group [REQUIRED] |
Select the item's tax group from the drop-down list. Possible values are from the Tax Group table (tax_tax_group). |
|
Availability |
Select the product availability to determine whether or not an item is available for sale: Available, Not Sellable at POS, or Recalled. |
|
Stock Status check box |
If applicable, select this option and type the item's status based on its stock availability when prompted for a value. For example, RESTRICTED_QTY, DISCONTINUED, CLEARANCE, and so on. |
|
Commission check box |
If applicable, select this option if the item qualifies for commission. |
|
Attached Items check box |
Select this option if the item has attached items. (See Attached Items for more information about setting up attached items.) |
|
Serial Number check box |
Select this option if a serial number is required. |
|
Selling Group ID |
If you assign an item to a selling group, the item can not be sold in any transaction containing items from a different selling group. |
Table 6-2 Merchandise Attributes
| Field | Description |
|---|---|
|
Department |
Select the item's department from the drop-down list. Possible values are from the itm_merch_hierarchy table where level code is DEPARTMENT. |
|
Subdepartment |
Select the item's subdepartment from the drop-down list. Possible values are from the itm_merch_hierarchy table where level code is SUBDEPARTMENT. |
|
Class |
Select the item's class from the drop-down list. Possible values are from the itm_merch_hierarchy table where level code is CLASS. |
|
Subclass |
Select the item's subclass from the drop-down list. Possible values are from the itm_merch_hierarchy table where level code is SUBCLASS. |
|
Style check box |
Select this option if the item is associated with a style, then enter the style ID when prompted. |
|
Season check box |
Select this option if the item is associated with a season, then enter the season code when prompted. |
|
Vendor check box |
Select this option if the item is associated with a vendor, then select the vendor from the drop-down list when prompted. |
|
Item UPCs |
Enter the UPC for the item and click Add. You can enter as many UPCs as needed. After adding at least one UPC, a Delete option will be available to remove a UPC if needed. |
Table 6-3 Quantity Attributes
| Field | Description |
|---|---|
|
Sale Quantity check box |
Select this option if the item quantity cannot be changed from 1. Note: This option will disable all other item quantity options listed here. |
|
Quantity Prompt check box |
Select this option if the item quantity must be manually entered when this item is sold. |
|
Weight Prompt check box |
Select this option if the item weight must be manually entered when this item is sold. |
|
Initial Sale Quantity check box |
Select this option if the item is sold in a quantity other than one. If selected, enter the initial quantity at which this item must be sold. |
|
Minimum Sale Quantity check box |
Select this option if the item has a minimum sale quantity. If selected, enter the minimum quantity of this item that may be sold in a single transaction. |
|
Maximum Sale Quantity check box |
Select this option if the item has a maximum sale quantity. If selected, enter the maximum quantity of this item that may be sold in a single transaction. If a value is not specified, the system configuration for maximum quantity per sale item is used. If a value is specified here and it is greater than the system configuration value, the maximum sale quantity is used. |
Table 6-4 Customer Related Attributes
| Field | Description |
|---|---|
|
Customer Information Required check box |
Select this option if the system prompts for customer information when the item is sold. If selected, a prompt for information will be displayed. Select whether the information is required or optional: Prompt, entry is required Prompt, entry is optional |
|
Purchaser Minimum Age Required check box |
Select this option if a minimum age is required to purchase the item. If selected, enter the minimum age (in years) required to purchase the item. |
Table 6-5 Item Restriction Attributes
| Field | Description |
|---|---|
|
Inventoried check box |
Select this option if inventory levels are tracked for this item. |
|
Item Type Restrictions: |
|
|
Disallow Layaway check box |
Select this option if this item cannot be added to a layaway transaction type. |
|
Disallow Order check box |
Select this option if this item cannot be ordered via Oracle Retail Order Broker Cloud Service Order functionality. |
|
Disallow Rain Check check box |
Select this option if this item is not eligible for rain check functionality. |
|
Disallow Returns check box |
Select this option if this item cannot be added to a return transaction type. |
|
Disallow Send Sale check box |
Select this option if this item cannot be added to a send sale transaction type. |
|
Disallow Special Order check box |
Select this option if this item cannot be added to a special order transaction type. |
|
Disallow Work Order check box |
Select this option if this item cannot be added to a work order transaction type. |
|
Price Change Restrictions: |
|
|
Disallow Deal check box |
Select this option if this item does not qualify for deals. |
|
Disallow Discount check box |
Select this option if this item cannot be discounted. |
|
Disallow Price Change check box |
Select this option if this item price cannot be changed. |
Table 6-6 Values Attributes
| Field | Description |
|---|---|
|
Unit Cost |
Enter the cost for each retail sale unit of this item. |
|
Initial List Price |
Enter the retail price per sale unit of the item. |
|
Prompt for Price check box |
Select this option if the retail price must be manually entered when this item is sold. |
Item Prices
When viewing item information, and if the selected item record is within your targeted org node, there is an option available to view and edit item pricing information. You can edit prices for your org node level only. However, you can view prices set above your org node level.
-
At the Item Maintenance page (Figure 6-4), enter search criteria and select Search to find/edit an existing item in your organization.
-
At the Item search results list, select the item row from the list.
-
Click Prices at the Item Information window.
Figure 6-5 Item Information Window
-
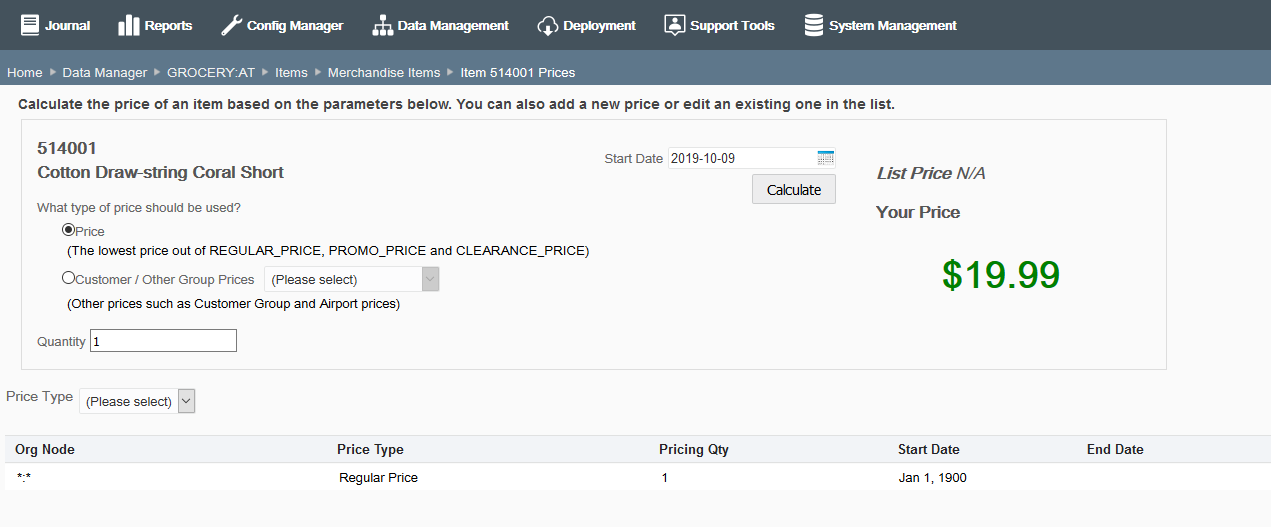
At the Item Prices page you can calculate the price of an item based on specified parameters, add a new price, or edit an existing price as needed.
Figure 6-6 Item Prices Page
Note:
To quickly find an item price in the list at the Item Prices page, select the type of price from the Price Type filter list.

Calculating the Price of an Item
Use this procedure to identify the exact price that exists for an item based on the type of price (regular price or a customer group), the pricing quantity, and date.
-
At the Item Prices page, enter the required information:
-
Price [REQUIRED] - What type of price should be used?
-
Price - The lowest price out of the regular price, promo price and clearance price.
-
Customer/Other Group Prices - Select from the list of available price types for the organization. For example, Airport Price, Airport Tax Exempt Price, Elite Program Member, Employee, Employee Family, Maximum Retail Price, Normal Level
-
-
Pricing Quantity [REQUIRED] - Enter the quantity of the item you are pricing.
-
Start Date [REQUIRED] when the price is in effect - Use the calendar to select the date for the item you are pricing.
-
-
Click Calculate. The system retrieves the pricing information:
-
If pricing information is found, the price for the item-based on the criteria you entered-is displayed.
-
If no pricing information is found, the "No Price Found" message displays. If you want to add pricing information, click the "No Price Found" link to open the Add Item Price window.
At the Add Item Price window, the parameters you
entered in the pricing search (Price Type, Pricing Qty, and Start Date) are populated automatically. See Adding or Editing a Price below for more information about adding/editing prices.
-
Adding or Editing a Price
-
At the Item Prices page, do one of the following:
-
To add a new price, click Add New and complete the fields as required.
-
To edit an existing price, click a row in list and edit the fields as needed.
Figure 6-7 Item Price Window - Add New Price Example
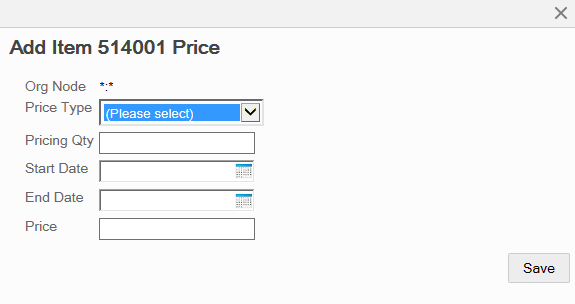
Table 6-7 Add Item Price Fields
Field Description Ord Node
This value cannot be changed.
Price Type [REQUIRED]
Select a price type from the drop-down list of available price types. This value cannot be changed in Edit mode.
Pricing Qty [REQUIRED]
Enter the pricing quantity for this item. This value cannot be changed in Edit mode.
Start Date [REQUIRED]
Enter/select the starting date for this price to be in effect. This value cannot be changed in Edit mode.
End Date
Enter/select the ending date when this price is no longer in effect.
Price [REQUIRED]
Enter the item price.
-
-
Click Save.
Attached Items
When viewing item information, if the selected item record is within your targeted org node and enabled for attached items, there is an option available to view and edit attached item information. You can edit attached items for your org node level only. See Table 6-1 for attached item setup information.
-
At the Item Maintenance page, enter search criteria and select Search to find/edit an existing item in your organization.
-
At the Item search results list, select the item row from the list.
Figure 6-8 Merchandise Items List Page - With Attached Items

-
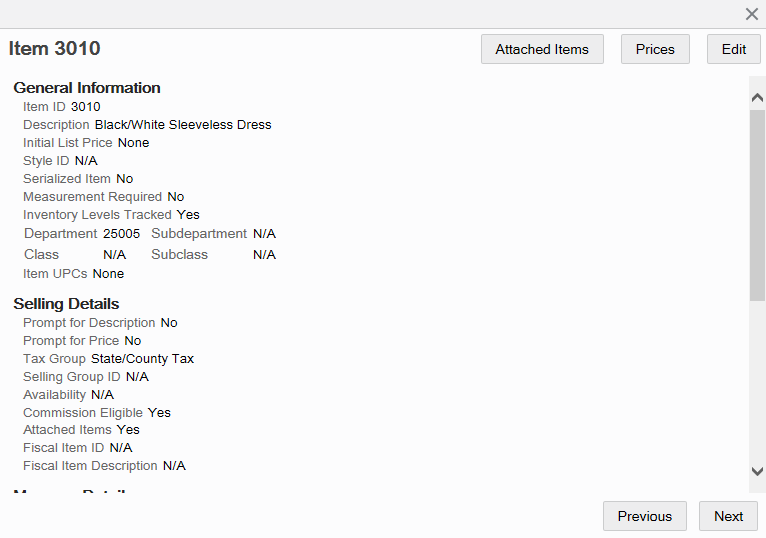
Click Attached Items at the Item Information window to open the Attached Items page.
Figure 6-9 Item Information Window - Attached Items Button
-
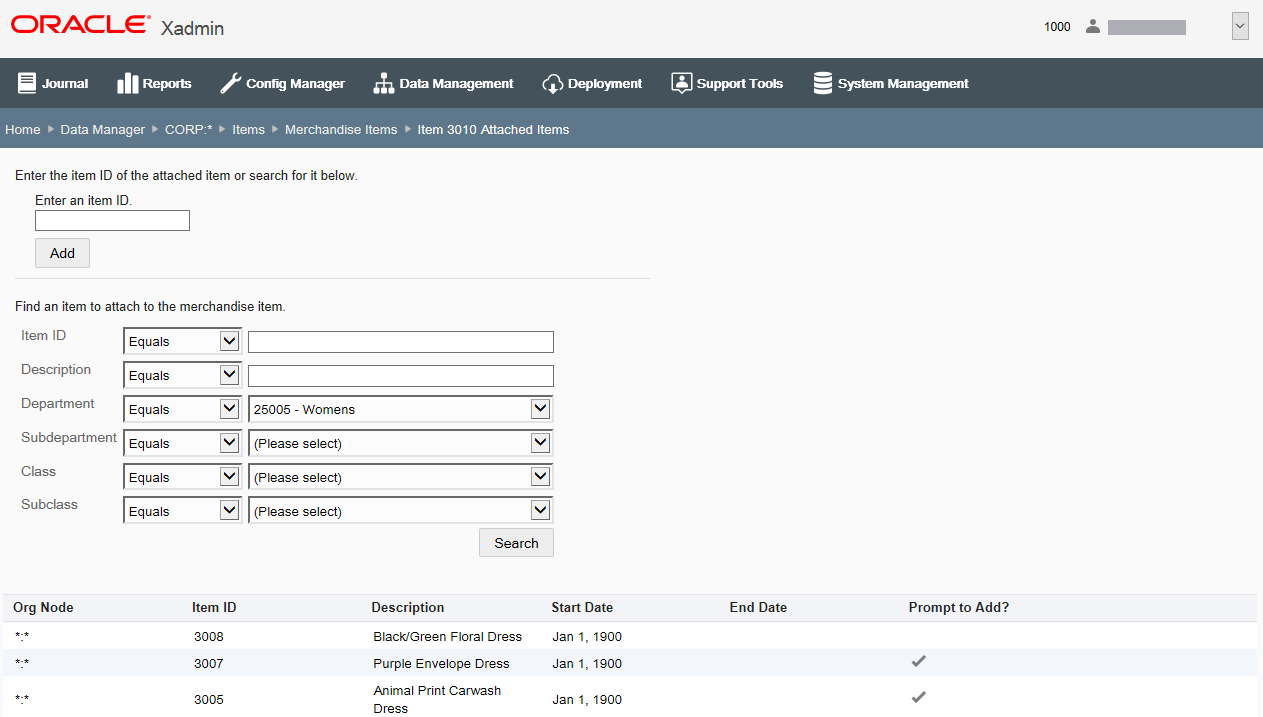
The Attached Items page lists the existing attached items for the selected merchandise item.
Figure 6-10 Attached Items Page
-
To add an attached item to the sold item:
-
If you know the attached item ID, enter the item ID in the "Enter an item ID" field and click Add. Continue with step 2 on page 14.
-
If you do not know the item ID, enter search criteria and then click Search to find an item to attach to the merchandise item. Continue with To Add an Attached Item.
-
To edit an attached item, select the row you want to edit. Continue with To Edit an Attached Item.
-
To delete the relationship between the attached item and the sold item, click the Delete icon associated with the attached item and click Yes when prompted to confirm the deletion.
-
-
Adding an Attached Item
-
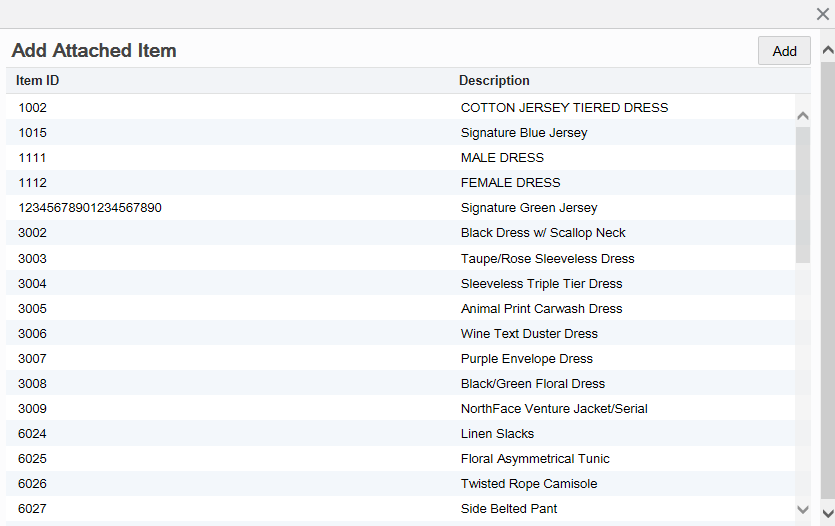
At the Add Attached Item window, select the item and click Add.
Figure 6-11 Add Attached Item Window
-
Enter the attached item information.
Figure 6-12 Item Information

-
Sold Item - The merchandise item. [CANNOT BE CHANGED]
-
Attached Item - The item attached to the merchandise item. [CANNOT BE CHANGED]
-
Org Node - The org node that was targeted when the attached item relationship was originally made. [CANNOT BE CHANGED]
-
Quantity to Add - [REQUIRED] The quantity of the item that is to be attached.
-
Start Date - [REQUIRED] The starting date for this attached item.
-
End Date - The ending date for this attached item.
-
Do you want to prompt users before adding this item check box - Select to enable prompting.
-
Do you want to prompt users when returning this item check box - Select to enable prompting.
-
-
Click Save. The system returns to the Attached Items page.
Editing An Attached Item
-
After selecting the row you want to change, edit the attached item information.
-
Sold Item - The merchandise item. [CANNOT BE CHANGED]
-
Attached Item - The item attached to the merchandise item. [CANNOT BE CHANGED]
-
Org Node - The org node that was targeted when the attached item relationship was originally made. [CANNOT BE CHANGED]
-
Quantity to Add - [REQUIRED] The quantity of the item that is to be attached.
-
Start Date - [REQUIRED] The starting date for this attached item.
-
End Date - The ending date for this attached item.
-
Do you want to prompt users before adding this item check box - Select to enable prompting.
-
Do you want to prompt users when returning this item check box - Select to enable prompting.
-
-
Click Save. The system returns to the Attached Items page.
Merchandise Hierarchy
...continued from Items
Select the Merchandise Hierarchy option (Figure 6-3) to view and configure the merchandise hierarchy for your organization.
Figure 6-13 Merchandise Hierarchy Maintenance Page - Dept 300 Selected
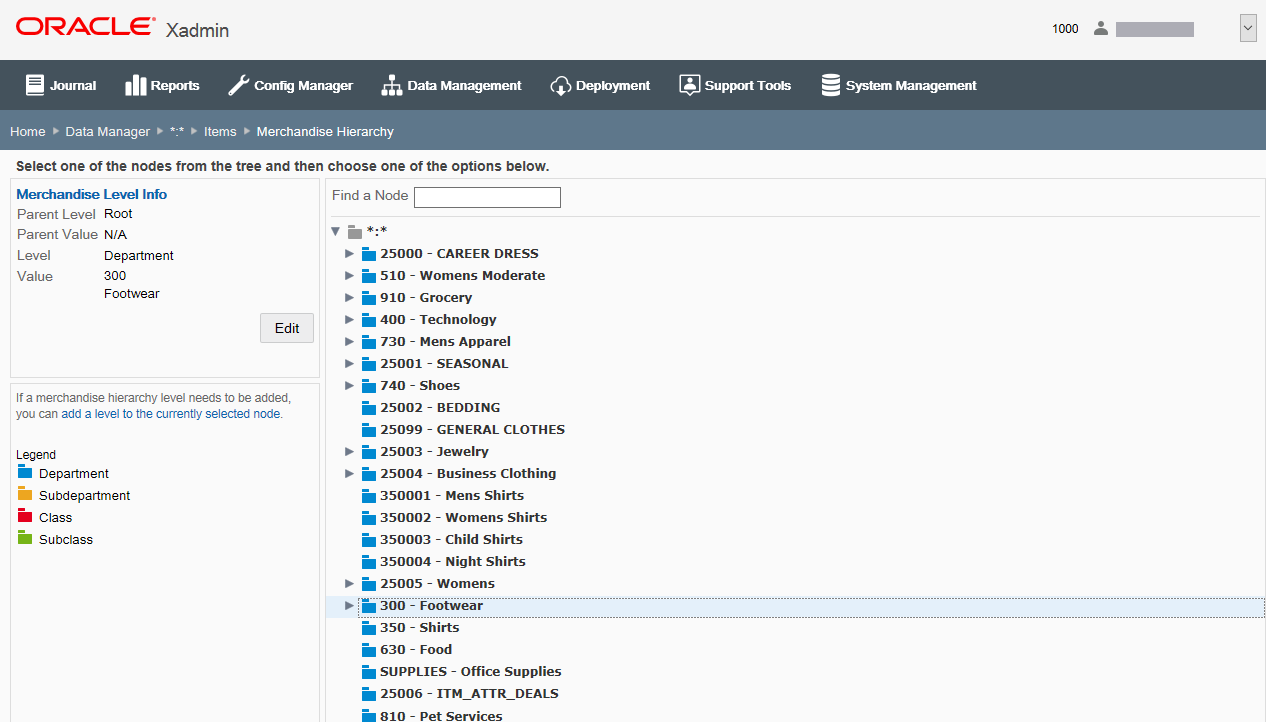
The following information is shown on this page:
Merchandise Level Information - This area shows information about the selected level of the merchandise hierarchy, including the Parent Level and Value and the Item Level and Value.
If a level is inactive, it will be indicated as “Hidden".
Use the merchandise hierarchy tree to navigate and understand the hierarchy itself. (By default, the tree displays the Department level). When you select a merchandise hierarchy level in the tree view, the details of the level are displayed in the Merchandise Level Information panel.
Click Edit to update the merchandise level information displayed in the panel. See Editing a Merchandise Hierarchy Level below.
Action Panel - This area contains the link to add to an organization's organization hierarchy. The color legend shown here corresponds to the colors in the tree view for the merchandise hierarchy levels. To add new areas of a merchandise hierarchy, see Adding to a Merchandise Hierarchy Level.
Note:
You cannot add a new merchandise hierarchy level. Levels are restricted to what currently exists in your organization: Department, Subdepartment, Class, and so on.
Editing a Merchandise Hierarchy Level
-
In the tree view, select the parent hierarchy level for the planned edit to the merchandise hierarchy.
Note:
Use the "Find a Node" search box to quickly locate a node in the merchandise hierarchy tree.
-
With the node selected, click Edit.
-
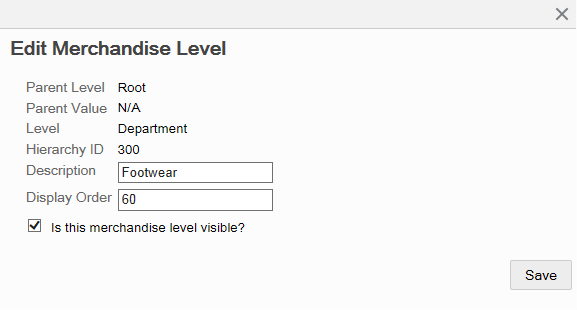
Edit the information as needed:
Figure 6-14 Edit Merchandise Level
-
Parent Level - The parent merchandise hierarchy level. [CANNOT BE CHANGED]
-
Parent Value - The parent merchandise hierarchy value. [CANNOT BE CHANGED]
-
Level - The level type. (For example, if the parent level is a Department, then this level is Subdepartment based on the Merchandise Hierarchy setup shown here). [CANNOT BE CHANGED]
-
Hierarchy ID - The identifier for the merchandise hierarchy level. [CANNOT BE CHANGED]
-
Description - The description for the merchandise hierarchy level.
-
Display Order - The display order for the merchandise hierarchy level.
-
Is this merchandise level visible? check box - When selected, the merchandise level is active and visible. To deactivate the merchandise hierarchy level, remove the check mark from the check box. The deactivated level and all sublevels are grayed out on the page and a message displays in the Merchandise Level Information panel indicating that the level is hidden.
Note:
If needed, click the Close icon to close the window without saving your changes. If prompted, click Yes to confirm you do not want to save any changes.
-
-
Click Save to close the window. The merchandise hierarchy level is updated as specified.
Adding to a Merchandise Hierarchy Level
-
In the tree view, select the parent hierarchy level for the planned addition to the merchandise hierarchy.
Note:
Use the "Find a Node" search box to quickly locate a node in the merchandise hierarchy tree.
-
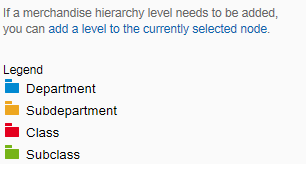
With the node selected, click the link - add a level to the currently selected node.
Figure 6-15 Add a Level Link
-
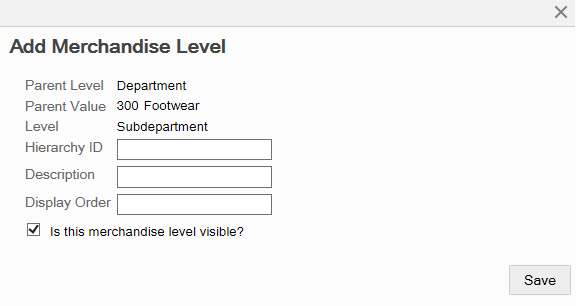
Enter the information for the new level:
Figure 6-16 Add Merchandise Level
-
Parent Level - The parent merchandise hierarchy level. [CANNOT BE CHANGED]
-
Parent Value - The parent merchandise hierarchy value. [CANNOT BE CHANGED]
-
Level - The level type to be created. (For example, if the parent level is a Department, then this level is Subdepartment based on the Merchandise Hierarchy setup shown here). [CANNOT BE CHANGED]
-
Hierarchy ID - The identifier for the new merchandise hierarchy level. [REQUIRED]
-
Description - The description for the new merchandise hierarchy level. [REQUIRED]
-
Display Order - The display order for the new merchandise hierarchy level.
-
Is this merchandise level visible? check box - When selected, the merchandise level is active and visible. To deactivate the merchandise hierarchy level, remove the check mark from the check box. The deactivated level and all sublevels are grayed out on the page and a message displays in the Merchandise Level Information panel indicating that the level is hidden.
Note:
If needed, click the Close icon to close the window without saving your changes. When prompted, click Yes to confirm you do not want to save any changes.
-
-
Click Save to close the window. The new merchandise hierarchy level is added to the tree.
Non-Merchandise Items
...continued from Items
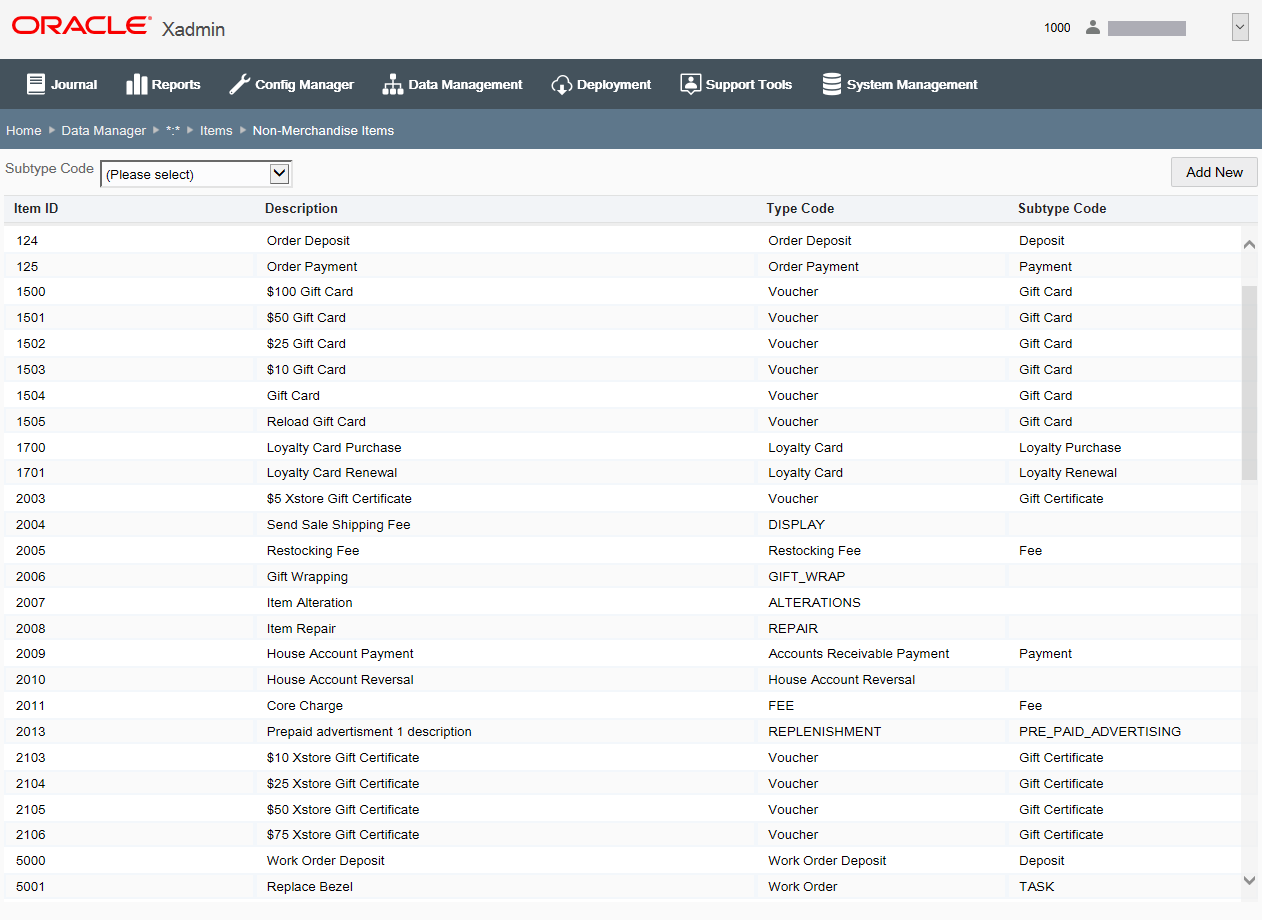
Select the Non-Merchandise Items option (Figure 6-3) to view and configure the merchandise hierarchy for your organization. The Non-Merchandise Items Maintenance page displays all non-merchandise items available to the targeted org node.
Figure 6-17 Non-Merchandise Items Maintenance Page
Note:
Use the Subtype Code filter to find non-merchandise items within the list of non-merchandise items.
If adding a new non-merchandise item:
At the Non-Merchandise Items Maintenance page, click Add New to create a new item.
If editing an existing item:
At the Non-Merchandise Items Maintenance page, select the row from the non- merchandise items list and click Edit at the item information window.
Note:
To view and/or edit item prices, refer to Item Prices, step 2, for procedural information.
See step 6 for additional procedural information.
The following Non-Merchandise Item Maintenance fields are available:
Table 6-8 Basic Non-Merchandise Information
| Field | Description |
|---|---|
|
Item ID [REQUIRED] |
Enter the item identifier. This field cannot be edited for existing items. |
|
Description [REQUIRED] |
Enter the item description. |
|
Prompt for Description check box |
Select this check box if the item description must be manually entered when this item is sold. |
|
Tax Group [REQUIRED] |
Select the item's tax group from the drop- down list. Possible values are from the Tax Group table (tax_tax_group). |
|
Availability |
Select the product availability to determine whether or not an item is available for sale: Available, Not Sellable at POS, or Recalled. |
|
Commission check box |
If applicable, select this option if the item qualifies for commission. |
|
Serial Number check box |
Select this option if a serial number is required. |
Table 6-9 Quantity Attributes
| Field | Description |
|---|---|
|
Sale Quantity check box |
Select this option if the item quantity cannot be changed from 1. Note: This option will disable all other item quantity options listed here. |
|
Quantity Prompt check box |
Select this option if the item quantity must be manually entered when this item is sold. |
|
Initial Sale Quantity check box |
Select this option if the item is sold in a quantity other than one. If selected, enter the initial quantity at which this item must be sold. |
|
Maximum Sale Quantity check box |
Select this option if the item has a maximum sale quantity. If selected, enter the maximum quantity of this item that may be sold in a single transaction. |
|
Customer Information Required check box |
Select this option if the system prompts for customer information when the item is sold. If selected, a prompt for information will be displayed. Select whether the information is required or optional: Prompt, entry is required Prompt, entry is optional |
|
Purchaser Minimum Age Required check box |
Select this option if a minimum age is required to purchase the item. If selected, enter the minimum age (in years) required to purchase the item. |
Table 6-10 Item Restriction Attributes
| Field | Description |
|---|---|
|
Inventoried check box |
Select this option if inventory levels are tracked for this item. |
|
Item Type Restrictions: |
|
|
Disallow Layaway check box |
Select this option if this item cannot be added to a layaway transaction type. |
|
Disallow Order check box |
Select this option if item cannot be ordered via Oracle Retail Order Broker Cloud Service Order functionality. |
|
Disallow Returns check box |
Select this option if this item cannot be added to a return transaction type. |
|
Disallow Send Sale check box |
Select this option if this item cannot be added to a send sale transaction type. |
|
Disallow Special Order check box |
Select this option if this item cannot be added to a special order transaction type. |
|
Disallow Work Order check box |
Select this option if this item cannot be added to a work order transaction type. |
|
Price Change Restrictions: |
|
|
Disallow Deal check box |
Select this option if this item does not qualify for deals. |
|
Disallow Discount check box |
Select this option if this item cannot be discounted. |
|
Disallow Price Change check box |
Select this option if this item price cannot be changed. |
Table 6-11 Specific Non-Merchandise Item Attributes
| Field | Description |
|---|---|
|
Type Code [REQUIRED] |
Select the type code for the non-merchandise item. If needed, select Other to create a new type code and enter new type code in the Type Code field. Note: A new type code created here will only be for this non-merchandise item and will not be available for any other items. |
|
Subtype Code [REQUIRED] |
Select the subtype code for the non-merchandise item. |
|
Exclude From Net Sales check box |
Select this option if the non-merchandise item will not be attributed as revenue. |
|
Prompt for Price check box |
Select this option if the retail price must be manually entered when this item is sold. |
Item Matrix Manager
...continued from Items
Select the Item Matrix Manager option (Figure 6-3) to manage the item matrix information for your organization.
At the Item Matrix Manager page, manage the look and feel of the item matrix in Oracle Retail Xstore Point of Service. Use this feature to assign matrix colors to merchandise hierarchy and/or item records, mark merchandise hierarchy and/or item records as hidden (items labeled as hidden will not show in the item matrix in Oracle Retail Xstore Point of Service), and change the sort order of merchandise hierarchy and/or item records to specify how they will display within the item matrix in Oracle Retail Xstore Point of Service.
Figure 6-18 Item Matrix Manager Page
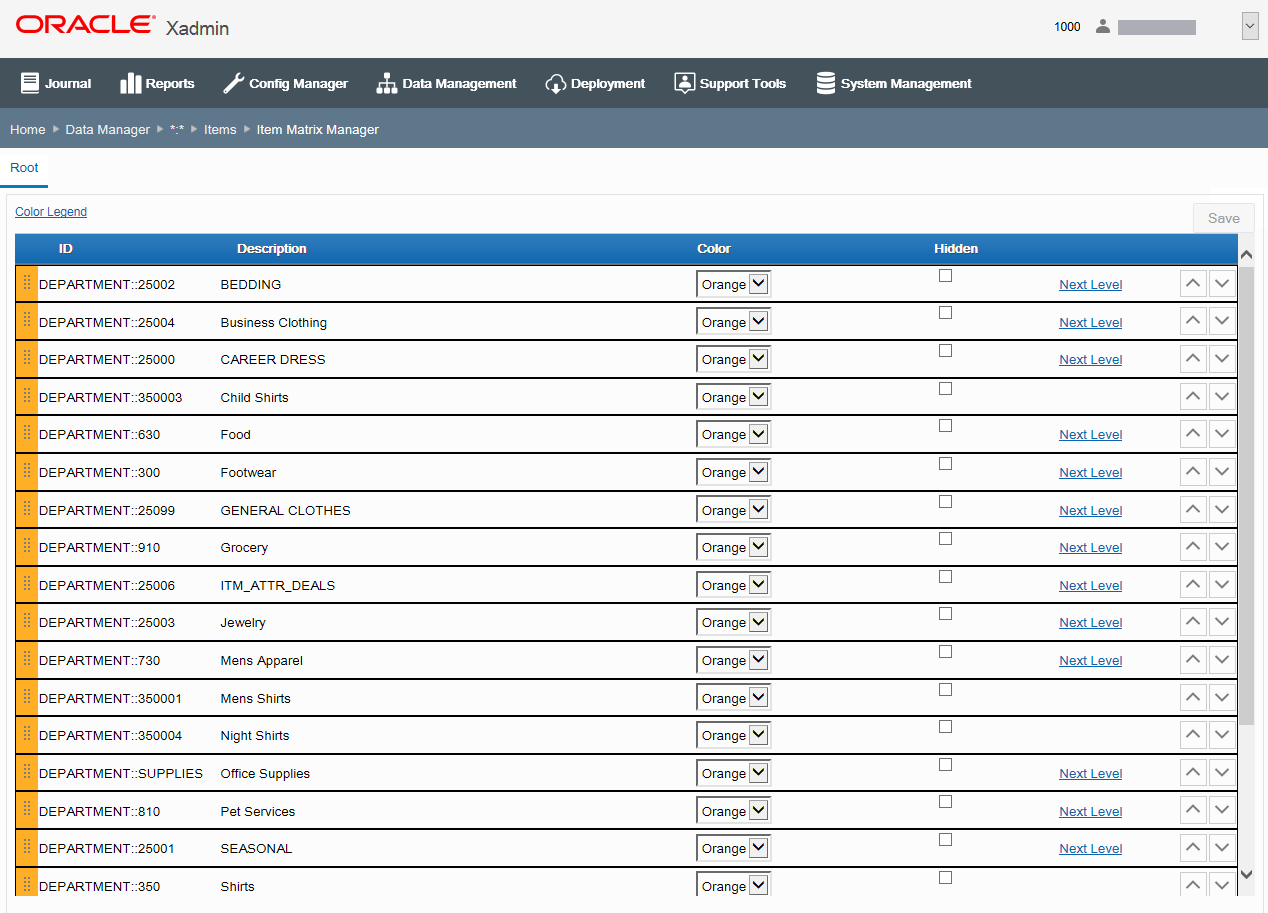
Table 6-12 Fields on the Item Matrix Screen
| Field | Description |
|---|---|
|
|
Shows the color currently associated with the merchandise hierarchy or item and is used to drag and drop the selection to another location in the list. |
|
ID |
The merchandise hierarchy or item identifier. |
|
Description |
The merchandise hierarchy or item description. |
|
Color |
The color associated with the merchandise hierarchy or item for display in the item matrix in Oracle Retail Xstore Point of Service. |
|
Hidden |
If the check box is selected, the merchandise hierarchy or item will not show in the item matrix in Oracle Retail Xstore Point of Service. |
Table 6-13 Links and Buttons the Item Matrix Screen
| Link | Description |
|---|---|
|
Color Legend |
Opens a window showing the available color palette. The link is not available for screen readers. |
|
Next Level |
Opens a new page showing the items in next merchandise hierarchy level. |
|
Move Up and Move Down Arrow buttons |
Change the sort order of the displayed list. |
Assigning Matrix Colors To Merchandise Hierarchy And/Or Item Records
-
Select a color from the Color drop-down list for the merchandise hierarchy or item record you want to change.
The color in the Color Area associated with the item is changed to the selected color.
Note:
To view the available colors, click the Color Legend link.
The color Gray shown in the legend is not available from the drop-down list of available colors. Gray is used to denote "Hidden" buttons only.

-
Click Save to save your changes.
Changing the Sort Order
There are two ways to change the sort order of the items:
Drag and Drop:
-
Hover over the shaded area of the row you want to move.
-
With the move icon showing for the selected item row, drag and drop the item to a new location in the list to change the sort order.
-
Click Save to save your changes.
Move Up and Down Arrow buttons:
-
Select the row you want to move.
-
Use the Move Up and Move Down Arrow buttons of the selected row to change the sort order in the list.
-
Click Save to save your changes.
Specifying Merchandise Hierarchy And/Or Item Records As Hidden
-
Click the Hidden check box for the merchandise hierarchy or item record.
Figure 6-19 Hidden Check Box Selected
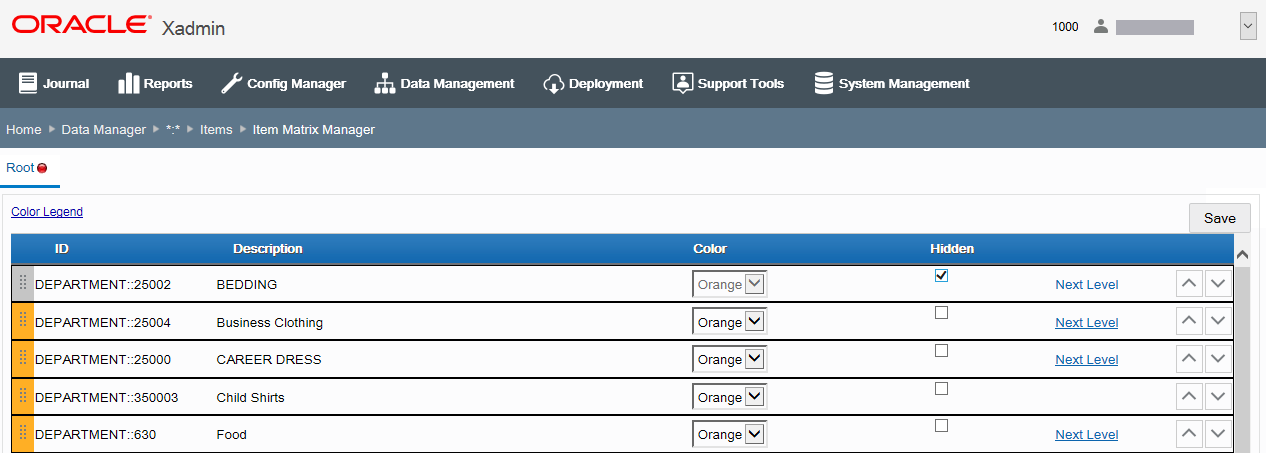
When the Hidden check box is selected, the color drop-down list and the Next Level link are no longer available for selection. In addition, the color in the shaded area associated with the item is changed to gray.
-
Click Save to save your changes.
Item Message Maintenance
...continued from Items
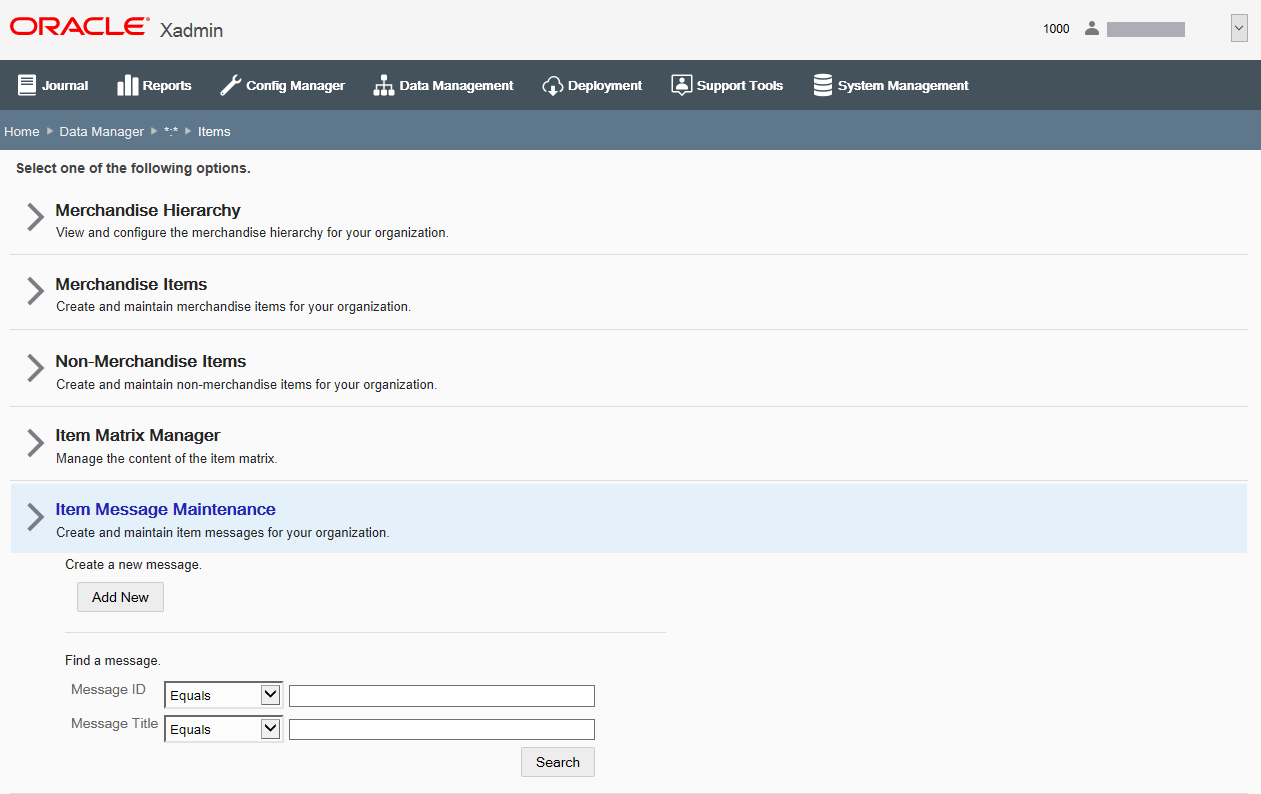
The Item Message Maintenance option (Figure 6-3) allows you to add, edit or delete a message to/from a number of items. The message is then displayed in the Info tab in the Xstore POS during a sale transaction.
Note:
Only one message per item is displayed in the Info tab int the Xstore POS. If you want to display multiple messages per item you need to enable the DisplayMessageAsNotify configuration in the database.
To add messages for a large number of items, use the DataLoader. For more information about the DataLoader, see the Oracle Retail Xstore Point of Service Host Interface Guide.
There are four message types that can be displayed the Xstore POS Info tab:
-
Text messages
-
HTML messages - HTML messages may include graphics and text.
-
Titled image messages - Titled image messages contain an image along with a title.
-
Composite messages - Composite messages include graphics and text. The image and text message are displayed together in the Info tab.
Figure 6-20 Item Message Maintenance
Adding an Item Message
To add an item message:
-
Click Add New. The Edit Item Message page appears.
-
Select one of the following message types from the list:
-
Text
-
HTML
-
Composite
-
Titled Image
Note:
If an item has more than one message type, the message types are display in the following order:
-
Composite
-
Text
-
HTML
-
Titled Image
-
-
Depending on the selected message type, enter the following fields:
Figure 6-21 Edit Item Message Window
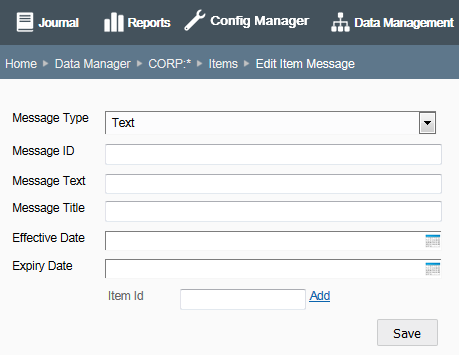
Table 6-14 Item Messages Fields
Field Description Message ID [REQUIRED]
Enter a message ID.
Message Text [REQUIRED]
Enter a message text.
Message Title
Enter a message title.
Message HTML File
Only available for message type HTML
To upload a file:
-
Click Browse to select the HTML file you want to upload.
-
The file name is displayed with a Delete link next to it.
-
If you want to remove the message file, select the Delete link.
Note: You can only upload one HTML file per message.
Message HTML
Only available for message type HTML
Enter the message in HTML format. ?
Image
Only available for message type Composite and Titled Image
You can upload the following file formats.png, .jpg, and .gif
To upload an image file:
-
Click Browse to select the file you want to upload.
-
The file name is displayed with a Delete link next to it.
-
If you want to remove the image file, select the Delete link.
Note: You can only upload one image file per message.
Effective Date
Enter or use the Calendar icon to select an effective date for the message.
Expiry Date
Enter or use the Calendar icon to select an expiry Date for the message.
Item ID
To add an item to the message:
-
In the Item ID filed, enter the item ID to which you want to add the message.
-
Click the Add link next to the Item ID field.
-
The item ID is displayed below the Item ID field.
To delete the item form the message:
-
Click the Delete link next to the item ID.
-
The item is removed.
-
-
Click Save to save the message for the selected items.
Editing an Item Message
To edit an item message:
-
Enter search criteria and click Search to find/edit an item message. If you do not enter any criteria before selecting Search, all item messages will be displayed in the Search Results page.
-
To edit information for an existing message, select the row from the search results list and edit the information as needed. You can also create a new message by clicking Add New at the Search Results page.
-
Complete the fields as required, then click Save.
Note:
To delete an existing message, click the Delete icon associated with the record at the search results list. When prompted, click Yes to confirm the deletion.
See step 6 for additional procedural information.
Item Restrictions
...continued from Items
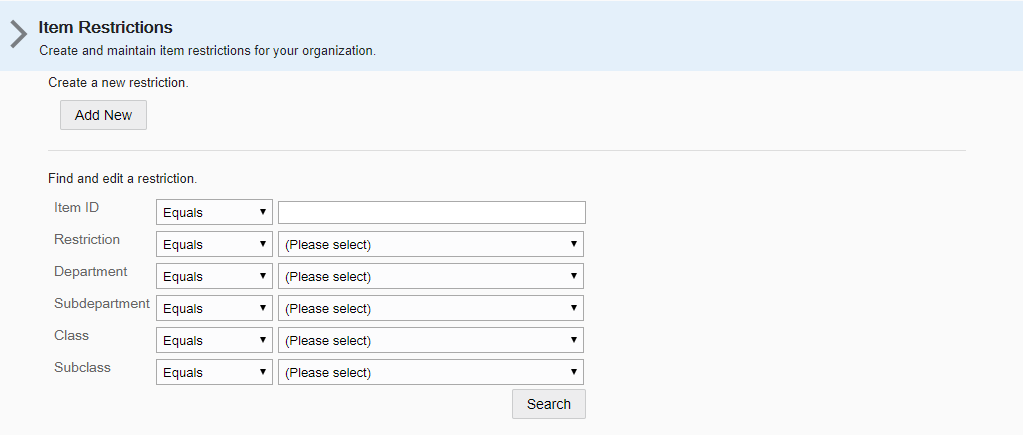
Select the Item Restrictions option (Figure 6-3) to add and/or edit item restrictions.
Note:
You need to create at least one item restriction, before you can define item restrictions types. For more information on item restriction types, see the Item Restriction Types section.
Figure 6-22 Item Restrictions Maintenance
Adding an Item Restriction
To add an item restriction:
-
Click Add New. The Edit Restriction page appears.
-
In the Define tab, enter the following information:
-
Restriction ID [REQUIRED]- Enter the ID for the item restriction.
-
Description [REQUIRED] - Enter a short description for the item restriction.
-
-
Then click Next to open the Associate tab.
-
In the Associate tab, select or enter the merchandise hierarchy information for the item restriction.
-
Select the desired merchandise level from the list:
Table 6-15 Merchandise Level Fields - Associate Tab
Field Description Department
Select the item's department from the drop-down list.
Subdepartment
Select the item's subdepartment from the drop-down list.
Class
Select the item's class from the drop-down list.
Subclass
Select the item's subclass from the drop-down list.
-
Then click the Add link, to add the merchandise hierarchy level to the list below the entry fields.
-
-
and/or go to the Item ID field and enter the item ID for the restriction.
-
Then select the Add link, to add the item to the list.
-
Note:
To delete a merchandise hierarchy or item from the restriction, click the Delete (X) icon associated with the record at the list. When prompted, click Yes to confirm the deletion.
-
-
Click Next to open the Review tab.
-
Review your entries and click Save to save the item restriction.
Editing an Item Restriction
To edit an item restriction:
-
Enter search criteria and click Search to find/edit an item restriction. If you do not enter any criteria before selecting Search, all item restrictions will be displayed in the Search Results page.
-
To edit information for an existing restriction, select the row from the search results list. The Item Restriction window appears.
Note:
You can also create a new item restriction by clicking Add New at the Search Results page.
-
Click Edit. The Edit Item Restriction page opens.
-
Complete the fields in the tabs as required, then click Save.
Note:
To delete an existing restriction, click the Delete (X) icon associated with the record at the search results list. When prompted, click Yes to confirm the deletion.
See step 6 for additional procedural information.
Item Restriction Types
...continued from Items
Note:
You need to create at least one item restriction, before you can define item restrictions types. For more information on item restriction types, see the Item Restriction Types section.
Select the Item Restrictions Types option (Figure 6-3) to create item restrictions for the days and time frame in which certain items are sold. You can also configure the minimum required customer age to purchase an item, and the minimum required cashier age to sell an item.
Figure 6-23 Item Restriction Types

Searching for Item Restriction Types
To search for an item restriction type:
-
In the Item Restriction Type section, select the Restriction from the list.
-
Then click Next. The Item Restriction Type Search Results are displayed.
In the Search Results page you can:
-
Add an item restriction type. For more information, see Adding Item Restriction Types.
-
Edit an item restriction type. For more information, see Editing an Item Restriction
-
Adding Item Restriction Types
To add an item restriction type:
-
Click Add New. The Edit Restriction Type page appears.
-
In the Define tab, enter the following information:
Table 6-16 Item Restriction Type - Define Tab
Field Description Restriction [REQUIRED]
Select the restriction.
Restriction ID [REQUIRED]
Select restriction ID.
Effective Date [REQUIRED]
Enter an effective date or use the Calendar icon to select a date.
Expiration Date [REQUIRED]
Enter an expiration date or use the Calendar icon to select a date.
Is this restriction type excluded during returns? check box
If you want to exclude this restriction types for returns, select the check box.
-
Then click Next to open the Restriction Type tab.
-
Depending on the selected Restriction Type in the Define tab, complete the fields as following:
-
If you selected Minimum Customer Age, enter the minimum required customer age to purchase the item(s).
-
If you selected Minimum Cashier Age, enter the minimum required cashier age to sell the item(s).
-
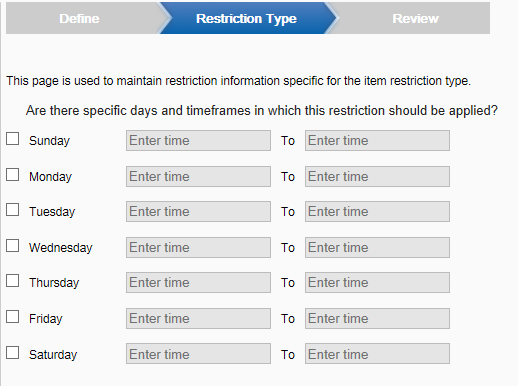
If you selected Day Restriction, select a day check box. Then enter a start and end time to define the restriction period.
Figure 6-24 Day Restriction
-
-
Click Next to open the Review tab.
-
Review your entries and click Save to save the item restriction type.
Editing Item Restriction Types
To edit an item restriction type:
-
To edit information for an existing restriction type, select the row from the search results list. The Item Restriction Types window opens.
-
Click Edit. The Edit Item Restriction Types page opens.
-
Complete the fields in the tabs as required, then click Save.
Note:
To delete an existing restriction type, click the Delete (X) icon associated with the record at the search results list. When prompted, click Yes to confirm the deletion.
See step 6 for additional procedural information.