Managing the Organization Hierarchy
Organization Hierarchy management includes both defining the hierarchy levels in your organization, as well as organizing and maintaining the nodes in the hierarchy.
-
From the Oracle Retail Xstore Office menu, select Data Management, then Organization Hierarchy, or click the Organization Hierarchy link in the Data Management panel.
-
At the Organization Hierarchy page, you have the following options:.
Figure 6-42 Organization Hierarchy Page

-
To define organization hierarchy levels, click Organization Hierarchy Levels.
Refer to Defining Organization Hierarchy Levels below for procedural information.
-
To maintain and organize the nodes in the hierarchy, click Organization Hierarchy Maintenance. Refer to Managing the Organization Hierarchy for procedural information.
-
To create and maintain store collections, click Store Collections. Refer to Creating and Maintaining Store Collections.
-
Defining Organization Hierarchy Levels
Use this feature to define the Organization Hierarchy levels in your organization. Once set up, these levels will be available for use in Organization Hierarchy Maintenance.
The Parent (root) Level field cannot be edited, and only one root level (*) is allowed.
Note:
STORE is a reserved word within organization hierarchy maintenance and cannot be added as an organization level.
Figure 6-43 Organization Hierarchy Levels Page

Adding an Organization Hierarchy Level
-
Select an org node within the org hierarchy tree.
-
With the node selected, click Add Level to add an org level to the selected node.
-
Complete the fields as required and click Save.
Table 6-40 Organization Hierarchy Levels Fields
Field Description Parent Level
Defaults to the currently selected node and cannot be changed.
Org Level [Required]
Enter the name of the new org level.
Description
Enter a description for the new org level.
Editing the Description of an Organization Hierarchy Level
-
Select an org node within the org hierarchy tree.
-
With the node selected, enter the description in the Description field.
-
Click Save. The tree view description is updated with the new description.
Deleting an Organization Hierarchy Level
-
Select an org node within the org hierarchy tree.
-
With the node selected, click Delete.
Note:
Levels that are currently being used, that is, levels with children, cannot be deleted.
-
When prompted, click Yes to confirm you want to delete the selected hierarchy level.
Maintaining the Organization Hierarchy
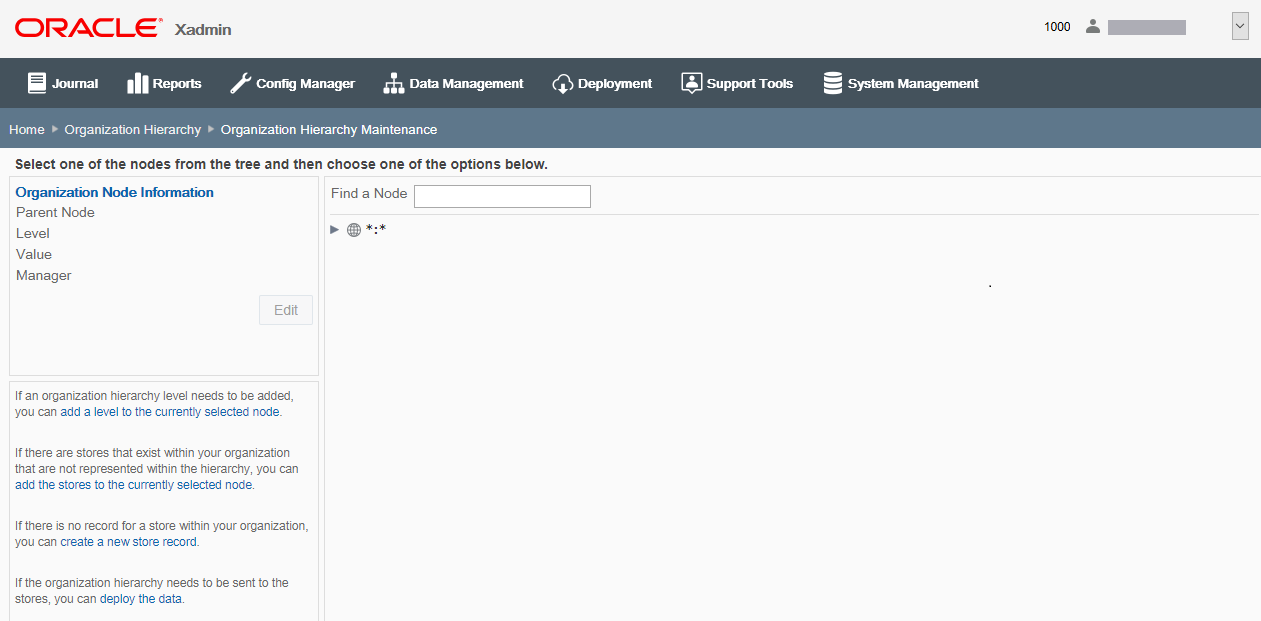
The Organization Hierarchy Maintenance feature provides the ability to add an organization hierarchy level to a node, create a new store and add it to an org node, add an existing, unassigned store to an org node, temporarily deactivate an org node, and deploy the changes.
Figure 6-44 Organization Hierarchy Maintenance Page

Note:
To search for a specific node, begin typing the node description in the Find a Node field.
Adding an Organization Hierarchy Level to a Node
Note:
Organization Hierarchy levels must be defined before they can be used in Organization Hierarchy Maintenance. See Defining Organization Hierarchy Levels for more information about setting up Organization Hierarchy levels for your organization.
Perform the following steps to add an organization hierarchy level to a node.
-
From the Organization Hierarchy Maintenance page, select an org node within the org hierarchy tree.
-
With the node selected, click the add a level to the currently selected node link.
-
In the Add Hierarchy Level Node window, complete the fields as required:
Table 6-41 Add Hierarchy Level Node Window
Field Description Parent Node
Defaults to the currently selected node.
Level [Required]
Select the new level from the drop-down list.
Organization Hierarchy levels must be defined before they can be used in Organization Hierarchy Maintenance. See Defining Organization Hierarchy Levels for more information about setting up Organization Hierarchy levels for your organization.
Value [Required]
Enter a value for the new level.
Manager
Enter the manager for the new level. This is a level manager or an org node manager (for example, district manager). The value is stored in the org hierarchy table along with the node info.
Active Node check box
Selected by default, indicating the organization hierarchy level is active and available. To deactivate the org node, deselect the Is this node active? check box. Refer to Deactivating an Org Node for more information.
-
Click Save.
Editing the Value and Manager Information
Perform the following steps to edit an organization hierarchy level value and/or manager.
-
Select an org node within the org hierarchy tree.
-
With the node selected, click Edit.
-
Make changes to the level Value and/or Manager as needed.
-
Click Save.
Note:
To deactivate the org node, deselect the Is this node active? check box. Refer to Deactivating an Org Node for more information.
Adding Unassigned Stores to an Org Node
Perform the following steps to add any unassigned stores to the organization hierarchy. This process does not create new stores, it is used to add existing stores to the Organization Hierarchy tree.
-
Select an org node within the org hierarchy tree.
-
With the node selected, click the Add the stores to the currently selected node link to display a list of all unassigned stores.
-
Select the check box for one (or more) stores from the list, then click Add to add the selected stores to the selected org node.
-
The stores are added to the selected org node and the system returns to the Organization Hierarchy Maintenance page.
Creating a New Store and Add It to an Org Node
Perform the following steps to create a new store and place it within the organization hierarchy. This process is not used to add existing stores to an org hierarchy node.
-
Select the node where the new store will be placed.
-
With the node selected, click the Create a new store record link.
-
Complete the required fields in the Store wizard, then click Save.
This is the same wizard used to edit stores within Data Manager; see Stores for detailed information about the fields.
-
When prompted, click OK to close the "Store created successfully" prompt. A deployment of this record to all stores will now be scheduled.
-
When prompted, click OK to close the "Deployment was scheduled successfully" prompt.
-
The system returns to the Organization Hierarchy Maintenance page. The new store is added to the selected org node.
Deactivating an Org Node
Perform the following steps to deactivate an org node. Deactivated org nodes will not appear in drop-down pick lists throughout Oracle Retail Xstore Office. Making an org node inactive does not stop the stores within that node from functioning. This inactive setting simply prevents users from making data changes and deployments to the node. For example, this feature may be used when creating new districts or reorganizing the hierarchy. Deactivating an org node ensures that other users cannot make data changes or deployments to the stores that fall within that node.
Perform the following steps to deactivate an org node.
-
Select an org node within the org hierarchy tree.
-
With the node selected, click Edit.
-
Deselect the Is this node active? check box.
-
Click Save.
-
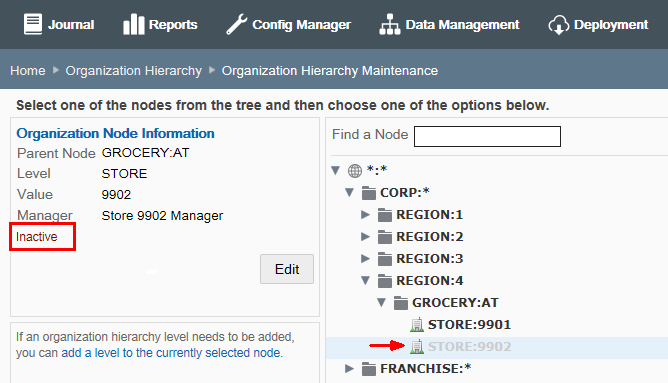
The org node information shows the node is Inactive and the org node is grayed-out in the tree view.
Figure 6-45 Inactive Org Node Example

Note:
To activate an inactive org node, select the Is this node active? check box.
Moving an Org Node
Perform the following steps to move org nodes throughout the org hierarchy. For example, this feature can be used if redistricting actions are needed within the organization. This type of movement may be as simple as: Move STORE:101 from DISTRICT:2 to DISTRICT:3, or it may be more complicated and involve multiple moves. In either case, the process is the same.
-
Select an org node (other than the root node) within the org hierarchy tree.
-
With the node selected, click Edit.
-
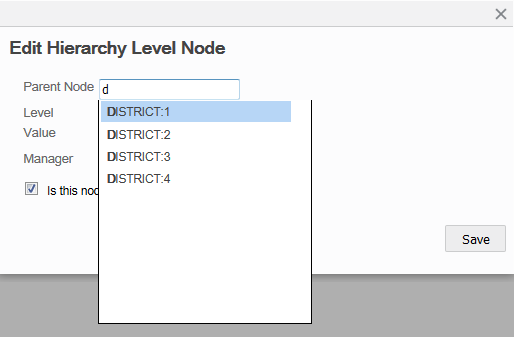
To change the selected node's parent level, begin typing the node identifier in the Parent Node field. The suggested parent nodes are displayed in a list.
Figure 6-46 Parent Node Suggestion List

-
Select the new parent level, then click Save.
The previously selected node is now shown under its new parent level.
Creating and Maintaining Store Collections
Use Store Collections to create and maintain groups of organization nodes that represent collections of stores from different places in the organization hierarchy.
Store Collections are user-defined store groups. Once defined and set up, these Store Collections are made available to be used as target areas for configuration and data changes.
The Store Collections page shows your current Store Collections and the number of stores in each collection. In the example below, two store collections have been defined. If no collections have been defined this page will be blank. Click a column header to sort the column as needed.
Figure 6-47 Store Collections Page

Adding a Store Collection
-
At the Store Collections page, click Add New to create a new store collection.
-
Complete the fields as required:
-
ID - Enter the collection identifier. This field can only be edited when adding a new Store Collection. A store collection ID must be letters or numbers only and cannot include a colon (:), underscore (_), or comma (,) in the name.
-
Description - Enter the collection description. This field can be changed when adding a new Store Collection, and when editing an existing Store Collection.
-
Organization Nodes - Specify the node belonging to this store collection, then click Add. Repeat this step for each node that is part of this collection.
-
-
Click Save.
-
Oracle Retail Xstore Office returns to the Store Collections page.
Editing a Store Collection
-
At the Store Collections page, select a Store Collection from the list.
Note:
To delete a store collection, at the Store Collections page, select the Delete icon associated with the Store collection. When prompted, click Yes to confirm the deletion
-
Complete the fields as required:
-
ID - This field cannot be changed.
-
Description - Edit the collection description.
-
Organization Nodes
-
To add a node, specify the node belonging to this store collection, then click Add. Repeat this step for each node to be added to this collection.
-
To remove a node from the collection, click the Delete link associated with the node.
-
-
-
Click Save.
-
Oracle Retail Xstore Office returns to the Store Collections page.