Note:
- This tutorial requires access to Oracle Cloud. To sign up for a free account, see Get started with Oracle Cloud Infrastructure Free Tier.
- It uses example values for Oracle Cloud Infrastructure credentials, tenancy, and compartments. When completing your lab, substitute these values with ones specific to your cloud environment.
Publish a Message in OCI Notifications, Trigger a Function and Create a File in OCI Object Storage Bucket
Introduction
You can configure a publish subscribe service such as Oracle Cloud Infrastructure (OCI) Notifications that pushes messages to endpoints that can alert, take action through subscription configured; not only supporting Oracle Cloud Infrastructure Monitoring or OCI Connector Hub use cases, but also the events can be generated from the customers applications, API messages that must represent an immediate action to be executed when the application sends a message when an event triggers OCI Notifications.
The architecture can be more or less complex, but for this use case the client makes an HTTP POST request, sending in the body a JSON that has certain attributes to create a file, such as filename, name of the bucket where you want to create the file in OCI Object Storage and the message that will be inside of the file.
Then the API REST application deployed in Oracle Cloud Infrastructure Container Engine for Kubernetes (OKE) and developed in Node.js gets the JSON from the request body and also in this application the OCI libraries are used to publish a message in OCI Notifications that already has a Node.js function subscribed and developed for creating the text file in a specific bucket in OCI Object Storage with the JSON parameters sent.
OCI Architecture

Use Case Architecture

In this tutorial, we are going to start configuring from the last service until we reach the first one in Oracle Cloud Infrastructure (OCI):
-
OCI Object Storage
-
OCI Functions
-
OCI Notifications
-
Oracle Cloud Infrastructure Container Engine for Kubernetes
Objectives
-
Create a new OCI Object Storage bucket.
-
Configure and create OCI Functions.
-
Configure, develop and push OCI Functions using the Function Development Kit (FDK) Node.js to create a new text file in a specific bucket from JSON parameters.
-
Create a new topic in OCI Notifications and create a subscription associating an OCI Functions as the endpoint.
-
Create and configure a Kubernetes cluster in OKE.
-
Develop and deploy an API REST application in Node.js to get the JSON from the HTTP POST request body and publish this JSON body as a message in OCI Notifications.
-
Request HTTP POST with a JSON body to URL exposed in load balancer of the API REST application.
Prerequisites
-
Access to an OCI tenant. To create a free Oracle Cloud account, see Create a Free Oracle Cloud Account.
-
Install OCI Command Line Interface (CLI). For more information, see Installing OCI CLI.
-
Create VCN with public and private subnets. For more information, see Creating a VCN and Creating a Subnet.
-
Create route table for internet access traffic with internet gateway. For more information, see VCN Route Tables and Internet Gateway.
-
Create compartment where you can group your OCI services. For more information, see Creating a Compartment.
Task 1: Create a Bucket in OCI Object Storage
-
Log in to the OCI Console, navigate to Storage, Object Storage & Archive Storage, Buckets and select the Compartment of your preference.
-
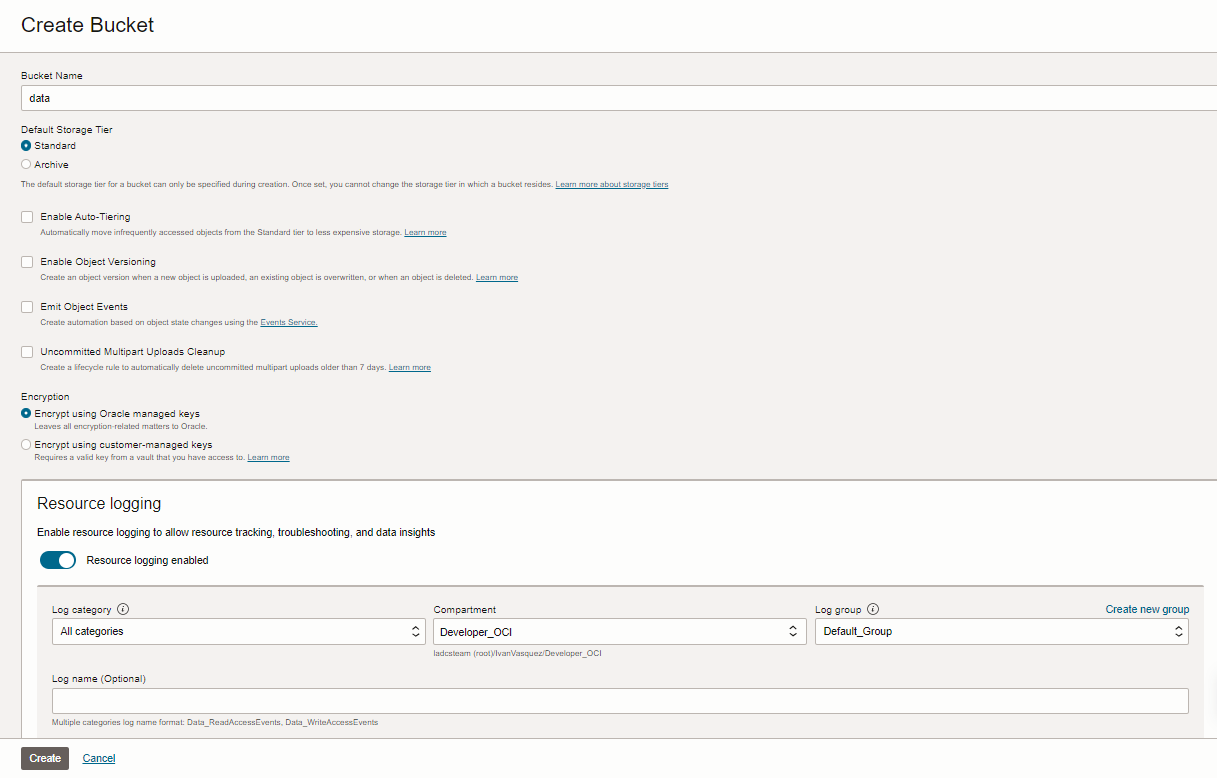
Click Create Bucket and enter the following information.
- Bucket Name: Enter the name of bucket. For example,
dataor other name. - Default Storage Tier: For this tutorial, select Standard.
- Encryption: Select Encrypt using Oracle managed keys.
- Resource logging: Select Resource logging enabled to have observability on what is happening in the bucket.
- Bucket Name: Enter the name of bucket. For example,
Task 2: Configure and Create an OCI Functions
-
Go to the OCI Console, navigate to Developer Services, Functions, Applications and select Compartment.
-
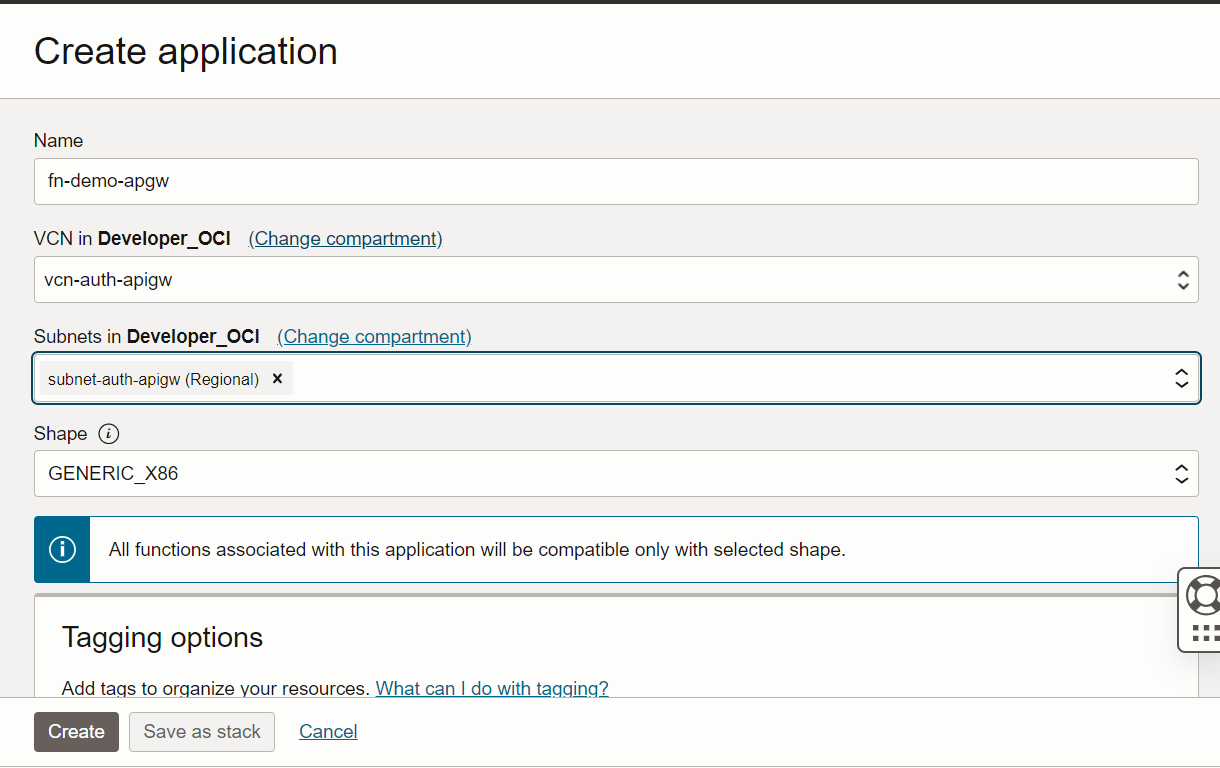
Click Create application and enter the following information.
- Name: Enter the name for your function application.
- VCN: Select VCN created in prerequisites.
- Subnets: Select subnet created in prerequisites. In this tutorial, we configured a public subnet.
- Shape: Select the shape related with the processor that is supported by this application. For this tutorial, it is
GENERIC_X86.
-
Enable the logs to track the execution and see errors of the OCI Functions application, so in the detail of the function application, under Resources, click Logs and select Enable Log configuring the compartment, Log Group, Log Name and the time of the Log Retention.

Task 3: Configure, Develop and Push OCI Functions using FDK Node.js to Create a new Text File
Configure, develop and push an OCI Functions using FDK Node.js to create a new text file in a specific bucket from JSON parameters.
Note: Configure your client such as: Desktop, PC, Laptop or Virtual Machine (VM) and the context of your function where you will work with Fn Project, because OCI Functions is powered by the Fn Project open source engine in order to perform create, read, update, and delete operations on OCI Functions.
We will use an Oracle Linux 8 VM (admin host) in OCI as seen in the architecture in Introduction.
-
Go to the OCI Console, navigate to Developer Services, Functions, Applications and click your function application.
-
Under the Resources section, click Getting started and select Local setup to use an external Oracle Linux VM.

Note: You must have installed the following components.
-
OCI Command Line Interface (CLI).
-
Node.js in Oracle Linux.
sudo yum update
sudo yum install -y nodejs
node --version
The version of Node.js must be supported by OCI FDK Functions.

If the version is not supported, it is necessary to execute the following commands.
Example:
sudo yum module reset nodejs sudo yum module enable nodejs:18 sudo yum module install nodejs -
Fn Project CLI installed in your VM. For more information, see Installing the Fn Project CLI.
-
-
Create your project in the desired programming language. In this tutorial, we will use Node.js. To create a new project, run the following command.
fn init --runtime node "Name_Of_Your_Project"Example:
fn init --runtime node app_mess_createFile_os_function -
To access the project folder, run the following command.
cd "Name_Of_Your_Project"/Example:
cd app_mess_createFile_os_function/ -
Create and update a specific context for our compartment and the Oracle Functions API URL for your region that is specified in Getting Started.
fn create context "specific_context" --provider oraclefn use context "specific_context"fn update context "your_compartment_id"fn update context api-url "your_api_url"Example:
fn create context Developer_OCI --provider oraclefn use context Developer_OCIfn update context oracle.compartment-id ocid1.compartment.oc1..aaaaaaaa4ixxxxxxxxxxxxxxxxxxxxxxxxxxxxxxxxxxxxxxxxxxxxxxxfn update context api-url https://functions.sa-vinhedo-1.oraclecloud.com -
Enter the path of the Oracle Cloud Infrastructure Container Registry where the application image will be pushed.
Note: If you do not have the Oracle Cloud Infrastructure Container Registry, you must create this repository to push the function image.
-
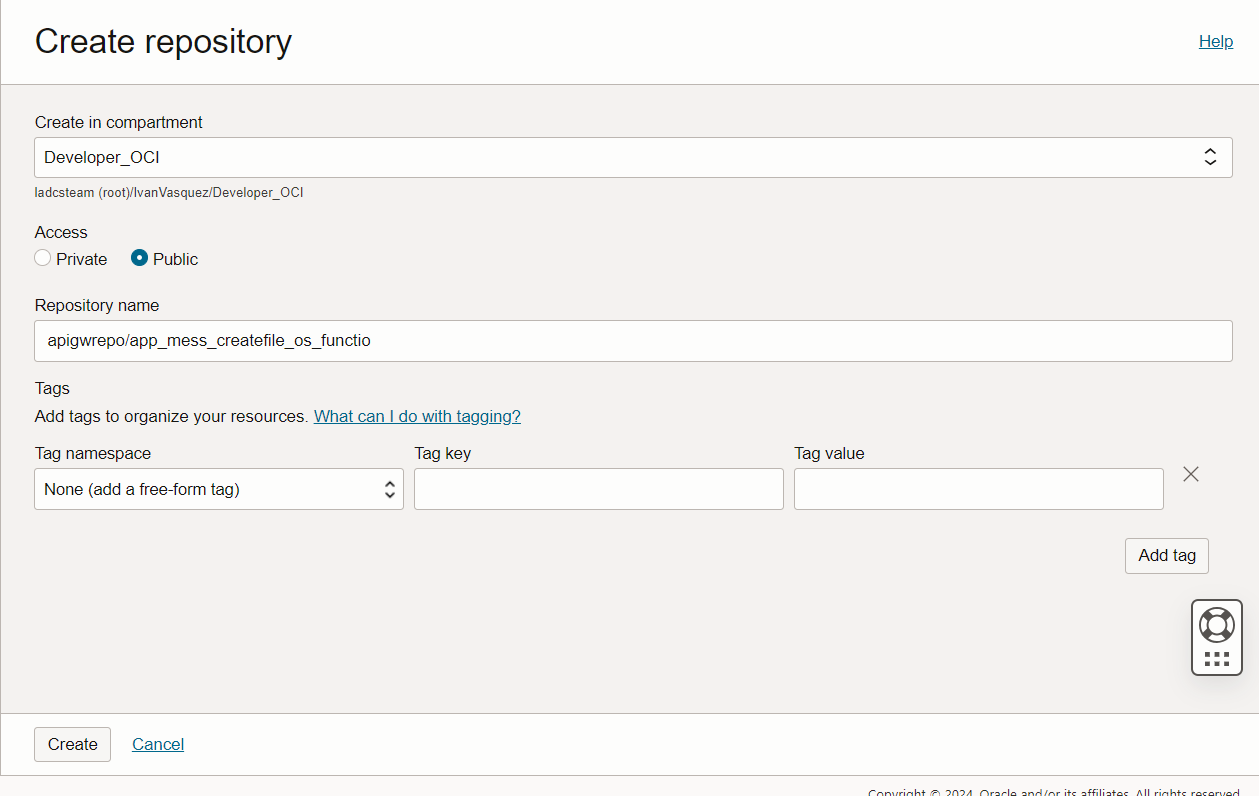
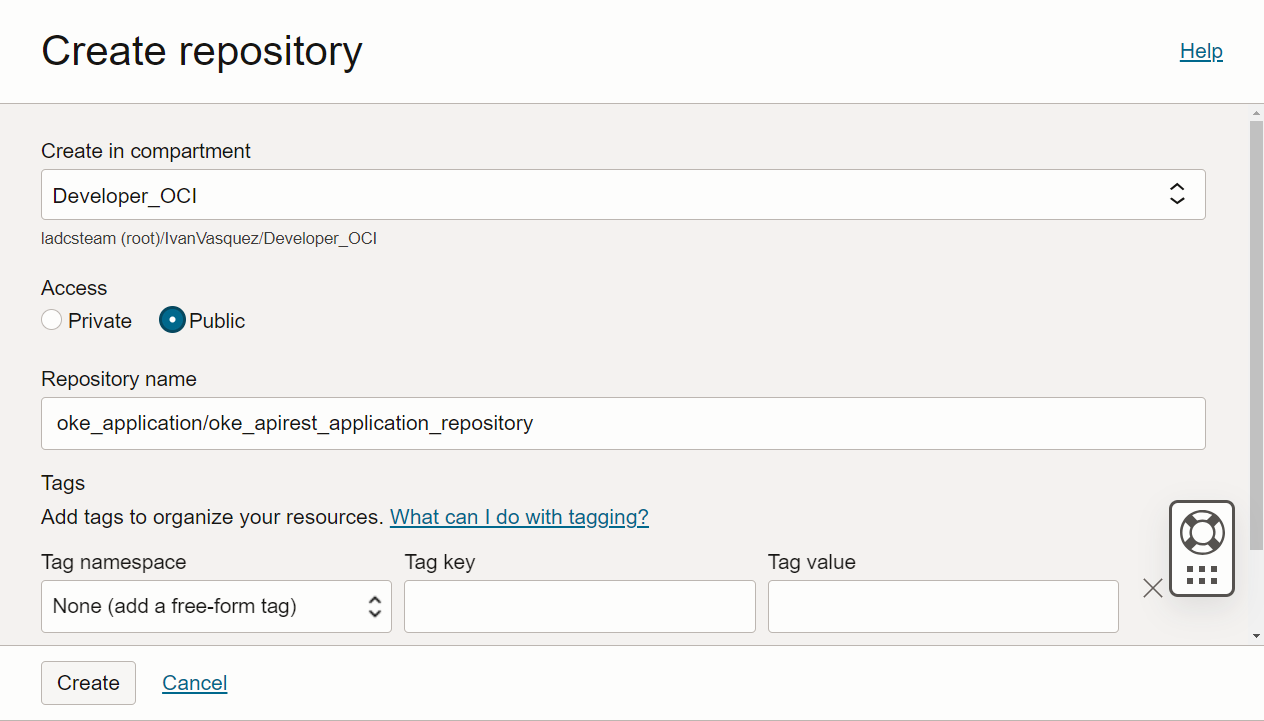
Go to Developer Services, Containers & Artifacts, Container Registry and click Create repository.
-
Enter the following information and click Create.
- Create in Compartment: Select your compartment,
- Access: Select Public.
- repository name: Enter the repository name.
Once you are sure you have Oracle Cloud Infrastructure Container Registry created, set the path of this repository until prefix in the context.
fn update context registry "regionID.ocir.io/tenancy_namespace/[repo-name-prefix]"Example:
fn update context registry vcp.ocir.io/idccixxxxx/apigwrepo -
-
Log in to the Oracle Cloud Infrastructure Container Registry.
Note: To log in, build, pull and push images to the repository you must have:
-
Docker installed. For more information, see How to install Docker on Oracle Linux 8/7.
-
Oracle Cloud Infrastructure username and an auth token created. For more information, see Getting an Auth Token.
Run the following command to log in to the Oracle Cloud Infrastructure Container Registry.
sudo docker login -u 'tenancy_namespace/username' regionID.ocir.ioPassword: xxxxxxExample (For this example the username is federated with Oracle Identity Cloud Service so it must be included):
sudo docker login -u 'idccixxxxx/OracleIdentityCloudService/ivan.v.vasquez@oracle.com' vcp.ocir.ioPassword: xxxxxx
-
-
Once you have configured the OCI Functions, we will develop Node.js program to create a text file in a specific bucket.
We have created function project in Task 3.3, it creates the following files in the project folder:
func.js(In this file we write the node.js project logic).func.yaml(This is the function configuration file).package.json(This file specifies the Node.js dependencies required for the project logic).
In this project, we will require to add the following Node.js OCI SDK dependencies; oci-objectstorage and oci-common. Run the following command to install dependencies.
npm install oci-common
npm install oci-objectstorage
We can see the dependencies added in the
package.jsonfile.
We are going to authenticate in OCI from the code using the config file, similar to the process of configuring OCI CLI where both the keys and the config file were placed in the Fn Project folder.

The following is the Node.js source code, and the detail of each code fragment is explained with comments.
-
func.js.//Dependencies are added const fdk= require('@fnproject/fdk'); const os = require("oci-objectstorage"); const common = require("oci-common"); //method invoked when is triggered the function fdk.handle(async function(input){ try{ //declaration of constants such as tenancy namespace and region const namespace = 'idccixxxxx'; const region = 'sa-vinhedo-1'; //declaration of variables required such as bucket name, file name and text for create the file text in a specific bucket let bucketName = 'data'; let objectName = 'empty.txt'; let fileMessage = 'Empty!' //Getting json values from input variable if (input.objectName) { objectName = input.objectName; } if (input.bucketName){ bucketName = input.bucketName; } if (input.fileMessage){ fileMessage = input.fileMessage; } //Creation of Authentication, using Config File Authentication Object const configurationFilePath = "config"; const configProfile = "DEFAULT"; const provider = new common.ConfigFileAuthenticationDetailsProvider( configurationFilePath, configProfile ); //Creation of Object Storage Client using authentication object const client = new os.ObjectStorageClient({authenticationDetailsProvider: provider}); client.regionId = region; //The object to upload to the object store. const putObjectRequest = { namespaceName: namespace, //namespace of your object storage bucketName: bucketName, //name of the bucket where the file will be placed objectName: objectName, //name of the text file putObjectBody: generateStreamFromString(fileMessage) //The body that will be uploaded in the object stored }; //Put the text file object in the object storage specified const response = await client.putObject(putObjectRequest); return {'message': 'Bucket Name: ' + bucketName+' - FileName: '+objectName+ ' \nMessage: '+fileMessage} }catch (error) { console.error('Error uploading to Object Storage:', error); } }) //return ReadableStream object required by putObjectBody, using the string message that will write in the text file function generateStreamFromString(data) { let Readable = require("stream").Readable; let stream = new Readable(); stream.push(data); // the string you want stream.push(null); return stream; }
Note: Download the OCI Functions Project from here: app_mess_createFile_os_function.zip.
-
Project is created, ensure you stay logged in Oracle Cloud Infrastructure Container Registry. We will build and push the image in Oracle Cloud Infrastructure Container Registry and deploy this function in the OCI Functions application.
-
Go to the OCI Console, navigate to Developer Services, Functions, Applications and click your function application.
In our local machine, we must be in the OCI Functions project folder.
fn deploy --app name_of_your_function_applicationExample:
fn deploy --app fn-demo-apgw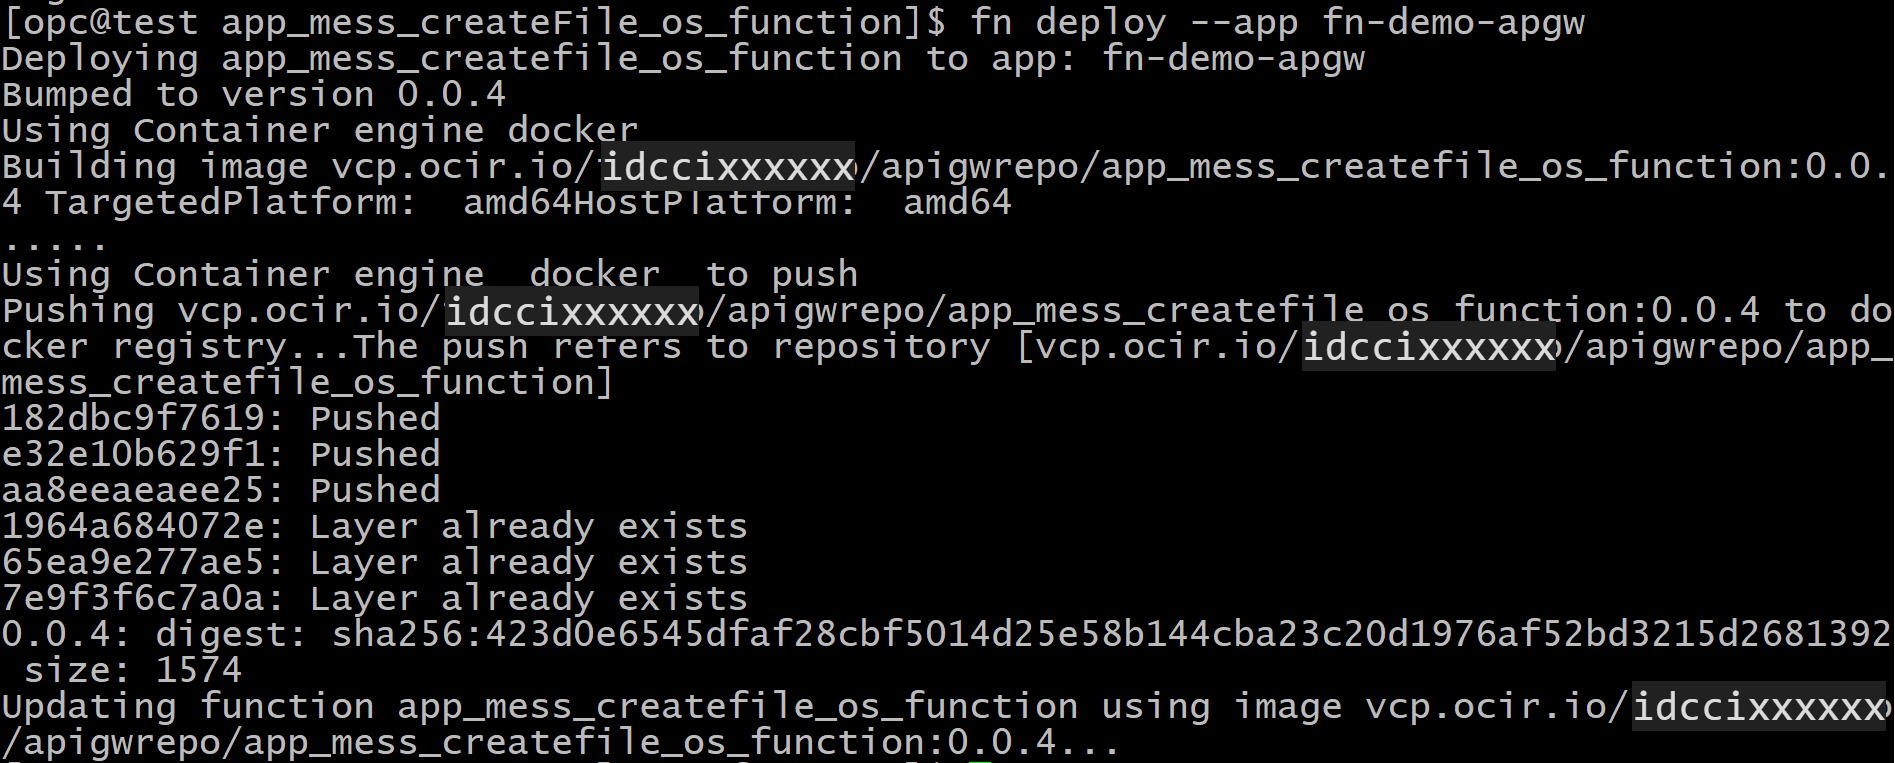
-
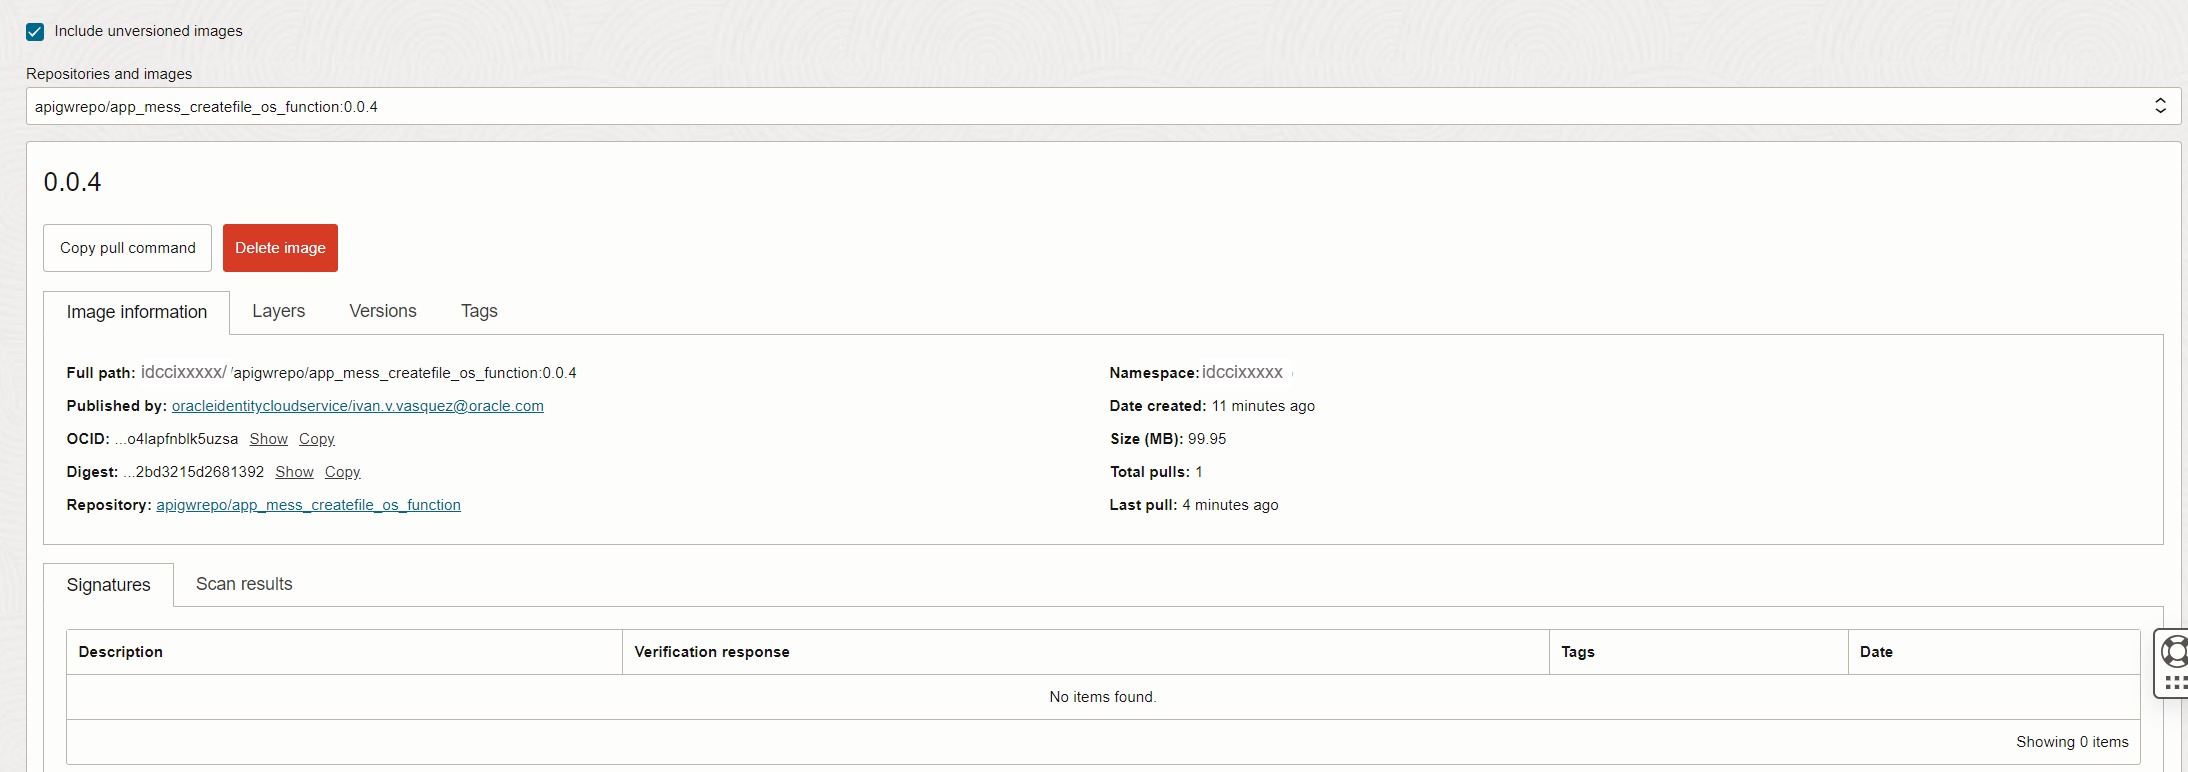
To validate the image has been deployed in Oracle Cloud Infrastructure Container Registry, go to the OCI Console and navigate to Developer Services, Containers & Artifacts, and Container Registry.
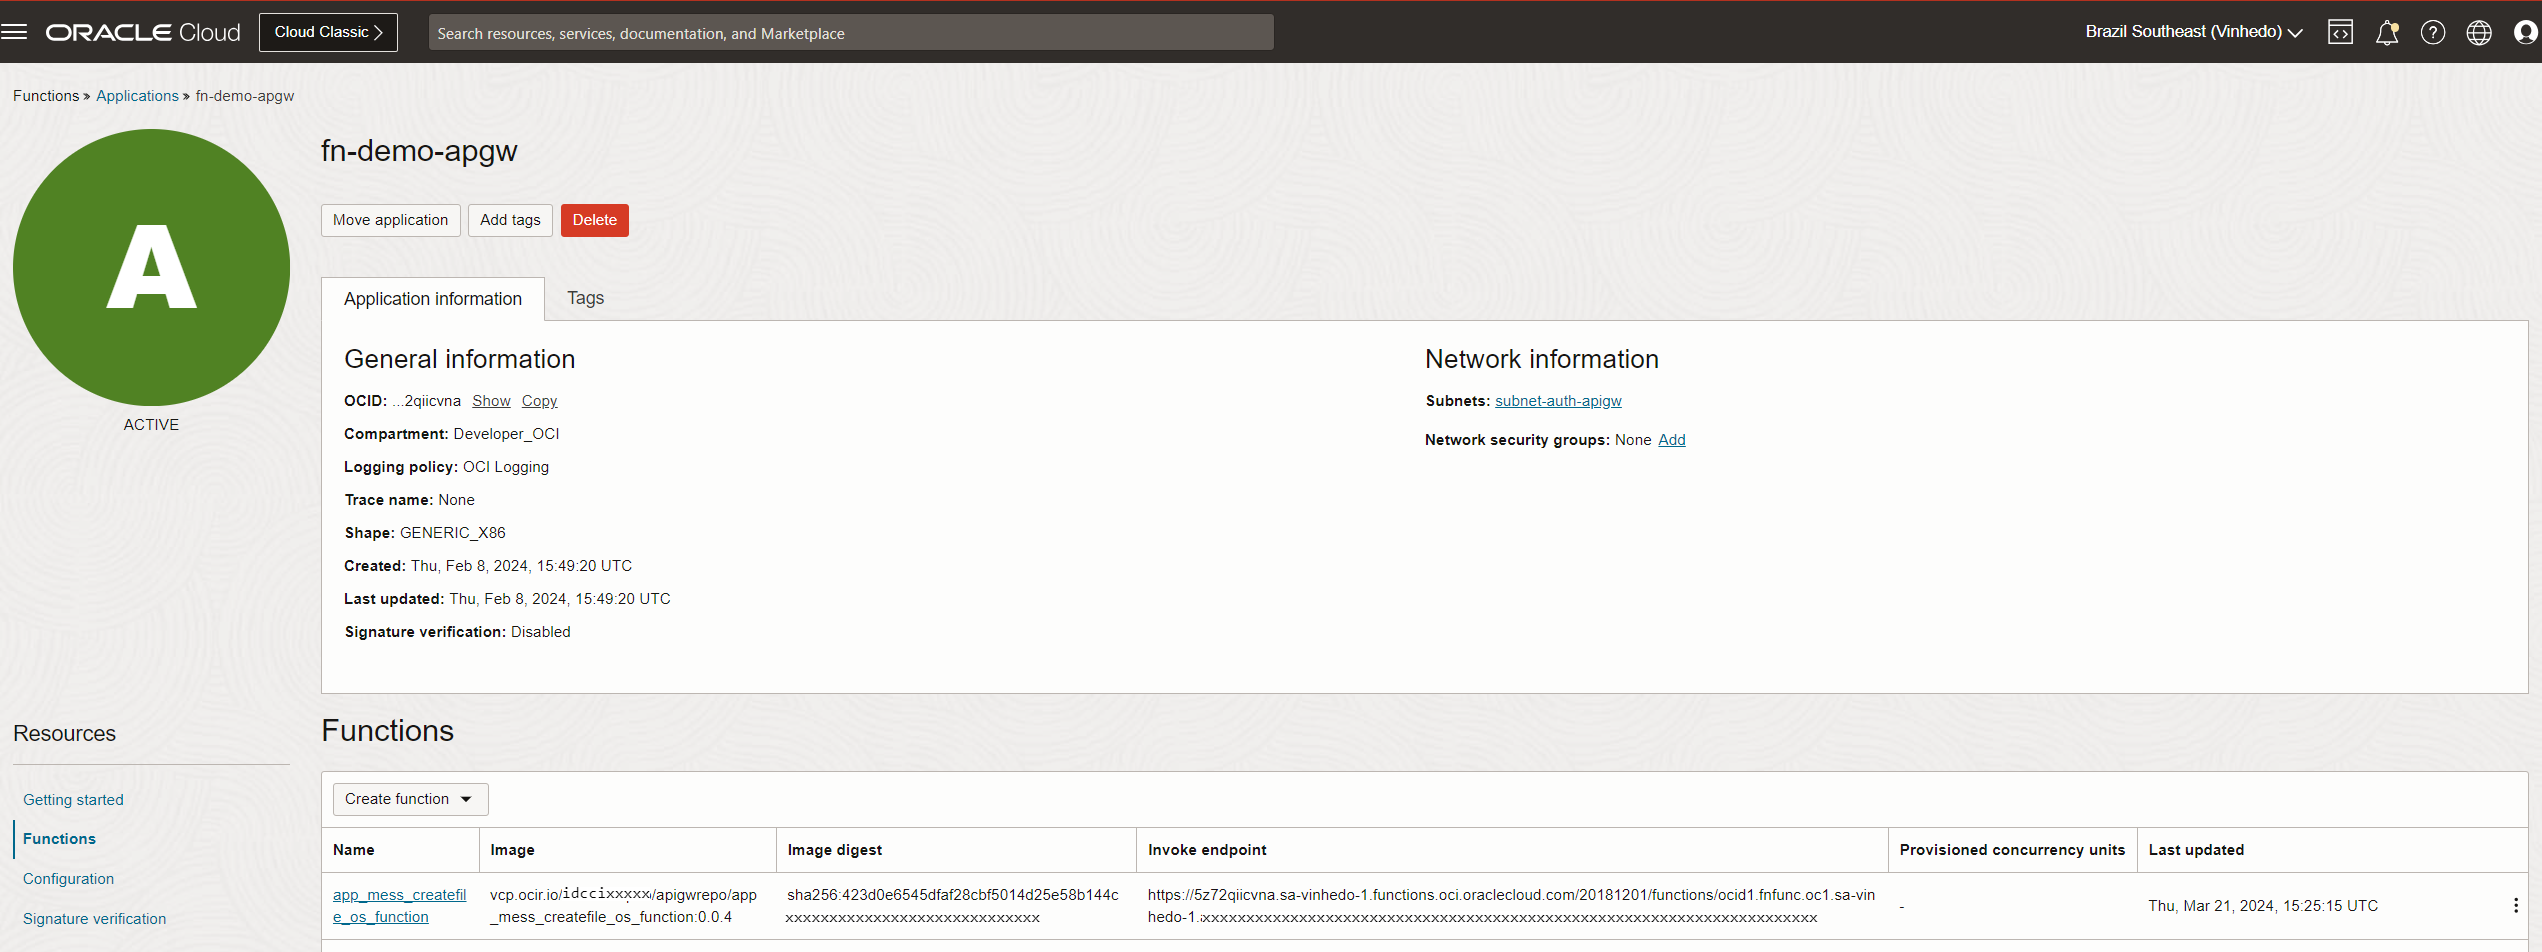
To check if the function is deployed in the OCI Functions application, go to the OCI Console and navigate to Developer Services, Functions, Applications, click your function application and see that the image is referenced there with the Oracle Cloud Infrastructure Container Registry path.
-
-
Run a test from your local machine, execute the following Fn Project command simulating an input with the parameters provided by a JSON format.
echo -n '{"jsonVariable": "value"}' | fn invoke application_function_name function_nameExample:
echo -n '{"objectName": "tutorialFileText.txt", "bucketName":"data", "fileMessage":"This an example message, for this tutorial in the text file"}' | fn invoke fn-demo-apgw app_mess_createfile_os_function
To review the file created in the bucket, go to Storage, Object Storage & Archive Storage, Buckets and click your bucket and validate the file is present.


Task 4: Create a new OCI Notifications Topic and a Subscription Associating an OCI Functions as an Endpoint
-
Create and utilize OCI Notifications. When a message is published in a topic within this service, it will generate a trigger towards an endpoint. This endpoint will be the function created in Task 3.
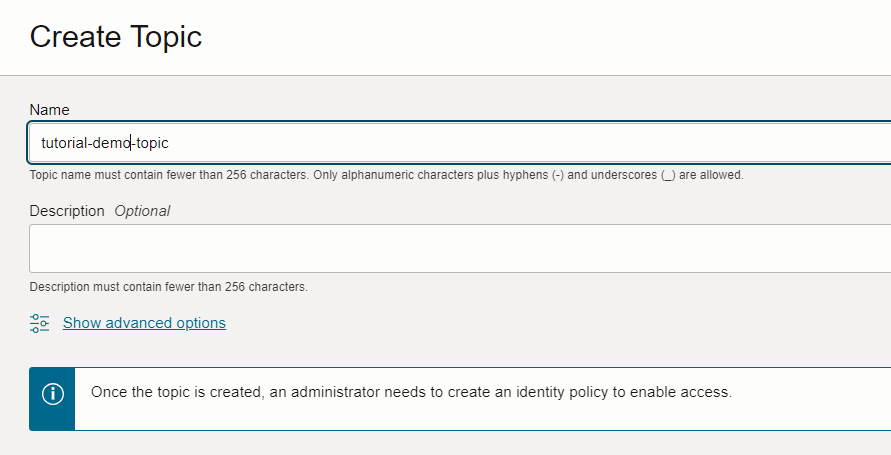
Go to the OCI Console, navigate to Developer Services, Application Integration and Notifications. Click Create Topic and enter the name for this topic.

-
To create a subscription for this topic, click your topic and Create Subscription. In this tutorial, we will select
Functionsas the endpoint. You can select an endpoint such as Email, Slack, SMS, PagerDuty or HTTPS URL and select the Function compartment, Oracle Functions application and Function.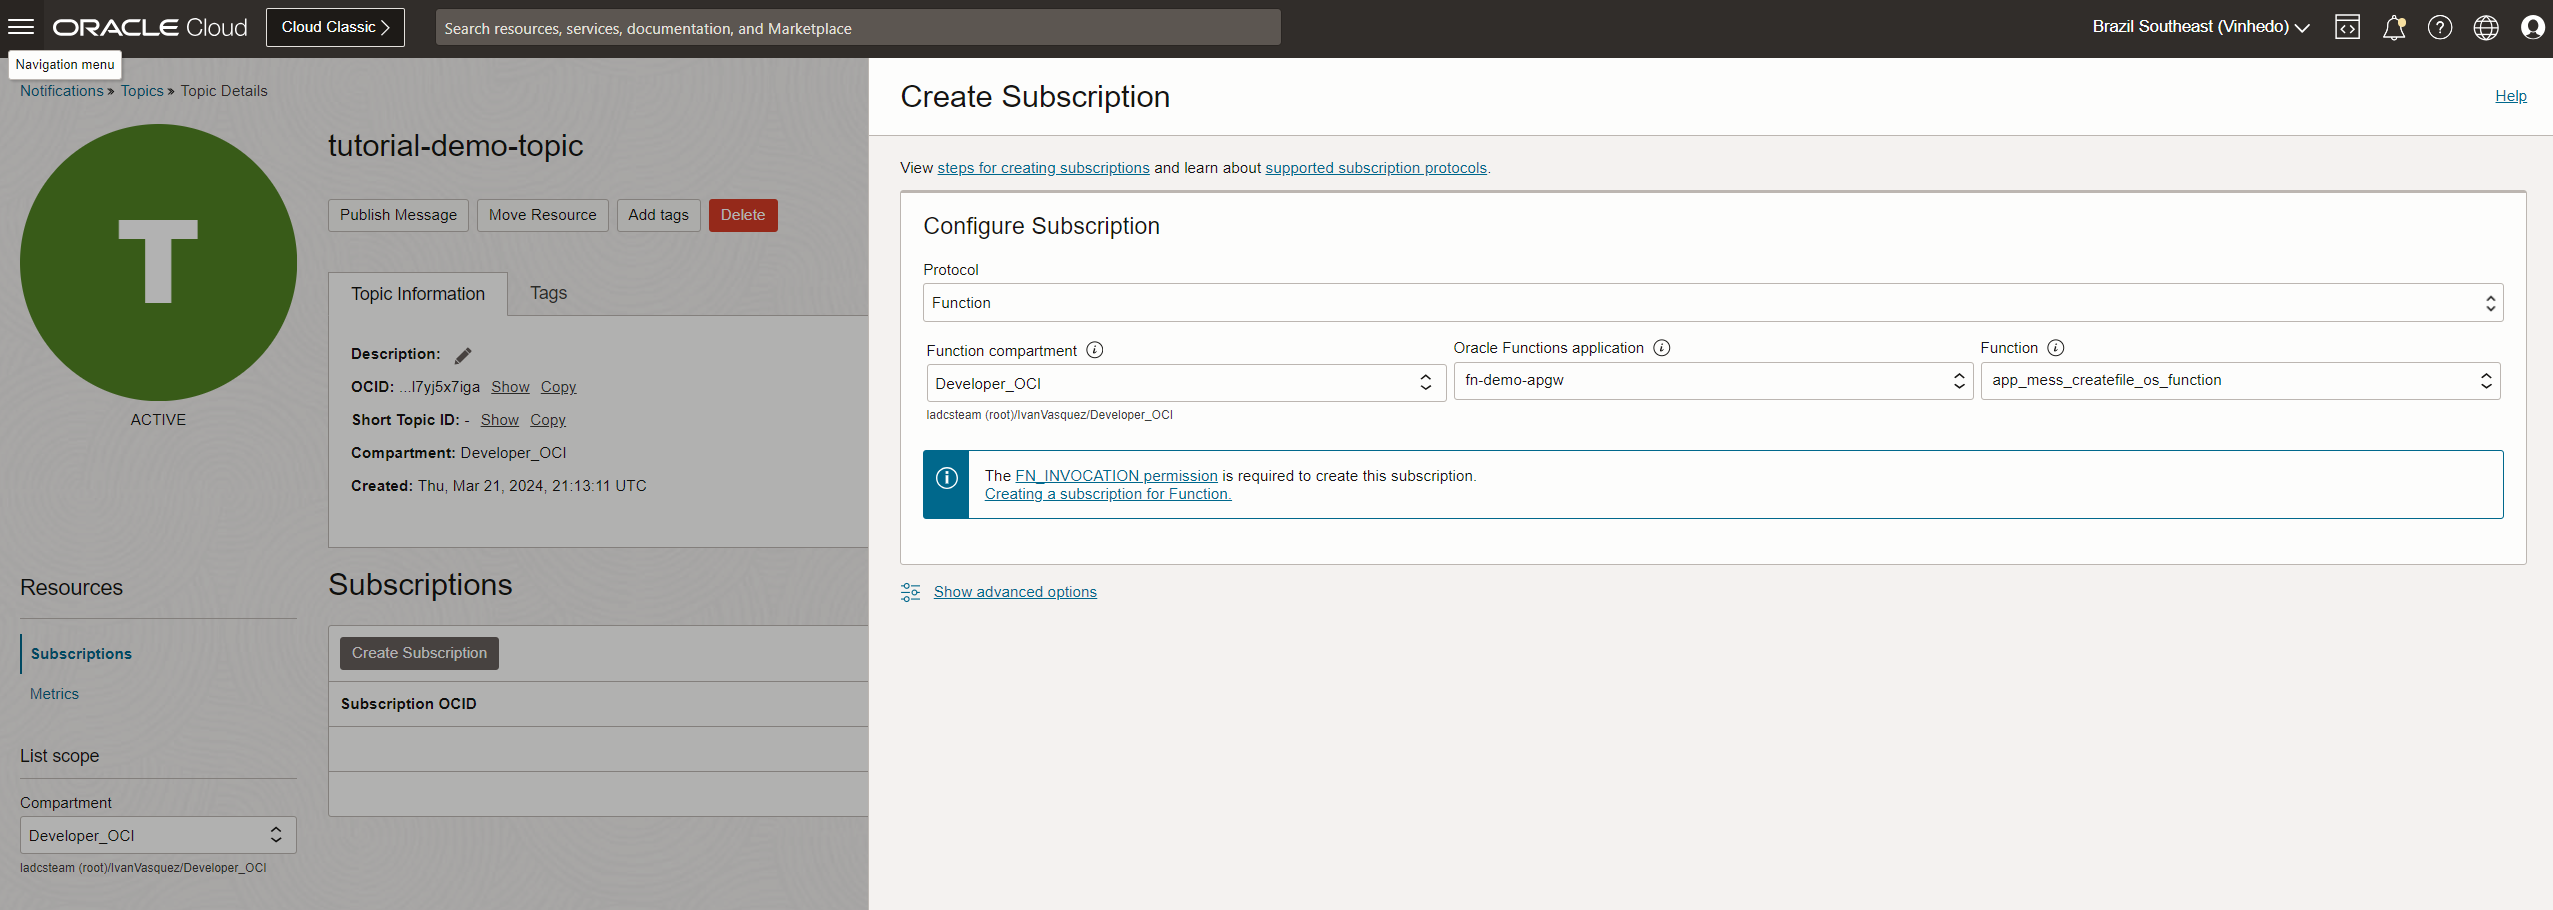
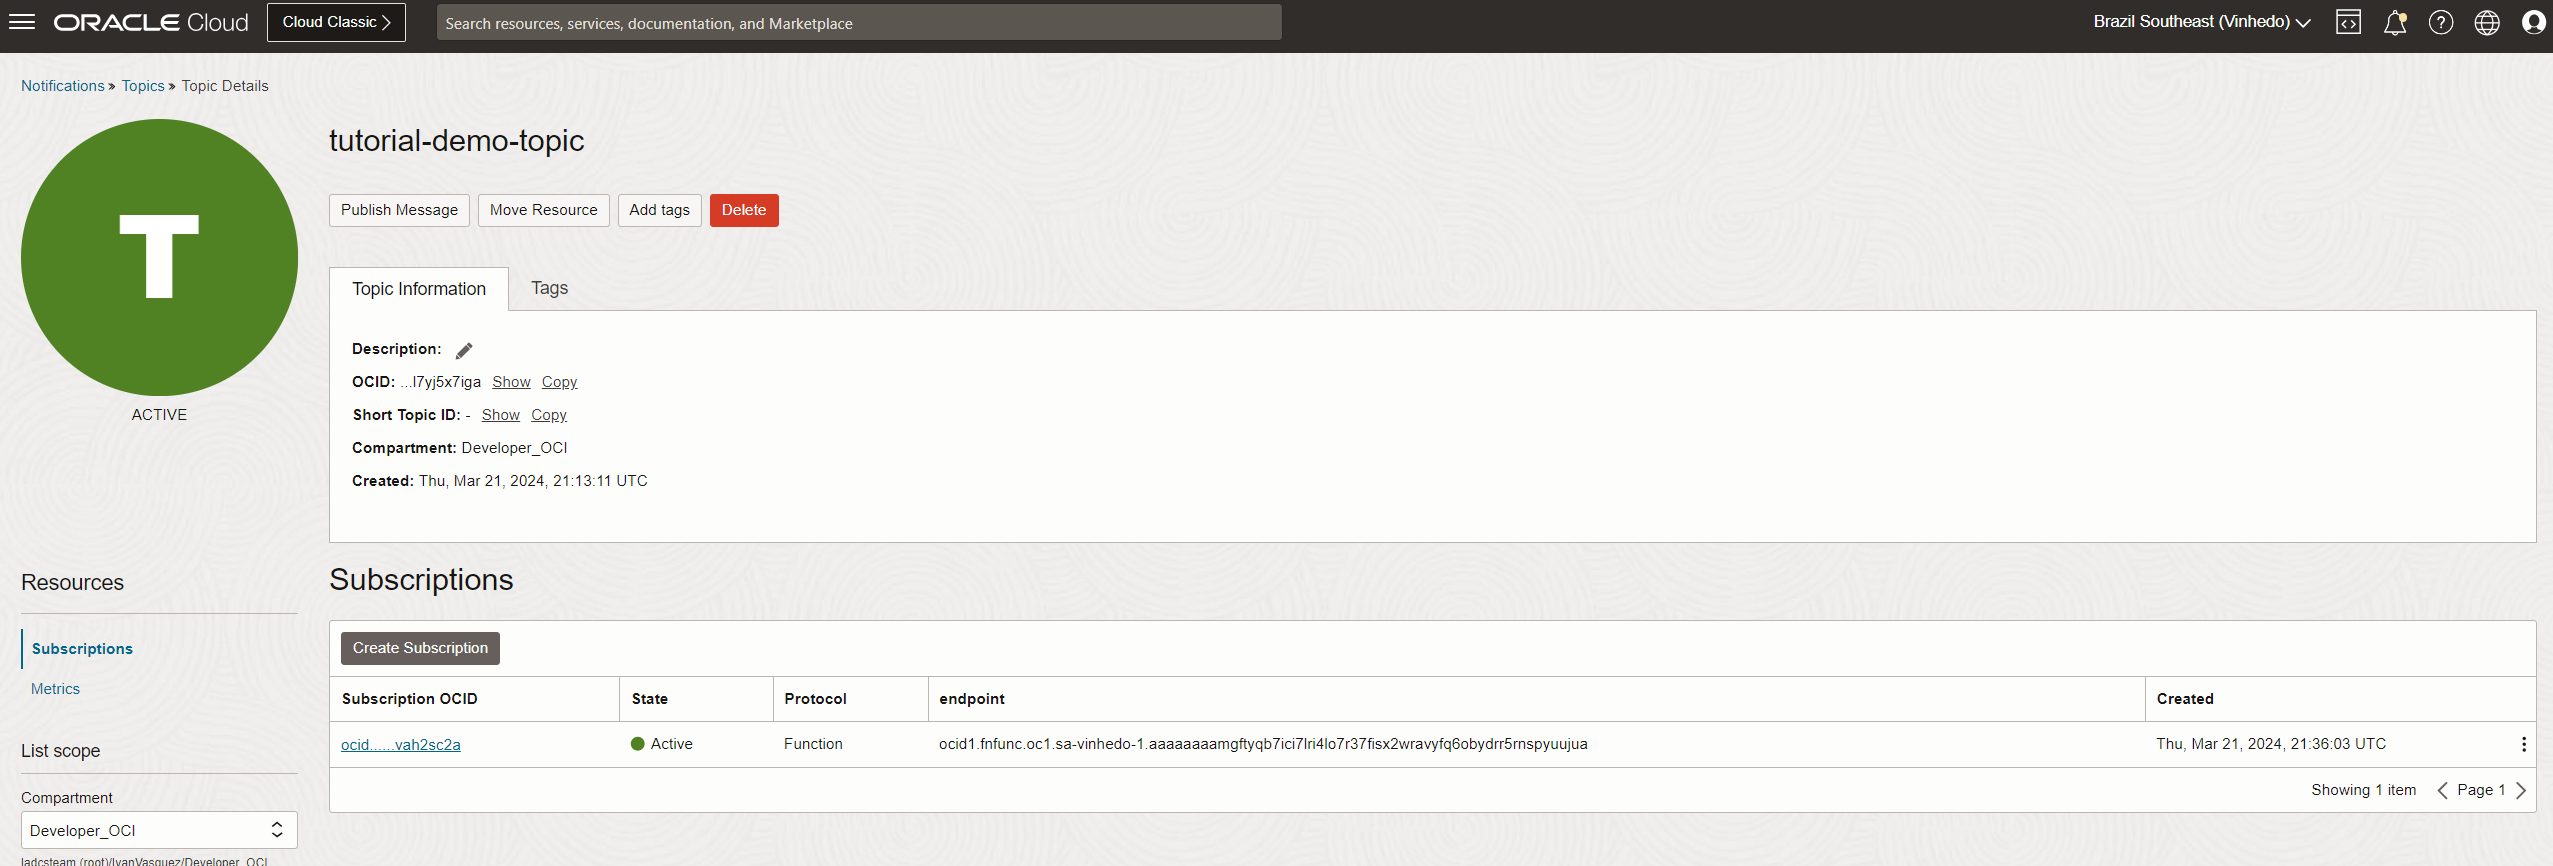
Note: In OCI Notifications, we can create multiple subscriptions with a different endpoint if required.
-
From OCI Notifications, we can publish a JSON format message with the required variables similar to what we did in Task 3 for OCI Functions.
Go to the OCI Console, navigate to Developer Services, Application Integration and Notifications. Click your topic and enter the Message as shown in the following image.

To verify in your bucket, go to Storage, Object Storage & Archive Storage and Buckets. Click your bucket and validate if the file is present.


Task 5: Create and Configure a Kubernetes Cluster in Oracle Cloud Infrastructure Container Engine for Kubernetes
In this task, we will create a simple Kubernetes cluster. For more information, see Creation of OKE Cluster.
-
Go to the OCI Console, navigate to Developer Services, Containers & Artifacts and click Kubernetes Clusters (OKE).
-
In the Clusters page, click Create cluster.
-
We have two workflows to create the cluster. Click Custom create and Submit.
-
Quick Create: This is easier, faster and automatically deploys all the elements required by OKE for its operation, such as:
- Virtual Cloud Network (VCN)
- Internet Gateway (IG)
- NAT Gateway (NAT)
- Service Gateway (SGW)
- Kubernetes cluster
- Kubernetes worker nodes(s) and node pool
-
Custom create: For the enterprise environments, where already the customers have services, network, infrastructure, it is important customize the OKE deployment, to be in compliance, aligned with the client architecture, resources and following the best practices.
In this tutorial, we will select Custom Create to preserve our architecture shown above.

-
-
Enter cluster Name, Compartment, Kubernetes version and click Next.

-
In the Network setup page, enter the following information and click Next.
- Network Type: Select VCN-native pod networking. For more information, see POD Networking.
- VCN: Select your VCN.
- Subnets: Select private and public subnet. In this tutorial, we use public subnet for load balancer, and private subnet for api-endpoint.

-
In the Node pools page, enter the following information.
- Name: Enter the name of node pool.
- Compartment: Select your compartment.
- Node type: Select Managed node type. For more information, see Comparing Virtual Nodes with Managed Nodes.
- Version: Select the version of Kubernetes.
- Node Placement Configuration:
- Availability domain: Configure the availability domain.
- Worker node subnet: Set the private subnet for the nodes that will be created in this node pool.
- Fault domain: Select the fault domains where you want the nodes to be distributed.
- Shape and image: Select a shape and image for our worker nodes,
- Node shape: Select
VM.Standard.E3.Flex Shape (16GB RAM memory and 1 OCPU). - Image: Select
Oracle-Linux-8.9-2024.01.26-0-OKE-1.28.2-679image.
- Node shape: Select
- Node count: Enter
1, for this tutorial, 1 is enough. - Boot volume: We will not modify the boot volume parameters.
- Pod communications: Select private subnet.


-
Review the Kubernetes cluster configuration and click Create cluster.
Note: Before clicking Create cluster, ensure that all the ingress and egress security list rules have been configured in each OKE network subnet for load balancer, API endpoint and worker nodes. For more information, see Network Resource Configuration for Cluster Creation and Deployment.

To verify the Kubernetes cluster, navigate to Developer Services, Containers & Artifacts and Kubernetes Clusters (OKE).

-
To access to the Kubernetes cluster, click the Kubernetes cluster name and Access Cluster.
You can see that the Cloud Shell Access is disabled, and Local Access is enabled, because when we selected the API endpoint subnet, we choosed a private subnet, which is more secure and the only way to access the Kubernetes cluster is using a local machine, so it is exactly the configuration that we are using in this tutorial with our admin host Oracle Linux VM. Select Local Access.

Note: We must have installed OCI CLI, Docker and kubectl. For more information, see Installing kubectl.
-
Once the admin host is ready, execute the following command to get access from your local machine to the Kubernetes cluster.
-
Verify OCI CLI version.
oci -v -
Create kubeconfig directory in your home.
mkdir -p $HOME/.kube -
Create kubeconfig file with a VCN-Native private endpoint.
oci ce cluster create-kubeconfig --cluster-id ocid1.cluster.oc1.sa-vinhedo-1.xxxxxxxxxxxxxxxxxxxxxxxxxxxxxxxxxxxxxxxxxxx --file $HOME/.kube/config --region sa-vinhedo-1 --token-version 2.0.0 --kube-endpoint PRIVATE_ENDPOINT -
Set kubeconfig environment variable.
export KUBECONFIG=$HOME/.kube/config
-
-
To verify the access of Kubernetes cluster, run kubectl commands.
-
Get the OKE worker nodes.
kubectl get nodes
-
Get the OKE pods.
kubectl get pods -A
-
Task 6: Develop and Deploy an API REST Application in Node.js and Publish Message in OCI Notifications
In this tutorial, we will develop and deploy an API REST Application in Node.js to get the JSON from the HTTP Post request body and publish this JSON body as a message in OCI Notifications.
We will create a Node.js project, build the project, push it to Oracle Cloud Infrastructure Container Registry and deploy in OKE. We will use an existing Oracle Linux administration host configured for OCI Functions so we have already installed Node.js and Docker.
-
Run the following commands to create a folder with the name of our project in the local machine home and change directory to the project folder.
mkdir api_rest_application_okecd api_rest_application_oke -
To initialize a project, run the following command and configure the
package.jsonfile as shown in the following image.npm init
-
Before developing the Node.js code, we need to install the required libraries for the project.
-
API REST application needs to works like a web application, so we will require express library.
npm install express
-
We will need to get the JSON body from the HTTP POST request, therefore we will require the body-parser library.
npm install body-parser
-
The application will need to authenticate with OCI to have access to its services, so we will require the oci-common library.
npm install oci-common
-
To publish a message in OCI Notifications that comes from the request body, we will require the oci-ons library.
npm install oci-ons
Our
package.jsonhas the following dependencies.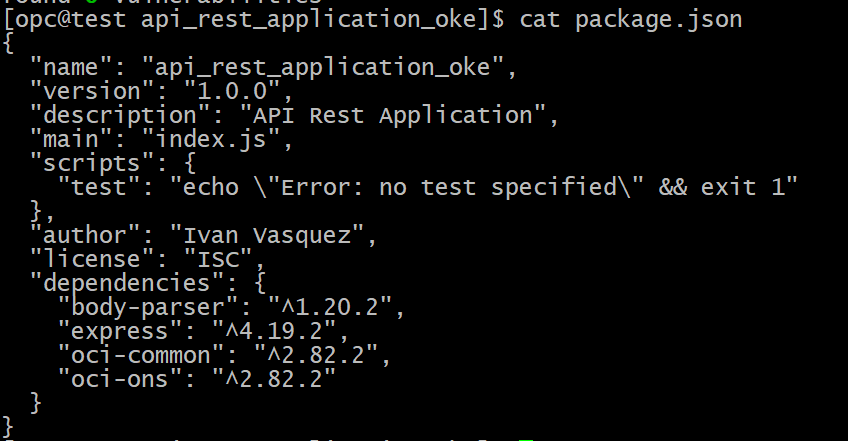
-
-
When the Node.js project is configured, we can create our code in the
index.jsfile. The following is the source code.We are going to authenticate in OCI from the code using the config file, similar to how we configured OCI CLI. In both cases, the keys and the config file are placed in the API REST application project folder, as shown in the following image.

-
index.js.//Dependencies are added const ons = require("oci-ons"); //oci notifications library const common = require("oci-common"); //oci authentication library const express = require('express'); //web application framework const bodyParser = require('body-parser');//extract information from an incoming HTTP request //invocation of express framework const app = express(); //definition of port that We will be used to listen the requests from the client side const port = 8080; //Create a default authentication provider that uses the DEFAULT const provider = new common.ConfigFileAuthenticationDetailsProvider( "config", "DEFAULT" ); //Use in the body HTTP POST request json format app.use(bodyParser.json()); //creation of POST endpoint app.post('/api/receive-json', (req, res) => { const jsonData = req.body; //If the Body is empty or not json format return error if (!jsonData) { return res.status(400).json({ error: 'Invalid JSON data in the request body' }); } (async () => { try { // Create OCI Notifications Client with OCI Authentication Object const client = new ons.NotificationDataPlaneClient({ authenticationDetailsProvider: provider }); // Create constant message object required for OCI Notifications const messageDetails = { title: "PUBLISH_MESSAGE", //Message Title body: JSON.stringify(jsonData) //Body Message }; //Create publish Message Request in a specific topic in OCI Notifications const publishMessageRequest = ons.requests.PublishMessageRequest = { topicId: "ocid1.onstopic.oc1.sa-vinhedo-1.amaaaaaan4xxxxxxxxxxxxxxxxxxxxxxxxxxxxxxxxxxxxxxxxxxxxxxxxxx", messageDetails: messageDetails }; //Publish Message sending Publish Message Request object previously created const publishMessageResponse = await client.publishMessage(publishMessageRequest); } catch (error) { //error log console.log("publishMessage Failed with error " + error); } })(); res.json({ success: true, message: 'JSON data received successfully' }); }); //listening for a specific port app.listen(port, () => { console.log(`Server is running at http://localhost:${port}`); });
-
-
In the same folder, create
Dockerfile, which will allow us to create a container image.FROM node:14 WORKDIR /usr/src/app COPY package*.json ./ RUN npm install COPY . . EXPOSE 8080 CMD [ "node", "index.js" ] -
Build and push the image of the project in the local Docker repository.
docker build . -t apirestapp:latest
Verify the image in the local Docker repository.
docker images
Note:
-
You must have Oracle Cloud Infrastructure Container Registry. Refer to Task 3.6.
-
You must be logged in to Oracle Cloud Infrastructure Container Registry, as we are using the same local machine admin host we should be logged in. Refer to Task 3.7.
-
-
We can tag the API REST application image in Oracle Cloud Infrastructure Container Registry.
docker tag apirestapp:latest vcp.ocir.io/idccixxxxx/oke_application/oke_apirest_application_repository:latestVerify in the local Docker repository.
docker images
Push the image to Oracle Cloud Infrastructure Container Registry.
docker push vcp.ocir.io/idccixxxxx/oke_application/oke_apirest_application_repository:latest
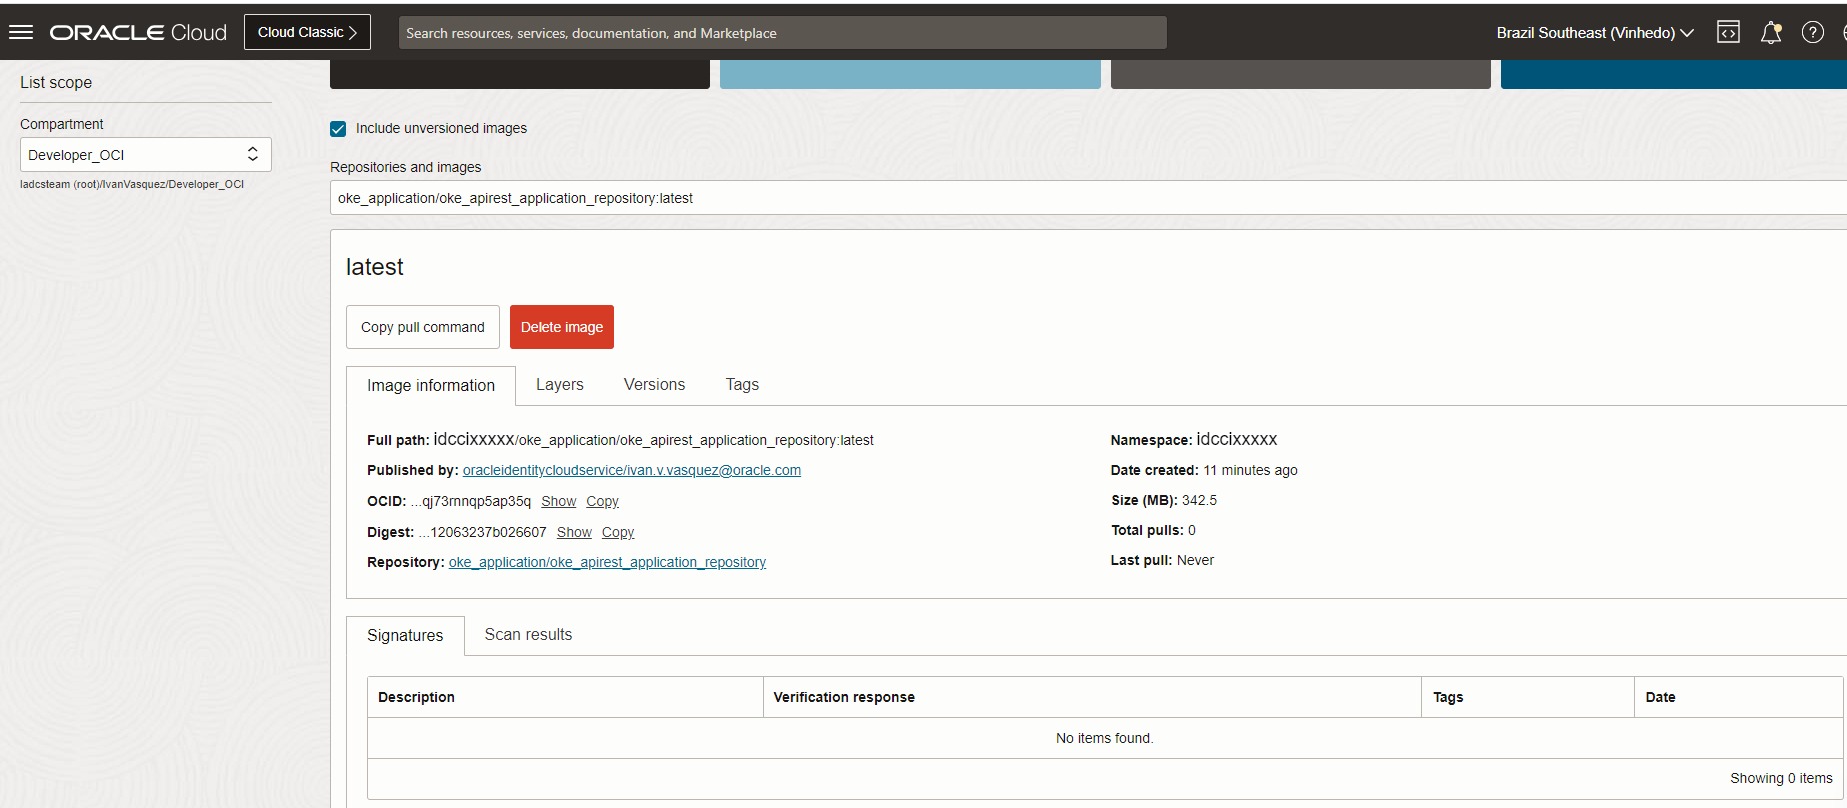
To review the OKE image application in Oracle Cloud Infrastructure Container Registry, go to Developer Services, Containers & Artifacts and Container Registry.
-
Once the image is in the Oracle Cloud Infrastructure Container Registry, we can go to our local Oracle Linux VM administration host and deploy this image in OKE. For this tutorial, run the following command to create the namespace and secret for OKE.
-
Access the project folder.
cd api_rest_application_oke/ -
Create namespace for OKE.
kubectl create namespace ns-tutorial
-
Verify the namespace.
kubectl get namespace ns-tutorial
-
Create secret for OKE.
kubectl create secret -n ns-tutorial generic ocir --from-file=.dockerconfigjson=../.docker/config.json --type=kubernetes.io/dockerconfigjson
-
Verify the secret.
kubectl get secrets -A
-
-
We already have OKE environment ready so deploy the application image from Oracle Cloud Infrastructure Container Registry to OKE.
Note: To deploy the application image, it is necessary to have a manifest file. In this tutorial, the following
yamlfile is the manifest file, it is used to deploy the application and create the ingress service represented in an OCI Load Balancer that is listening using80port.-
apirest_application_manifest.yaml.apiVersion: apps/v1 kind: Deployment metadata: name: app-restapi namespace: ns-tutorial labels: app: app-restapi spec: replicas: 1 selector: matchLabels: app: app-restapi template: metadata: labels: app: app-restapi spec: containers: - name: app-restapi image: vcp.ocir.io/idccixxxxx/oke_application/oke_apirest_application_repository:latest ports: - containerPort: 8080 imagePullSecrets: - name: ocir apiVersion: v1 kind: Service metadata: name: svc-restapp namespace: ns-tutorial spec: selector: app: app-restapi ports: - port: 80 targetPort: 8080 type: LoadBalancer -
Execute kubectl command in the folder where you saved the manifest file.
kubectl apply -f apirest_application_manifest.yamlNow, the application is deployed and the ingress load balancer service is created in OKE,

-
To validate the pod and service created in OKE, run the following command.
kubectl get pods -A
kubectl get svc -A
Note: Download API REST Application project from here: api_rest_application_oke.zip.
-
Task 7: Request HTTP POST with JSON body to URL exposed in Load Balancer of the API REST Application
In this task, we will make an HTTP POST request with JSON message body from Postman client that contains the basic data to create a file in a bucket. This request will be sent to the API REST application in OKE and pushing the message in OCI Notifications topic will trigger a function with the logic to create a text file in a specific bucket as illustrated in the architecture in Introduction.
-
To install Postman, see Postman Installation.
-
Open Postman application.
-
Click hamburger menu, File and select New.

-
Select HTTP.

-
Enter the URL exposed by the API REST application deployed in OKE:
http://"IP ADDRESS LOAD BALANCER"/api/receive-jsonand select the POST method. In the Body tag, select raw and enter the JSON message in the blank field.
-
-
Click Send to send the request.

To verify the file created in the specific bucket in OCI Object Storage, go to Storage, Object Storage & Archive Storage, Buckets and click your bucket.


In this tutorial, you have used OCI Notifications with a new use case, integrating several services such as APIs, OCI SDK, Kubernetes applications deployed in OKE, OCI Functions and OCI Object Storage.
Related Links
-
Installing Oracle Cloud Infrastructure Command Line Interface (OCI CLI)
-
Network Resource Configuration for Cluster Creation and Deployment
Acknowledgments
- Author - Iván Alexander Vásquez Chinome (Oracle LAD A-Team Cloud Solution Specialist)
More Learning Resources
Explore other labs on docs.oracle.com/learn or access more free learning content on the Oracle Learning YouTube channel. Additionally, visit education.oracle.com/learning-explorer to become an Oracle Learning Explorer.
For product documentation, visit Oracle Help Center.
Publish a Message in OCI Notifications, Trigger a Function and Create a File in OCI Object Storage Bucket
F96526-01
April 2024