7 Servicing the Internal M.2 Flash SSDs (CRU)

This section describes how to service M.2 flash solid-state drives (SSDs). M.2 flash SSDs are customer-replaceable units (CRUs) that do not require you to power off the server. For more information about CRUs, see Illustrated Parts Breakdown and Customer-Replaceable Units.

Caution:

These procedures require that you handle components that are sensitive to electrostatic discharge. This sensitivity can cause the component to fail. To avoid damage, ensure that you follow antistatic practices as described in Electrostatic Discharge Safety.

Caution:

Unless the two M.2 risers are running in a software RAID configuration, removing one might result in a system crash and possible data corruption.

This section covers the following procedures:

Remove a Flash Riser Board

The server can contain up to two hot-pluggable flash riser boards. Each flash riser board can contain either one or two M.2 flash SSDs.

  1. Prepare the server for service.
    1. Extend the server into maintenance position.
    2. Attach an antistatic wrist strap to your wrist, and then to a metal area on the chassis.
    3. Remove the server top cover.
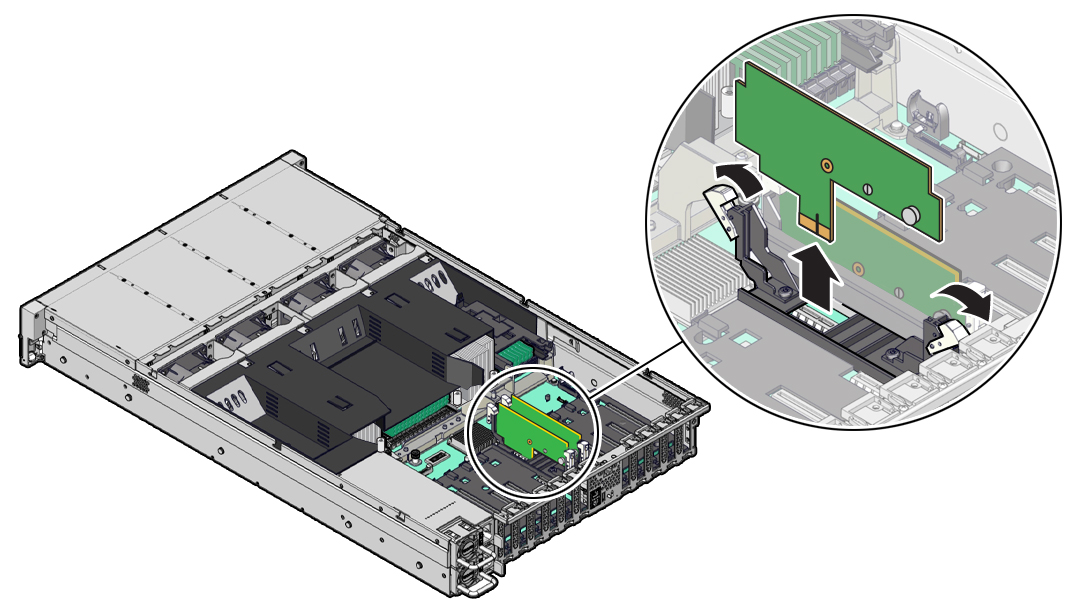
  2. To remove the flash riser board, do the following:
    1. Rotate both riser board socket levers outward as far as they go.

      Note:

      The green Power LED indicator located on the riser board is extinguished when you open the socket levers.
    2. Carefully lift the riser board straight up to remove it from the sockets.

      Place the riser board on an antistatic mat. If required, perform the procedures for removing the M.2 flash SSD from the flash riser board. See Identify and Remove an M.2 Flash SSD.


      Figure showing a flash riser board being removed from the server.

Install a Flash Riser Board

The system motherboard provides two slots (labeled SSDR 0 and SSDR 1) for flash riser boards. When installing flash riser boards, install the first riser board into slot SSDR 0 and then into SSDR 1.

  1. Unpack the replacement flash riser board and place it on an antistatic mat.

    If required, ensure that you have installed an M.2 flash SSD onto the riser board before installing the riser board into the server. See Install an M.2 Flash SSD.

  2. Install the flash riser board.
    1. Ensure that the riser board socket levers are in the open position.
    2. Align the notch in the replacement riser board with the connector key in the connector socket.

      The notch ensures that the riser board is oriented correctly.

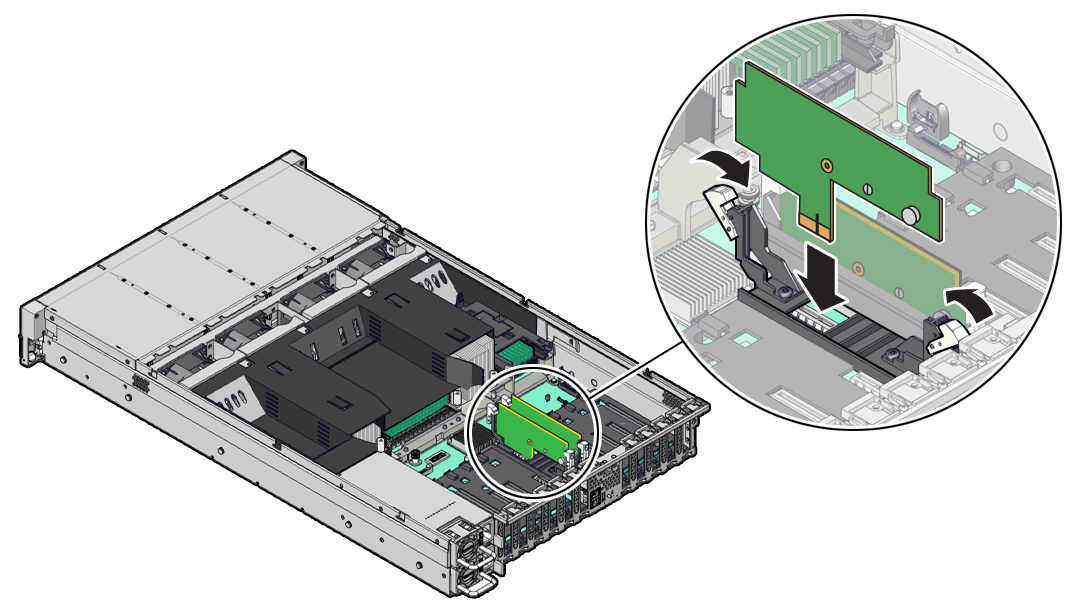
    3. Push the riser board into the connector socket until the riser board is securely seated in the socket.

      Caution:

      If the riser board does not easily seat into the connector socket, verify that the notch in the riser board is aligned with the connector key in the connector socket. If the notch is not aligned, damage to the riser board might occur.

      Figure showing an M.2 flash riser board being installed into the server.
    4. Rotate the riser board socket levers inward until the riser board is secured in place.
  3. (Optional) Repeat Step 2 to install a second flash riser board into the server.
  4. Return the server to operation.
    1. Install the server top cover.
    2. Return the server to the normal rack position.

Identify and Remove an M.2 Flash SSD

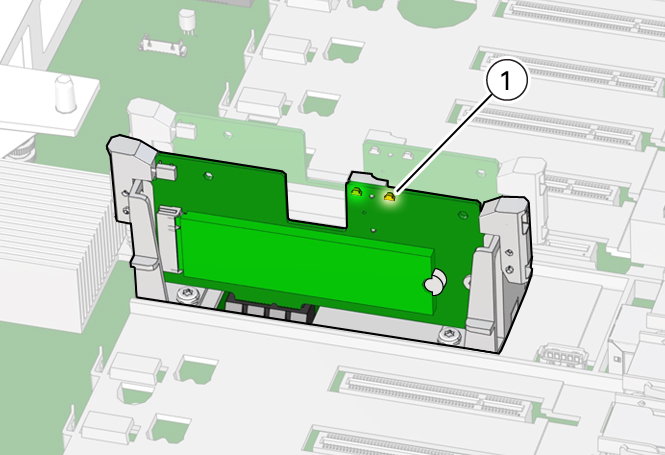
In the standard Oracle Server X9-2L configuration, the flash riser board contains an M.2 flash SSD in socket SSD.
  1. Prepare the server for service.
    1. Extend the server into maintenance position.
    2. Attach an antistatic wrist strap to your wrist, and then to a metal area on the chassis.
    3. Remove the server top cover.
  2. Identify and note the location of the failed M.2 flash SSD by pressing the Fault Remind button on the motherboard.

    See Using the Server Fault Remind Button.

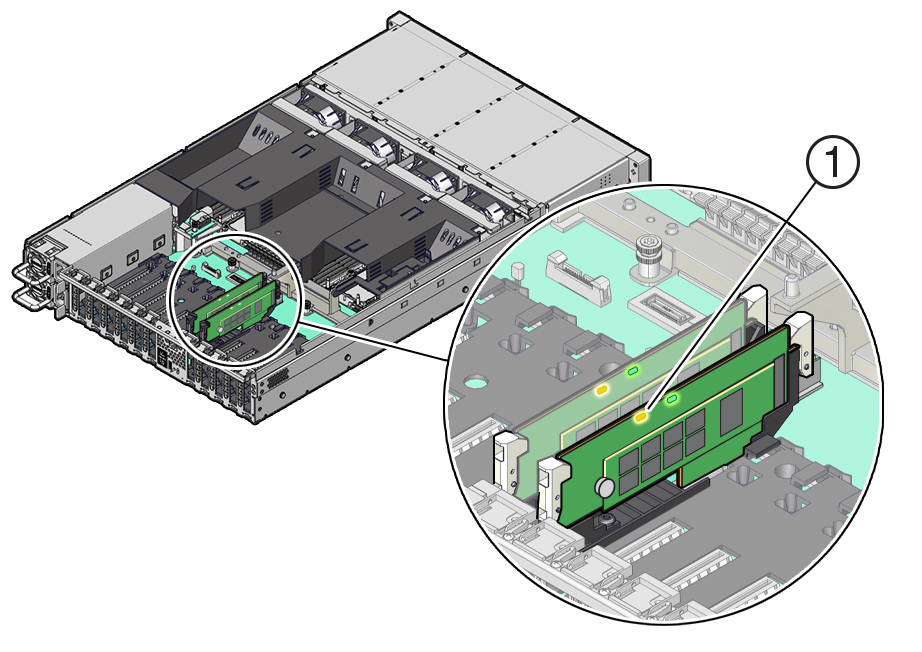
    Failed SSDs are identified with a corresponding amber LED that is lit on the flash riser board.

    • If the SSD fault LED is off, then the SSD is operating properly.

    • If the SSD fault LED is on (amber), then the SSD is failed and must be replaced [1].

    Note:

    The green Power LED indicator is illuminated when power is applied to the system. The green Power LED indicator is extinguished when you open the riser board socket levers.

    Figure showing a faulty SSD.

    Figure showing a faulty SSD.
  3. Perform Step 2 in Remove a Flash Riser Board to remove the flash riser board from the server.
  4. Place the riser board on an antistatic mat.
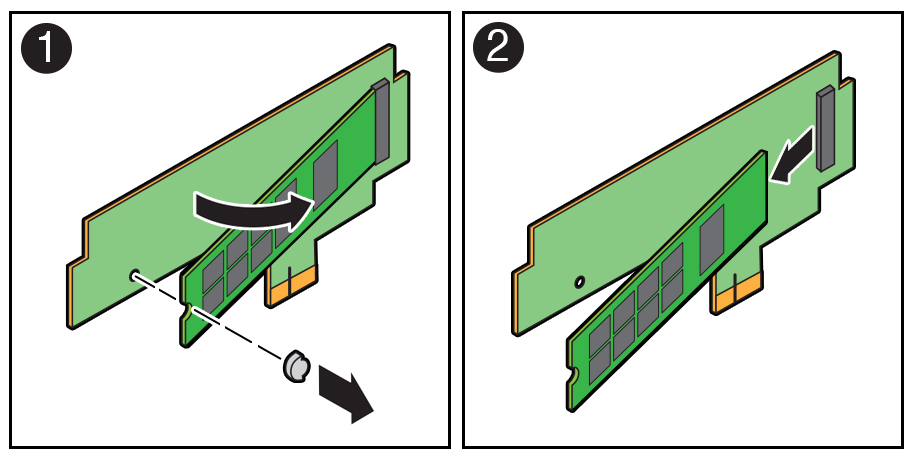
  5. Remove the M.2 flash SSD in socket SSD from the riser board.
    1. Using your fingers, push the plastic retainer clip through the flash riser board to release the M.2 flash SSD from the riser board [1].

      Figure showing an M.2 flash SSD being removed from a riser board.
    2. Remove the plastic retainer clip from the M.2 flash SSD [1].
    3. Lift up on the end of the M.2 flash SSD where the plastic retainer clip was removed by one-half to one inch [2].
    4. Gently slide the M.2 flash SSD card back and out of the connector to disengage the SSD contacts from the riser board socket [2].
    5. Place the M.2 flash SSD on an antistatic mat.

Install an M.2 Flash SSD

In the standard Oracle Server X9-2L configuration, the flash riser board contains an M.2 flash SSD in socket SSD.
  1. Unpack the replacement M.2 flash SSD and place it on an antistatic mat.
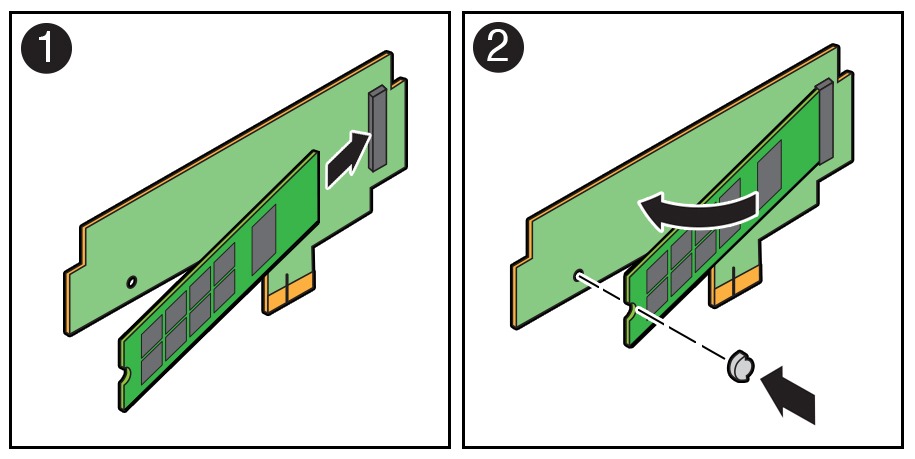
  2. Install the M.2 flash SSD into socket SSD on the flash riser board.
    1. Align and then insert the plastic retainer clip into the slot on the M.2 flash SSD [1].
    2. Hold the M.2 flash SSD so that the end of the card containing the plastic retainer clip is approximately one-half to one inch above the riser board, and the other end is adjacent to the riser SSD socket [1].

      Figure showing an M.2 flash SSD being installed on to a riser board.
    3. Gently slide the M.2 flash SSD forward and into the connector to engage the flash SSD contacts with the riser board socket [2].
    4. Using your fingers, push down on the end of the card containing the plastic retainer clip until the M.2 flash SSD snaps into place on the riser board [2].

      You hear an audible click when the M.2 flash SSD is secured to the flash riser board.

  3. Perform the steps to install the M.2 flash riser board with the replacement flash SSD into the server.
  4. Return the server to operation.
    1. Install the server top cover.
    2. Return the server to the normal rack position.