A script enabled browser is required for this page to function properly.
Exit Print View

Oracle® Java Micro Edition Embedded Client Installation Guide, Version 1.0

Get PDF Book Print View
 

Document Information

1.  System Requirements

2.  Installation Procedures

3.  Working With NetBeans

4.  Working With Eclipse

Oracle Java ME Embedded Client SDK and Eclipse Projects

Adding a Java Platform

Writing Your First Application

5.  Command Line Options

Chapter 4

Working With Eclipse

This chapter details the steps to configure Eclipse to use the Oracle Java ME Embedded Client SDK as a Java platform, and presents a sample project and a sample application to run in your configured environment.


Note - The SDK supports application development and the emulation. Debugging and Profiling are not supported.


Oracle Java ME Embedded Client SDK and Eclipse Projects

This section describes how to add the Oracle Java ME Embedded Client SDK as a Platform in Eclipse and how to create a new project in Eclipse.

Adding a Java Platform

Before You Begin

Launch Eclipse and follow these steps:

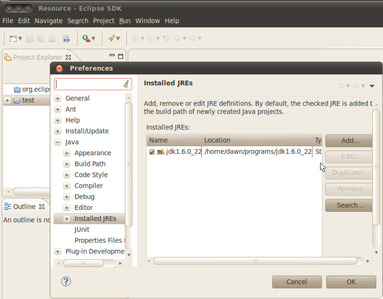
  1. Select Window > Preferences.

    The Preferences Window opens.

  2. In the Preferences window, go to the left panel, expand the Java item, and select Installed JREs.
    The Add JRE window lists the installed JRE types in the central panel. Click the Add button.

    The central panel displays the JREs on this machine.

  3. Click the Add button on the right to open the Add JRE window.

    The window displays the JRE Type options.
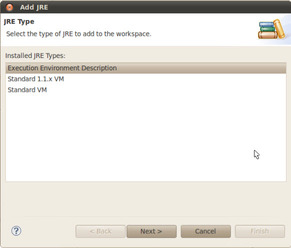
  4. Select Execution Environment Description and click Next.
    Select Execution Environment Description (the first JRE type) and click the Next button on the bottom center

    The window displays the JRE definition panel.

  5. In the Definition File field, click File to open a file chooser window.
    1. Navigate to /usr/local/Oracle_JavaME_Embedded_Client/1.0/emulator-platform .
      Click the File button on the upper right, browse to the SDK installation directory, and locate /emulator-platform/ojec_re_def.ee. Click Next. With the file chosen the JRE name should read Oracle Java Micro Edition Embedded Client 1.0. The default VM arguments are -Djava.home=”path_to_emulator-platform”
    2. Select ojec_re_def.ee and click OK to close the file chooser window.
  6. Click Finish to load the Oracle Java ME Embedded Client JRE and close the Add JRE window.

    The Installed JREs panel lists Oracle Java Micro Edition Embedded Client 1.0 as an installed JRE.
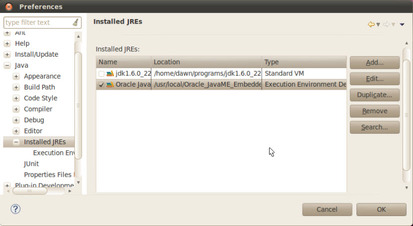
  7. Check the box in front of Oracle Java Micro Edition Embedded Client 1.0 and click OK.
    Click the check box in front of Oracle Java Micro Edition Embedded Client and click OK.

    Now you are ready to develop applications for the Oracle Java ME Embedded Client.

Writing Your First Application

After completing the steps documented in the previous task, Eclipse has the JRE platform required to build and run Oracle Java ME Embedded Client applications.

  1. Select File > New > Project and then Java Project.

    The Create a Java Project window is displayed.
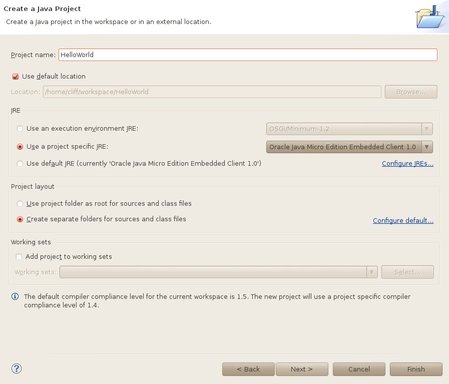
  2. In the Create a Java Project window, perform the following actions:
    The New Java Project window with project name and Oracle Java Micro Edition Embedded client JRE specified for Project Specific JRE
    1. Enter a project name, such as HelloWorld.
    2. In the JRE area, select Use a project specific JRE and choose Oracle Java Micro Edition Embedded Client 1.0.
    3. For this example, choose Create separate folders for sources and class files.
    4. Click the Finish button.

    The new project HelloWorld is created along with separate directories for sources and class files, src and bin respectively.

  3. Select File > New > Class.

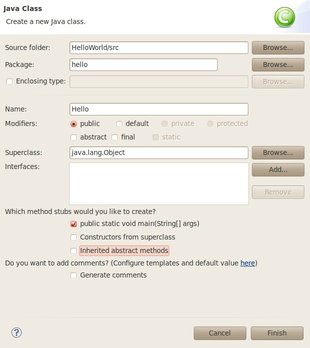
    The New Java Class window opens.

  4. In the New Java Class window, perform the following actions:
    The New File window showing the project hierarchy
    1. The Source folder field should be populated. If it isn’t, browse for the folder.
    2. In the Package field, use lower case characters to enter a name.
    3. In the Name field, enter the class file name.
    4. In the method stubs area, deselect the Inherited abstract methods option and check:

      public static void main(String[] args)

  5. Click Finish to create the file Hello.java in the src folder.

    The new Hello.java file in the src folder is an empty template and must be modified.

  6. In Hello.java, add a print line to the body of the main function:
    package hello;
    public class Hello {
        /**
         * @param args
         */
        public static void main(String[] args) {
            // TODO Auto-generated method stub
            System.out.println("Hello World");
        }
    } 
  7. Click the green triangle Run button to compile and run your code.

    The Hello World message prints in the console.