Chapter 3
Working With NetBeans
As mentioned in  Development Environment, the recommended NetBeans version is 6.9.1. You can find
this version at:
http://netbeans.org/downloads/index.html
Choose the “Java” download bundle.
This chapter details the steps to configure NetBeans to use the Oracle Java
ME Embedded Client SDK as a Java platform, and presents a sample
project and to run in your configured environment.
Oracle Java ME Embedded Client SDK and NetBeans Projects
This section details how to add the SDK as a Java Platform in
NetBeans and how to create an Oracle Java ME Embedded Client project.
Adding the SDK as a Java Platform
Before You Begin
Oracle Java ME Embedded Client provides the Java ME platform for embedded devices,
such as TV Set Top boxes and smart electric meters. These devices run
a virtual machine based on Java ME CDC. To emulate this environment, the
NetBeans IDE must be configured to use the Oracle Java ME Embedded Client
platform. Follow these steps to install this platform into your NetBeans IDE.
This procedure was recorded on a Linux machine. If you are a PC
user, use the Windows paths discussed in  SDK Installation Structure.
- Start the NetBeans IDE.
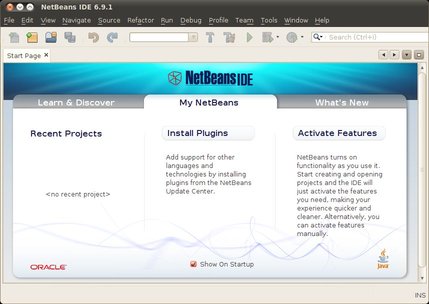
- Choose Tools > Plugins or go to the My NetBeans tab and click Install Plugins.
- Click the Installed Tab and determine if the Java ME item has a
green check mark under the Active column.
If Java ME is checked, continue to  Step 9 or, if Java ME is
not enabled, perform the following actions:
- Check the box in the Select column as shown in the following screen.
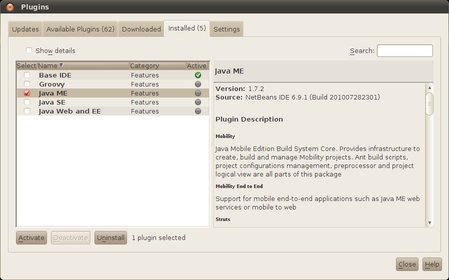
- Click the Activate button on the bottom left of the Plugins window.
The NetBeans IDE Installer window opens.
- Click the Activate button at the bottom, as shown below.
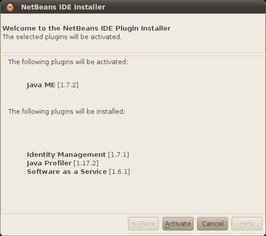
- Click Finish when the Java ME plugin activation is complete.
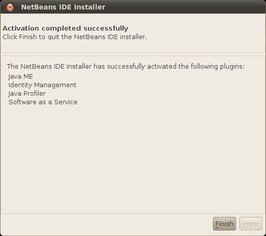
- If you have an older 6.9.1 installation it must be updated to work
with Oracle Java ME Embedded Client. In NetBeans, select Help > check for
Updates. Repeat the update process until NetBeans reports “Your IDE is up to
date.”
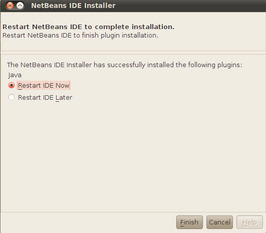
- After a successful update, NetBeans will prompt you to restart the IDE. Click
the option Restart IDE now, and click Finish.
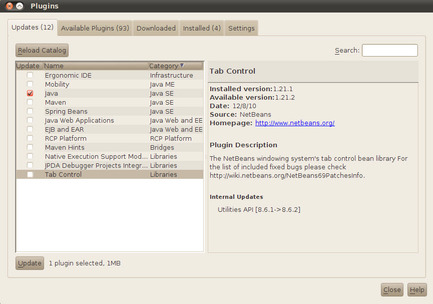
- Select the menu Tools->Plugins and click the Update tab.
Click the Java box as shown, and click the Update button. This step
enables the plugin for CDC Java Embedded Client Platform Implementation.
- After a successful update, NetBeans will again prompt you to restart the IDE.
Click the option Restart IDE now, and click Finish.

- Click the Close button to dismiss the Plugins window.
- Select Tools > Java Platforms and the Java Platform Manager window opens.
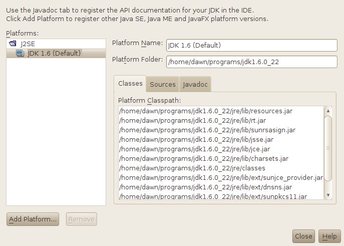
- Click the Add Platform button below the Platforms pane and the Add Java
Platform window opens.
- On the Select platform type page, select Java ME CDC Platform Emulator.
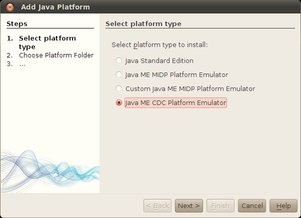
- Click Next to display the Choose Platform Folder page.
- On the Choose Platform Folder page, go to the Look In field and
choose or navigate to /usr/local/Oracle_JavaME_Embedded_Client/1.0/emulator-platform.
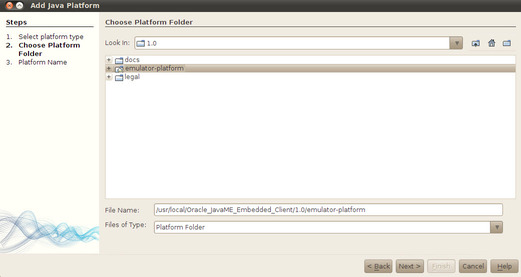
- Click Next to display the Platform Name page.
If no errors are displayed on the Platform Name page, click Finish and
the Java Platform Manager opens.
- Verify that the Oracle Java Micro Edition Embedded Client is added as a
CDC platform on the left and click Close.
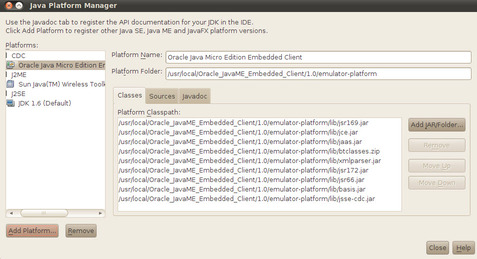
You are ready to develop applications.
Create and Run a New Project
- Select File > New Project and the New Project wizard opens.
- On the Choose Project page, complete the following:
- In the categories area, select Java ME.
- In the Projects area, select CDC Application.
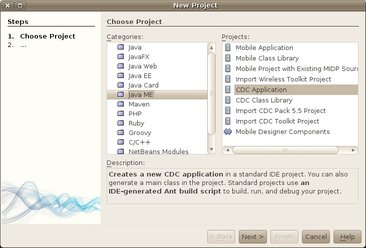
- Click Next and the Name and Location page is displayed.
- On the Name and Location, perform the following actions:
- Enter HelloWorld for the Project Name.
- Select an appropriate Project Location.
- De-select the Create Main Class option.
- Click Next and the Select Platform page is displayed.
- On the Select Platform page, perform the following actions:
- Select Oracle Java Micro Edition Embedded Client Emulator from the Java Platform list.
- Choose JEC-1.0 from the Profile list.
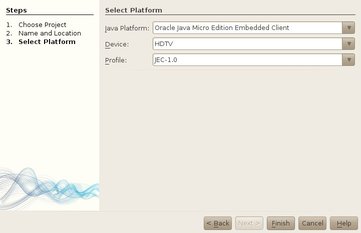
- Click the Finish button to create the new HelloWorld project (the name entered
in
 Step 3).
- Create a Main class in the HelloWorld package by performing the following actions
in the Projects view:
- Expand the HelloWorld application and the Source Packages tree.
- Right-click on <default package>.
- Select New > Java Class to open the New Java Class window.
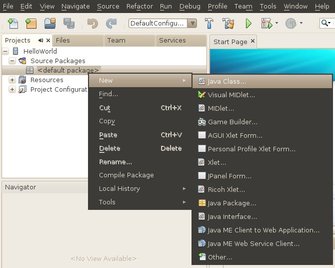
- Name the class Main, enter a lower case package name such as helloworld,
and click Finish.
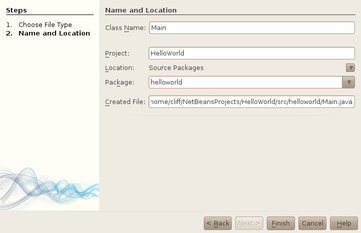
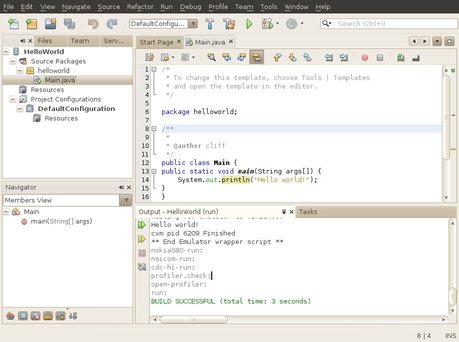
- Edit the Main class by inserting a main method to print a string.
For example:
public class Main {
  public static void main(String args[]) {
    System.out.println("Hello, world!");
  }
}
- In the Projects tab, right-click on the project and select the option Build.
- Identify helloworld.Main as the HelloWorld project main class.
- In the Projects tab, right-click on the HelloWorld project and select Properties to open
the properties window.
- In the Category area, select Running.
- In the Main Class field, click Browse to select the Main.java file.
The Browse Main Classes window opens with helloworld.Main selected. The option Run using main(String[] args) method execution should
be selected.
- Click the Select Main Class button and then click OK to close the
HelloWorld properties window.
- In the Projects tab, right-click on the project and select the option Run.
The message, “Hello, world!” prints in the NetBeans Output window. To open the
output window, select Window > Output > Output.
Project Options
To edit project properties, right click on the project and select the option
Properties.
-
To change the display resolution, select the Platform category to switch to another emulator platform (if available).
-
Open the Build sub-options to set desired values. For example, you can add any JAR file to the build system by selecting Build sub-option Libraries & Resources.
-
Modify the Running option to pass Arguments or VM options for the Java runtime.

![]() Development Environment, the recommended NetBeans version is 6.9.1. You can find
this version at:
Development Environment, the recommended NetBeans version is 6.9.1. You can find
this version at:![]() SDK Installation Structure.
SDK Installation Structure.
![]() Step 9 or, if Java ME is
not enabled, perform the following actions:
Step 9 or, if Java ME is
not enabled, perform the following actions:


