17 セパレータ
この章では、セパレータを使用してJavaFXアプリケーションのUIコンポーネントを編成する方法について説明します。
JavaFX APIで使用可能なSeparatorクラスは水平および垂直のセパレータの線を表します。 これはアプリケーション・ユーザー・インタフェースの要素を分割しますが、アクションは何も生成しません。 ただし、これにはスタイルの設定、視覚効果の適用、またはアニメーション化を行うこともできます。 デフォルトでは、セパレータは水平です。 この方向はsetOrientationメソッドを使用して変更できます。
セパレータの作成
例17-1のコード・フラグメントでは、1つの水平セパレータと1つの垂直セパレータを作成します。
例17-1 垂直および水平セパレータ
//Horizontal separator
Separator separator1 = new Separator();
//Vertical separator
Separator separator2 = new Separator();
separator2.setOrientation(Orientation.VERTICAL);
SeparatorクラスはNodeクラスの拡張です。 このため、このセパレータはNodeクラスのインスタンス変数をすべて継承します。
通常、セパレータはUIコントロールのグループの分割に使用されます。 例17-2に示すコード・フラグメントを調べます。 ここでは、春季の月のチェック・ボックスと夏季の月のチェック・ボックスを分けています。
例17-2 チェック・ボックス・カテゴリ間でのセパレータの使用
final String[] names = new String[]{"March", "April", "May",
    "June", "July", "August"};
final CheckBox[] cbs = new CheckBox[names.length];
final Separator separator = new Separator();
final VBox vbox = new VBox();

for (int i = 0; i < names.length; i++) {
    cbs[i] = new CheckBox(names[i]);
}

separator.setMaxWidth(40);
separator.setHalignment(HPos.LEFT);
vbox.getChildren().addAll(cbs);
vbox.setSpacing(5);
vbox.getChildren().add(3, separator);
このコード・フラグメントをアプリケーションに適用すると、図17-1に示すコントロールが作成されます。
セパレータは割り当てられている水平または垂直スペース全体を使用します。 setMaxWidthメソッドが適用され、特定の幅を定義します。 setValignmentメソッドは、割り当てられたレイアウト・スペース内のセパレータの垂直位置を指定します。 同様に、setHalignmentメソッドを適用すると、セパレータの線の水平位置を設定できます。
例17-2では、専用のメソッドadd(index, node)を使用してセパレータが垂直ボックスに追加されています。 このアプローチをアプリケーションで使用すると、UIを作成した後、またはUIを動的に変更する場合にセパレータを組み込むことができます。
アプリケーションのUIへのセパレータの追加
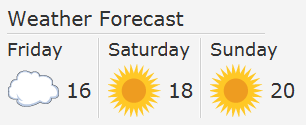
前述のとおり、セパレータはUIコントロール・グループの分割に使用できます。 また、ユーザー・インタフェースの構成にも使用できます。 図17-2に示す天気予報データを表示するタスクについて考えてみます。
図17-2に示すアプリケーションでは、LabelオブジェクトとImageViewオブジェクトの分割にセパレータを使用しています。 例17-3に示すこのアプリケーションのソース・コードを調べます。
例17-3 天気予報アプリケーションでのセパレータの使用
import javafx.application.Application;
import javafx.geometry.Insets;
import javafx.geometry.Orientation;
import javafx.geometry.VPos;
import javafx.scene.Group;
import javafx.scene.Scene;
import javafx.scene.control.*;
import javafx.scene.image.Image;
import javafx.scene.image.ImageView;
import javafx.scene.layout.GridPane;
import javafx.scene.text.Font;
import javafx.stage.Stage;

public class SeparatorSample extends Application {

    Label caption = new Label("Weather Forecast");
    Label friday = new Label("Friday");
    Label saturday = new Label("Saturday");
    Label sunday = new Label("Sunday");

    @Override
    public void start(Stage stage) {
        Group root = new Group();
        Scene scene = new Scene(root, 350, 150);
        stage.setScene(scene);
        stage.setTitle("Separator Sample");

        GridPane grid = new GridPane();
        grid.setPadding(new Insets(10, 10, 10, 10));
        grid.setVgap(2);
        grid.setHgap(5);

        scene.setRoot(grid);

        Image cloudImage = new Image(getClass().getResourceAsStream("cloud.jpg"));
        Image sunImage = new Image(getClass().getResourceAsStream("sun.jpg"));

        caption.setFont(Font.font("Verdana", 20));
        GridPane.setConstraints(caption, 0, 0);
        GridPane.setColumnSpan(caption, 8);
        grid.getChildren().add(caption);

        final Separator sepHor = new Separator();
        sepHor.setValignment(VPos.CENTER);
        GridPane.setConstraints(sepHor, 0, 1);
        GridPane.setColumnSpan(sepHor, 7);
        grid.getChildren().add(sepHor);

        friday.setFont(Font.font("Verdana", 18));
        GridPane.setConstraints(friday, 0, 2);
        GridPane.setColumnSpan(friday, 2);
        grid.getChildren().add(friday);

        final Separator sepVert1 = new Separator();
        sepVert1.setOrientation(Orientation.VERTICAL);
        sepVert1.setValignment(VPos.CENTER);
        sepVert1.setPrefHeight(80);
        GridPane.setConstraints(sepVert1, 2, 2);
        GridPane.setRowSpan(sepVert1, 2);
        grid.getChildren().add(sepVert1);

        saturday.setFont(Font.font("Verdana", 18));
        GridPane.setConstraints(saturday, 3, 2);
        GridPane.setColumnSpan(saturday, 2);
        grid.getChildren().add(saturday);

        final Separator sepVert2 = new Separator();
        sepVert2.setOrientation(Orientation.VERTICAL);
        sepVert2.setValignment(VPos.CENTER);
        sepVert2.setPrefHeight(80);
        GridPane.setConstraints(sepVert2, 5, 2);
        GridPane.setRowSpan(sepVert2, 2);
        grid.getChildren().add(sepVert2);

        sunday.setFont(Font.font("Verdana", 18));
        GridPane.setConstraints(sunday, 6, 2);
        GridPane.setColumnSpan(sunday, 2);
        grid.getChildren().add(sunday);

        final ImageView cloud = new ImageView(cloudImage);
        GridPane.setConstraints(cloud, 0, 3);
        grid.getChildren().add(cloud);

        final Label t1 = new Label("16");
        t1.setFont(Font.font("Verdana", 20));
        GridPane.setConstraints(t1, 1, 3);
        grid.getChildren().add(t1);

        final ImageView sun1 = new ImageView(sunImage);
        GridPane.setConstraints(sun1, 3, 3);
        grid.getChildren().add(sun1);

        final Label t2 = new Label("18");
        t2.setFont(Font.font("Verdana", 20));
        GridPane.setConstraints(t2, 4, 3);
        grid.getChildren().add(t2);

        final ImageView sun2 = new ImageView(sunImage);
        GridPane.setConstraints(sun2, 6, 3);
        grid.getChildren().add(sun2);

        final Label t3 = new Label("20");
        t3.setFont(Font.font("Verdana", 20));
        GridPane.setConstraints(t3, 7, 3);
        grid.getChildren().add(t3);

        stage.show();
    }
    public static void main(String[] args) {
        launch(args);
    }
}
このアプリケーションでは、水平セパレータと垂直セパレータの両方を使用して、GridPaneコンテナ内で行と列を分割するセパレータを作成します。 実際のアプリケーションでは、セパレータの望ましい長さ(水平セパレータの幅と垂直セパレータの高さ)を設定し、ユーザー・インタフェースのサイズが変更されたときに動的に変化するようにもできます。 また、Separatorオブジェクトに使用できるCSSクラスを適用すると、セパレータの視覚的な外観を変更できます。
セパレータのスタイル設定
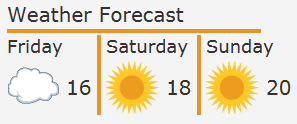
例17-3に示すすべてのセパレータに同じスタイルを適用するには、CSSファイル(controlStyle.cssなど)を作成し、このファイルをアプリケーションのメイン・クラスと同じパッケージに保存します。 例17-4は、controlStyleファイルに追加できるCSSクラスを示しています。
例17-4 CSSクラスを使用したセパレータのスタイル設定
/*controlStyle.css */
.separator .line {
    -fx-border-color: #e79423;
    -fx-border-width: 2;
}
例17-5に示すように、SceneクラスのgetStylesheetsメソッドを使用すると、アプリケーションでのセパレータのスタイルを有効にできます。
図17-3では、アプリケーションをコンパイルして実行したときに、天気予報のセパレータがどのように表示されるかを示します。
関連APIドキュメント


