14 ツリー・ビュー
この章では、JavaFXアプリケーションにツリー構造をビルドし、ツリー・ビューに項目を追加し、イベントを処理し、セル・ファクトリを適用してツリーのセルをカスタマイズする方法について学習します。
javafx.scene.controlパッケージのTreeViewクラスは、階層構造のビューを提供します。 それぞれのツリーで、階層の最上位にあるオブジェクトは「ルート」と呼ばれます。 ルートには複数の子項目が含まれ、またその項目にも子が含まれます。 子のない項目は「リーフ」と呼ばれます。
図14-1に、ツリー・ビューのアプリケーションの画面キャプチャを示します。
ツリー・ビューの作成
JavaFXアプリケーション内にツリー構造をビルドする場合、通常はTreeViewクラスをインスタンス化し、複数のTreeItemオブジェクトを定義し、ツリー項目のいずれかをルートにしてそのルートをツリー・ビューに追加し、その他のツリー項目をルートに追加する必要があります。
それぞれのツリー項目には、TreeItemクラスの対応するコンストラクタを使用するか、setGraphicメソッドをコールすることにより、グラフィック・アイコンを付加できます。 アイコンの推奨サイズは16x16ですが、実際には、Nodeオブジェクトをアイコンとして設定でき、完全にインタラクティブにできます。
例14-1は、ルートと5つのリーフのある単純なツリー・ビューの実装を示しています。
例14-1 ツリー・ビューの作成
import javafx.application.Application;
import javafx.scene.Node;
import javafx.scene.Scene;
import javafx.scene.control.TreeItem;
import javafx.scene.control.TreeView;
import javafx.scene.image.Image;
import javafx.scene.image.ImageView;
import javafx.scene.layout.StackPane;
import javafx.stage.Stage;

public class TreeViewSample extends Application {

    private final Node rootIcon = new ImageView(
        new Image(getClass().getResourceAsStream("folder_16.png"))
    );

    public static void main(String[] args) {
        launch(args);
    }

    @Override
    public void start(Stage primaryStage) {
        primaryStage.setTitle("Tree View Sample");

        TreeItem<String> rootItem = new TreeItem<> ("Inbox", rootIcon);
        rootItem.setExpanded(true);
        for (int i = 1; i < 6; i++) {
            TreeItem<String> item = new TreeItem<> ("Message" + i);
            rootItem.getChildren().add(item);
        }
        TreeView<String> tree = new TreeView<> (rootItem);
        StackPane root = new StackPane();
        root.getChildren().add(tree);
        primaryStage.setScene(new Scene(root, 300, 250));
        primaryStage.show();
    }
}
forループ内に作成したツリー項目はすべて、getChildrenメソッドとaddメソッドをコールすることでルート項目に追加されます。 また、addメソッドではなくaddAllメソッドを使用して、事前に作成したツリー項目を一括して組み込むことができます。
例14-1に示すように、新たにTreeViewオブジェクトを作成するときに、TreeViewクラスのコンストラクタ内にツリーのルートを指定するか、またはTreeViewクラスのsetRootメソッドをコールして設定することができます。
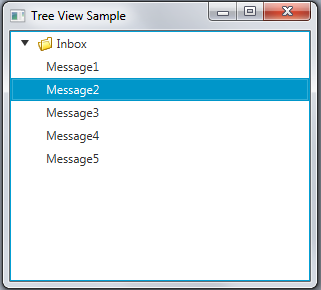
ルート項目にコールされたsetExpandedメソッドは、ツリー・ビュー項目の初期の外観を定義します。 デフォルトでは、すべてのTreeItemインスタンスは圧縮されており、必要に応じて手動で展開する必要があります。 true値をsetExpandedメソッドに渡すと、図14-2に示すように、ルート・ツリー項目はアプリケーションの開始時に展開されて表示されます。
例14-1では、String項目のある単純なツリー・ビューを作成します。 ただし、ツリー構造には異なるタイプの項目を含めることができます。 TreeItemコンストラクタの一般的な表記法、TreeItem<T> (T value)を使用して、ツリー項目で表されるアプリケーション固有のデータを定義します。 Tの値はUIコントロールやカスタム・コンポーネントなどの任意のオブジェクトを指定できます。
TreeViewクラスとは異なり、TreeItemクラスはNodeクラスを拡張するものではありません。 このため、ツリー項目への視覚効果の適用、またはメニューの追加はできません。 この問題を解決するには、セル・ファクトリのメカニズムを使用して、アプリケーションの要件にあわせてツリー項目のカスタム動作を定義します。
セル・ファクトリの実装
セル・ファクトリのメカニズムは、単一のTreeItemをTreeViewに表すTreeCellインスタンスの生成に使用されます。 セル・ファクトリの使用は、アプリケーションで使用するデータ量が多く、オンデマンドで動的に変更または追加する必要がある場合に特に役立ちます。
特定の会社の人事データを視覚化し、ユーザーが従業員の詳細を変更し、新規従業員を追加できるアプリケーションを想定します。
例14-2では、Employeeクラスを作成し、従業員をその部門に応じてグループ化して配置します。
例14-2 人事ツリー・ビューのモデルの作成
import java.util.Arrays;
import java.util.List;
import javafx.application.Application;
import javafx.scene.Node;
import javafx.scene.Scene;
import javafx.scene.control.TreeItem;
import javafx.scene.control.TreeView;
import javafx.scene.image.Image;
import javafx.scene.image.ImageView;
import javafx.scene.paint.Color;
import javafx.stage.Stage;

import javafx.beans.property.SimpleStringProperty;
import javafx.scene.layout.VBox;

public class TreeViewSample extends Application {

    private final Node rootIcon =
        new ImageView(new Image(getClass().getResourceAsStream("root.png")));
    private final Image depIcon =
        new Image(getClass().getResourceAsStream("department.png"));
    List<Employee> employees = Arrays.<Employee>asList(
            new Employee("Jacob Smith", "Accounts Department"),
            new Employee("Isabella Johnson", "Accounts Department"),
            new Employee("Ethan Williams", "Sales Department"),
            new Employee("Emma Jones", "Sales Department"),
            new Employee("Michael Brown", "Sales Department"),
            new Employee("Anna Black", "Sales Department"),
            new Employee("Rodger York", "Sales Department"),
            new Employee("Susan Collins", "Sales Department"),
            new Employee("Mike Graham", "IT Support"),
            new Employee("Judy Mayer", "IT Support"),
            new Employee("Gregory Smith", "IT Support"));
    TreeItem<String> rootNode;

    public static void main(String[] args) {
        launch(args);
    }

    public TreeViewSample() {
        this.rootNode = new TreeItem<>("MyCompany Human Resources", rootIcon);
    }

    @Override
    public void start(Stage stage) {
        rootNode.setExpanded(true);
        for (Employee employee : employees) {
            TreeItem<String> empLeaf = new TreeItem<>(employee.getName());
            boolean found = false;
            for (TreeItem<String> depNode : rootNode.getChildren()) {
                if (depNode.getValue().contentEquals(employee.getDepartment())){
                    depNode.getChildren().add(empLeaf);
                    found = true;
                    break;
                }
            }
            if (!found) {
                TreeItem<String> depNode = new TreeItem<>(
                    employee.getDepartment(),
                    new ImageView(depIcon)
                );
                rootNode.getChildren().add(depNode);
                depNode.getChildren().add(empLeaf);
            }
        }

        stage.setTitle("Tree View Sample");
        VBox box = new VBox();
        final Scene scene = new Scene(box, 400, 300);
        scene.setFill(Color.LIGHTGRAY);

        TreeView<String> treeView = new TreeView<>(rootNode);

        box.getChildren().add(treeView);
        stage.setScene(scene);
        stage.show();
    }

    public static class Employee {

        private final SimpleStringProperty name;
        private final SimpleStringProperty department;

        private Employee(String name, String department) {
            this.name = new SimpleStringProperty(name);
            this.department = new SimpleStringProperty(department);
        }

        public String getName() {
            return name.get();
        }

        public void setName(String fName) {
            name.set(fName);
        }

        public String getDepartment() {
            return department.get();
        }

        public void setDepartment(String fName) {
            department.set(fName);
        }
    }
}
例14-2に示すそれぞれのEmployeeオブジェクトには、nameおよびdepartmentの2つのプロパティがあります。 従業員に対応するTreeItemオブジェクトはツリーのリーフとして記述され、部門に対応するツリー項目は子のあるツリー項目として記述されます。 作成する新しい部門名は、getDepartmentメソッドをコールすることにより、Employeeオブジェクトから取得されます。
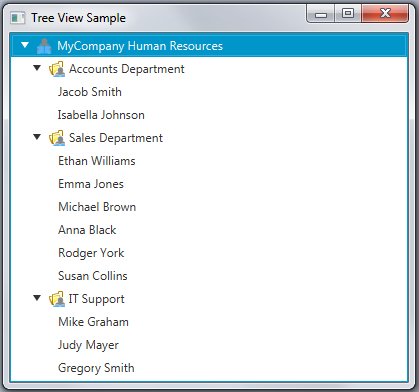
このアプリケーションをコンパイルして実行すると、図14-3に示すウィンドウが表示されます。
例14-2では、ツリー・ビューとその項目のプレビューを表示できますが、既存の項目の変更または新規項目の追加はできません。 例14-3に、セル・ファクトリを実装したアプリケーションの変更バージョンを示します。 変更バージョンでは、従業員の名前を変更できます。
例14-3 セル・ファクトリの実装
import java.util.Arrays;
import java.util.List;
import javafx.application.Application;
import javafx.scene.Node;
import javafx.scene.Scene;
import javafx.scene.control.TextField;
import javafx.scene.control.TreeCell;
import javafx.scene.control.TreeItem;
import javafx.scene.control.TreeView;
import javafx.scene.image.Image;
import javafx.scene.image.ImageView;
import javafx.scene.input.KeyCode;
import javafx.scene.input.KeyEvent;
import javafx.scene.paint.Color;
import javafx.stage.Stage;
import javafx.beans.property.SimpleStringProperty;
import javafx.scene.layout.VBox;

public class TreeViewSample extends Application {

    private final Node rootIcon =
        new ImageView(new Image(getClass().getResourceAsStream("root.png")));
    private final Image depIcon =
        new Image(getClass().getResourceAsStream("department.png"));
    List<Employee> employees = Arrays.<Employee>asList(
            new Employee("Jacob Smith", "Accounts Department"),
            new Employee("Isabella Johnson", "Accounts Department"),
            new Employee("Ethan Williams", "Sales Department"),
            new Employee("Emma Jones", "Sales Department"),
            new Employee("Michael Brown", "Sales Department"),
            new Employee("Anna Black", "Sales Department"),
            new Employee("Rodger York", "Sales Department"),
            new Employee("Susan Collins", "Sales Department"),
            new Employee("Mike Graham", "IT Support"),
            new Employee("Judy Mayer", "IT Support"),
            new Employee("Gregory Smith", "IT Support"));
    TreeItem<String> rootNode;

    public static void main(String[] args) {
        Application.launch(args);
    }

    public TreeViewSample() {
        this.rootNode = new TreeItem<>("MyCompany Human Resources", rootIcon);
    }

    @Override
    public void start(Stage stage) {
        rootNode.setExpanded(true);
        for (Employee employee : employees) {
            TreeItem<String> empLeaf = new TreeItem<>(employee.getName());
            boolean found = false;
            for (TreeItem<String> depNode : rootNode.getChildren()) {
                if (depNode.getValue().contentEquals(employee.getDepartment())){
                    depNode.getChildren().add(empLeaf);
                    found = true;
                    break;
                }
            }
            if (!found) {
                TreeItem<String> depNode = new TreeItem<>(
                    employee.getDepartment(),
                    new ImageView(depIcon)
                );
                rootNode.getChildren().add(depNode);
                depNode.getChildren().add(empLeaf);
            }
        }

        stage.setTitle("Tree View Sample");
        VBox box = new VBox();
        final Scene scene = new Scene(box, 400, 300);
        scene.setFill(Color.LIGHTGRAY);

        TreeView<String> treeView = new TreeView<>(rootNode);
        treeView.setEditable(true);
        treeView.setCellFactory((TreeView<String> p) ->
            new TextFieldTreeCellImpl());

        box.getChildren().add(treeView);
        stage.setScene(scene);
        stage.show();
    }

    private final class TextFieldTreeCellImpl extends TreeCell<String> {

        private TextField textField;

        public TextFieldTreeCellImpl() {
        }

        @Override
        public void startEdit() {
            super.startEdit();

            if (textField == null) {
                createTextField();
            }
            setText(null);
            setGraphic(textField);
            textField.selectAll();
        }

        @Override
        public void cancelEdit() {
            super.cancelEdit();
            setText((String) getItem());
            setGraphic(getTreeItem().getGraphic());
        }

        @Override
        public void updateItem(String item, boolean empty) {
            super.updateItem(item, empty);

            if (empty) {
                setText(null);
                setGraphic(null);
            } else {
                if (isEditing()) {
                    if (textField != null) {
                        textField.setText(getString());
                    }
                    setText(null);
                    setGraphic(textField);
                } else {
                    setText(getString());
                    setGraphic(getTreeItem().getGraphic());
                }
            }
        }

        private void createTextField() {
            textField = new TextField(getString());
            textField.setOnKeyReleased((KeyEvent t) -> {
                if (t.getCode() == KeyCode.ENTER) {
                    commitEdit(textField.getText());
                } else if (t.getCode() == KeyCode.ESCAPE) {
                    cancelEdit();
                }
            });
        }

        private String getString() {
            return getItem() == null ? "" : getItem().toString();
        }
    }

    public static class Employee {

        private final SimpleStringProperty name;
        private final SimpleStringProperty department;

        private Employee(String name, String department) {
            this.name = new SimpleStringProperty(name);
            this.department = new SimpleStringProperty(department);
        }

        public String getName() {
            return name.get();
        }

        public void setName(String fName) {
            name.set(fName);
        }

        public String getDepartment() {
            return department.get();
        }

        public void setDepartment(String fName) {
            department.set(fName);
        }
    }
}
treeViewオブジェクトにコールされたsetCellFactoryメソッドが、TreeCell実装をオーバーライドし、TextFieldTreeCellImplクラスで指定されたとおりにツリー項目を再定義します。
TextFieldTreeCellImplクラスはそれぞれのツリー項目にTextFieldオブジェクトを作成し、編集イベントを処理するメソッドを提供します。
ツリー・ビューでは、setEditable(true)メソッドを明示的にコールし、そのすべての項目の編集を有効にする必要があります。
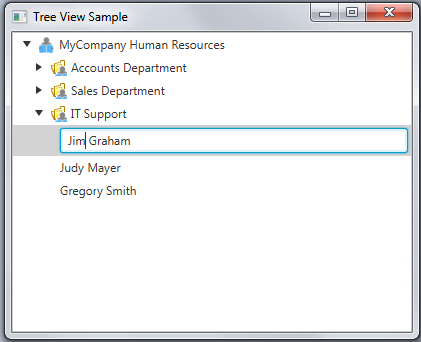
例14-3のアプリケーションをコンパイルし、実行します。 次に、ツリーの従業員をクリックして、その名前の変更を試行します。 図14-4はユーザーが「IT Support」部門のツリー項目を編集する瞬間のキャプチャを示します。
オンデマンドでの新規ツリー項目の追加
人事担当者が新規従業員を追加できるように、ツリー・ビューのサンプル・アプリケーションを変更します。 参照のために例14-4の太字の行を使用します。 これらの行は、部門に応じてコンテキスト・メニューをツリー項目に追加します。 「Add Employee」メニュー項目が選択されると、新しいツリー項目が現在の部門のリーフとして追加されます。
部門ツリー項目と従業員ツリー項目を識別するには、isLeafメソッドを使用します。
例14-4 新規ツリー項目の追加
import java.util.Arrays;
import java.util.List;
import javafx.application.Application;
import javafx.scene.Node;
import javafx.scene.Scene;
import javafx.scene.control.TextField;
import javafx.scene.control.TreeCell;
import javafx.scene.control.TreeItem;
import javafx.scene.control.TreeView;
import javafx.scene.image.Image;
import javafx.scene.image.ImageView;
import javafx.scene.input.KeyCode;
import javafx.scene.input.KeyEvent;
import javafx.scene.paint.Color;
import javafx.stage.Stage;
import javafx.beans.property.SimpleStringProperty;
import javafx.event.ActionEvent;
import javafx.scene.control.ContextMenu;
import javafx.scene.control.MenuItem;
import javafx.scene.layout.VBox;

public class TreeViewSample extends Application {

    private final Node rootIcon =
        new ImageView(new Image(getClass().getResourceAsStream("root.png")));
    private final Image depIcon =
        new Image(getClass().getResourceAsStream("department.png"));
    List<Employee> employees = Arrays.<Employee>asList(
            new Employee("Jacob Smith", "Accounts Department"),
            new Employee("Isabella Johnson", "Accounts Department"),
            new Employee("Ethan Williams", "Sales Department"),
            new Employee("Emma Jones", "Sales Department"),
            new Employee("Michael Brown", "Sales Department"),
            new Employee("Anna Black", "Sales Department"),
            new Employee("Rodger York", "Sales Department"),
            new Employee("Susan Collins", "Sales Department"),
            new Employee("Mike Graham", "IT Support"),
            new Employee("Judy Mayer", "IT Support"),
            new Employee("Gregory Smith", "IT Support"));
    TreeItem<String> rootNode =
        new TreeItem<>("MyCompany Human Resources", rootIcon);

    public static void main(String[] args) {
        Application.launch(args);
    }

    @Override
    public void start(Stage stage) {
        rootNode.setExpanded(true);
        for (Employee employee : employees) {
            TreeItem<String> empLeaf = new TreeItem<>(employee.getName());
            boolean found = false;
            for (TreeItem<String> depNode : rootNode.getChildren()) {
                if (depNode.getValue().contentEquals(employee.getDepartment())){
                    depNode.getChildren().add(empLeaf);
                    found = true;
                    break;
                }
            }
            if (!found) {
                TreeItem depNode = new TreeItem(employee.getDepartment(),
                    new ImageView(depIcon)
                );
                rootNode.getChildren().add(depNode);
                depNode.getChildren().add(empLeaf);
            }
        }

        stage.setTitle("Tree View Sample");
        VBox box = new VBox();
        final Scene scene = new Scene(box, 400, 300);
        scene.setFill(Color.LIGHTGRAY);

        TreeView<String> treeView = new TreeView<>(rootNode);
        treeView.setEditable(true);
        treeView.setCellFactory((TreeView<String> p) ->
            new TextFieldTreeCellImpl());

        box.getChildren().add(treeView);
        stage.setScene(scene);
        stage.show();
    }

    private final class TextFieldTreeCellImpl extends TreeCell<String> {

        private TextField textField;
        private final ContextMenu addMenu = new ContextMenu();

        public TextFieldTreeCellImpl() {
            MenuItem addMenuItem = new MenuItem("Add Employee");
            addMenu.getItems().add(addMenuItem);
            addMenuItem.setOnAction((ActionEvent t) -> {
                TreeItem newEmployee =
                    new TreeItem<>("New Employee");
                getTreeItem().getChildren().add(newEmployee);
            });
        }

        @Override
        public void startEdit() {
            super.startEdit();

            if (textField == null) {
                createTextField();
            }
            setText(null);
            setGraphic(textField);
            textField.selectAll();
        }

        @Override
        public void cancelEdit() {
            super.cancelEdit();

            setText((String) getItem());
            setGraphic(getTreeItem().getGraphic());
        }

        @Override
        public void updateItem(String item, boolean empty) {
            super.updateItem(item, empty);

            if (empty) {
                setText(null);
                setGraphic(null);
            } else {
                if (isEditing()) {
                    if (textField != null) {
                        textField.setText(getString());
                    }
                    setText(null);
                    setGraphic(textField);
                } else {
                    setText(getString());
                    setGraphic(getTreeItem().getGraphic());
                    if (
                        !getTreeItem().isLeaf()&&getTreeItem().getParent()!= null
                    ){
                        setContextMenu(addMenu);
                    }
                }
            }
        }

        private void createTextField() {
            textField = new TextField(getString());
            textField.setOnKeyReleased((KeyEvent t) -> {
                if (t.getCode() == KeyCode.ENTER) {
                    commitEdit(textField.getText());
                } else if (t.getCode() == KeyCode.ESCAPE) {
                    cancelEdit();
                }
            });

        }

        private String getString() {
            return getItem() == null ? "" : getItem().toString();
        }
    }

    public static class Employee {

        private final SimpleStringProperty name;
        private final SimpleStringProperty department;

        private Employee(String name, String department) {
            this.name = new SimpleStringProperty(name);
            this.department = new SimpleStringProperty(department);
        }

        public String getName() {
            return name.get();
        }

        public void setName(String fName) {
            name.set(fName);
        }

        public String getDepartment() {
            return department.get();
        }

        public void setDepartment(String fName) {
            department.set(fName);
        }
    }
}
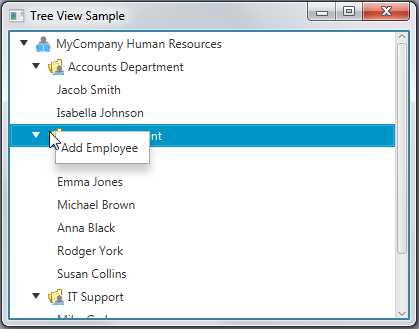
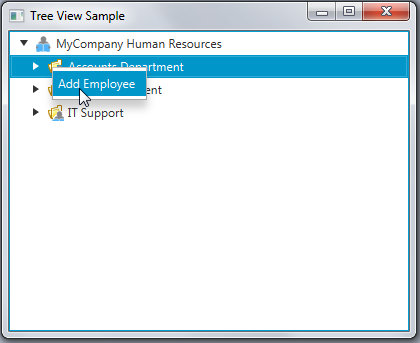
アプリケーションをコンパイルして実行します。 次に、ツリー構造にある部門を選択し、右クリックします。 図14-5に示すように、コンテキスト・メニューが表示されます。
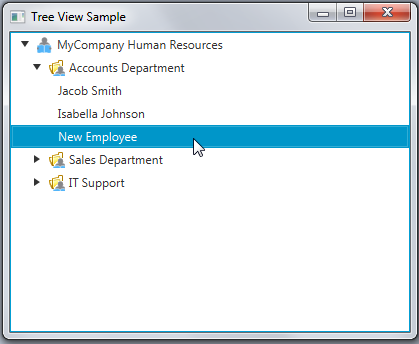
コンテキスト・メニューから「Add Employee」メニュー項目を選択すると、現在の部門に新しいレコードが追加されます。 図14-6に、新たに「Accounts Department」に追加されたツリー項目を示します。
ツリー項目の編集が有効化されているため、デフォルトの「New Employee」の値は該当する名前に変更できます。
ツリー・セル・エディタの使用
APIで提供されているツリー・セル・エディタ、CheckBoxTreeCell、ChoiceBoxTreeCell、ComboBoxTreeCell、TextFieldTreeCellを使用できます。 そのクラスはTreeCellの実装を拡張し、セル内に特定のコントロールを表示します。
例14-5では、チェック・ボックスの階層構造をビルドするCheckBoxTreeCellクラスのUIでの使用例を示します。
例14-5 CheckBoxTreeCellクラスの使用
import javafx.application.Application;
import javafx.scene.Scene;
import javafx.scene.control.*;
import javafx.scene.control.cell.CheckBoxTreeCell;
import javafx.scene.layout.StackPane;
import javafx.stage.Stage;

public class TreeViewSample extends Application {

    public static void main(String[] args) {
        launch(args);
    }

    @Override
    public void start(Stage primaryStage) {
        primaryStage.setTitle("Tree View Sample");

        CheckBoxTreeItem<String> rootItem =
            new CheckBoxTreeItem<>("View Source Files");
        rootItem.setExpanded(true);

        final TreeView tree = new TreeView(rootItem);
        tree.setEditable(true);

        tree.setCellFactory(CheckBoxTreeCell.<String>forTreeView());
        for (int i = 0; i < 8; i++) {
            final CheckBoxTreeItem<String> checkBoxTreeItem =
                new CheckBoxTreeItem<>("Sample" + (i+1));
                    rootItem.getChildren().add(checkBoxTreeItem);
        }

        tree.setRoot(rootItem);
        tree.setShowRoot(true);

        StackPane root = new StackPane();
        root.getChildren().add(tree);
        primaryStage.setScene(new Scene(root, 300, 250));
        primaryStage.show();
    }
}
例14-5では、TreeItemではなくCheckBoxTreeItemクラスを使用してツリー・ビューをビルドします。 CheckBoxTreeItemクラスはツリー構造での選択済、未選択、および不確定の状態をサポートするよう設計されています。 CheckBoxTreeItemインスタンスは非依存と依存のどちらにもできます。 CheckBoxTreeItemインスタンスが非依存の場合、この選択状態に対する変更は、親および子CheckBoxTreeItemインスタンスには影響しません。 デフォルトでは、すべてのChechBoxTreeItemインスタンスが依存になっています。
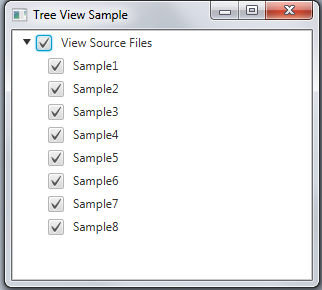
例14-5をコンパイルして実行し、「View Source Files」項目を選択します。 図14-7の出力で、すべての子項目が選択されていることを確認します。
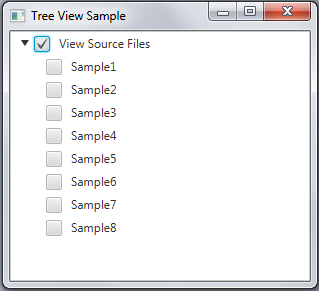
CheckBoxTreeItemインスタンスを非依存にするには、setIndependentメソッド、rootItem.setIndependent(true);を使用します。
TreeViewSampleアプリケーションを実行すると、その動作は図14-8に示すように変更されます。
TreeTableViewコントロールは、ツリー構造を表形式で表示する追加機能を提供します。 これらのコントロールの詳細は、「ツリー表ビュー」の章を参照してください。
関連ドキュメント
