52 Adding Polls to a Portal
This chapter describes how to create, manage, and analyze polls, as well as how to work with the properties of the Polls task flows.
This chapter includes the following topics:
Permissions:
To perform the tasks in this chapter, you need the portal-level permissionManage Security and Configuration or Manage Configuration. A portal moderator has this permission by default.
To add the Polls task flows to a page, you need the portal-level permission Basic Services: Edit Page Access, Structure, and Content (simple permissions) or Create, Edit, and Delete Pages (advanced permissions).
For more information about permissions, see Section 29.1, "About Roles and Permissions for a Portal."
52.1 Prerequisite for Working with Polls
For polls to work in a portal, the portal moderator anyone with Manage Security and Configuration or Manage Configuration permission has to perform the following task:
-
Add a polls task flow to a page in the portal, as described in Section 52.3, "Adding a Polls Task Flow to a Page."
Note:
For information about working with polls, see Section 52.5, "Working with the Polls Task Flows."52.2 About Polls
WebCenter Portal users can create, edit, take, and analyze online polls. With polls, you can survey your audience (such as their opinions and their experience level), check whether they can recall important information, and gather feedback and metrics.
WebCenter Portal provides the following Polls task flows:
-
Quick Poll task flow creates a quick one-question poll. For more information about creating a quick poll, see Section 52.5.1, "Creating a Quick Poll Task Flow."
-
Take Polls task flow publishes the most recently published poll or the one you want to display. The Take Polls task flow displays the poll for users to take. For more information about the Take Polls task flow, see Section 52.5.2, "Working with the Take Polls Task Flow."
-
Polls Manager task flow creates detailed polls, and lets you view the status of all current polls, perform operations on current polls, as well as publish, analyze, close, and delete all polls. For more information about creating polls using the Polls Manager task flow, see Section 52.5.3, "Working with the Polls Manager Task Flow."
-
View Poll Results task flow lets you view poll results. For more information about viewing the results of a specific poll, see Section 52.5.4, "Working with the View Poll Results Task Flow."
You can do the following with polls:
-
Create a poll. You can create quick polls with only a name, description, and question, or you can create detailed polls.
Use the Quick Poll task flow to create a quick one-question poll (see Section 52.5.1, "Creating a Quick Poll Task Flow"), or use the Polls Manager to create more detailed polls (see Section 52.5.3.1, "Creating a Poll").
-
Create a template for polls. Templates contain the same questions, sections, and welcome and closing content.
-
Edit an existing poll. For example, you can add questions to the poll, change existing questions, or publish (open) and close the poll.
See Section 52.5.3.2, "Editing a Poll," Section 52.5.3.3, "Deleting a Poll," and Section 52.5.3.4, "Closing a Poll."
-
Take a specific or the most recently-published poll (see the "Working with Polls" chapter in Using Oracle WebCenter Portal).
-
View poll results. See Section 52.5.4, "Working with the View Poll Results Task Flow."
-
See the status of all polls and available actions for each poll, such as edit, delete, publish, analyze, and clear results.
Polls are integrated with instant messaging and presence in the Polls Manager.
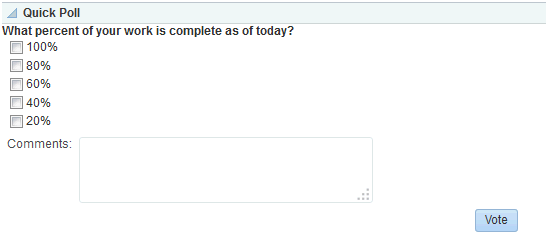
Figure 52-1 shows a sample quick poll.
More detailed poll functionality is available through the Polls Manager (Figure 52-2). For more information, see Section 52.5.3, "Working with the Polls Manager Task Flow."
Polls created through the Polls Manager must be published and open to be taken. Users cannot take unpublished or closed polls.
52.3 Adding a Polls Task Flow to a Page
For the steps to add a Polls task flow to a page, see Section 14.2, "Adding a Component to a Page."
Tip:
The presence or location of the Polls task flows in the resource catalog depends on how the resource catalog is configured. For example, in the Default Portal Catalog, the Polls task flows are included under the Polls folder.For more information about the polls task flows, see Section 52.2, "About Polls."
The Polls task flow you select is displayed on your page. Figure 52-3 shows the Quick Poll task flow.
Users with Edit privileges can access the task flow's Component Properties dialog in Composer. For information about configuring a polls task flow, see Section 52.4, "Setting Polls Task Flow Properties."
52.4 Setting Polls Task Flow Properties
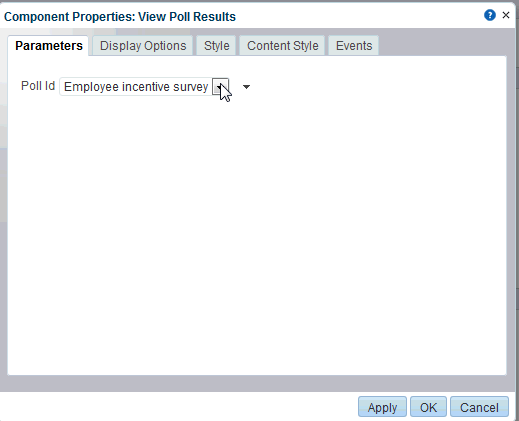
The polls task flows have associated properties, which users with sufficient privileges can access through the Component Properties dialog in Composer (Figure 52-4).
Figure 52-4 Task Flow Component Properties
Description of ''Figure 52-4 Task Flow Component Properties''
For information about accessing the Component Properties dialog, see Section 14.3, "Modifying Component Properties."
The following sections provide information about properties of the polls task flows and describe the properties on the Parameters tab.
52.4.1 About the Polls Task Flow Properties
The properties on the Parameters tab of the Component Properties dialog control the default task flow content. For descriptions of the parameters on this tab, see Section 52.4.2, "Polls Task Flow Parameters." For some task flows, parameters on this tab facilitate the wiring of the task flow to page parameters and page definition variables. For more information, see Chapter 19, "Wiring Pages, Task Flows, Portlets, and ADF Components."
Changes to the properties on the Display Options, Style, and Content Style tabs affect the appearance and behavior of the task flow for all users. These properties are common to all task flows. For more information, see Section 14.3, "Modifying Component Properties."
The content of the Events tab depends on the events supported by the task flow. For more information, see Section 14.3.7, "Working with Component Contextual Events."
The Child Components tab displays all of the components contained within the current component. It provides controls for rearranging, showing, and hiding child components. Not all components contain children. So you may find this tab devoid of content. For more information, see Section 14.3.5, "Working with Child Components."
All properties on the Parameters and Display Options tabs provide access to an Expression Language (EL) editor, which you can use to select or specify a variable value instead of a constant value. Click the ![]() icon next to a property, then select Expression Builder to open the editor.
icon next to a property, then select Expression Builder to open the editor.
Note:
When you enter EL on the generic Display Options tab in the Component Properties dialog, the parser reports an error only if it detects invalid syntax, such as a missing closing bracket. Validation is performed only on syntax, not on the expression value. Generic Display Options are those cataloged in Table 14-1, "Display Options Properties".EL validation is not performed on non-generic display options.
If you need EL assistance, an application developer can provide an EL expression; see the "Expression Language Expressions" appendix in Developing Portals with Oracle WebCenter Portal and Oracle JDeveloper.
52.4.2 Polls Task Flow Parameters
Table 52-1 describes the parameters that are unique to the polls task flows.
Table 52-1 Polls Task Flow Parameters
| Parameter | Description |
|---|---|
|
|
The portal name from which polls are to be fetched. If this is supplied, then polls of that particular portal are shown. In the Home portal, when this parameter is not supplied, polls from all portals are fetched. This parameter appears in the properties for the Polls Manager task flow. |
|
|
Specifies whether to display all polls or only those created by the current user:
If the This parameter appears in the properties for the Polls Manager task flow. |
|
|
The name of the poll to display, available from the drop-down list. This parameter appears in the properties for the following task flows.
|
|
|
Specifies whether users can edit a quick poll:
This parameter appears in the properties for the Quick Poll task flow. |
52.5 Working with the Polls Task Flows
The polls task flows let you create and manage polls.
Note:
For information about taking polls, see the "Working with Polls" chapter in Using Oracle WebCenter Portal.This section includes the following subsections:
52.5.1 Creating a Quick Poll Task Flow
Quick Poll allow one-question polls to be published immediately. Each quick poll needs its own Quick Poll task flow on the page.
Note:
To add the Quick Poll task flow, see Section 52.3, "Adding a Polls Task Flow to a Page."To create a quick poll:
-
From the Quick Poll task flow, click Design Poll (Figure 52-5).
Note:
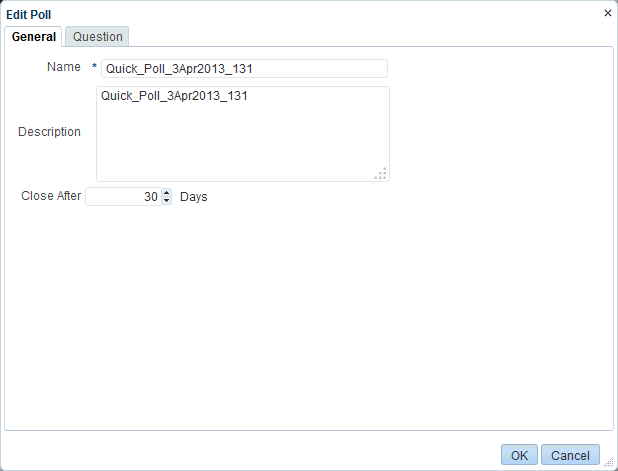
The Design Poll button will not be visible in page view if you select No for the Show in Edit Mode parameter for this task flow. This prevents participants from editing the poll. For more information, see Section 52.4, "Setting Polls Task Flow Properties."The Edit Poll dialog opens (Figure 52-6).
-
On the General tab (Figure 52-6), enter the following information:
-
Name: The name of the poll.
The name you enter appears in the Component Properties as a parameter in the Take Polls and View Poll Results task flows.
-
Description: Optionally, enter a description of the poll. This description does not appear in the poll.
-
Close After: Optionally, select or enter the number of days for the poll to stay open.
Figure 52-6 Quick Poll - Edit Poll Dialog (General tab)
Description of ''Figure 52-6 Quick Poll - Edit Poll Dialog (General tab)''
-
-
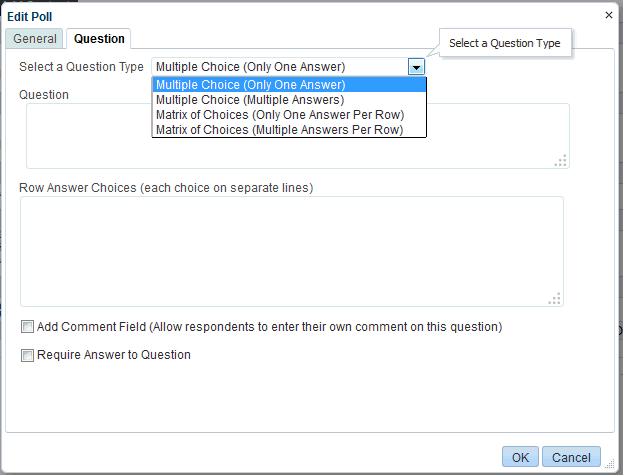
Click the Question tab (Figure 52-7), then design your one-question poll.
-
Make a selection from the Select a Question Type drop-down list.
Your selection determines the answer choices the user sees, for example, Multiple Choice (Only One Answer) or Multiple Choice (Multiple Answers).
-
Enter your question in the Question field.
-
Enter the answer selections in the answer field.
For a multiple choice question, enter each answer choice in a separate line.
-
Optionally, select the Add Comment Field box to add a custom field, such as Tell us more! or Other or Please Explain.
-
Select the Require Answer to Question check box if you want to make the question mandatory, requiring users to answer the question.
-
Click OK.
-
Note:
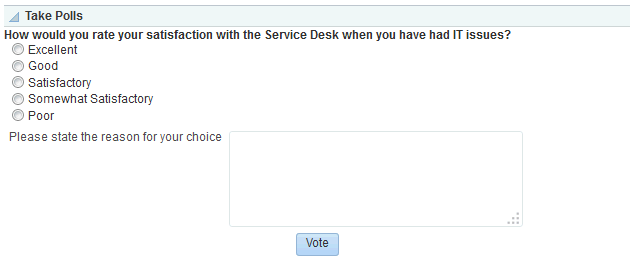
The same types of questions are available in Quick Poll and in the Polls Manager.Figure 52-8 shows what poll users see. Note that the same Quick Poll you designed appears in the Quick Poll and Take Polls task flows.
Quick Poll also appears in the Polls Manager (Figure 52-12).
Quick polls can be managed in the following ways:
-
From the Polls Manager (see Section 52.5.3.2, "Editing a Poll")
-
From the Quick Poll task flow in Composer (in Edit Page mode), click the Design Poll button to edit the quick poll).
Note:
To prevent participants from editing a Quick Poll, in Composer, click the Edit icon and open the Component Properties dialog. Select No for the Show in Edit Mode parameter. For more information, see Section 52.4, "Setting Polls Task Flow Properties." -
To select which Quick Poll to view, from the Quick Poll task flow in Composer, click the Edit icon to open the Component Properties dialog. Select the poll to view from the Poll Id field (see also, Section 52.5.4, "Working with the View Poll Results Task Flow").
52.5.2 Working with the Take Polls Task Flow
The Take Polls task flow (Figure 52-11) displays the most recently-published available poll, unless it is set to display a specific poll with the Poll Id parameter.
Note:
To add the Take Polls task flow, see Section 52.3, "Adding a Polls Task Flow to a Page.":After a user submits a response for that poll, this task flow displays the next most recently-published poll.
To configure the Take Polls task flow:
-
After you add the Take Polls task flow to the page, in Composer, click the Edit icon (wrench), as shown in Figure 52-9.
Figure 52-9 Take Polls Task Flow in Composer

Description of ''Figure 52-9 Take Polls Task Flow in Composer''
The Component Properties dialog opens (Figure 52-10).
Figure 52-10 Take Polls Component Properties Dialog
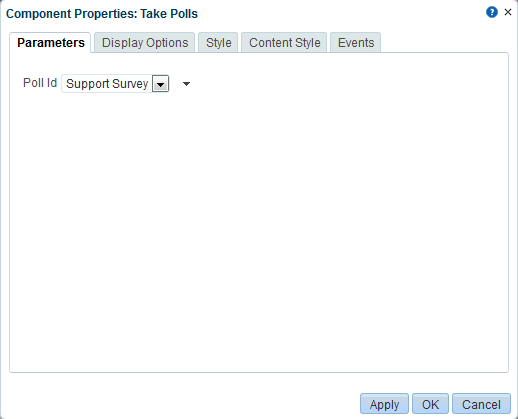
Description of ''Figure 52-10 Take Polls Component Properties Dialog''
-
From the Poll Id drop-down list, select the poll you want users to take (Figure 52-10).
-
Click OK.
The poll you selected appears in the Take Polls task flow (Figure 52-11).
Note:
For information about taking polls, see the "Working with Polls" chapter in Using Oracle WebCenter Portal.
52.5.3 Working with the Polls Manager Task Flow
The Polls Manager (Figure 52-12) task flow lets you create polls, view the status of all current polls, and perform operations on existing polls, including edit, save (as a poll or as a poll template), publish, clear results, close, analyze, and delete.
Note:
To add the Polls Manager task flow, see Section 52.3, "Adding a Polls Task Flow to a Page."When you add the Polls Manager task flow to a page, you can do the following tasks to prevent other participants from editing the poll:
-
Set the page security access on the page where you add the Polls Manager task flow. See Section 13.15, "Setting Page Security."
-
If participants have permissions to edit the page, they can add the Polls Manager task flow to their Home portal. To prevent this, customize the resource catalog and edit the resource catalog to remove the Polls Manager task flow. Make sure to assign the new resource catalog to the Resource Catalog for Pages. See Chapter 23, "Working with Resource Catalogs."
From the Poll Manager, you can do the following:
-
Add a new poll. Click Create Poll to add a new poll.
-
View the latest poll date. Click the Refresh icon to update your view.
-
Click the Actions icon next to a poll to edit the poll, analyze the poll results, close the poll, delete the poll, or clear the existing results.
This section contains the following subsections:
52.5.3.1 Creating a Poll
-
From the Poll Manager task flow, click Create Poll (Figure 52-13).
Figure 52-13 Polls Manager - Create Poll

Description of ''Figure 52-13 Polls Manager - Create Poll''
-
In the Create Poll dialog that opens, enter the name of the poll and optionally a brief description (Figure 52-14).
Figure 52-14 Polls Manager - Create Poll
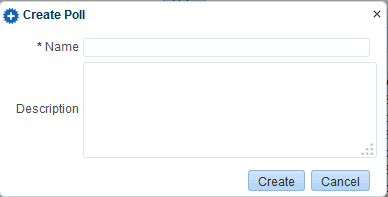
Description of ''Figure 52-14 Polls Manager - Create Poll''
The Design page opens.
-
On the Design page, click Add and then make a selection to populate the poll with an existing template or with questions and surrounding text (Figure 52-15).
To apply a template, you must have an existing template saved. When you save any poll, you can select to save it as a template. After it is saved as a template, you later apply that poll template to other polls.
Figure 52-15 Polls Manager - Design Page

Description of ''Figure 52-15 Polls Manager - Design Page''
-
Click Add Section to enter any explanatory text or to split your poll into sections (Figure 52-15).
The Create Section dialog opens (Figure 52-16).
-
Enter your desired text.
-
Apply formatting by selecting options from the rich text editor controls.
-
Click OK.
Figure 52-16 Polls Manager - Design Page to Create Section
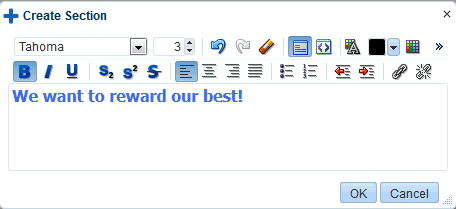
Description of ''Figure 52-16 Polls Manager - Design Page to Create Section''
-
-
Click Add Question to add each poll question (Figure 52-15).
If you want to add questions to the section, click Add Question in the section. If you want to add a question that will not be within the section, click Add Question at the top of the Design page.
Tip:
New questions are added to top of the poll, so you may want to enter poll questions in reverse order.The Create Question dialog opens (Figure 52-17).
Figure 52-17 Polls Manager - Create Question Dialog
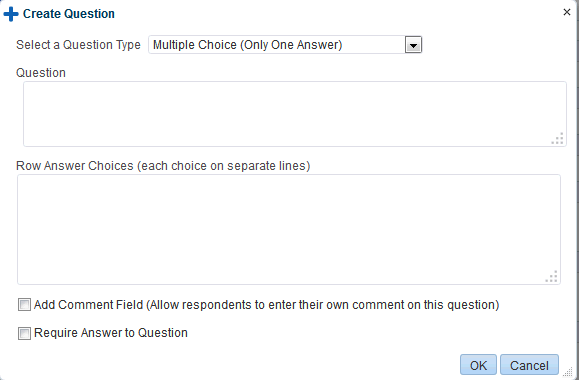
Description of ''Figure 52-17 Polls Manager - Create Question Dialog''
-
Make a selection from the Select a Type of Question drop-down list.
Your selection determines the answer choices the user sees, for example, Multiple Choice (Only One Answer) or Multiple Choice (Multiple Answers).
-
Enter your question in the Question field.
For a multiple choice question, enter each answer choice in a separate line.
-
Enter the answer selections in the answer field.
-
Select the Add Comment Field box to add a custom field, such as Tell us more! or Other.
-
Click OK.
An example of a prepopulated dialog is shown in Figure 52-18.
Figure 52-18 Create Question Dialog with Sample Question and Answer
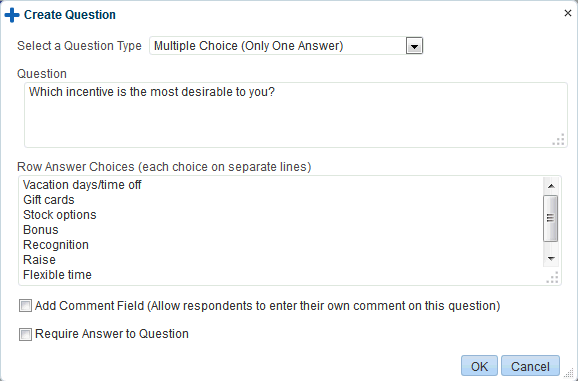
Description of ''Figure 52-18 Create Question Dialog with Sample Question and Answer''
A sample section with a question is shown in Figure 52-19.
Figure 52-19 Design Poll with a Section and a Question

Description of ''Figure 52-19 Design Poll with a Section and a Question''
-
-
Add more questions to the poll or a section, as described in the preceding steps.
-
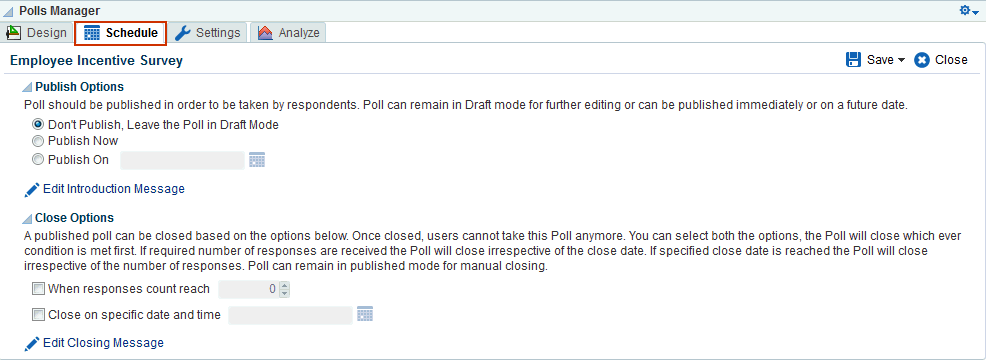
Click Schedule to select publish and close options for the poll (Figure 52-20).
Polls must be published and open to be taken. Users cannot take unpublished or closed polls.
-
Make a selection from Publish Options.
Select to keep the poll in draft mode for further editing, publish it immediately, or publish it on a future date.
If you select to publish it on a future date, click the Select Date and Time icon to enter the publishing time through a calendar.
Click Edit Introduction Message to customize the text provided at the beginning of the poll in the rich text editor.
-
Make a selection from Close Options.
Select to close the published poll after it reaches a certain number of responses or on a certain date. If you select both options, then the poll closes when either condition is first met.
If you select to close the poll on a specific date, click the Select Date and Time icon to enter the closing time through a calendar.
Click Edit Closing Message to customize the text provided at the end of the poll in the rich text editor.
-
Click OK.
-
Click Save to save your schedule.
-
-
Click Settings to select what to display after users take the poll (Figure 52-21).
For example, you can set a custom URL or JSF task flow as a Thank You page that appears after the poll is taken.
From After taking the Poll, select one of the following options:
-
Show Closing Message as 'Thank You' message or Show Poll Results
If you select Show Poll Results, select to Show Graph in either 2D Graph or 3D Graph.
-
Use Custom URL as 'Thank You' page
Enter the URL of the page you want to show after the user takes the poll.
The URL can be any URL, either the URL of a portal page, or an external URL. When you create a page in a portal, you can specify the pretty URL of that page here (for example,
http://<host>:<port>/webcenter/portal/<portalname>/pages/<pagename -
Use Custom Task Flow as 'Thank You' page
Copy the metadata file location of the custom task flow you want to show after the user takes the poll. You can view the metadata file location from the Task Flows page of the Assets pages, as described in Section 20.5.1, "Viewing Information About an Asset." For more information about the available options for task flows, see Section 27.3.8, "Managing Task Flows."
To create a custom task flow, see Section 27.3.3, "Creating a Task Flow to Visualize Data," and make sure that the task flow is available (as described in Section 20.5.3, "Showing and Hiding Assets").
-
-
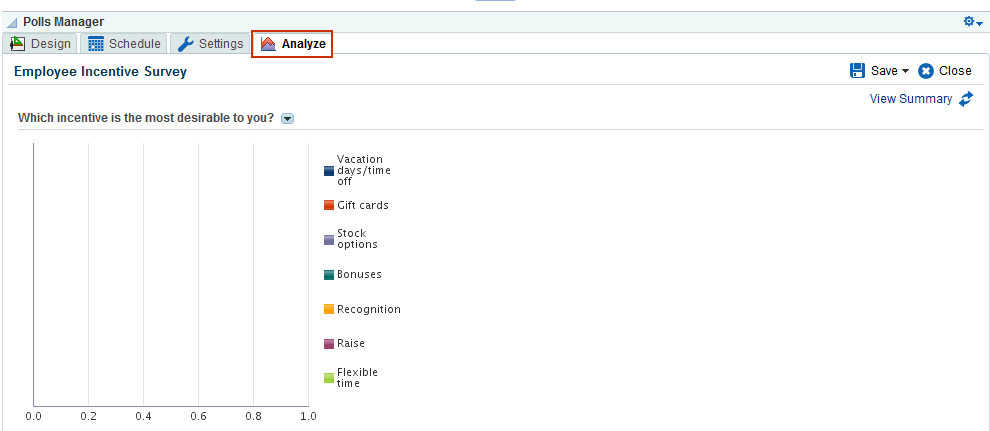
Click Analyze to view results after users have taken the poll (Figure 52-22).
For more information, see Section 52.5.3.5, "Analyzing the Results of a Poll."
-
Click Save to save your poll (Figure 52-23).
When you save any poll, you can select to save it as a template. After it is saved as a template, you can later apply that poll template to other polls.
Figure 52-24 shows your poll after it is published on a portal page. For users to view and take polls, add the Take Polls task flow to a page. See Section 52.5.2, "Working with the Take Polls Task Flow."
Figure 52-24 Poll Shown in the Take Polls Task Flow

Description of ''Figure 52-24 Poll Shown in the Take Polls Task Flow''
52.5.3.2 Editing a Poll
You can edit a poll from the Polls Manager task flow on a portal page or from the page editor, Composer (see Figure 52-25).
To edit a poll:
-
Click the poll name link to edit the poll name and description.
-
Click the Actions menu and then select Design to make any changes.
See Section 52.5.3.1, "Creating a Poll" for more information.
-
Click Save and then Close.
52.5.3.3 Deleting a Poll
You can delete a poll from the Polls Manager task flow on a portal page or from the page editor, Composer (see Figure 52-26).
To delete a poll:
-
Click the Actions menu and select Delete.
-
Click Yes in the Delete Poll dialog.
-
Click Save and then Close.
52.5.3.4 Closing a Poll
You can close a poll from the Polls Manager task flow on a portal page or from the page editor, Composer (see Figure 52-27).
To close a poll:
-
Click the Actions menu and select Close.
The Close option is available only after a poll is published.
The Status of the poll changes to Closed, showing the date and time the poll closed.
Tip:
Click the Actions menu and select Publish if you want to open the poll again. -
Click Save and then Close.
52.5.3.5 Analyzing the Results of a Poll
You can analyze the results for a poll from the Polls Manager task flow on a portal page or from the page editor, Composer.
To analyze a poll:
-
Click the Actions menu and select Analyze (Figure 52-28).
The Analyze page opens (Figure 52-29).
Figure 52-29 Polls Manager - Analyze Page
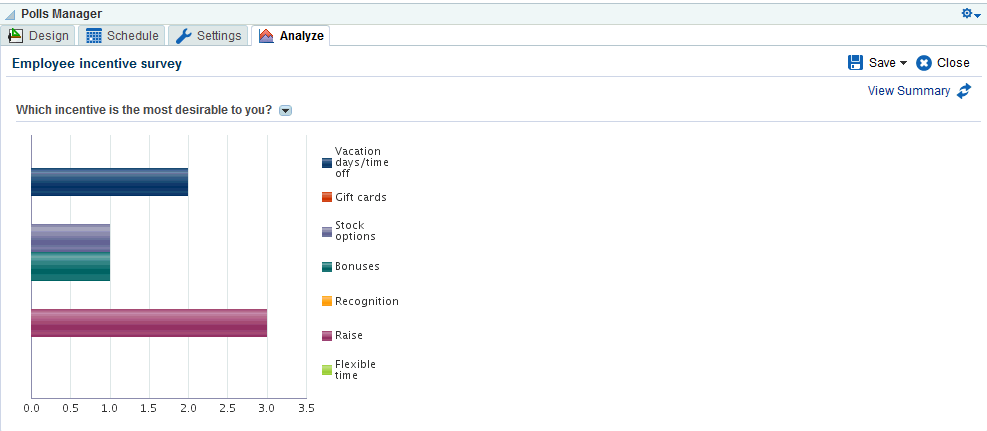
Description of ''Figure 52-29 Polls Manager - Analyze Page''
-
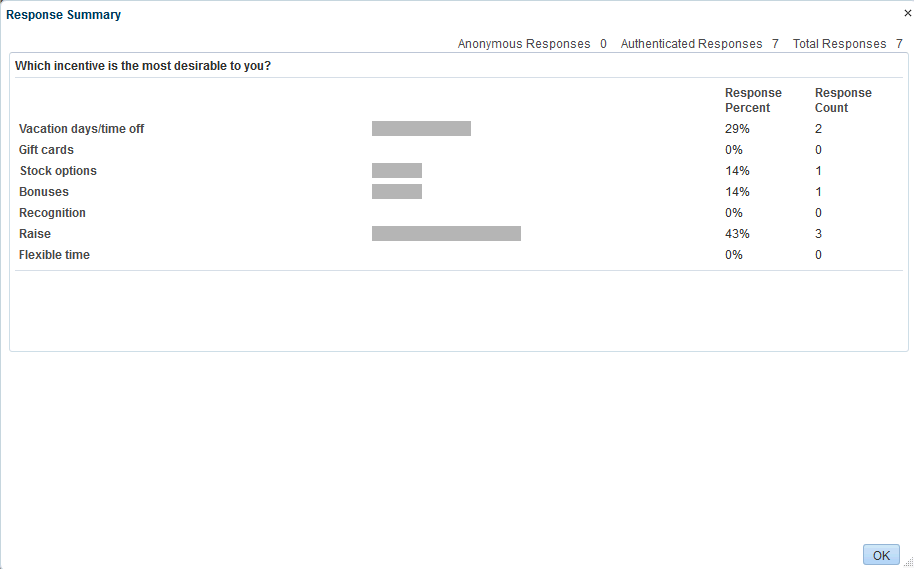
If the poll included a field for poll takers to add comments, click View Summary to see consolidated comments.
The Response Summary dialog opens (Figure 52-30).
Expand the name of the poll's custom field name to view all comments, if you gave poll respondents an option to add comments.
52.5.4 Working with the View Poll Results Task Flow
The View Poll Result task flow provides a graphical view of poll results. The View Poll Results task flow must be set to display a specific poll with the Poll Id parameter. For more information, see Section 52.4, "Setting Polls Task Flow Properties."
Note:
To add the View Poll Results task flow, see Section 52.3, "Adding a Polls Task Flow to a Page."To view poll results:
-
After you add the View Poll Results task flow to the page, in Composer, click the Edit icon (wrench), as shown in Figure 52-31.
Figure 52-31 View Poll Results Task Flow in Composer

Description of ''Figure 52-31 View Poll Results Task Flow in Composer''
The Component Properties dialog opens (Figure 52-32).
Figure 52-32 View Poll Results Component Properties Dialog

Description of ''Figure 52-32 View Poll Results Component Properties Dialog''
-
From the Poll Id drop-down list, select the poll you want to view (Figure 52-32).
-
Click OK.
Notice that the poll you selected appears in the task flow, showing the results of the poll.
Figure 52-33 View Poll Results Task Flow

Description of ''Figure 52-33 View Poll Results Task Flow''
