15 Tuning Oracle Traffic Director for Performance
This chapter describes how you can use statistical data about Oracle Traffic Director instances and virtual servers to identify potential performance bottlenecks. It also describes configuration changes that you can make to improve Oracle Traffic Director performance.
This chapter contains the following sections:
15.1 General Tuning Guidelines
The outcome of the tuning suggestions provided in this chapter might vary depending on your specific environment. When deciding the tuning parameters that are suitable for your needs, keep the following guidelines in mind:
-
Adjust one parameter at a time
To the extent possible, make one adjustment at a time. Measure the performance before and after each change, and revert any change that does not result in measurable improvement.
-
Establish test cases that you can use to create a performance benchmark
Before changing any parameter, set up test cases, and automate them if possible, to test the effect of the changes on performance.
-
Tune gradually
When adjusting a quantitative parameter, make changes in small increments. This approach is most likely to help you identify the optimal setting quickly.
-
Start afresh after a hardware or software change
At each major system change, a hardware or software upgrade, for example, verify whether the previous tuning changes still apply.
15.2 Tuning the File Descriptor Limit
The operating system uses file descriptors to handle file-system files as well as pseudo files, such as connections and listener sockets.
When an Oracle Traffic Director instance starts, the following parameters are taken into consideration when auto-configuring values related to file descriptors:
-
HTTP processing threads (
<thread-pool>) -
Access log counts for all virtual servers (
<access-log>) -
Listeners (
<http-listener>, <tcp-listener>) -
Keep-alive connections (
<keep-alive>) -
Number of origin server pools (
<origin-server-pool>) -
Number of origin servers (
<origin-server>) -
Origin server connections (
<origin-server>/<max-connections>) -
TCP processing threads (
<tcp-thread-pool>)
The key Oracle Traffic Director objects that require file descriptors are keep-alive connections, queued connections, and connections to origin servers. If you do not explicitly specify limits for these objects, then when the Oracle Traffic Director instance starts, it configures the limits—maximum keep-alive connections, connection queue size, and maximum connections for each origin server—automatically based on the total number of available file descriptors in the system.
When the file descriptor limit is set to a very high value, auto-configuration of unspecified parameters can cause Oracle Traffic Director instances to consume excessive amount of memory or can result in sub-optimal configurations. To avoid these issues, specify values for these parameters explicitly on systems that have a high file-descriptor limit.
For instance, max-threads * 4 should ideally be less than the maximum number of file descriptors available to the process. For example, if the file descriptor limit is set to 65536, then setting max-threads to 20000 will cause sub-optimal tuning as 80000 (20000*4=80000) will exhaust/reserve file descriptors for the worker threads, which does not leave much for other subsystems. Hence a high value should be set for max-threads only after some experimentation.
The number of allocated file descriptors cannot exceed the limit that the system can support. To find out the current system limit for file descriptors, run the following command:
$ cat /proc/sys/fs/file-max
2048
To find out how many of the available file descriptors are being currently used, run the following command:
$ cat /proc/sys/fs/file-nr
The command returns an output that resembles the following:
625 52 2048
In this example, 625 is the number of allocated file descriptors, 52 is the number of free allocated file descriptors, and 2048 is the maximum number of file descriptors that the system supports.
Note:
In Solaris, system wide file descriptors in use can be found by using the following command:# echo ::kmastat | mdb -k | grep file_cache
This command returns an output that resembles the following:
file_cache 56 1154 1305 73728B 659529 0
In this example, 1154 is the number of file descriptors in use and 1305 the number of allocated file descriptors. Note that in Solaris, there is no maximum open file descriptors setting. They are allocated on demand as long as there is free RAM available.
When the number of allocated file descriptors reaches the limit for the system, the following error message is displayed in the system console when you try to open a file:
Too many open files in system.
The following message is written to the server log:
[ERROR:16] [OTD-10546] Insufficient file descriptors for optimum configuration.
This is a serious problem, indicating that the system is unable to open any more files. To avoid this problem, consider increasing the file descriptor limit to a reasonable number.
To change the number of file descriptors in Linux, do the following as the root user:
-
Edit the following line in the
/etc/sysctl.conffile:fs.file-max = valuevalueis the new file descriptor limit that you want to set. -
Apply the change by running the following command:
# /sbin/sysctl -p
Note:
In Solaris, change the value ofrlim_fd_maxin the/etc/systemfile to specify the ”hard” limit on file descriptors that a single process might have open. Overriding this limit requires superuser privilege. Similarly,rlim_fd_curdefines the ”soft” limit on file descriptors that a single process can have open. A process might adjust its file descriptor limit to any value up to the ”hard” limit defined byrlim_fd_maxby using thesetrlimit()call or by issuing the limit command in whatever shell it is running. You do not require superuser privilege to adjust the limit to any value less than or equal to the hard limit.For example, to increase the hard limit, add the following command to /etc/system and reboot it once:
set rlim_fd_max = 65536
For more information about Solaris file descriptor settings, see Section 15.12.1, "Files Open in a Single Process (File Descriptor Limits)".
As a rough rule of thumb, the thread-pool element, max-threads * 4 should be less than the maximum number of file descriptors available to the process. That is, max-threads should be less than 1/5th of the maximum number of file descriptors.
For example, if the file descriptor limit is set to 65536, then setting max-threads to 20000 will cause sub-optimal tuning as 20000*4=80000 will exhaust/reserve file descriptors for the worker threads, leaving little else for other subsystems.
High values of max-threads should be used only after experimentation. Having tens of thousands of threads in a process may hurt performance.
15.3 Tuning the Thread Pool and Connection Queue
This section contains the following topics:
-
Section 15.3.2, "Reviewing Thread Pool Metrics for an Instance"
-
Section 15.3.3, "Reviewing Connection Queue Metrics for an Instance"
-
Section 15.3.4, "Tuning the Thread Pool and Connection Queue Settings"
15.3.1 About Threads and Connections
When a client sends a request to an HTTP listener in an Oracle Traffic Director instance, the connection is first accepted by an acceptor thread that is associated with the HTTP listener. The acceptor thread puts the connection in a connection queue and then waits for the next client request. A request processing thread from a thread pool takes the connection from the connection queue and processes the request. Note that if the thread pool is disabled, acceptor threads themselves process every request. The connection queue and request-processing threads do not exist.
Figure 15-1 depicts the connection handling process.
Figure 15-1 Connection Handling in Oracle Traffic Director
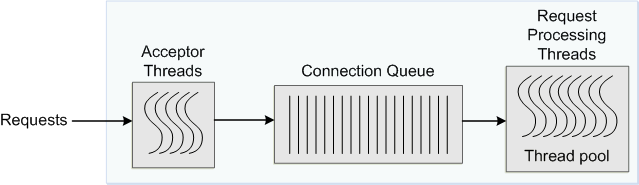
Description of ''Figure 15-1 Connection Handling in Oracle Traffic Director ''
When an Oracle Traffic Director instance starts, it creates the specified number of acceptor threads for each listener and a thread pool that contains a specified, minimum number of request-processing threads.
-
If the number of acceptor threads for a listener is not specified, Oracle Traffic Director creates one acceptor thread per CPU on the host.
-
If the minimum size of the thread pool is not specified, Oracle Traffic Director creates one request-processing thread per processor on the host on which the instance is running.
As the request load increases, Oracle Traffic Director compares the number of requests in the connection queue with the number of request-processing threads. If the number of requests in the queue is more than the number of request-processing threads, Oracle Traffic Director creates additional threads, up to the specified maximum size for the thread pool.
The default value of the maximum number of request-processing threads will never be more than quarter of the maximum number of file descriptors available to the process. If there are 1, 2 CPUs, then the default is 256 and if there are 3, 4 CPUs, the default is 512. If there are more than 4 CPUs, the default is 1024.
The maximum number of threads is a hard limit for the number of sessions that can run simultaneously. Note that the maximum threads limit applies across all the virtual servers in the instance.
15.3.2 Reviewing Thread Pool Metrics for an Instance
You can review the thread-pool information for an instance in the SessionCreationInfo section of the plain-text perfdump report, as shown in the following example.
SessionCreationInfo:
------------------------
Active Sessions 2187
Keep-Alive Sessions 0
Total Sessions Created 4016/4016
-
Active Sessionsis the number of request-processing threads that are currently servicing requests. -
Keep-Alive Sessionsshows the number of HTTP request processing threads serving keep-alive sessions. -
Total Sessions Created-
The first number is the number of request-processing threads created.
-
The second number is the maximum threads allowed in the thread pool; that is, the sum of the maximum threads configured in the thread-pool and the number of keep alive threads.
-
If you observe that the total number of request-processing threads created is consistently near the maximum number of threads, consider increasing the thread limit. Otherwise, requests might have to wait longer in the connection queue; and, if the connection queue becomes full, further requests are not accepted. If the average queueing delay (see Section 15.3.3, "Reviewing Connection Queue Metrics for an Instance") is significantly high in proportion to the average response time, that too is an indication that the thread limit needs to be increased.
15.3.3 Reviewing Connection Queue Metrics for an Instance
If the maximum size of the connection queue is not large enough, client requests might be rejected during peak load periods. You can detect this situation by examining the connection queue section in the perfdump plain-text report, as shown in the following example.
ConnectionQueue:
-----------------------------------------
Current/Peak/Limit Queue Length            0/1853/160032
Total Connections Queued                   11222922
Average Queue Length (1, 5, 15 minutes)    90.35, 89.64, 54.02
Average Queueing Delay                     4.80 milliseconds
-
The
Current/Peak/Limit Queue Lengthline indicates the following:-
Current: The number of connections currently in the queue. -
Peak: The largest number of connections that have been in the queue simultaneously.If the peak queue length is close to the limit, it is an indication that the connection queue might not be large enough for the given load.
-
Limit: The maximum size of the connection queue, which is equal to the size of the thread-pool queue + maximum threads + the size of the keep-alive queue.
-
-
Total Connections Queuedis the total number of times a connection has been queued. This number includes newly-accepted connections and connections from the keep-alive system. -
Average Queue Lengthis the average number of connections in the queue during the most recent 1-minute, 5-minute, and 15-minute intervals. -
Average Queueing Delayis the average amount of time a connection spends in the connection queue. It represents the delay between when a request is accepted by the server and when a request-processing thread begins processing the request. If the average queueing delay is relatively high in proportion to the the average response time, consider increasing the number of threads in the thread pool.
15.3.4 Tuning the Thread Pool and Connection Queue Settings
You can change the thread pool and connection queue settings by using either Fusion Middleware Control or the WLST.
Changing the Thread Pool and Connection Queue Settings Using Fusion Middleware Control
To change the thread-pool settings by using the Fusion Middleware Control, do the following:
-
Log in to Fusion Middleware Control, as described in Section 1.7.2, "Displaying Fusion Middleware Control."
-
Click the WebLogic Domain button at the upper left corner of the page.
-
Select Administration > OTD Configurations.
A list of the available configurations is displayed.
-
Select the configuration for which you want to modify.
-
Click the Traffic Director Configuration In the Common Tasks pane.
-
Select Advanced Configuration > Settings.
-
Go to the Thread Pool section on the page.
-
Specify the parameters that you want to change.
On-screen help and prompts are provided for all of the parameters.
When you change the value in a field or tab out of a text field that you changed, the Apply button near the upper right corner of the page is enabled.
At any time, you can discard the changes by clicking the Revert button.
-
After making the required changes, click Apply.
-
A message, confirming that the updated configuration was saved, is displayed in the Console Messages pane.
-
Changing the Thread Pool and Connection Queue Settings Using WLST
-
To view the current thread-pool settings, run the
otd_getHttpThreadPoolPropertiesorotd_getTcpThreadPoolPropertiescommands, as shown in the following example:props = {} props['configuration'] = 'foo' otd_getHttpThreadPoolProperties(props) enabled=true queue-size=2000 min-threads=20480 max-threads=20480 stack-size=262145 -
To change the thread-pool settings, run the
otd_setHttpThreadPoolPropertiesorotd_setTcpThreadPoolPropertiescommands,.For example, to change the stack size for HTTP processing threads, run the following command:
props = {}props['configuration'] = 'foo'props['stack-size'] = '8192'
For more information about the WLST commands mentioned in this section, see WebLogic Scripting Tool Command Reference for Oracle Traffic Director.
15.4 Tuning HTTP Listener Settings
The following are the key HTTP listener parameters that affect performance:
-
Listener address
The listener address consists of an IP address and a port number. The host on which an Oracle Traffic Director instance is running can have multiple network interfaces and multiple IP addresses.
A listener that is configured to listen for client requests on all network interfaces on the host machine would have
0.0.0.0as its IP address. While specifying0.0.0.0as the IP address for a listener is convenient, it results in one additional system call for each connection. For better performance, consider specifying an actual IP address for the listener. -
Number of acceptor threads
Acceptor threads receive client requests and put them in the connection queue. When an Oracle Traffic Director instance starts, it creates the specified number of acceptor threads for each listener. If the number of acceptor threads for a listener is not specified, Oracle Traffic Director creates one acceptor thread per CPU on the host
Too many idle acceptor threads place an unnecessary burden on the system, while having too few acceptor threads might result in client requests not being accepted. One acceptor thread per CPU, which is the default setting, is an acceptable trade-off in most situations.
For HTTP 1.0 workloads, which necessitate opening and closing a relatively large number of connections, the default number of acceptor threads—1 per listener—would be suboptimal. Consider increasing the number of acceptor threads.
-
Listen queue size
As explained earlier, acceptor threads receive client requests and put them in the connection queue. If the operating system has not yet scheduled the acceptor thread, the operating system kernel maintains TCP connections on behalf of Oracle Traffic Director process. The kernel can accept connections up to the limit specified by the listen queue size.
HTTP 1.0-style workloads can have many connections established and terminated. So if clients experience connection timeouts when an Oracle Traffic Director instance is heavily loaded, you can increase the size of the HTTP listener backlog queue by setting the listen queue size to a larger value.
The plain-text perfdump report shows the IP address and the number of acceptor threads for each HTTP listener in the configuration, as shown in the following example:
ListenSocket ls1:
------------------------
Address                   https://0.0.0.0:1904
Acceptor Threads          1
Default Virtual Server    net-soa
You can change the HTTP listener settings by using either Fusion Middleware Control or the CLI, as described in Section 9.3, "Modifying a Listener."
15.5 Tuning Keep-Alive Settings
This section contains the following topics:
15.5.1 About Keep-Alive Connections
HTTP 1.0 and HTTP 1.1 support sending multiple requests over a single HTTP connection. This capability, which was called keep alive in HTTP 1.0, is called persistent connections in HTTP 1.1 and is enabled by default in Oracle Traffic Director.
Keeping a connection active even after processing the original request helps reduce the time and overhead associated with creating and closing TCP connections for future similar requests. However, keep-alive connections over which few or no requests are received are an unnecessary burden on the system.
Figure 15-2 depicts the connection handling process when keep-alive is enabled.
Figure 15-2 Connection Handling in Oracle Traffic Director with Keep Alive Enabled
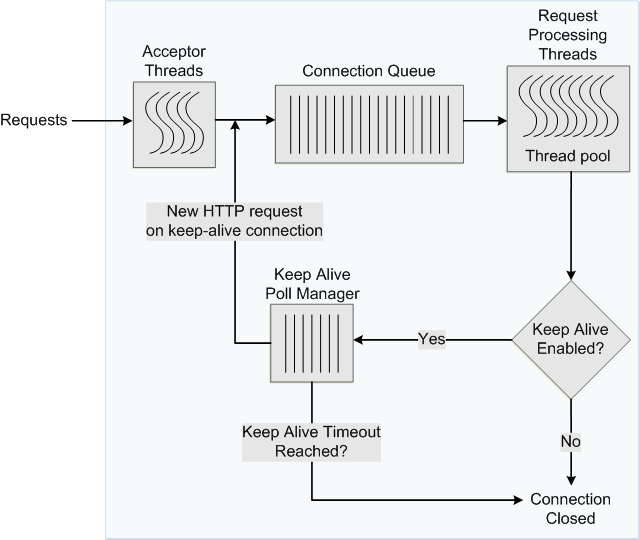
Description of ''Figure 15-2 Connection Handling in Oracle Traffic Director with Keep Alive Enabled''
To avoid this problem, you can specify the maximum number of waiting keep-alive connections. When a keep-alive request is received, if there are more open connections waiting for requests than the specified maximum number, the oldest connection is closed. In addition, you can specify the period after which inactive keep-alive connections should be closed.
15.5.2 Reviewing Keep-Alive Connection Settings and Metrics
The plain-text perfdump report shows the current keep-alive settings and metrics, as shown in the following example:
KeepAliveInfo:
--------------------
KeepAliveCount 26/60000
KeepAliveHits 154574634
KeepAliveFlushes 0
KeepAliveRefusals 0
KeepAliveTimeouts 5921
KeepAliveTimeout 120 seconds
The KeepAliveInfo section of the perdump report shows the following:
-
KeepAliveCount:-
The first number is the number of connections in keep-alive mode.
-
The second number is the maximum number of keep-alive connections allowed.
-
-
KeepAliveHitsis the number of times a request was successfully received over a connection that was kept alive.If
KeepAliveHitsis high when compared withKeepAliveFlushes, it indicates that the keep-alive connections are being utilized well.If
KeepAliveHitsis low, it indicates that a large number of keep-alive connections remain idle, unnecessarily consuming system resources. To address this situation, you can do the following:-
Decrease the maximum number of keep-alive connections so that fewer connections are kept alive.
Note that the number of connections specified by the maximum connections setting is divided equally among the keep-alive threads. If the maximum connections setting is not equally divisible by the keep-alive threads setting, the server might allow slightly more than the maximum number of keep-alive connections.
-
Decrease the
KeepAliveTimeoutso that keep-alive connections do not remain idle for long. Note that if theKeepAliveTimeoutis very low, the overhead of setting up new TCP connections increases.
-
-
KeepAliveFlushesis the number of times the server closed connections that the client requested to be kept alive.To reduce keep-alive flushes, increase the keep-alive maximum connections.
Caution:
On UNIX/Linux systems, if the keep-alive maximum connections setting is too high, the server can run out of open file descriptors. Typically, 1024 is the limit for open files on UNIX/Linux; so increasing the keep-alive maximum connections above 500 is not recommended. Alternatively, you can increase the file descriptor limit, as described in Section 15.2, "Tuning the File Descriptor Limit." -
KeepAliveRefusalsis the number of times the server could not hand off a connection to a keep-alive thread, possibly because theKeepAliveCountexceeded the keep-alive maximum connections. If this value is high, consider increasing the maximum number of keep-alive connections. -
KeepAliveTimeoutsis the number of times idle keep-alive connections were closed because no requests were received over them during the lastKeepAliveTimeoutperiod. -
KeepAliveTimeoutis the duration, in seconds, after which idle keep-alive connections are closed.Another parameter that is configurable and affects performance, but is not shown in the
perfdumpreport is the keep-alive poll interval, which, together withKeepAliveTimeout, controls latency and throughput. Decreasing the poll interval and the timeout period reduces latency on lightly loaded systems. Increasing the values of these settings raises the aggregate throughput on heavily loaded systems. However, if there is too much latency and too few clients, the aggregate throughput suffers, because the server remains idle unnecessarily. Therefore, at a given load, if there is idle CPU time, decrease the poll interval; if there is no idle CPU time, increase the poll interval.
15.5.3 Tuning Keep-Alive Settings
You can tune the keep-alive settings by using either Fusion Middleware Control or the WLST.
Changing Keep-Alive Settings Using Fusion Middleware Control
To change the keep-alive settings by using the Fusion Middleware Control, do the following:
-
Log in to Fusion Middleware Control, as described in Section 1.7.2, "Displaying Fusion Middleware Control."
-
Click the WebLogic Domain button at the upper left corner of the page.
-
Select Administration > OTD Configurations.
A list of the available configurations is displayed.
-
Select the configuration for which you want to modify.
-
Click the Traffic Director Configuration In the Common Tasks pane.
-
Select Advanced Configuration > HTTP.
-
Go to the Keep Alive section on the page.
-
Specify the parameters that you want to change.
On-screen help and prompts are provided for all of the parameters.
When you change the value in a field or tab out of a text field that you changed, the Apply button near the upper right corner of the page is enabled.
At any time, you can discard the changes by clicking the Revert button.
-
After making the required changes, click Apply.
-
A message, confirming that the updated configuration was saved, is displayed in the Console Messages pane.
-
Changing Keep-Alive Settings Using WLST
-
To view the current the keep-alive settings, run the
otd_getKeepalivePropertiescommand, as shown in the following example:props = {} props['configuration'] = 'foo' otd_getKeepaliveProperties(props) enabled=true threads=20 max-connections=2000 timeout=30 poll-interval=0.001 -
To change the keep-alive settings, run the
otd_setKeepalivePropertiescommand.For example to change the maximum number of keep-alive subsystem threads, run the following command:
props = {}
props['configuration'] = 'foo'
props['threads'] = '128'
otd_setKeepaliveProperties(props)
For more information about the WLST commands mentioned in this section, see the WebLogic Scripting Tool Command Reference for Oracle Traffic Director.
15.6 Tuning HTTP Request and Response Limits
To optimize the time that an Oracle Traffic Director instance spends in processing requests and responses, you can configure parameters such as the size of request and response headers, the number of allowed header fields in a request, and the time that Oracle Traffic Director waits to receive an HTTP request body and header.
You can view the change the HTTP request and response limits by using either Fusion Middleware Control or the WLST.
Viewing and Changing HTTP Request/Response Limits Using Fusion Middleware Control
-
Log in to Fusion Middleware Control, as described in Section 1.7.2, "Displaying Fusion Middleware Control."
-
Click the WebLogic Domain button at the upper left corner of the page.
-
Select Administration > OTD Configurations.
A list of the available configurations is displayed.
-
Select the configuration for which you want to modify.
-
Click the Traffic Director Configuration In the Common Tasks pane.
-
Select Advanced Configuration > HTTP.
-
Go to the HTTP section on the page.
-
Specify the parameters that you want to change.
On-screen help and prompts are provided for all of the parameters.
When you change the value in a field or tab out of a text field that you changed, the Apply button near the upper right corner of the page is enabled.
At any time, you can discard the changes by clicking the Revert button.
-
After making the required changes, click Apply.
-
A message, confirming that the updated configuration was saved, is displayed in the Console Messages pane.
-
Viewing and Changing HTTP Request/Response Limits Using WLST
-
To view the current settings, run the
otd_getHttpPropertiescommand, as shown in the following example:props = {} props['configuration'] = 'foo' otd_getHttpProperties(props) server-header=Oracle Traffic Director/12.2.1 etag=true request-header-buffer-size=8192 strict-request-headers=false websocket-strict-upgrade=false discard-misquoted-cookies=true max-request-headers=64 body-buffer-size=1024 output-buffer-size=8192 max-unchunk-size=8192 unchunk-timeout=60 io-timeout=30 request-body-timeout=-1 request-header-timeout=30 ecid=true favicon=true -
To change the request and response limits, run the
otd_setHttpPropertiescommand.For example to change the unchunk timeout, run the following command:
props = {}
props['configuration'] = 'foo'
props['unchunk-timeout'] = '120'
otd_setHttpProperties(props)
For more information about the WLST commands mentioned in this section, see WebLogic Scripting Tool Command Reference for Oracle Traffic Director.
15.7 Tuning DNS Caching Settings
DNS caching helps reduce the number of DNS lookups that Oracle Traffic Director needs to perform to resolve client host names to IP addresses. The DNS cache is enabled by default in Oracle Traffic Director and stores IP address-to-DNS name mappings. Each entry in the DNS cache represents a single IP address or DNS name lookup. The DNS cache is used only when DNS lookup is enabled and when Oracle Traffic Director performs operations that require DNS lookup, such as recording client IP addresses and host names in the access log.
For the DNS cache hit rate to be high, the cache should be large enough to store the IP address-to-DNS name mappings for the maximum number of clients that you expect to access Oracle Traffic Director concurrently. You can tune the maximum number of entries allowed in the DNS cache and the cache expiry time. Note that setting the cache size too high might result in wasted memory.
This section contains the following topics:
15.7.1 Viewing DNS Cache Settings and Metrics
To view the current DNS cache settings for a configuration, run the otd_getDnsCacheProperties command, as shown in the following example:
props = {}
props['configuration'] = 'foo'
otd_getDnsCacheProperties(props)

enabled=true
max-age=120
max-entries=1024
Viewing DNS Cache Metrics
You can view the current DNS cache utilization and hit rate in the plain-text perfdump report, as shown in the following example:
DNSCacheInfo:
------------------
enabled             yes
CacheEntries        0/1024
HitRatio            0/0 ( 0.00%)

Async DNS disabled
-
The first line indicates whether the DNS cache is enabled.
-
CacheEntriesshows the number of entries currently in the DNS cache and the maximum number of entries allowed. -
HitRatiois the number of cache hits compared to the number of DNS cache lookups. -
The last line indicates whether asynchronous DNS lookup is enabled.
You can configure Oracle Traffic Director to perform DNS lookups by using either its own asynchronous resolver or the operating system's synchronous resolver. DNS lookups performed by using the operating system's resolver are faster.
15.7.2 Configuring DNS Cache Settings
You configure the DNS cache settings for a configuration by using either Fusion Middleware Control or the WLST.
Configuring DNS Cache Settings Using Fusion Middleware Control
To configure DNS cache settings by using the Fusion Middleware Control, do the following:
-
Log in to Fusion Middleware Control, as described in Section 1.7.2, "Displaying Fusion Middleware Control."
-
Click the WebLogic Domain button at the upper left corner of the page.
-
Select Administration > OTD Configurations.
A list of the available configurations is displayed.
-
Select the configuration for which you want to modify.
-
Click the Traffic Director Configuration In the Common Tasks pane.
-
Select Advanced Configuration > Settings.
-
Go to the DNS section on the page.
-
Specify the parameters that you want to change.
On-screen help and prompts are provided for all of the parameters.
When you change the value in a field or tab out of a text field that you changed, the Apply button near the upper right corner of the page is enabled.
At any time, you can discard the changes by clicking the Revert button.
-
After making the required changes, click Apply.
-
A message, confirming that the updated configuration was saved, is displayed in the Console Messages pane.
-
Configuring DNS Cache Settings Using WLST
To change the DNS cache settings for a configuration, run the otd_setDnsCacheProperties command.
For example, the following command changes the maximum amount of time to cache a DNS lookup result to 240 seconds:
props = {}
props['configuration'] = 'foo'
props['max-age'] = '240'
otd_setDnsCacheProperties(props)
For more information about the WLST commands mentioned in this section, see WebLogic Scripting Tool Command Reference for Oracle Traffic Director.
15.8 Tuning SSL/TLS-Related Settings
This section contains the following topics:
15.8.1 SSL/TLS Session Caching
During the initial SSL/TLS handshake process for an HTTPS connection, the client and server negotiate the cipher suites to be used, and the encryption/decryption and MAC keys (see About SSL). This activity requires significant CPU time, depending on whether RSA or ECC private keys are used, and the size of the keys.
The initial SSL/TLS handshake results in the generation of a unique SSL/TLS session ID. If the SSL/TLS session ID is cached, then the next time that same HTTPS client opens a new socket connection, the server can reduce the time taken to establish the connection by retrieving the SSL/TLS session ID from the cache and performing an abbreviated SSL/TLS handshake, which is less CPU-intensive than the initial handshake.
SSL/TLS session caching is enabled by default in Oracle Traffic Director. When a new connection is established on an SSL/TLS-enabled listener, Oracle Traffic Director checks whether the SSL/TLS session cache contains a session ID for the client. If the session ID for the client exists in the cache and is valid, Oracle Traffic Director allows the client to reuse the session.
You can configure the maximum number of entries in the SSL/TLS session cache and the duration for which SSL/TLS session IDs should be stored in the cache.
You can configure the SSL/TLS session cache settings for a configuration by using either Fusion Middleware Control or the WLST.
Configuring SSL/TLS Session Cache Settings Using Fusion Middleware Control
To configure SSL/TLS session cache settings by using the Fusion Middleware Control, do the following:
-
Log in to Fusion Middleware Control, as described in Section 1.7.2, "Displaying Fusion Middleware Control."
-
Click the WebLogic Domain button at the upper left corner of the page.
-
Select Administration > OTD Configurations.
A list of the available configurations is displayed.
-
Select the configuration for which you want to modify.
-
Click the Traffic Director Configuration In the Common Tasks pane.
-
Select Advanced Configuration > Settings.
-
Go to the SSL/TLS Cache section on the page.
-
Specify the parameters that you want to change.
On-screen help and prompts are provided for all of the parameters.
When you change the value in a field or tab out of a text field that you changed, the Apply button near the upper right corner of the page is enabled.
At any time, you can discard the changes by clicking the Revert button.
-
After making the required changes, click Apply.
-
A message, confirming that the updated configuration was saved, is displayed in the Console Messages pane.
-
Configuring SSL/TLS Session Caching Settings Using WLST
-
To view the current SSL/TLS caching settings for a configuration, run the
otd_getSslSessionCachePropertiescommand, as shown in the following example:props = {} props['configuration'] = 'foo' otd_getSslSessionCacheProperties(props) enabled=true max-entries=10000 max-ssl3-tls-session-age=86400 -
To change the SSL/TLS session caching settings, run the
otd_setSslSessionCachePropertiescommand.For example, the following command changes the maximum number of entries allowed in the SSL/TLS session cache to 20000.
props = {}
props['configuration'] = 'foo'
props['max-entries'] = '20000'
otd_setSslSessionCacheProperties(props)
For more information about the WLST commands mentioned in this section, see the WebLogic Scripting Tool Command Reference for Oracle Traffic Director.
15.8.2 Ciphers and Certificate Keys
Strong ciphers and large private keys provide better security for SSL/TLS connections, but they affect performance.
-
In SSL/TLS connections, certain ciphers—such as AES and RC4—require less computing resources for the data transfer than stronger ciphers such as 3DES. Consider this factor when you select SSL/TLS ciphers for listeners for which Strict SNI Host Matching is enabled.
For information about configuring ciphers for listeners, see Section 10.1.4, "Configuring SSL/TLS Ciphers for a Listener."
For information about SNI host matching, see Section 10.1.6, "About Strict SNI Host Matching."
-
The initial SSL/TLS handshake process takes less time for RSA certificates with small key sizes—512, 1024 and 2048 bits—than for certificates with large key size— 4096 bits.
For information about creating self-signed certificates and certificate-signing requests, see Section 10.3, "Managing Certificates."
15.9 Configuring Access-Log Buffer Settings
The access log contains information about client requests to, and responses from, the server. When the rate at which an Oracle Traffic Director instance receives client requests is very high, which is usually the case in a production environment, the frequency of writing entries to the log file on the disk increases. Writing frequently to the disk is an I/O-intensive activity that can affect the performance of the server.
To reduce the frequency at which Oracle Traffic Director writes entries to the access log on the disk, access log updates can be buffered. Access-log buffering is enabled by default in Oracle Traffic Director.
You can specify limits for the access-log buffer size, the number of access-log buffers per server, and the maximum duration for which entries should be held in the buffer. When the buffer size, the number of buffers, or the age of an entry in the buffer reaches the specified limit, Oracle Traffic Director writes the buffered data to the access log on the disk.
You can configure the access-log buffer settings by using either Fusion Middleware Control or the WLST.
Configuring Access-Log Buffer Settings Using Fusion Middleware Control
To configure access-log buffer settings by using the Fusion Middleware Control, do the following:
-
Log in to Fusion Middleware Control, as described in Section 1.7.2, "Displaying Fusion Middleware Control."Section 1.7.2, "Displaying Fusion Middleware Control."
-
Click the WebLogic Domain button at the upper left corner of the page.
-
Select Administration > OTD Configurations.
A list of the available configurations is displayed.
-
Select the configuration for which you want to configure access-log buffer preferences.
-
Click the Traffic Director Configuration In the Common Tasks pane.
-
Select Administration > Logging.
The Log Preferences page is displayed.
-
Go to the Advanced Settings section on the page, and scroll down to the Access Log Buffer subsection.
-
Specify the parameters that you want to change.
On-screen help and prompts are provided for all of the parameters.
When you change the value in a field or tab out of a text field that you changed, the Apply button near the upper right corner of the page is enabled.
At any time, you can discard the changes by clicking the Revert button.
-
After making the required changes, click Apply.
-
A message, confirming that the updated configuration was saved, is displayed in the Console Messages pane.
-
Configuring Access-Log Buffer Settings Using WLST
-
To view the current access-log buffer properties, run the
otd_getAccessLogBufferPropertiescommand, as shown in the following example:props = {} props['configuration'] = 'foo' otd_getAccessLogBufferProperties(props) enabled=true buffer-size=8192 direct-io=false max-buffers=1000 max-buffers-per-file=default max-age=1 -
To change the access-log buffer properties, run the
otd_setAccessLogBufferPropertiescommand, as shown in the following example:props = {} props['configuration'] = 'foo' props['max-buffers'] = '2000' otd_setAccessLogBufferProperties(props)
For more information about the WLST commands mentioned in this section, see WebLogic Scripting Tool Command Reference for Oracle Traffic Director.
For information about viewing logs, configuring log preferences, rotating logs, and so on, see Chapter 11, "Managing Logs."
15.10 Enabling and Configuring Content Compression
Compressed objects are delivered faster to clients, with fewer round-trips, reducing the overall latency without increasing the investment in expensive hardware.
You can create one or more compression rules specific to each Oracle Traffic Director virtual server, and configure the rules to be applicable either to all requests or to only those requests that match a specified condition.
Note:
Certain files—such as GIF, JPEG, and PNG images; and zipped files—are either already compressed or cannot be compressed any further. Requiring Oracle Traffic Director to compress such files causes additional overhead without providing any compression benefit. Therefore, when creating compression rules for a virtual server, exclude such files.For each compression rule, you can also specify the following parameters:
-
Compression level, on the scale 1–9. At level 1, the compression time is the least; at level 9, the compression ratio is the best.
At the higher compression levels, more CPU resources are consumed during the compression process, but relatively less network bandwidth is required to transmit the compressed content. On the other hand, compression at the lower levels is relatively less CPU-intensive, but more bandwidth is required to transmit the resulting content. So when choosing the compression level, consider which resource is more expensive in your environment—CPU resources or network bandwidth.
-
If CPU usage is more expensive, select a lower compression level.
-
If network bandwidth is the primary constraint, select a higher compression level.
-
-
Number of bytes (fragment size) that should be compressed at a time.
-
Whether the
Vary: Accept-Encodingheader should be included the response.The
Vary: Accept-Encodingheader instructs proxies situated between the client and Oracle Traffic Director that the compressed content should not be served to clients that cannot decompress the content.
Configuring Compression Rules Using Fusion Middleware Control
To create compression rules by using the Fusion Middleware Control, do the following:
-
Log in to Fusion Middleware Control, as described in Section 1.7.2, "Displaying Fusion Middleware Control."
-
Click the WebLogic Domain button at the upper left corner of the page.
-
Select Administration > OTD Configurations.
A list of the available configurations is displayed.
-
Select the configuration for which you want to create compression rules.
-
Click the Traffic Director Configuration In the Common Tasks pane.
-
Select Administration > Virtual Servers.
The Virtual Servers page is displayed.
-
In the navigation pane, expand Virtual Servers, expand the name of the virtual server for which you want to create compression rules, and select Compression.
The Compression Rules page is displayed. It lists the compression rules that are currently defined for the virtual server, and indicates whether the rules are enabled.
Creating a Compression Rule
-
Click New Compression Rule.
The New Compression Rule dialog box is displayed.
In the Name field, enter a name for the new compression rule.
-
Click Next.
If you wish to apply the condition, select Edit Expression. In the New Expression pane, select Create button a new page displays, Select Variable/Functions and an Operator from the respective drop-down lists and provide a value in the Value field.
Select the
and/oroperatorfrom the drop-down list when configuring multiple expressions. Similarly, use theNotoperator when you want the route to be applied only when the given expression is not true.To enter a condition manually, click Edit Manually on the right top corner of the page. In the Condition field, specify the condition under which the rule should be applied. For information about building condition expressions, click the help button near the Condition field or see "Using Variables, Expressions, and String Interpolation" in the Configuration File Reference for Oracle Traffic Director .
-
Click OK and then click Create Compression Rule.
The caching rule that you just created is displayed on the Compression Rules page.
Editing a Compression Rule
To enable or disable a compression rule, or to change the settings of a rule, do the following:
-
Click the Name of the compression rule that you want to change.
The Edit Compression Rule dialog box is displayed.
Note:
To access the condition builder to edit conditions, select Requests satisfying the condition and click Edit. The condition builder enables you to delete old expressions and add new ones. -
Specify the parameters that you want to change.
On-screen help and prompts are provided for all of the parameters.
When you change the value in a field or tab out of a text field that you changed, the Ok button near the upper right corner of the page is enabled.
At any time, you can discard the changes by clicking the Cancel button.
-
After making the required changes, click Ok.
A message, confirming that the updated configuration was saved, is displayed in the Console Messages pane.
Deleting a Compression Rule
To delete a compression rule, click the Delete button. At the confirmation prompt, click Yes.
-
Configuring Compression Rules Using WLST
-
To create a compression rule for a virtual server, run the
otd_createCompressionRulecommand.For example, the following command creates a rule named
compress-docsfor the virtual serverbarin the configurationfoo, to cache the requests for which the expression$uri='^/docs'evaluates to true.props = {} props['configuration'] = 'foo' props['virtual-server'] = 'bar' props['compression-rule'] = 'compress-docs' props['condition'] = '$uri='^/docs'' otd_createCompressionRule(props)Note that the value of the
conditionproperty should be a regular expression. For information about building condition expressions, see "Using Variables, Expressions, and String Interpolation" in the Configuration File Reference for Oracle Traffic Director . -
To view a list of the compression rules defined for a virtual server, run the
otd_listCompressionRulescommand, as shown in the following example:props = {}props['configuration'] = 'foo'props['virtual-server'] = 'bar'otd_listCompressionRules(props) compress-docs compress-all -
To view the current settings of a compression rule, run the
otd_getCompressionRulePropertiescommand, as shown in the following example:props = {} props['configuration'] = 'foo' props['virtual-server'] = 'bar' props['compression-rule'] = 'compression-rule-1' otd_getCompressionRuleProperties(props) name=compression-rule-1 condition="$uri = '^/doc'" insert-vary-header=true compression-level=6 fragment-size=8192 -
To change a compression rule, run the
otd_setCompressionRulePropertiescommand.For example, the following command changes the compression level for the rule
compression-rule-1to level 8.props = {} props['configuration'] = 'foo' props['virtual-server'] = 'bar' props['compression-rule'] = 'compression-rule-1' props['compression-level'] = '8' otd_setCompressionRuleProperties(props) -
To delete a compression rule, run the
otd_deleteCompressionRulecommand, as shown in the following example.props = {} props['configuration'] = 'foo' props['virtual-server'] = 'bar' props['compression-rule'] = 'compression-rule-1' otd_deleteCompressionRule(props)
For more information about the WLST commands mentioned in this section, see the WebLogic Scripting Tool Command Reference for Oracle Traffic Director.
15.11 Tuning Connections to Origin Servers
Each Oracle Traffic Director virtual server acts as a reverse proxy through which clients outside the network can access critical data and applications hosted on multiple origin servers in the back end. This section describes the parameters that you can tune to improve the performance of Oracle Traffic Director as a reverse-proxy server.
-
Enable keep-alive: This parameter indicates whether the Oracle Traffic Director virtual server should attempt to use persistent connections to the origin server or create a new connection for each request. It is enabled by default.
-
Keep-alive timeout: This parameter specifies the maximum duration, in seconds, for which a persistent connection can be kept open. The default timeout duration is 29 seconds.
-
Idle timeout: This parameter specifies the maximum duration, in seconds, for which a connection to the origin server can remain idle. The default duration is 300 seconds.
-
Always use keep-alive: This parameter indicates whether the Oracle Traffic Director virtual server can reuse existing persistent connections to origin servers for all types of requests. If this parameter is not enabled (default), the Oracle Traffic Director virtual server attempts to use persistent connections to the origin server only for the GET, HEAD, and OPTIONS request methods.
-
Proxy buffer size: This parameter specifies the size of the buffer in which Oracle Traffic Director stores data received from the origin server, before sending the data to the client. Larger the buffer, lower is the number of
writesystem calls. The default size of the proxy buffer is 16 kilobytes.
The reverse-proxy settings for connections between an Oracle Traffic Director virtual server and an origin server pool are defined in routes. To change the reverse-proxy settings, you should edit the routes by using either Fusion Middleware Control or the WLST.
Note:
In the current release, you cannot configure the proxy buffer size by using Fusion Middleware Control or WLST.To configure the proxy buffer size for a route, do the following:
-
Add the
proxy-buffer-sizeparameter to thehttp-client-configserver application function (SAF) in thevs_name-obj.confconfiguration file of the virtual server that contains the route that you want to edit.The
vs_name-obj.conffile is located in the following directory:INSTANCE_HOME/net-config_name/configThe following is an example of a route (
route1) for which theproxy-buffer-sizeand other reverse-proxy parameters have been configured.<Object name="route1"> ObjectType fn="http-client-config" keep-alive-timeout="31" always-use-keep-alive="true" keep-alive="false" timeout="360" proxy-buffer-size="32768" Route fn="set-origin-server" origin-server-pool="origin-server-pool-1" </Object> -
Save and close the
vs_name-obj.conffile. -
Run the
pullComponentChangescommand to update the configuration store on the administration server and to give effect to this change in all the instances of the configuration.pullComponentChanges('otd_example.com')otd_example.comis the name of the node on which you configured the proxy buffer size.
For more information about the http-client-config server application function (SAF), see the Configuration File Reference for Oracle Traffic Director .
Editing Routes Using Fusion Middleware Control
To edit routes by using the Fusion Middleware Control, do the following:
-
Log in to Fusion Middleware Control, as described in Section 1.7.2, "Displaying Fusion Middleware Control."
-
Click the WebLogic Domain button at the upper left corner of the page.
-
Select Administration > OTD Configurations.
A list of the available configurations is displayed.
-
Select the configuration for which you want to edit routes.
-
Click the Traffic Director Configuration In the Common Tasks pane.
-
Select Administration > Virtual Servers.
The Virtual Servers page is displayed.
-
In the navigation pane, expand Virtual Servers, expand the name of the virtual server for which you want to edit routes, and select Routes.
The Routes page is displayed. It lists the routes that are currently defined for the virtual server.
-
Click the Name of the route that you want to edit.
The Route Settings page is displayed.
-
Specify the reverse-proxy parameters in the following fields on the Route Settings page:
Section of the Route Settings Page Field/s Advanced Settings: Client Configuration for Connections with Origin Servers Keep Alive Keep Alive Timeout
Always Use Keep Alive Idle Timeout
On-screen help and prompts are provided for all of the parameters.
When you change the value in a field or tab out of a text field that you changed, the Ok button near the upper right corner of the page is enabled.
At any time, you can discard the changes by clicking the Cancel button.
-
After making the required changes, click Ok.
-
A message, confirming that the updated configuration was saved, is displayed in the Console Messages pane.
-
Configuring Routes Using WLST
To change the properties of a route, run the otd_setRouteProperties command. The following are the names of the reverse-proxy parameters described earlier:
keep-alive-timeout
always-use-keep-alive
use-keep-alive
timeout
For example, the following command changes the keep-alive timeout duration for the route route1 in the virtual server bar of the configuration foo to 30 seconds.
props = {}
props['configuration'] = 'foo'
props['virtual-server'] = 'bar'
props['route'] = 'route-1'
props['keep-alive-timeout'] = '30'
otd_setRouteProperties(props)
For more information about the WLST commands mentioned in this section, see the WebLogic Scripting Tool Command Reference for Oracle Traffic Director.
15.12 Solaris-specific Tuning
This section provides tuning information that is specific to Solaris. Note that these are platform-specific tuning tips and any changes that you make could affect other process on the system.
15.12.1 Files Open in a Single Process (File Descriptor Limits)
Different platforms have different limits on the number of files that can be open in a single process at one time. For busy sites, increase that number. On Solaris systems, control this limit by setting rlim_fd_max and rlim_fd_cur in the /etc/system file. For Solaris 11, the default for rlim_fd_max is 65536 and the default value for rlim_fd_cur is 256.
After making this or any change in the /etc/system file, reboot Solaris for the new settings to take effect. In addition, if you upgrade to a new version of Solaris, remove any line added to /etc/system and add it again only after verifying that it is still valid.
An alternative way to make this change is by using the ulimit –n <value> command. Using this command does not require a system restart. However, this command only changes the login shell, whereas editing the etc/system file affects all shells.
15.12.2 Failure to Connect to HTTP Server
If clients experience connection timeouts when an Oracle Traffic Director instance is heavily loaded, you can increase the size of the HTTP listener backlog queue. To increase this setting, edit the HTTP listener's listen queue value.
In addition to this, you must also increase the limits within the Solaris TCP/IP networking code. There are two parameters that are changed by executing the following commands:
ipadm set-prop -p _conn_req_max_q=4096 tcp

ipadm set-prop -p _conn_req_max_q0=4096 tcp
These two settings increase the maximum number of two Solaris listen queues that can fill up with waiting connections. The setting _conn_req_max_q increases the number of completed connections waiting to return from an accept() call. The setting _conn_req_max_q0 increases the maximum number of connections with the handshake incomplete. The default values for _conn_req_max_q and _conn_req_max_q0 are 128 and 1024, respectively.
You can monitor the effect of these changes by using the netstat -s command and looking at the tcpListenDrop, tcpListenDropQ0, and tcpHalfOpenDrop values. Review them before adjusting these values. If the counters are not zero, adjust the value to 2048 initially, and continue monitoring the netstat output.
Do not accept more connections than Oracle Traffic Director is able to process. The value of 2048 for the parameters tcpListenDrop, tcpListenDropQ0, and tcpHalfOpenDrop typically reduces connection request failures, and improvement has been seen with values as high as 4096.
The HTTP listener's listen queue setting and the related Solaris _conn_req_max_q and _conn_req_max_q0 settings are meant to match the throughput of Oracle Traffic Director. These queues act as a buffer to manage the irregular rate of connections coming from web users. These queues allow Solaris to accept the connections and hold them until they are processed by Oracle Traffic Director.
15.12.3 Tuning TCP Buffering
TCP buffering can be tuned by using the send_buf and recv_buf parameters. For more information about these parameters, see Table 15-1, "Tuning Solaris for Performance Benchmarking".
15.12.4 Reduce File System Maintenance
UNIX file system (UFS) volumes maintain the time that each file was accessed. If the file access time updates are not important in your environment, you can turn them off by adding the noatime parameter to the data volume's mount point in /etc/vfstab. For example:
/dev/dsk/c0t5d0s6 /dev/rdsk/c0t5d0s6 /data0 ufs 1 yes noatime
Note:
Thenoatime parameter does not turn off the access time updates when the file is modified, but only when the file is accessed.For ZFS, you can use the zfs set command to modify any settable dataset property. The following example sets the atime property to off for tank/home.
zfs set atime=off tank/home
15.12.5 Long Service Times on Busy Volumes or Disks
An Oracle Traffic Director instance's responsiveness depends greatly on the performance of the disk subsystem. The iostat utility can be used to monitor how busy the disks are and how rapidly they complete I/O requests (the %b and svc_t columns, respectively). Service times are not important for disks that are less than 30% busy. However, for busier disks, service times should not exceed about 20 milliseconds. If busy disks have slower service times, improving disk performance can help performance substantially.If some disks are busy while others are lightly loaded, balance the load by moving some files from the busy disks to the idle disks.
15.12.6 Short-Term System Monitoring
Solaris offers several tools for keeping track of system behavior. Although you can capture their output in files for later analysis, the tools listed below are primarily meant for monitoring system behavior in real time:
-
The
iostat -x 60command reports disk performance statistics at 60-second intervals.To see how busy each disk is, take a look at the
%bcolumn. For any disk that is busy more than 20% of the time, pay attention to the service time as reported in thesvctcolumn. Other columns provide information about I/O operation rates, amount of data transferred, and so on. -
The
vmstat 60command summarizes virtual memory activity and some CPU statistics at 60-second intervals.Take a look at the
srcolumn to keep track of the page scan rate and take action if it is too high. In addition, monitor theus,sy, andidcolumns to see how heavily the CPUs are being used. Note that you need to keep plenty of CPU power in reserve to handle sudden bursts of activity. Also keep track of thercolumn to see how many threads are competing for CPU time. If this remains higher than about four times the number of CPUs, reduce the server's concurrency. -
The
mpstat 60command provides detailed view of the CPU statistics, while thedlstat show-link -i 60command summarizes network activity.
15.12.7 Long-Term System Monitoring
While it is important to monitor system performance with the tools mentioned above, collecting longer-term performance histories is equally important, as it can help you detect trends. For example, a baseline record of a system will help you find out what has changed if the system starts behaving poorly. Enable the system activity reporting package by doing the following:
-
Run the following command:
svcadm enable system/sar
-
Run the command
crontab -e sysand remove the#comment characters from the lines with thesa1andsa2commands. You can adjust how often the commands run and the time depending on your site's activity profile. For an explanation of the format of this file see thecrontabman page.This command causes the system to store performance data in files in the
/var/adm/sadirectory, where they are retained for one month by default. You can then use thesarcommand to examine the statistics for time periods of interest.
15.12.8 Tuning for Performance Benchmarking
The following table shows the operating system tuning for Solaris used when benchmarking for performance and scalability. These values are an example of how you can tune your system to achieve the desired result.
Table 15-1 Tuning Solaris for Performance Benchmarking
| Parameter | Scope | Default Value | Tuned Value | Comments |
|---|---|---|---|---|
|
|
|
256 |
65536 |
Soft limit |
|
|
|
65536 |
65536 |
Process open file descriptors limit; accounts for the expected load (for the associated sockets, files, and pipes if any). |
|
|
|
60000 |
600000 |
Set on clients as well. |
|
|
|
128 |
1024 |
|
|
|
|
1024 |
4096 |
|
|
|
|
300000 |
600000 |
|
|
|
|
7200000 |
9000000 |
For high traffic web sites, lower this value. |
|
|
|
1000 |
3000 |
If re-transmission is greater than 30-40%, increase this value. |
|
|
|
60000 |
100000 |
|
|
|
|
200 |
3000 |
|
|
|
|
32768 |
65535 |
Set on clients as well. |
|
|
|
49152 |
128000 |
To increase the transmit buffer. |
|
|
|
128000 |
1048576 |
To increase the receive buffer. |