The ebXML language (Electronic Business using eXtensible Markup Language) is a business protocol that enables enterprises to conduct business over the Internet. Oracle Workshop for WebLogic uses ebXML controls for initiator processes and ebXML Participant Business Processes templates for participant processes to build business processes systems which exchange ebXML business messages between trading partners. The ebXML control provides the initiator business process with predefined customizable methods for sending and receiving ebXML messages in a conversation. The ebXML Participant Business Process template provides a head start for building public participant business processes for ebXML conversations. Although the template is not required to build ebXML participant business processes, it includes the nodes and business process annotations needed to integrate easily with ebXML initiator business processes. The purpose of this tutorial is to demonstrate the different options available for ebXML trading partner management in Oracle Workshop for WebLogic and Oracle WebLogic Integration.
Before You Begin
This topic describes tasks that you should perform before you begin using this tutorial. It contains the following sections:
In this tutorial, the first couple of examples contains detailed instructions of how to use the Oracle Workshop for WebLogic user interface and the Oracle WebLogic Integration Administration Console user interface to perform the steps outlined in the example. The preceding examples build on the skills you learn in the first couple of sections, but do not outline the steps in quite as much detail.
This section describes how to create the business process application in which you will create the business processes and other components required for the examples of the tutorial. It also describes how to import the sample data and schemas which are included in the zipped archive of the tutorial files.
This example demonstrates how to send an XML message from one trading partner to another through a simple one-way ebXML exchange. In this example, you will learn how to create participant and initiator business processes as well as, how to create and configure ebXML and file controls. The section also contains a detailed description of how to deploy and test business processes using the Oracle Workshop for WebLogic Test Browser.
This example is similar to the preceding one except for that this example demonstrates how to specify the trading partner information dynamically by using an XQuery selector, rather than specifying it statically in the ebXML control. It also describes how to configure the ebXML control to use typed XML data and specific method names.
This section describes how to implement an ebXML conversation in which when a request message (order) is received, a response (invoice) message is sent back by adding a Client Response node to the participant business process and using the ebXML control callback feature to send the response message.
This example illustrates how to use subprocesses to implement the public/private pattern. The public/private pattern can be used to keep the details of backend integration contained to a private process definition, while the public process definitions are dedicated to trading partner interaction.
In this section, you learn how to at run time obtain trading partner information from the TPM repository. You also learn how to use the onAck callback of the ebXML control.
In this example, you investigate the already built application included with the tutorial files to learn how to read the name of a sub-directory and use that as the partner ID. The business process sets the partner ID dynamically using the setProperties method included in the ebXML control.
This example briefly explains how to move to a distributed setup where one trading partner operates in one Oracle WebLogic Integration instance while the other trading partner operates in another instance. This is the setup that you would use in a production scenario where the two trading partners are running on two physically separated systems.
In this section you will learn how to add a service and a service profile in the Oracle WebLogic Integration Administration Console, which will give you control over trading partner communications.
Step 1: Getting Started
Before you start the ebXML tutorial, you have to complete the procedures described in
Setting Up the Tutorials. If you have not yet completed these procedures, please do so before proceeding with this section.
In this step, you use Oracle Workshop for WebLogic to create application, in which you build the ebXML tutorial business processes. You then import the sample data and schemas provided in the zipped archive that came with the tutorial files (see,
Step 3: Install the Tutorial Files). The sample data and schemas are used to illustrate the functionality of the ebXML tutorial examples. Lastly, you create two directories on your hard drive which are used throughout the tutorial to read files from and to write files to.
Oracle WebLogic Integration extends the Oracle Workshop for WebLogic to allow the building of integrated enterprise applications. An application in turn contains projects and files. A project can contain several components including, business processes, Web services, and XML files. In this section, you will create the Business Process Application in which you will later build the ebXML tutorial processes and process components.
To Create a Business Process Application
Start Oracle Workshop for WebLogic by choosing, Start > All Programs > Oracle WebLogic > Workshop for WebLogic 10gR3
If this is the first time Oracle Workshop for WebLogic is started since it was installed, the samples project, which contains sample services installed with Oracle Workshop for WebLogic, is displayed. Otherwise, the project which was opened last is displayed.
From the Oracle Workshop for WebLogic menu, click File > New>Project.
The Select a wizard dialog box is displayed.
Expand WebLogic Integration and select Process Application and click Next.
The Process Application dialog box is displayed.
In the Process Application dialog box, enter the following:
In the EAR Project Name field, enter ebXML.
In the Web Project Name field, ebXMLWeb.
In the Utility Project Name field, enter Schemas.
Select Add WebLogic Integration System and Control Schemas in Utility Project check box. This adds the system schemas to the Utility Project/schemas folder.
Click Finish.
In the displayed Open Associated Perspective? dialog box, click Yes to switch to Process Perspective.
Your ebXML process application is created and displayed in the Package Explorer pane (see Figure 3-1).
Figure 3-1 ebXML Application
The components we will work with in this tutorial includes the following:
ebXML—This contains the JAR files and deployment descriptors build files and auto-generated files. J2EE Applications and their components are deployed on the Oracle WebLogic Server as EAR files.
ebXMLWeb—A Web application project folder. Every application contains one or more projects. Projects represent Oracle WebLogic Server Web applications. In other words, when you create a project, you are creating a Web application. (The name of your project is included in the URL your clients use to access your application.)
Note:
The Web application project folder is named by appending Web to the name you gave your application.
Schemas—A Schemas project that contains the XML Schemas and the Message Broker channel file used in the application. It also contains ebXML envelope schemas that are used to package ebXML messages.
Expand the ebXMLWeb folder.
The processes folder inside the ebXMLWeb folder is created when you created your business process application. Since we do not need it for our tutorial, you can delete it:
Go to ebXMLWeb > src > processes.
Right-click on the processes folder and select Delete from the drop-down menu.
Click Yes in the confirmation dialogue.
You have now completed the first step in this tutorial and are ready to start creating the tutorial ebXML business processes. For more information about business process applications, see Guide to Building Business Processes
.
Importing the Tutorial Sample Data
In this tutorial, we use sample data files to send in the ebXML messages. You can use your own XML data files if you wish, but some sample data files have been provided for you in the tptutorial.zip archive that you downloaded from the Oracle website (see,
Step 3: Install the Tutorial Files).
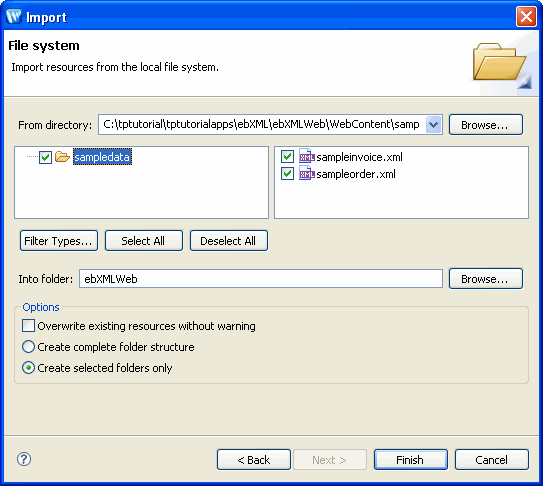
To Import the Sample Data Into Your Project Application
In the Package Explorer pane, right click on ebxmlWeb and select Import.
The Import dialog box is displayed.
In the Import dialog box, select General > File System,and click next.
In File System window, click Browse next to From directory: and navigate to [unzip location]\tptutorialapps\ebxml\ebxmlWeb\webContent\sampledata where [unzip location] is the directory to which you unzipped the files from the tptutorial.zip (see,
Step 3: Install the Tutorial Files).
sampleinvoice.xml and sampleorder.xml is added to your Package Explorer pane under ebXMLWeb.
Importing the Tutorial Schemas
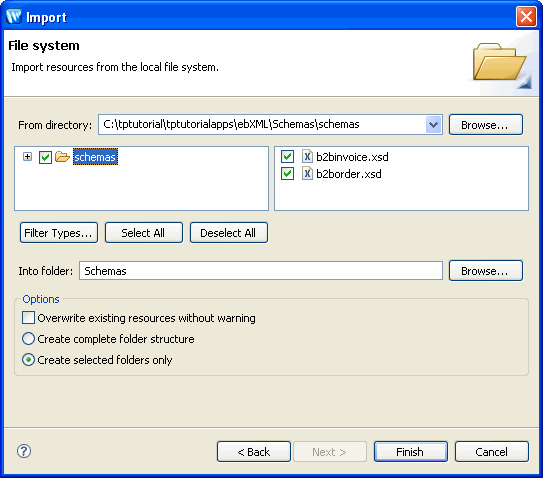
In this tutorial, specific schemas are used for the XML data that is sent by the ebXML messages. This section describes how to import the schemas into your schemas folder in your ebXML application.
To Import the Tutorial Schemas
In the Package Explorer pane, right-click on Schemas.
Select Import from the drop-down menu.
The Import dialog box is displayed.
In the Import dialog box, select General > File System and click Next.
In File System window, click Browse next to From directory: and navigate to: [unzip location]\tptutorialapps\ebxml\Schemas\schemas. Where [unzip location] is the directory to which you unzipped the files from the tptutorial.zip file (see,
Step 3: Install the Tutorial Files).
When a XSD or MFL file is imported, a build of the current Schemas project folder is triggered. (The build verifies that the schema file is well formed. For XSD files, it also verifies that the element and attribute names in the XML Schema do not conflict with the XSD files that have already been imported into the current Schemas project folder.) For more information about what gets generated when you import schemas, see Importing Schemas.
Creating the Read and Write Directories
To demonstrate how messages can be exchanged by ebXML, several of the examples in this tutorial write out files to and read files from directories on your hard drive. Before you start working with any of the examples in this tutorial, create the following two directories on your hard drive:
C:\tptutorial\binary-in
C:\tptutorial\binary-out
Note:
This is assuming that you created your application in
Creating the Business Process Application on the C drive. If you created the application on another drive, please place the above directories at the root level of that drive.
Step 2: Sending an XML Message through an One-Way ebXML Exchange
In this example, you will learn how to send an XML message from one trading partner to another using ebXML. Imagine that one of the trading partners is accepting and processing orders. We refer to this partner as the seller and it is the participator of the ebXML conversation. The other trading partner, which we call the buyer, sends an XML order to the seller. The buyer is the initiator of the conversation. The seller accepts the message and simply writes it out to a file. This section contains the following procedures:
The Seller business process is the participator of our ebXML conversation. When building ebXML participator processes, you can use the ebXML Participant Process file which comes pre-configured with the nodes, variables, and other components necessary for building participants processes. In this example, you add a File control to the business process which writes the test data out to a file located on your hard drive. This section includes the following tasks:
In the Package Explorer pane, expand ebXMLWeb and select src.
Right-click the src folder, then select New > Package.
The New Java Packagedialog box is displayed.
In the New Java Packagedialog box, enter ebxml.oneway as the name of the new package.
Click Finish.
The ebxml.onewaypackage appears under ebXMLWeb/src directory in the Project Explorer.
Right-click ebxml.oneway package.
Select New > Other.
The Select a Wizarddialog box is displayed.
Expand WebLogic Integration and select ebXML Participant Process.
Click Next.
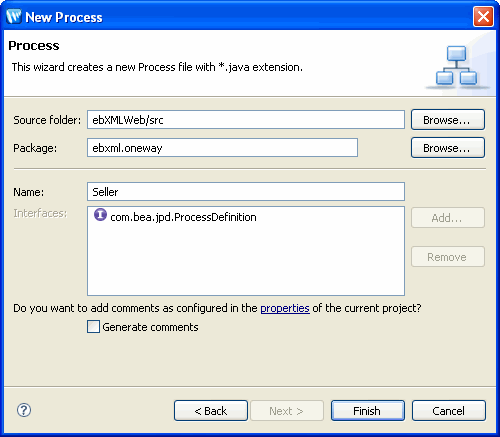
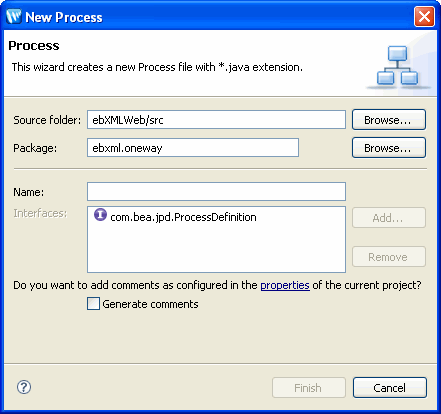
The New Process dialog box is displayed.
In the New Process dialog box, enter Seller in the Name field (see Figure 3-4).
Figure 3-4
New Process Dialog Box
Click Finish.
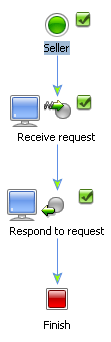
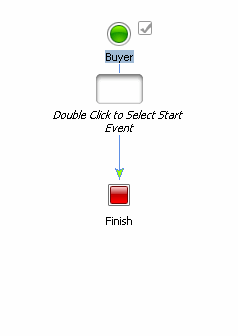
A new ebXML participant process file is created in your ebxml.oneway package in the Package Explorer pane and is displayed in Design view (see Figure 3-5).
Figure 3-5 Seller ebXML participant process
The ebXML participant process file is created pre-configured with the nodes and business process annotations needed to integrate easily with ebXML initiator business processes. For more information about ebXML participant process files, see Building ebXML Participant Business Processes.
In this example, we will not respond to the buyer process, so we can delete the Respond to request node: right-click on the node and select Delete from the drop-down menu.
In this example, instead of responding to the buyer process, we add a File control which will write out the incoming ebXML messages to a file. This File control is then added to the business process as a Control Send with Return node.
To Create the File Control and the Control Node
If the Data Palette is not visible in Oracle Workshop for WebLogic, choose Window > Show View > Data Palette from the Oracle Workshop for WebLogic menu.
Click on the Data Palette. A drop-down list of controls that represent the resources with which your business process can interact is displayed. Instances of controls already available in your project are displayed in the Controls tab.
Select File from the Integrations Controls drop-down menu.
The Insert Control: File window opens.
In the Insert File: Control dialog box do the following:
In the Field Name, type the variable name as File, this is used to access the new File control instance from your business process. The name you enter must be a valid Java identifier.
Click Next.
In the Create Control dialog box enter the following details:
In the Name field, enter File as the name of the new control file that will be created.
Click Next.
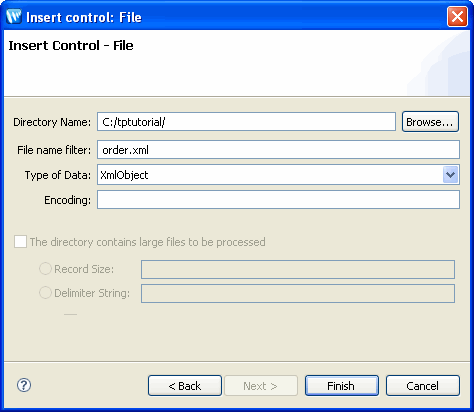
The Insert control - File dialog-box appears.
In the Insert control - File dialog-box enter the following.
In the Directory Name field, enter /tptutorial as the directory-name. This is the directory to which the message received by the Seller.java will be written. In this tutorial, we always use the tptutorial directory that you created in the
Creating the Read and Write Directories section as the directory to read from and write to.
In the File name filter field, enter order.xml as the file name This is the name of the file to which the message received by the Seller.java will be written.
Select XmlObject as the type of data contained in the received message from the Type of Data drop-down menu (see Figure 3-6).
Figure 3-6 File Control Properties
Click Finish.
The File control instance is added to your list of controls in the Data palette, and a control file corresponding to the File control (File.java) is added to the Package Explorerpane. For more information about File controls, see File Control.
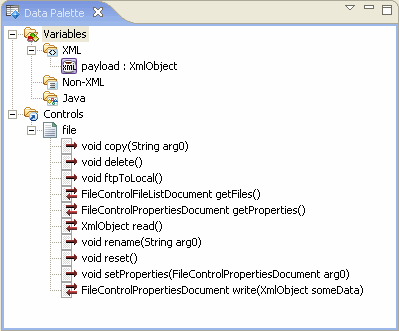
In the Data palette, under Controls expand the File control by clicking on the + next to it.
The methods associated with the File control are displayed (see Figure 3-7).
Figure 3-7 File Control Methods
" id="wp1094062"/>
Select the FileControlPropertiesDocument write(XmlObject someData)method.
Drag the selected method into Design view and drop it on the
" id="wp1094062"/>
" id="wp1059351"/> which appears immediately following the Receive request node.
A new Control Send with Return node named write is added to your business process. For more information about Control Send with Return nodes, see Interacting With Resources Using Controls.
The next step in our procedure is to configure the Control Node we just created with the correct variables and method assignments.
To Configure the Control Node
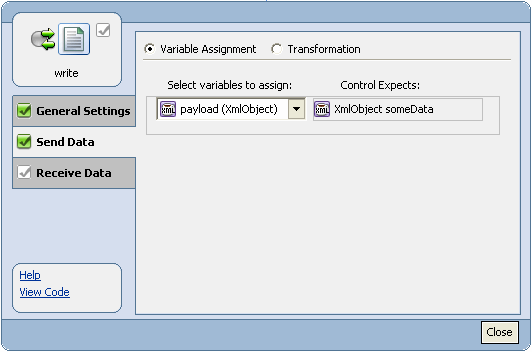
Double-click the new write node.
The write node builder is invoked.
Click Send Data.
From the Select variables to assign drop-down menu, select payload as the variable to assign to the write method (see Figure 3-8).
Figure 3-8 Configure Send Data
Click Close to close the node builder.
Select File > Save or enter Ctrl+S to save your work.
Your seller side ebXML process is now complete. The process is invoked when an XML message is received from the Buyer initiator process by the Receive request node, the Receive request node assigns the XML to a variable, and the write node writes the XML message to a file named order.xml via the File control.
Note:
The grey check box icon is there because the receive data tab of the node has not been configured which marks the node as incomplete. However, since the example is not receiving any data, no more configuration is necessary for the business process to run properly.
To View the ebXML Source view Parameters
The ebXML binding information and service name of the business process is displayed in the JPD Configuration pane in Source view. To view these properties:
Click the Source view tab.
Click on public class Seller implements com.bea.jpd.ProcessDefinition to display the JPD Configuration pane for the Seller class.
In the JPD Configuration pane, note the following:
In the process section, the binding is listed as ebxml.
In the ebxml section, the ebxml-service-name property is set to Seller. This is the name you gave your process and it corresponds to the eb:Service entry in the ebXML message envelope. It is also the name used by the initiator business process as the ebXML service name. This is the name that trading partners will use to identify this service, it also matches the initiator process with the participant process.
For more information about Source view ebXML process annotations, see ebxml Annotation.
We are now ready to test the Seller business process. Oracle Workshop for WebLogic provides a browser-based interface through which you can test the functionality of your business process. Using this Test view interface, you play the role of the client, invoking the business process's methods and viewing the responses.
To Test the Seller Process
If the Server view is not visible in Oracle Workshop for WebLogic menu, choose Window > Show View > Other > Server > Servers, and click Ok. A Server view is displayed.
On the Package Explorer pane, select and right-click the Seller.java business process.
Click Run As, and Run On Server.
In the Define a New Server dialog box, select Choose an existing server option and click Next.
The server is started, and the application is deployed on it. When Oracle WebLogic Server is running, the following indicator is visible in the Server view (see Figure 3-9).
Figure 3-9 Sever Status
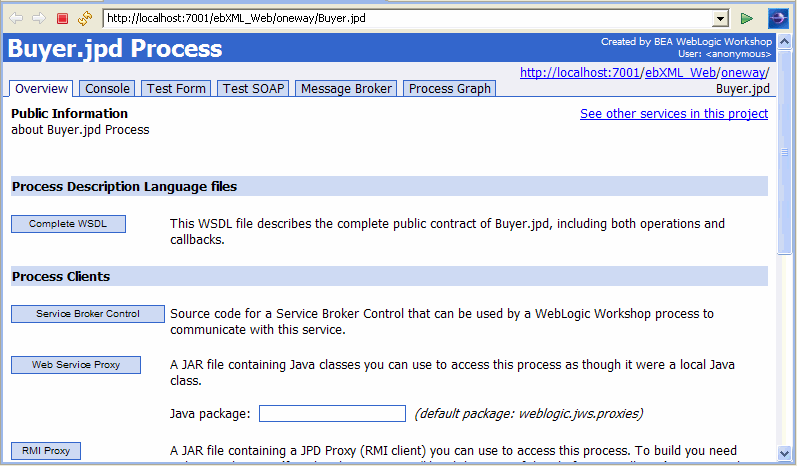
After the application is deployed, the Test Browser is displayed (see Figure 3-10).
Figure 3-10 Seller.jpd Process Test Browser
Click Test Form in the Test Browser window.
To enter test data, do one of the following:
Click Browse, and navigate to C:\myappstptutorialapps\ebXML\ebXMLWeb\WebContent\sampledata\sampleorder.xml.
Cut and paste the content of C:\myapps\tptutorialapps\ebXML\ebXMLWeb\WebContent\sampledata\sampleorder.xml, except for the first line of the file, into the xml variable (payload) field.
Click request.
The Test Form page refreshes to display a summary of your request parameters.
Click Refresh to refresh the summary.
Scroll down to the Operation request section to see the content of the sampleorder.xml file.
Using a file browser or command line tool, navigate to your C:\tptutorial directory.
It now contains a file named order.xml with identical content to that of sampleorder.xml. This file was written by the File control that you created and configured in the section
To Create the Seller Business Process File.
For more information about the different options in the Test Browser and how to use it to test your business processes, see Running and Testing Your Business Process.
Your Seller business process is now deployed and ready to accept ebXML messaged. By default the protocols specified in the default ebXML 2.0 binding will be used, so no additional configurations are required. In production scenarios however, you typically create a TPM service profile using the Oracle WebLogic Workshop Administration Console. For more information about creating service profiles, see Adding Service Profiles to a Service in Trading Partner Management.
Building the Buyer Business Process
The Buyer business process is the initiator of our ebXML conversation. After creating the Buyer business process, we will use an ebXML control to communicate with the Seller participator business process. This section contains the following procedures:
In the Package Explorerpane, right-click on ebxml.oneway and select New > Process.
The New Process dialog box opens (see Figure 3-11).
Figure 3-11 New Process
Since we are creating a initiator business process file this time and will use a ebXML file control to communicate with the participator process, we will create a default process file rather than an ebXML participant process file.
Enter Buyer in the Name field.
Click Finish.
A new Buyer.java file is added to your Package Explorer pane and displayed in Designview (see Figure 3-12).
Figure 3-12 Buyer Business Process
The Buyer.java file contains a Start node, a Start Event place holder and a Finish node.
Double-click on the Start Event place holder.
The Starting Event selection window is displayed.
Select Invoked via a Client Request and click Close.
A Client Request node is added as the Starting Event to your business process.
We will now configure the Client Request node with the correct methods and variable types.
To Configure the Client Request Node
Double-click the Client Request node.
The Client Request node builder is invoked.
In the General Settings tab:
Change the method name from clientRequest to startBuyer.
Click Add.
If not already selected, select the XML option.
Scroll down to the untyped XML types and select XmlObject.
Click OK.
The XmlObject parameter type is added to the pane.
Click Receive Data.
In the Receive Data tab:
Select Create New Variable... from the Select Variables to Assign drop-down menu.
The Create Variable window opens.
Enter order as the variable name.
Note that the type name XmlObject is preselected for you since this is the type you specified on the General Settings tab.
Click OK.
The new order variable is added to the Select variables to assign drop-down list.
It is now time to add the ebXML control which will be used to communicate with the Seller process. This control represents what would normally be the remote service we are trying to contact, although in this example, the service runs on the same machine as the Buyer process.
To Create the ebXML Control and Control Node
Click Menu on the Data Palette and from the drop-down list choose Integration Controls to display the list of controls used for integrating applications.
Note:
If the Data Palette view is not visible in Oracle Workshop for WebLogic, click Window > Show View > Data Palette from the menu bar.
Select ebXML.
The Insert Control: ebXML window opens.
In the Insert control: ebXML dialog box enter sellerControl as the name of the variable to use for the control. This name must be a valid Java identifier.
Click Next.
The Create Control wizard appears.
Enter SellerControl as the name of the new control file that will be created.
Click Next.
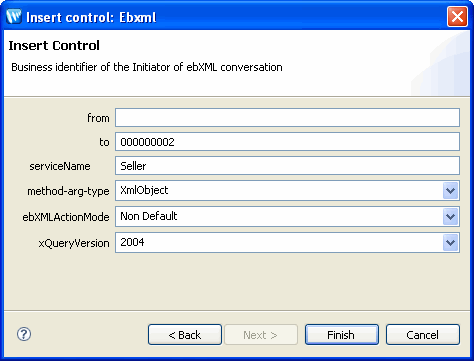
The Insert control: Ebxml dialog box appears.
In the Insert control: Ebxml dialog box, specify the following information:
Leave the from field blank. This will default to the 000000001 at runtime, the default trading partner.
Enter 000000002 in the to field. This sets the participating trading partner id as a static value.
Enter servicename as Seller.
select XmlObject as the type of data contained in the received message from the message-arg-type drop-down menu.
Accept the default setting for ebXMLActionMode and xQueryVersion (see Figure 3-13).
Figure 3-13 Ebxml Control Properties
Click Finish.
The ebXML control instance is added to your list of controls in the Data palette, and a control file (SellerControl.java) corresponding to the ebXML control is added to the Package Explorer pane. You can double-click on the control file (SellerControl.java) to open it in Design view and review the values which you just entered. For more information about ebXML controls, see ebXML Control.
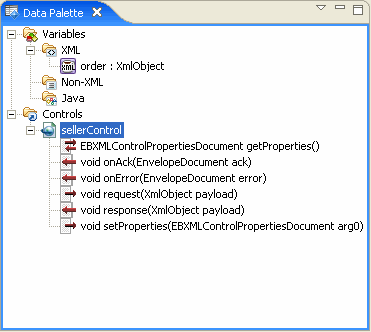
In the Data palette, expand the ebXML control (SellerControl) by clicking on the + next to it.
The methods associated with the ebXML control are displayed (see Figure 3-14).
Figure 3-14 ebXML Control Methods
Select the void request(XmlObject payload)method. The name of the method on this control must match the method name of the Receive request node in the participant process.
Drag the selected method into Designview and drop it on the
" id="wp1064726"/> which appears immediately following the Client Request node.
A new Control Send node named request is added to your business process.
We will now configure the request node with the correct variable assignment.
To Configure the Request Node
Double-click the new request node.
The request node builder is invoked.
Click Send Data.
From the Select variables to assign drop-down menu, select order as the variable to assign to the request method.
Click Close to close the node builder.
Select File > Save or enter Ctrl+S to save your work.
Your buyer side ebXML process is now complete. The process sends a message to the Seller business process which is then written to a file named order.xml via the File control in the Seller process.
To Test the Buyer Business Process
If the Server view is not visible in Oracle Workshop for WebLogic, choose Window > Show View > Other > Server > Servers, and click Ok. A Server view is displayed.
On the Package Explorer pane, select and right-click the Buyer.java business process.
Click Run As, and Run On Server.
In the Define a New Server dialog box, select Choose an existing server option and click Next.
The server is started, and the application is deployed on it.
After the application is deployed, the Test Browser is displayed (see Figure 3-15).
Figure 3-15 Buyer.Jpd Test Browser
" id="wp1095064"/>
Click Test Form in the Test Browser window.
To enter test data, do one of the following:
Click Browse, and navigate to C:\myapps\tptutorialapps\ebXML\ebXMLWeb\WebContent\sampledata\sampleorder.xml.
Cut and paste the content of C:\myapps\tptutorialapps\ebXML\ebXMLWeb\WebContent\sampledata\sampleorder.xml into the xml variable (payload) field.
Click startBuyer.
The Test Form page refreshes to display a summary of your request parameters.
Click Refresh to refresh the summary.
Confirm that the order.xml file was written out correctly to the C:\tptutorial directory by checking that the time stamp of the file is current.
This part of the tutorial is now complete. You have successfully sent an XML message over ebXML from one trading partner to another. The participant (Seller) process wrote the XML out to the file system.
Step 3: Selecting the Trading Partner Information Dynamically Through Typed XML
In this example we build on what you learned in the previous exercise,
Step 2: Sending an XML Message through an One-Way ebXML Exchange. You will learn how to specify the trading partner information dynamically using an XQuery selector rather than specifying it statically in the ebXML control. Then you will customize the ebXML control in the initiator (buyer) process and the participant process file (Seller) to use typed XML and business specific method names.
In this procedure, you create an ebXML participant business process which will accept typed XML data instead of the XmlObject variable you used in the previous example’s participant process. This section contains the following tasks:
To Create the SelectorSeller Business Process File
In the Package Explorer pane, go to ebXMLWeb > src.
Right-click src, and select New > Package.
The New Packagedialog box is displayed.
Enter the name ebxml.oneway.selector.
Click Finish.
The ebxml.oneway.selectorpackage appears under ebXMLWeb/src directory in the Package Explorer.
Right-click ebxml.oneway.selector package, then select New > Other.
In the New dialog box, expand WebLogic Integration and select ebXML Participant Process.
Click Next.
The New Process dialog box is displayed.
In the New Process dialog box, enter SelectorSeller in the Name field.
Click Finish.
A new ebXML participant process file is created in your ebxml.oneway.selector package in the Package Explorerpane and is displayed in Design view.
Delete the Respond to request node: right-click on the node and select Delete from the drop-down menu.
The next step involves configuring the Receive request node to accept XML data of a type that is specified in the Schemas which you imported into your application in
Importing the Tutorial Schemas.
To Configure the Receive Request Node
Double-click the Receive request node.
The Receive request node builder is invoked.
In the General Settings tab:
Change the method name from request to processOrder.
Select XmlObject payload.
Click Remove
Click Add.
If not already selected, select the XML option.
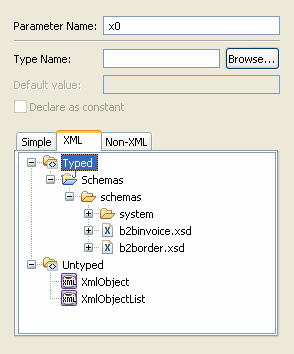
Expand Typed and go to Schemas > schemas and select b2border.xsd (see Figure 3-16).
Figure 3-16 Selecting Schemas
Expand the b2border.xsd by clicking on the + next to it.
Select Order from the expanded list.
Click OK
The OrderDocument parameter type is added to the pane.
Click Receive Data.
In the Receive Data tab:
Select Create New Variable... from the Select Variables to Assign drop-down menu.
The Create Variable window opens.
Enter order as the variable name.
Note:
The type of the variable is already specified to be com.bea.tutorial.order.OrderDocument which is what you specified in the preceding steps.
Click OK.
The new order variable is added to the Select variables to assign drop-down list.
Click Close.
You will add a file control to the business process file, which will write the order variable out to a file.
To Create the File Control and Control Node
Refer to the instructions in
To Create the File Control and the Control Node to create a new File control. To save time, you can also drag and drop File.java from the oneway package in the Package Explorer pane directly on to the Data Palette under Controls.
The control definitions you created earlier will be reused in a new instance for this business process.
To Configure the Control Node
Double-click the new write node.
The write node builder is invoked.
Click Send Data.
From the Select variables to assign drop-down menu, select order as the variable to assign to the write method.
Click Close to close the node builder.
Select File > Save or enter Ctrl+S to save your work.
This concludes the creation of the SelectorSeller business process.
To Test the SelectorSeller Process
Right-click SellectorSeller.java and select Run As > Run on Server. (For more detailed instructions refer back to,
To Test the Seller Process.)
After the application is deployed, the Test Browser is displayed.
To enter test data, do one of the following:
Click Browse, and navigate to C:\myapps\tptutorialapps\ebXML\ebXMLWeb\WebContent\sampledata\sampleorder.xml.
Cut and paste the content of C:\myapps\tptutorialapps\ebXML\ebXMLWeb\sampledata\WebContent\sampleorder.xml into the xml variable (payload) field.
Click processOrder
Confirm that the order.xml file was written out correctly to the C:\tptutorial directory by checking that the time stamp of the file is current
You are now ready to go on and create a SelectorBuyer initiator process.
Building the SelectorBuyer Business Process
For the initiator process in this example you use an XQuery selector to retrieve the trading partner ID dynamically rather than specifying it statically in the ebXML control as done in the previous example. This section contains the following tasks:
Right-click ebxml.oneway.selector package, and select New > Process.
Enter SelectorBuyer in the Name field.
Click Finish.
A new SelectorBuyer.java file is added to your Package Explorer pane and displayed in Designview.
The SelectorBuyer.java file contains a Start node, a Start Event place holder and a Finish node.
Double-click on the Start Event place holder.
The Starting Event selection window is displayed.
Select Invoked via a Client Request and click Close.
A Client Request node is added as the Starting Event to your business process.
We will now configure the Client Request node with the correct methods and variable types.
To Configure the Client Request Node
Double-click the Client Request node.
The Client Request node builder is invoked.
In the General Settings tab:
Click Add.
If not already selected, select the XML option.
Expand Typed and go to Schemas > schemas and select b2border.xsd.
Expand the b2border.xsd by clicking on the + next to it.
Select Order from the expanded list.
Click OK
The OrderDocument parameter type is added to the pane.
Click Receive Data.
In the Receive Data tab:
Select Create New Variable... from the Select Variables to Assign drop-down menu.
The Create Variable window opens.
Enter order as the variable name.
Note:
The type of the variable is already specified to be com.bea.tutorial.order.OrderDocument which is what you specified in the preceding steps.
Click OK.
The new order variable is added to the Select variables to assign drop-down list.
Click Close.
In the next step you add a ebXML control and configure this control with an XQuery selector.
To Create the ebXML Control
Click on the Data Palette and from the drop-down list choose Integration Controls to display the list of controls used for integrating applications.
Select ebXML.
The Insert Control: Ebxml dialog box displays.
In the Insert control: ebXML dialog box enter, enter selectorSellerControl as the name of the variable to use for the control. This name must be a valid Java identifier.
Click Next.
The Create Control wizard appears.
Enter SelectorSellerControl as the name of the new java file that will be created.
Click Next.
The Insert control: Ebxml dialog box appears.
In the Insert control: Ebxml dialog box, specify the following information:
Leave the from field blank. This will default to the 000000001 at runtime, the default trading partner.
Leave the to field blank. This will be determined at runtime by the XQuery selector which you will define in the next section.
Enter servicename as SelectorSeller.
select XmlObject as the type of data contained in the received message from the message-arg-type drop-down menu.
Accept the default setting for ebXMLActionMode and xQueryVersion
Click Finish.
The ebXML control instance is added to your list of controls in the Data palette, and a java file (SelectorSwllerControl.java) corresponding to the ebXML control is added to the Package Explorerpane. You can double-click on the java file to open it in Designview and review the values which you just entered.
You will now modify the control definition file of the ebXML control. In the next section, you change the method name, change the message type, and add an XQuery selector.
To Modify the ebXML Control Definition File
In the Data Palette, right-click on the ebXML selectorSellerControl.
Select Edit from the drop-down menu.
The SelectorSellerControl is displayed in Source view.
Renamerequest as processOrder in the Source view.
The method name now matches the name of the method on the participant business process. This method name corresponds to the eb:Action element in the ebXML message envelope.
Change the line void processOrder(XmlObject payload); to void processOrder(OrderDocument payload);
The tooltip editor displays a suggested package to import, select Import’OrderDocument‘(com.bea.tutoriat.order).
This ebXML control is now set up to use XML typed according to the schema you imported in
To Import the Tutorial Schemas rather than generic untyped XML.
Select processOrder in the Source view.
In the Propertiespane, expand EBXMLControl.EbxmlMethod and add the following value in the toselector:
If the Properties pane is not visible in Oracle Workshop for WebLogic, choose Window > Show View > Other > Workshop > Properties from the Oracle Workshop for WebLogic menu bar.
Select File > Save or enter Ctrl+S to save your work.
Close the SelectorSellerControl.java by clicking the x in the top right corner of the window.
The ebXML control is now configured to pick out the trading partner ID from the message according to the specifications of the XQuery statement you generated in the selector. The next step is to add a processOrder Control Send node to the business process.
To Create the processOrder Control Send Node
In the Data Palette, expand the selectorSellerControl by clicking on the + next to it.
Select the void processOrder(OrderDocument payload) method. The name of the method on this control must match the method name of the Receive request node in the participant process.
Drag the selected method into Designview and drop it on the which appears immediately following the Client Request node.
A new Control Send node named processOrder is added to your business process.
To specify the order variable as the input variable:
In the Data Palette, select order from the list of XML variables.
Drag and drop it onto the processOrder Control Send node.
This concludes the creation of the SelectorBuyer business process. In this section, you learned how to customize the participant and initiator processes to use typed XML and custom method names. You also learned how to use and XQuery selector to extract the target trading partner ID form the payload message rather than declaring it statically. The next section describes how to test your business processes.
To Test the SelectorBuyer Process
If the Server view is not visible in Oracle Workshop for WebLogic menu, choose Window > Show View > Other > Server > Servers, and click Ok. A Server view is displayed.
On the Package Explorerpane, select and right-click the SelectorBuyer.java business process.
Click Run As, and Run On Server.
In the Define a New Server dialog box, select Choose an existing server option and click Next.
Click Finish.
After the application is deployed, the Test Browser is displayed.
Click Test Form in the Test Browser window.
To enter test data, do one of the following:
Click Browse, and navigate to C:\myapps\tptutorialapps\ebXML\ebXMLWeb\WebContent\sampledata\sampleorder.xml.
Cut and paste the content of C:\myapps\tptutorialapps\ebXML\ebXMLWeb\WebContent\sampledata\sampleorder.xml into the xml variable (payload) field.
Click clientRequest.
Confirm that the order.xml file was written out correctly to the C:\tptutorial directory by checking that the time stamp of the file is current.
Step 4: Sending Raw Data (Binary File) Through an ebXML Exchange
In this example, we will use ebXML to send binary data between two trading partners through a Message Broker channel. This example builds on the examples describes in previous sections. If at any time you need more information about how to complete a task that was previously explained, refer back to the preceding sections. This section contains the following procedures:
This example builds on what you have learned in the previous examples. If at any time you need more detailed instructions, refer back to
Building the Seller Business Process. This section contains the following tasks:
In the Project Explorer, expand ebXMLWeb and select src folder.
Right-click src folder, then select New > Java Package.
Enter ebxml.oneway.binary, as the name.
Click Finish.
Create a new ebXML participant process named BinarySeller under the ebxml.oneway.binaryPackage.
Delete the Respond to request node.
Modify the Receive request node as follows:
In the General Setting tab, remove the XmlObject parameter data type.
Click Add.
Select the Non-XML option.
Go to Untyped and select RawData parameter data type.
Create a new variable named data of type RawData.
Click Close.
Create a new File control with the following values specified:
Variable name: file
New control name: File
directory-name: /tptutorial/binary-in
Type of Data: RawData
Drag and drop the write method (FileControlPropertiesDocument write(RawData someData) of the file control after the Receive request node in the business process.
Double-click the write node and on the Send Data tab, specify data as the variable to assign to the write method.
To Test the BinarySeller Business Process
On the Package Explorer pane, select and right-click the BinarySeller.java business process.
Use any binary file (for example an image file) as binary payload test data.
Confirm that the data.bin file was written out correctly to the C:\tptutorial\binary-in directory by checking that the time stamp of the file is current.
Building the BinaryBuyer Business Process
For the initiator side of this example, the process will look very similar to those in previous examples, except that it will be invoked through a subscription to a file event which will cause the process to pick up a file from a directory. This section contains the following tasks:
In the ebxml.oneway.binary package, create a new business process named BinaryBuyer.
Double-click the Start Event and select the Subscribe to a Message Broker channel and start via an event (Timer, Email, File, Adapter, etc.) option.
Click Close.
Before you can start to configure the Message Broker Subscription node, you need to create a subscription channel file to which the subscription node can listen for events.
To Create the Channel File
In the Package Explorer pane select ebxml.oneway.binary.
Right-click on the ebxml.oneway.binary folder.
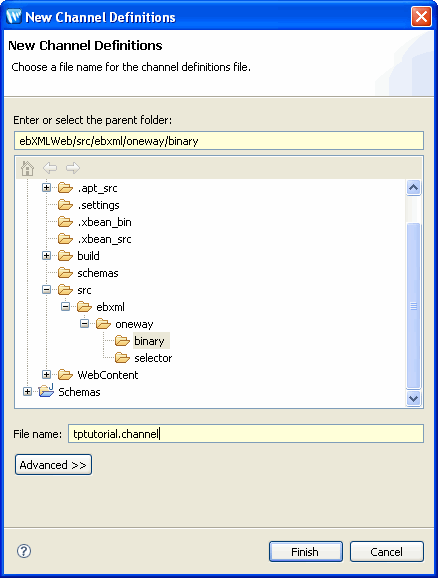
Select New > Channel Definitions.
Enter tptutorial.channel as the file name (see Figure 3-17).
Figure 3-17 New Channel Definitions
Click Finish.
The new channel file is created, added under the ebxml.oneway.binary Package in the Package Explorer pane, and displayed on screen. An application build is also started automatically to build the Schemas project.
In the channel file code, locate the following line: <channel name="SampleRawDataChannel" messageType="rawData"/>
Remove the comment tags <!-- and --> preceding and following the line.
Select File > Save or enter Ctrl+S to save the channel file.
The Schemas project builds again.
Close the Channel file.
The sample channels defined in the file are now available for selection in the subscription node.
To Configure the Subscription Node
Double-click the Subscription node.
The Subscription node builder is invoked.
On the General Settings tab, select the SampleRawDataChannel from the Channel name drop-down list.
In the Receive Data tab:
Create a variable named data of type RawData
Select it to be the variable to assign to the subscription method.
Click Close.
You have now completed the configuration of your subscription node.
In the next section, you create a ebXML control to be used to communicate with the participator business process.
ebxml-service-name: BinarySeller (must match the value in the participant process)
from: leave blank
to: 000000002
method-arg-type: RawData
Click Finish.
From the Data Palette, drag and drop the void request(RawData payload) method on the target appearing in the business process below the Subscription node.
From the Data Palette, drag and drop the data variable in the Non-XML list onto the request node.
The BinaryBuyer business process is now complete, run and test it to ensure that it is working properly.
To Test the BinaryBuyer Business Process
If the Server view is not visible in Oracle Workshop for WebLogic menu, choose Window > Show View > Other > Server > Servers, and click Ok. A Server view is displayed.
On the Package Explorer pane, select and right-click the BinaryBuyer.java business process (For more detailed instructions refer back to,
To Test the Seller Process).
After the application is deployed, the Test Browser is displayed, click Test Form in the Test Browser window.
Use an image file as the binary payload test data.
Click subscription.
Confirm that the data.bin file was written out correctly to the C:\tptutorial\binary-in directory by checking that the time stamp of the file is current.
Note:
Before you test your business process, make sure that you have completed the
To Create the Channel File section. If you do not create a channel file before testing the process, you will encounter an error.
Creating a File Event Generator
In this section you create the file event which will invoke the BinayBuyer business process when a raw data type file is dropped in a directory.
To Create the File Event
Create the following new directory on your hard drive: C:\tptutorial\errors
If not already running, start your Oracle WebLogic Server.
After the Server is running, open the Oracle WebLogic Administration Console by selecting Run > WebLogic Integration > WebLogic Integration Administration Console from the Oracle Workshop for WebLogic menu.
You have completed creating the File Event. For more information about the Oracle WebLogic Administration Console and Event Generators, see Event Generators.
To Test the Sending Raw Data Example.
On the Package Explorer pane, select and right-click the BinaryBuyer.java business process (For more detailed instructions refer back to,
To Test the Seller Process).
Put a binary file in the binary-out directory you created earlier. In a few seconds it should disappear and a file named data.bin should appear in the binary-in directory.
Note:
About Message Tracking: In this and previous examples, all messages sent via ebXML are tracked in the tracking database. In the Oracle WebLogic Administration Console, navigate to Trading Partner Management > Message Tracking to look at the messages. Basic message information and payload information are both tracked. You can also navigate from the message to the process that created or consumed the message. For more information see, Trading Partner Management.
Step 5: Creating a Roundtrip ebXML Conversation
This example illustrates how to implement an ebXML conversation in which a request message (order request) is followed by a response message (invoice). The first part of the conversation is identical to the one-way scenario you developed earlier. In this example, you add a Client Response node to the participant business process and use the ebXML control callback for the response message. This section contains the following procedures:
This example builds on the previous examples that you have completed. If at any time you need more detailed instructions, refer back to
Building the Seller Business Process to complete the following sections:
To Create the Business Process File and Configure the Receive Request Node
In the Package Explorer pane, expand ebxmlWeb and select src.
Right-click src, and select New > Package.
The Java Packagedialog box is displayed.
Enter ebxml.roundtrip in the Name field and click Finish.
The ebxml.roundtrip Package appears under ebxmlWeb\src.
In the roundtrip Package, create a new ebXML participant process named RoundtripSeller.
Double-click the Receive request node and configure as follows:
In the General Setting, tab rename the method to processOrder.
Remove the XmlObject payload parameter type.
Click Add and from the XML list select the parameter type Order (from b2border.xsd).
In the Receive Data tab, create a new variable named order and select it as the variable to be assigned to the method.
Click Close.
For illustration purposes, this example simplifies the order/invoice process.The seller will again write the incoming order out to file and for the response, the seller will read an invoice document from the file system. The invoice will be the same for each order. In production scenarios, the seller process could instead read the information from a database, obtain it from a message queue, or get it from a backend application as an event from an Application View control. The process could also delegate processing of the order to a subprocess, which is illustrated in the next example
Step 6: Implementing the Public/Private Pattern.
To Create the File Controls and Configure the Control Nodes
Add a new File control named file and configure it to write out order.xml to C:\tptutorial\
Note:
To save time, you can drag and drop the File.java in the ebxml.oneway folder onto the Data Palette. This will create a new instance of the File.java control.
Drag and drop the FileControlPropertiesDocument write(XmlObject someData) method to the target that appears below the Receive request node.
Double-click on the write node.
Select Send Data and select Order variable.
Create a new directory on your hard drive named C:\tptutorial\invoice.
Copy the file C:\myapps\tptutorialapps\ebxml\ebxmlWeb\WebContent\sampledata\sampleinvoice.xml to the C:\tptutorial\invoice directory
Rename sampleinvoice.xml to invoice.xml.
Create a second new File control named InvoiceFile and configure it to read an XmlObject (invoice.xml) from the <Home Directory>\tptutorial\invoice directory by using the following configurations:
Field name:InvoiceFile
File name filter: invoice.xml
Type of Data: XmlObject
directory-name: /tptutorial/invoice
Drag and drop the XmlObject read() method from Invoicefile control to the target that appears below the write node.
Double-click the read node.
Click Receive Data.
The method expects untyped XML (XmlObject) but our invoice.xml file contains typed XML so we will need to do a simple transformation between the two.
Select the Transformation Option.
Click Select Variable > Create New Variable....
The Create Variable window opens.
Enter invoice as variable name.
From the XML list, expand b2binvoice.xml and select Invoice.
Click OK.
The Create Variable window closes and your new variable is listed in the variable pane of the node builder.
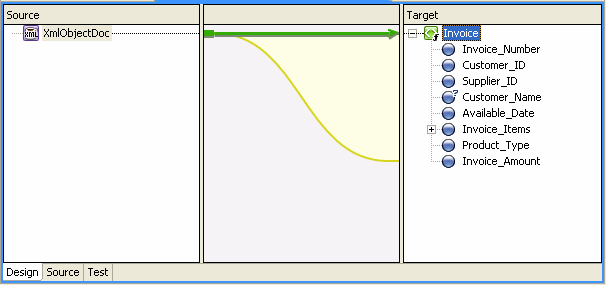
Click Create Transformation.
The Transformation Tool window opens.
Drag and drop the XmlObjectDoc in the Source pane to the Invoice root in the Target pane (see Figure 3-18).
Figure 3-18 Transformation Tool
An XQuery transformation is created a corresponding transformation control is created and stored in the RoundtripSellerTransformation.java file, which was created in your Package Explorer pane when you opened the Transformation tool.
Close the Transformation Tool window by clicking on the x in the top of the Transformation Toolwindow.
Click Yes in the Save Resource dialogue window.
Click Close in the node builder.
The transformation you created in the preceding steps, only transforms from one data type to another. In production scenarios, you would use the Transformation Tool to convert from the backend system format to the format expected by the trading partner. You can also use the Transformation Tool to manipulate data. For more information about the Transformation Tool, see Guide to Data Transformation.
The next step in this example is to configure the Respond to request node.
To Configure the Respond to Request Node
Double-click the Respond to request node.
Rename the method name to onInvoice.
Remove the XmlObject payload parameter type.
Click Add, and from the XML list, select the parameter Invoice from the b2binvoice.xsd schema.
Click Ok.
Click Send Data.
Select invoice from the Select variables to assign drop-down list.
Click Close.
SelectFile > Save or enter Ctrl+S to save.
You have completed building the seller (participant) side of this example. The seller will receive an order document from the buyer, write it out to file, read in an invoice file and send it to the buyer. The name of the ebXML service created for this transaction is RoundtripSeller. The message exchange will be carried out as a single ebXML conversation. The Trading Partner Integration (TPI) system automatically manages the ebXML conversation and ensures that the same conversation ID is used within the same participant process instance.
To Deploy the RoundtripSeller Business Process
On the Package Explorer pane, select and right-click the RoundtripSeller.java business process.
Click Run As, and Run On Server.
The server is started, and the application is deployed on it.
After the application is deployed, the Test Browser is displayed.
Close the Test Browser window.
Testing the process at this point would create an exception on the callback method since you have not yet created the initiator process. That is why you only deploy the process so that it will run properly when you test the initiator process later on.
Building the RoundtripBuyer Business Process
This section builds on the tasks that you have learned in previous examples. If at any time you need more detailed descriptions, refer back to
Building the Buyer Business Process while completing the following tasks:
Save your work by selecting File > Save or enter Ctrl+S
Close the ebXML Source view by clicking the x in the top right corner of the window.
You have now completed the roundtripSeller (ebXML) control configuration. In the next step, you create control nodes associated with the methods of your ebXML control.
To Create and Configure the ebXML Control Nodes
In the Data Palette, expand the roundtripSeller (ebXML) control.
Drag and drop the void processOrder(OrderDocument payload) method to the target that appears below the Client Request node.
Drag and drop the order: OrderDocument variable under the XML list on the Data Palette onto the processOrder node.
Drag and drop the void onInvoice (InvoiceDocument payload) callback to the target that appears below the processOrder node.
Double-click the onInvoice node.
Click Receive Data.
Select Create New Variable... from the Select variables to assign drop-down list.
Create a new variable named invoice.
Click OK.
Click Close.
Create a new File control named BuyerFile and configure it to write out invoice.xml to the <Home Directory>\tptutorial\buyer directory by using the following configurations:
Field name: File
Name: BuyerFile
Directory-name: /tptutorial/buyer
Note:
Create a new directory on your hard drive named C:\tptutorial\buyer.
File name filter: invoice.xml
Type of Data: XmlObject
In the Data palette, under Controls expand the File control and select the FileControlPropertiesDocument write(XmlObject someData)method.
Drag the selected method into Design view and drop it below the OnInvoice node.
Double-click the new write node.
The write node builder is invoked.
Click Send Data and select invoice variable.
Click Close
Right-click on the onInvoice node and select Add Timeout Path.
Select the OnTimeout Path and in the JPD Configuration pane configure the following properties:
duration: 10s
retry: 5
You have completed adding the controls. The next step is to add a Client Response node and configure it to return the contents of the invoice variable.
To Create and Configure the Client Response Node
Drag and drop a Client Response node from the Node Palette to the target that appears below the onInvoice node.
Double-click the Client Response node.
Change the method name to onBuyerComplete.
Click Add and select the parameter Invoice (under b2binvoice.xsd) from the XML list.
Click Send Data.
Select the invoice variable from the Select variables to assign drop-down list.
Click Close.
The buyer side of this example is almost complete, but you have not yet specified the ID of the trading partner. In the previous examples, you provided it as a static value in the ebXML control and also configured the control to pick the ID out at runtime from the payload. In this example, you specify the ID in a process XML variable using an XQuery selector.
To Specify the Trading Partner ID in an XML Variable
In the Data Palette, click on roundtripSellerControl.
In the Annotations pane, locate the ebxml attribute section.
In the previous examples, we specified the ebXML attributes in the control definition (the Java file). The values of those attributes apply wherever the control is used. Here you specify the control instance attributes, which only apply to the instance of the control declared in this business process.
In the ServiceName filed, enter RoundtripSeller.
Note:
This value has to be specified again although it exists in the controls definition file. This is because any required fields in the configuration will not be inherited from the controls definition file but instead needs to be specified in each instance of the control.
In the to-selector field, enter declare namespace ns0="bea.com/tutorial/order"data($order/ns0:Supplier_ID).
The buyer side is now complete. You can run and test your processes using the Oracle WebLogic Test Browser.
To Test the Business Processes
On the Package Explorer pane, select and right-click the RoundtripBuyer.java business process.
Click Run As, and Run On Server.
The server is started, and the application is deployed on it.
After the application is deployed, the Test Browser is displayed.
Select Test Form
In the Test Form page, click Browse and enter <Home Directory> \myapps\tptutorialapps\ebXML\ebXMLWeb\sampledata\sampleorder.xml into the xml variable (payload) field.
Click startBuyer.
Confirm that the Supplier_ID field in the test data has the correct trading partner ID (000000002).
Click the Refresh link to see the callback method.
Confirm that the order.xml file was written out correctly to the C:\tptutorial directory by checking that the time stamp of the file is current.
Confirm that the invoice.xml file was written out correctly to the C:\tptutorial\buyer directory by checking that the time stamp of the file is current.
Step 6: Implementing the Public/Private Pattern
This example illustrates how to use subprocesses to implement the public/private pattern. You can use this pattern to keep the details of backend integration confined to a private process definition and keep the public process definitions dedicated to trading partner interaction. This example contains the following procedures:
In this example we reuse some of the files that you have created in the previous examples.
In the Package Explorer pane, expand ebxmlWeb and select src.
Right-click src, and select New > Package.
The Java Package dialog box is displayed.
Enter ebxml.publicprivate in the Name field and click Finish.
The ebxml.publicprivate package appears under ebxmlWeb\src.
Click on the RoundtripBuyer.java in the ebxml.roundtrip folder and drag it to the publicprivate folder while holding down your Ctrl key.
Release your mouse button.
A copy of the RoundtripBuyer.java file is created in the publicprivate folder.
Note:
Whenever you duplicate a business process file, the new copy still reference the same (old) controls, even if you duplicate folders which include control files.
Right-click on the new business process and select Refactor > Rename.
Note:
You may have to stop the Oracle WebLogic Server before you can rename the business process. To do so, select Tools > WebLogic ServerStop > WebLogic Server.
Enter PublicBuyer and click OK.
Right-click on PublicBuyer and select Generate > Process Control.
Click Ok.
A new control definition file (PublicBuyerPControl.java) is created in your publicprivate folder. This control can be used in other processes to invoke the PublicBuyer.java business process. You use this control in the PrivateBuyer business process to invoke the PublicBuyer process.
Right-click on the onInvoice node and select Add Timeout Path.
Select the OnTimeout Path and in the JPD Configuration pane, configure the following properties:
duration: 10s
retry: 5
Create a new File control named BuyerFile and configure it to write out invoice.xml to the <Home Directory>\tptutorial\publicprivate directory by using the following configurations:
Note:
Create a new directory on your hard drive named C:\tptutorial\publicprivate.
Field name: File
Name: PublicFile
Directory-name: /tptutorial/publicprivate
File name filter: publicinvoice.xml
Type of Data: XmlObject
In the Data palette, under Controls expand the File control and select the FileControlPropertiesDocument write(XmlObject someData) method.
Drag the selected method into Design view and drop it below the OnInvoice node.
Double-click the new write node.
The write node builder is invoked.
Click Send Data and select invoice variable.
Click Close.
Building the PrivateBuyer Business Process
This section builds on the tasks you learned in previous examples. If at any time you need more detailed information, refer back to
Building the Buyer Business Process while completing the following tasks:
Create a new business process in the ebxml.publicprivate folder named PrivateBuyer.
Double-click Start Event and select Invoked via a Client Request node.
Configure the Client Request node according to the following:
Method name: startPrivateBuyer
Expected parameter type: Order from the b2border.xsd schema under XML list.
Receive data tab: create a new XML variable named order.
Add a Client Response node from the Node Palette.
Configure the Client Response node according to the following:
Method name: onPrivateBuyerComplete
Expected parameter type: Invoice from the b2binvoice.xsd schema under XML list.
Send Data tab: create a new XML variable named invoice of type Invoice and specify it to be assigned to the method.
Drag and drop the PublicBuyerPControl.java from the Package Explorer pane onto the Data Palette.
An instance of the publicBuyerPControl is added to your Controls list in the Data Palette.
Expand the new process control.
Drag and drop the startBuyer method onto the target that appears after the Client Request node.
Drag and drop the order variable from the Data Palette under the XML list onto the startBuyer node.
Drag and drop the onBuyerComplete method from the Controls list in the Data Palette onto the target that appears after the startBuyer node.
Drag and drop the invoice variable from the Data Palette under the XML list onto the onBuyerComplete node.
Click Save.
Right-click on the onBuyerComplete node and select Add Timeout Path.
Select the OnBuyerComplete Path and in the JPD Configuration pane, configure the following properties:
duration: 10s
retry: 5
The buyer side business processes are now complete.
In the ebxml.publicprivate folder, create a new business process named PrivateSeller.
Configure it to be invoked by a Client Request node.
Configure the Client Request node as follows:
Method name: privateProcessOrder
Expected variable type: Order from the b2border.xsd schema.
Receive Data tab: Create a new variable named order of type Order and specify it to be assigned to the method.
Add a Client Response node from the Node Palette to the business process, following the Client Request node.
Configure the Client Response node as follows:
Method name: onPrivateInvoice
Expected variable type: Invoice from the b2binvoice.xsd schema.
Send Data tab: create a new variable named invoice of type Invoice and specify it to be assigned to the method.
There are several options for processing a private process. Since this example is for illustration purposes only, you use a simple file control to read and write the data from and to the file directory system.
Drag and drop File.java from the ebxml.oneway folder in the Package Explorer pane onto the Data Palette.
Drag and drop the FileControlPropertiesDocument write method onto the target that appears below the Client Request node.
Double-click the write node.
Click Send Data and select the order variable from Select variable to assign.
Drag and drop InvoiceFile.java from the ebxml.roundtrip folder in the Package Explorer pane to the Data Palette.
Drag and drop the read method to the target that appears below the write node.
Double-click the XMLObject read() node.
Double-click the read node.
Click Receive Data.
The method expects untyped XML (XmlObject) but our invoice.xml file contains typed XML so we will need to do a simple transformation between the two.
Select the Transformation Option.
Click Select Variable and select invoice from the drop-down menu.
Click Create Transformation.
The Transformation Tool window opens.
Drag and drop the XmlObjectDoc in the Source Schema pane to the Invoice root in the Target Schema pane.
An XQuery transformation is created a corresponding transformation control is created and stored in the PrivateSellerTransformation.java file, which was created in your Package Explorer pane when you opened the Transformation tool.
Close the Transformation Tool window by clicking on the x in the top right corner of the window.
Click Yes in the Save Before Closing dialogue window.
Click Close in the node builder.
Save your work.
Right-click on PrivateSeller.java and select Generate > Process Control.
You have completed building the PrivateSeller business process. In the next section, you will create the public process for the seller side of the conversation.
Building the PublicSeller Business Process
To create the PublicSeller business process, you re-use some of the files that you created in the previous example. You can refer back to the detailed instruction in
Building the Seller Business Process to complete the tasks in this section.
Drop and drag the RoundtripSeller.java file from the ebxml.roundtrip folder to the ebxml.publicprivate folder while holding down your ctrl key.
Right-click on the new process file and select Refactor > Rename.
Enter PublicSeller.
Double-click on PublicSeller.
Click the Source view tab.
In the Annotations pane, change the ebxml-service-name to PublicSeller.
Click Design view.
Delete the write node.
Delete the read node
In the Data Palette Controls section, delete all three control instances (file, invoiceFile, and transformations).
Drag and drop the PrivateSellerPControl.java file from the Package Explorer pane onto Data Palette.
Expand the privateSellerPControl in the Data Palette.
Drag and drop the privateProcessOrder method onto the target that appears just below the Receive request node.
Drag and drop the order variable from the XML list in the Data Palette onto the privateProcessOrder node.
Drag and drop the onPrivateInvoice method onto the target that appears just below the privateProcessOrder node.
Drag and drop the invoice variable from the XML list in the Data Palette onto the onPrivateInvoice node.
Right-click on the onPrivateInvoice node and select Add Timeout Path.
Select the OnTimeout Path and in the JPD Configuration pane, configure the following properties:
duration: 10s
retry: 5
You have completed the seller side of the conversation. The public process receives a message via ebXML and passes it on to the private process. When the private process responds, it calls back to the public process, which returns the invoice information via ebXML to the initiating trading partner.
You need to do one final adjustment before running and testing this example:
Double-click on PublicBuyer.java.
In the Data Palette, select the roundtripSellerControl.
In the Annotaion pane, change the ebxml-service-name to PublicSeller to match the participant side.
Testing the Public/Private Pattern Example
Open PublicSeller.java.
Click Run As > Run On Server.
Switch back to Oracle Workshop for WebLogic and open PrivateBuyer.java.
Click Run As > Run On Server.
The server is started, and the application is deployed on it.
After the application is deployed, the Test Browser is displayed.
Click Test Form.
To enter test data, do one of the following:
Click Browse, and navigate to C:\myapps\tptutorialapps\ebXML\ebXMLWeb\sampledata\sampleorder.xml.
Cut and paste the content of C:\myapps\tptutorialapps\ebXML\ebXMLWeb\sampledata\sampleorder.xml into the xml variable (payload) field.
Refresh the browser after a few seconds. The log entry for callback.onPrivateBuyerComplete will have the content of the response with the Invoice document.
Confirm that the order.xml file was written out correctly to the C:\tptutorial directory by checking that the time stamp of the file is current.
Confirm that the invoice.xml file was written out correctly to the C:\tptutorial\publicprivate directory by checking that the time stamp of the file is current.
Step 7: Using the TPM Control and Callbacks
This example illustrates how to obtain trading partner information from the Trading Partner Management (TPM) repository at runtime by using the TPM control. It will also show you how to use the onAck callback of the ebXML control. In the example you send an ebXML message and wait for the ebXML acknowledgement. If the acknowledgement times out, for example, because the remote partner is offline, and the TPM protocol binding for both local and remote trading partners have “once and only once” or “at least once” delivery schematics, an email alert is sent to that remote trading partner. You obtain the email address by querying the TPM database using a TPM control.
Create a new package named tpm under the root ebxmlWeb/src of your project.
Add a new process file named BuyerAlert.
Configure the business process to be invoked by a Client Request node.
Configure the Client Request node as follows:
In General Settings tab: add Parameter Types: XmlObject and String
Receive Data tab: Create a new XmlObject variable named payload and a new String variable named partnerId. Select them to be assigned to the corresponding methods.
Click Close.
Add an ebXML control and configure it as follows:
Field Name: sellerControl
Name: SellerControl
ebxml-service-name: use any value that does not correspond to an actual deployed participant service
Accept defaults for all other fields
From the Data Palette, drag and drop the request method of the sellerControl onto the target that appear below the Client Request node.
Drag and drop the payload variable onto the request node.
Drag and drop the onAck callback onto the target that appears below the request node.
This callback will occur when the ebXML message sent in the previous step is acknowledged. In case the acknowledgement does not arrive, you add logic in the next steps that alerts the trading partner.
Right-click on the onAck node.
Select Add Timeout Path from the drop-down menu.
In the JPD Configuration pane, for the timer, provide a duration value of 10 seconds by typing 10s.
To Create and Add the TPM Control to the Process
Create a new TPM control by selecting Integration Controls > TPM in the Controls section of the Data Palette.
Enter tpm as the variable name.
Click Finish.
For more information about the TPM control, see TPM Control.
Expand the new TPM control.
Drag and drop the TradingPartnerDocument getBasicProperties(String partnerId) onto the target that appears in the timeout path below the timer.
Double-click the getBasicProperties node.
Click Send Data.
Select partnerId from the Select variables to assign drop-down list.
Click Receive Data.
Create a new variable named basicPartnerInfo of type TradingPartnerDocument and specify it to be assigned to the method.
Click Close.
To Create and Add an Email Control to the Business Process
Select Email from the Integrations Controls drop-down menu in the Data Palette.
Configure the Email control as follows:
Field Name: alert
Name: Alert
SMTP host: <your SMTP host name, e.g. mail.mycompany.com>
For more information about the Email control, see Email Control.
Expand the new Email control.
Drag and drop the sendEmail method onto the target that appears after the getBasicProperties node in the timeout path.
Double-click the sendEmail node.
Click on Send Data.
Select the Transformation option.
Click Select Variable and select basicPartnerInfo.
Click Create Transformation.
Drop and drag the email leaf from the Source Schema onto the arg1 (corresponds to the email ‘To’ filed) leaf in the Target Schema.
Right-Click on arg4 (corresponds to the email ‘Subject’ field).
Select Create Constant.
Enter Problem Sending Order.
Click OK.
Right-Click on arg5 (corresponds to the email body).
Select Create Constant.
Enter We encountered a problem while sending you an order.
Click OK.
Close the Transformation Tool by clicking the x in the top right corner.
Click Yes in the Save Before Closing? dialogue.
Click Close in the node builder.
The last step in this example is to specify the ID of the target trading partner in our ebXML control. In this example, you use the setProperties method of the control to accomplish this.
To Specify the Target Trading Partner ID
Select the setProperties method under the ebXML control in the Data Palette.
Drop and drag the method onto the target that appear between the Client Request node and the request node.
Double-click on the setProperties node.
Click Send Data.
Select the Transformation option.
Select partnerId as the variable.
Click on Create Transformation.
Drag the string variable from the Source Schema pane to the ‘to’ element in the Target Schema pane.
Close and Save your transformation.
Close the node builder
Before you can test the example, you need to specify the email address in the trading partner profile.
To Specify the Email Address for the Trading Partner Profile
If not already running, start your Oracle WebLogic Server.
After the Server is running, open the Oracle WebLogic Administration Console by selecting Run > WebLogic Integration > WebLogic Integration Administration Console.
In the Email field, enter you email. This is where the alert messages will be deliver.
Click Submit.
Close the console.
Testing the BuyerAlert Business Process
Select BuyerAlert.java.
Click Run As > Run On Server.
Test the BuyerAlert business process.
Specify any XML data as the payload.
Enter 000000002 for the string parameter.
After the process completes, check your email for the alert message.
These emails where sent since an error occurred and triggered the email control to send an email to the address you specified when you set up the control.
Step 8: Setting Partner ID Dynamically Based on Directory Name
In this example you look at the already built application which was distributed with the zipped archive that contained this tutorial (see,
Step 3: Install the Tutorial Files). This example demonstrates how to use the name of a sub-directory on your hard drive as the partner ID and set it dynamically using the setProperties method in the ebXML control. This example contains the following sections:
In this example you begin with looking at the initiator side of the application. Use the skills you learned in previous sections to complete the following tasks:
Create the following two directories on your hard drive:
C:\tptutorial\binary-out\dynamic\000000002
C:\tptutorial\binary-in\dynamic\000000001
Create a new package under ebxmlWeb/src, and name it as ebxml.oneway.binary.advance.
Right-click on ebxml.oneway.binary.advanced, and select Import from the drop-down menu.
The Import dialog box is displayed.
In the Import dialog box, select File System and click Next.
In the File System window, click Browse next to From directory: and navigate to the advanced folder in the [unzip location]\tptutorialapps\ebxml\ebxmlWeb\src\ebxml\oneway\binary directory where [unzip location] is the location where you unzipped the tutorial archive in
Step 3: Install the Tutorial Files.
Click Select All.
Click Finish.
In the Package Explorerpane, expand the ebxml.oneway.binary.advanced folder.
Double-click on DynamicBinaryBuyer.java
DynamicBinaryBuyer.java opens in Design view.
To Review the Configuration of the DynamicBinaryBuyer Process
This application uses the name of a sub directory as the partner ID and sets it dynamically using the setProperties method in the ebXML control. You can double-click on any of the nodes to note the following:
The business process is invoked by a RawData message coming through on the channel which the starting event subscribes to through the Subscription node.
The Extract partner id node contains custom Java code which extracts the partner id from the incoming message. To learn about writing custom Java code in business processes, see Writing Custom Java Code in Perform Nodes.
The setProperties node takes the trading partner ID and assigns it to a string variable which corresponds to the ‘to’ parameter of the ebXML envelope.
The request sends the message to the trading partner.
In the Package Explorer pane, double-click on the \Schemas\src\tptutorial.channel file.
The channel file opens in Design view.
Go to the Source view and add the following line to your channel file:
This line specifies a new channel which listens messages that are sent using event a File event generator. All event generators and some applications send metadata with messages.
The next step in the process is to add a new rule in the File Even Generator in the Oracle WebLogic Integration Administration Console to listen to the correct folder on your hard drive.
To Add a New Rule in the File Event Generator
If not already running, start your Oracle WebLogic Server.
After the Server is running, open the Oracle WebLogic Administration Console by selecting Run > WebLogic Integration > WebLogic Integration Administration Console from the Oracle Workshop for WebLogic menu.
The DynamicBinarySeller.java opens in Design view.
Double-click on the Receive request node and note that there are two parameter types; one for the payload and the other for the ebXML envelope.
Close the node builder.
Right-Click on the Receive request node and select View Code.
Select the request method and look at the JPD Configuration paneparameter entered for the ebxml-method envelope. The {env} parameter indicates that the ebXML envelope will be placed in the second parameter, env.
Click the Design tab.
In the Data Palette, select the baseDirectory variable. In the Annotations pane , note that the value of the variable is “/tptutorial/binary-in/dynamic/”. This is the base directory from which the application will read the sub-directory name and use it as the trading partner ID.
The remaining two nodes:
setProperties—invokes the setProperties on the file control with a transformation that concatenates the “From” ID from the ebXML envelope and the directory base string. To review the transformation, double-click on the DynamicBinarySellerfileSetProperties.xq in the Package Explorer pane.
write—this node reads and writes the binary files from and out to the directories you created on your hard drive.
To Test the Example
Select DynamicBinarySeller.java to run and deploy the process.
Drop a file into the C:\tptutorial\binary-out\dynamic\000000002 directory and watch it appear in a few moments in the C:\tptutorial\binary-in\dynamic\000000001 directory.
Step 9: Creating a Distributed Setup
In all of the examples so far, the initiator (000000001) and the participant (000000002) are both located in the same Oracle WebLogic Integration instance and are using the same database repository. In practice, the two sides will operate on two physically separated systems. This examples briefly describes how to move to a distributed setup where 000000001 operates in one Oracle WebLogic Integration instance and the 000000002 in another.
Install and configure a second Oracle WebLogic instance on another machine.
In the previous examples, default values were used for the initiator trading partner and the protocol information. The default values were used as follows:
from field (initiator ID)—trading partner which is marked as default in the Oracle WebLogic Integration Administration console, 000000001 in the previous examples.
Protocol information—taken from the binding which is marked as default for each business protocol (ebXML MS 2.0; RNIF 1.1, 2.0).
In production scenarios, you will typically add a service and service profile entry which gives you control over the trading partner communication. This example illustrates how to add a service and a service profile by using the Seller and Buyer business processes which you created in
Step 2: Sending an XML Message through an One-Way ebXML Exchange. It contains the following sections:
The Seller business process is the participant of the ebXML communication.
If not already running, start your Oracle WebLogic Server.
After the Server is running, open the Oracle WebLogic Administration Console by selecting Run > WebLogic Integration > WebLogic Integration Administration Console from the Oracle Workshop for WebLogic.
Click Trading Partner Management on the left pane.
In the Services on the left pane, click View All.
A list of all participant processes which are currently deployed on your server is displayed.
Click on ebxmlWeb\ebxml\oneway\Seller.java
The View And Edit Service window opens.
Click Add Service Profile.
The Add Service Profile window opens.
In the Name row, select Test_TradingPartner_2 as the LOCAL trading partner. This is the partner actually hosting the Seller service.
In the Name row, select Test_TradingPartner_1 as the REMOTE trading partner. This is the partner who will use the service.
Select ebXML 2.0 bindings for both the LOCAL and REMOTE binding.
Click Submit.
Configuring the Initiator Side
For the initiator side, service configuration information is added to the ebXML control that represents the remote service.
In the Services pane, click Create New.
Next to the name filed, click Browse.
A list of currently deployed participant business processes on your server and controls which are referenced from currently deployed processes is displayed.
Click on ebxml.oneway.SellerControl.
Click Add Service.
Click Add Service Profile.
In the Name row, select Test_TradingPartner_1 as the LOCAL trading partner. This is the initiator partner on the local system.
In the Name row, select Test_TradingPartner_2 as the REMOTE trading partner. This is the remote partner who hosts the actual service.
Select ebXML 2.0 bindings for both the LOCAL and REMOTE binding.
Click Submit.
You have now completed setting up the protocol settings. For each of the examples in this tutorial, you can create a corresponding service entry for each participant and initiator side. There is no limit to how many service profiles you enter, you can create as many as you need for each service entry to reference different protocol bindings.


 on the Data Palette. A drop-down list of controls that represent the resources with which your business process can interact is displayed. Instances of controls already available in your project are displayed in the Controls tab.
 File > Save or enter Ctrl+S to save.