JavaScript is required to for searching.
Skip Navigation Links
Exit Print View
Sun Storage 6 Gb SAS PCIe RAID HBA, Internal
Installation Guide For HBA Models SGX-SAS6-R-INT-Z and SG-SAS6-R-INT-Z

Oracle Technology Network
Library
PDF
Print View
Feedback
search filter icon
search icon

Document Information

Using This Documentation

Chapter 1 HBA Overview

Chapter 2 Hardware Installation and Removal

Observing ESD and Handling Precautions

Installing the HBA

To Prepare for Hardware Installation

To Install the HBA

To Connect the HBA to Internal Storage Devices

To Complete the Installation

HBA LEDs

Next Steps

Removing the HBA

To Remove the HBA

Chapter 3 Creating a Bootable Drive in a Preboot Environment

Chapter 4 HBA Software Installation

Chapter 5 Known Issues

Appendix A HBA Specifications

Glossary

To Install the HBA

  1. Attach an antistatic wrist strap and remove the HBA from its protective bag.

    See Observing ESD and Handling Precautions.

  2. Ensure that the jumper settings on the HBA are in the desired position.

    The jumpers are set at the factory, and you usually do not need to change them. See HBA Card Layout for information about the location of the jumpers on the HBA.

  3. If a removable memory option is present, ensure that the module is seated firmly in the dual-inline memory module (DIMM) socket.

    Note - This HBA has on-board DDR2 memory.
  4. Refer to the service or installation manual for your particular system for instructions on how to locate an available PCI Express slot in the system.
  5. Align the PCI Express bus connector of the HBA to the PCI Express slot.

    Note - Some PCIe slots support PCIe graphics cards only; if the HBA is installed in one of those PCIe slots, the HBA will not function.
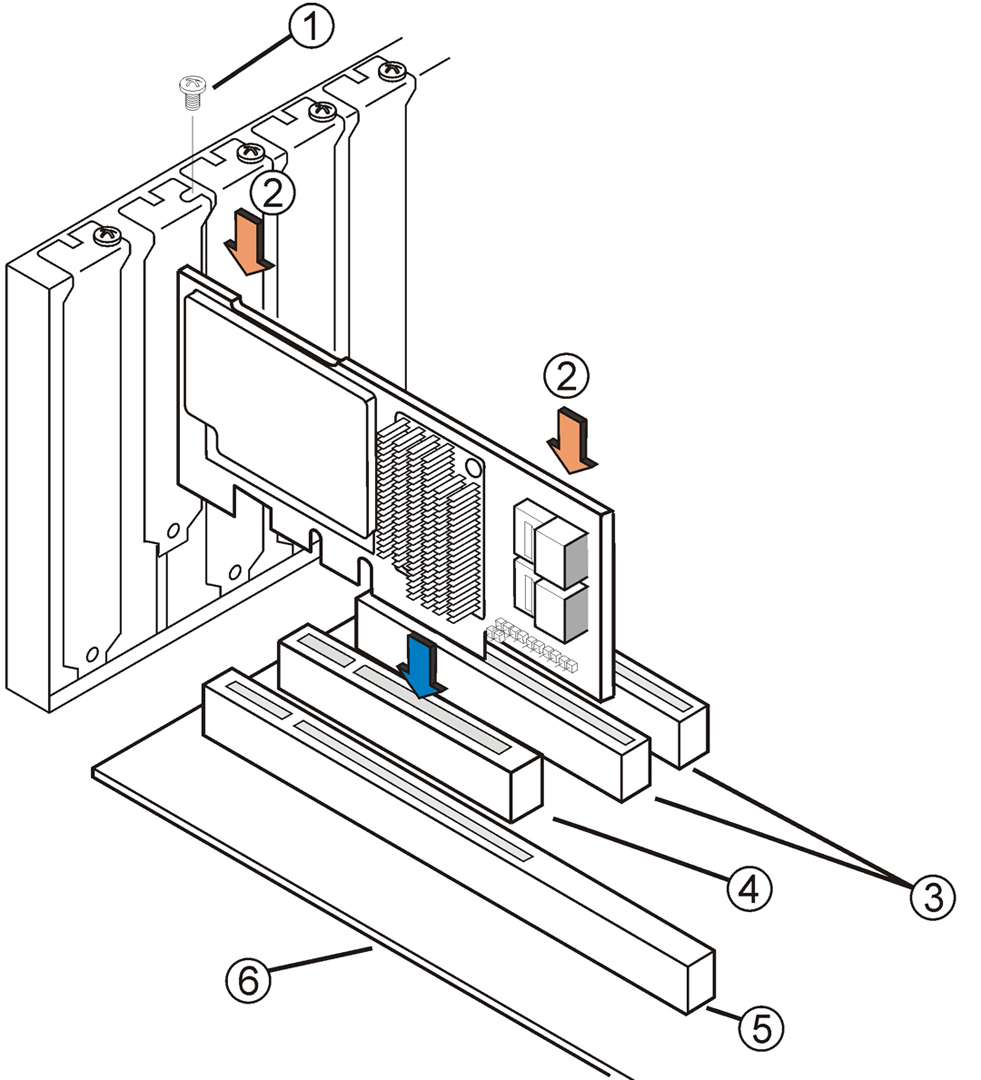
  6. Press down gently and firmly to seat the HBA in the PCIe slot, and then secure the bracket to the system chassis with the bracket screw (see Installing Oracle's Sun Storage 6 Gb SAS PCIe RAID HBA, Internal).

    Figure 2-1  Installing Oracle's Sun Storage 6 Gb SAS PCIe RAID HBA, Internal

    image:Figure that shows installing the host adapter board into a PCI Express slot.

    Figure Legend

    1 Bracket screw

    2Press down here

    3 x8 slots (3.3 V)

    4PCIe slot

    5 x16 slots (3.3 V)

    6Edge of motherboard


    Note - The configuration of the enclosure might not be the same as shown in this illustration.