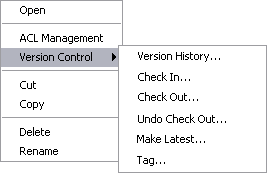
Project Component Context Menu
Project components have context menus such as that shown in the figure below.
Figure 8 Project Component Context Menu

The various menu options are described in the following table.
Table 2 Project Component Context Menu Options
|
|
|---|
Open |
If shown, opens
the selected component in the appropriate NetBeans editor. Click the Refresh All icon or
select Tools > CAPS Repository > Refresh All before you open any Project component (such as a Collaboration) to
ensure that you open the latest version of the component. |
ACL Management |
Presents the ACL
Properties dialog, with which an Administrator can assign read/write privileges to users for
the selected component. |
Version Control |
Version History |
Presents a dialog with which you can track
the version history for the selected component. The version history for a component
that has been cut and pasted is preserved, since there can be only one
instance of it. The version history for a component that has been copied
and pasted is not preserved, since there can be multiple instances of it;
the version number for each pasted instance is reset. |
Check In |
Presents a dialog with
which you can check in a new version of the selected component. |
Check Out |
Presents
a dialog with which you can check out the current version of the
selected component. |
Undo Check Out |
Presents a dialog with which you can reverse the
last checkout of the selected component. |
Make Latest |
Presents a dialog with which you can
check in the retrieved version of the selected component, making it the latest
version. |
Tag |
Presents a dialog with which you can specify a tag to attach to
the selected component. |
Cut |
Copies the selected component and removes it from the current Project,
after which you can paste it to another Project within the same branch
(once only). All changes must be committed before you can cut the component.
Cut and paste is disabled for other users when you have the component
checked out. |
Copy |
Copies the selected component, after which you can paste it to other
Projects within the same branch (multiple times). All changes must be committed before
you can copy the component. You can copy and paste a component even
when another user has the component checked out. If a component is copied
and pasted back into the original Project, the name is automatically modified with
a suffix (_1); in the case of multiple pastes, the suffix is incremented
by 1 for each subsequent paste. |
Delete |
Deletes the selected component, subject to the
following conditions:
You have write privileges for the component (see ACL Management, above). You have the component checked out to your workspace. The component is not checked out by anyone other than yourself. If these conditions are met, a dialog is presented in which you confirm that you want to delete the selected component. Clicking Yes then deletes the component.
|
Rename |
Activates the field, allowing you to rename the selected component. Note that
all Project component names should contain only alphanumeric characters (letters and numbers), dashes,
and underscores. Blank spaces are not allowed. |
Properties |
Presents a dialog showing the configuration properties
of the selected component, if such properties exist. |
|


