13 Register an Application Server
This chapter discusses:
-
Section 13.1, "Register an Oracle Application Server, Version 10.1.3.1"
-
Section 13.2, "Register a WebSphere Application Server, Version 7.0"
-
Section 13.3, "Register a WebSphere Application Server, Version 8.5 (Tools Release 9.1 Update 2.3)"
13.1 Register an Oracle Application Server, Version 10.1.3.1
Only Oracle Application Servers that are registered with the Management Console can be managed by the Management Console. The Oracle Application Server must be installed outside of Server Manager. You should always verify that your OAS versions are fix-current per Oracle directives. You should also verify that your version of OAS is compatible with JD Edwards EnterpriseOne servers (for details refer toSection 3.1, "Accessing the Certifications (Minimum Technical Requirements)" in this guide).
Note:
Registration of an Oracle Application Server requires that a Management Agent first be installed on the Oracle Application Server. This server must be installed with the correct user and also started with the correct user. Refer to Chapter 5, "Install a Management Agent".To register an existing Oracle Application Server:
-
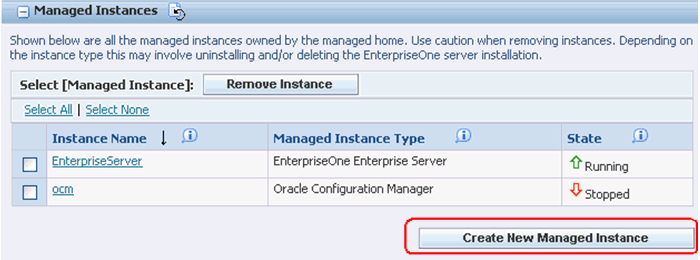
Select the Managed Home which resides on the machine on which your Oracle Application Server resides.
-
Click the Create a New Managed Instance button to create the Managed Instance within the Managed Home.
-
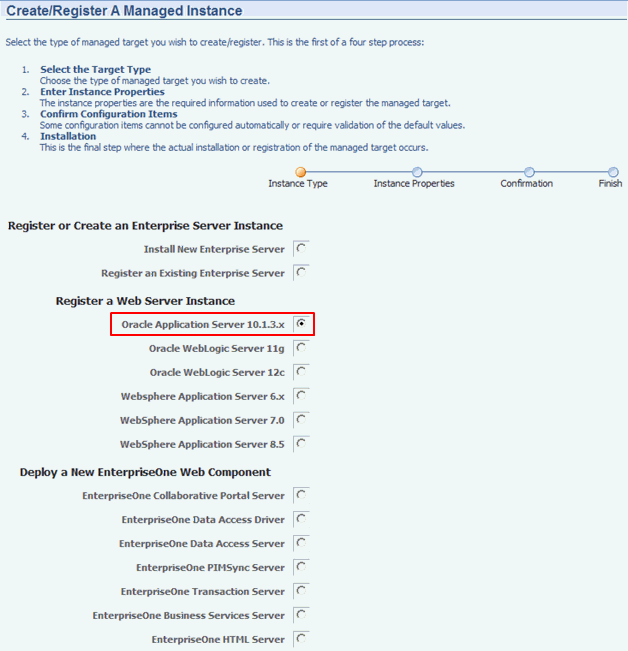
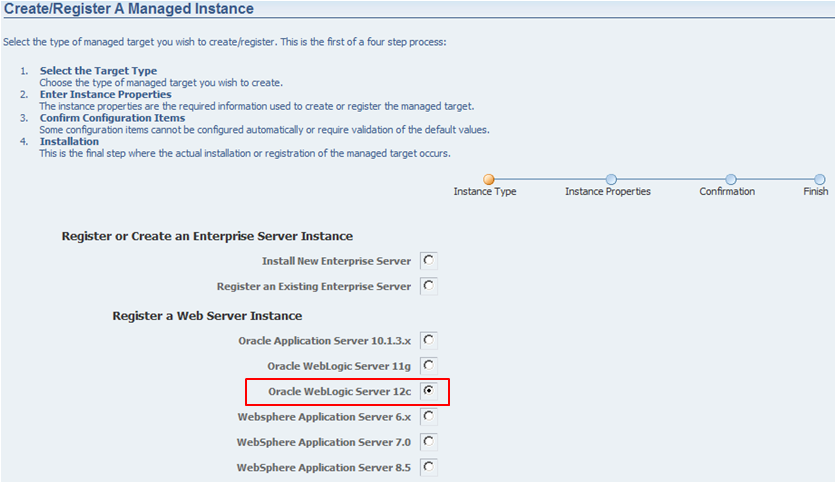
On Create/Register a Managed Instance, Instance Type, select this radio button:
Oracle Application Server 10.1.3.x
-
Click Continue.
-
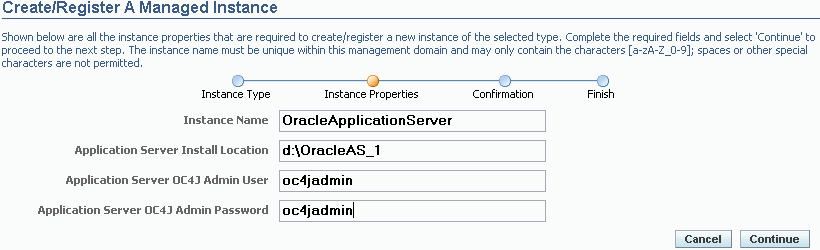
On Create/Register a Managed Instance, Instance Properties, complete these fields:
-
Instance Name
Enter a unique name for the instance name.
-
Application Server Install Location
Enter the installation location for the existing Oracle Application Server.
-
Application Server OC4J Admin User
Enter the administrative user for the Oracle Application Server on which this OC4J will be created.
-
Application Server OC4J Admin Password
Enter the password for the administrative user for the Oracle Application Server on which this OC4J will be created.
-
-
Click Continue.
-
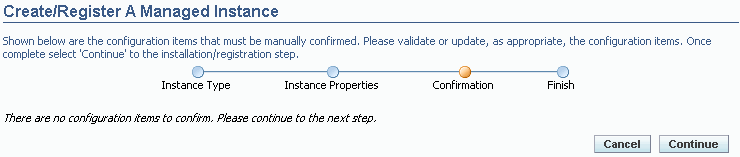
On Create/Register a Managed Instance, Confirmation, there are no configuration items to confirm.
-
Click Continue.

-
On Create/Register a Managed Instance, Finish, click the Create Instance button to complete the registration of the Oracle Application Server.
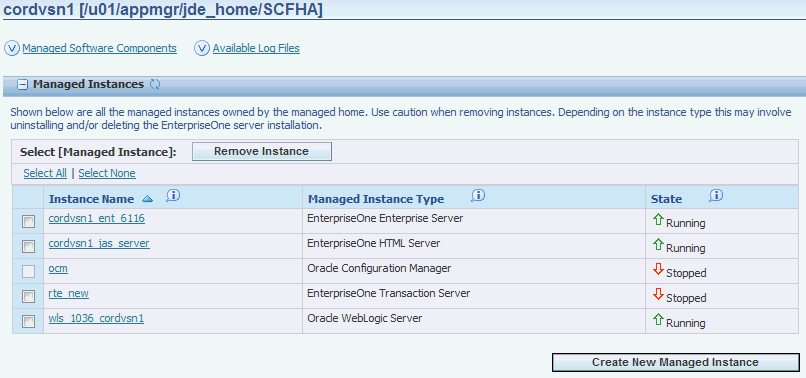
After you have completed the installation, the browser is redirected to the Management Console page for the newly registered Oracle Application Server. This server also appears as a Managed Instance within the corresponding Managed Home.
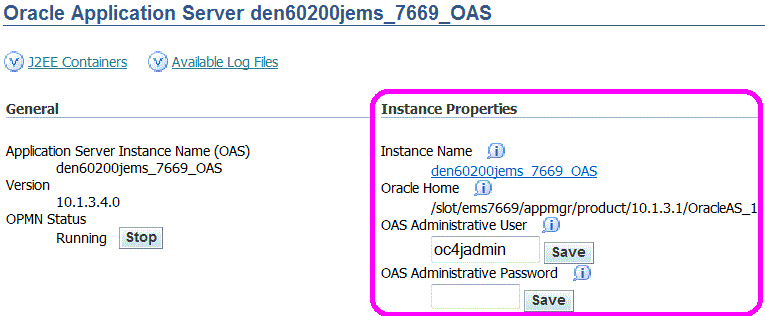
For each registered Oracle Application Server Managed Instance, the Management Console displays appropriate information at the top of the web page:
-
General
-
Application Server Instance Name (OAS)
Displays the name of this Oracle Application Server.
-
Version
Displays the version of this Oracle Application Server Managed Instance.
-
OPMN Status
Displays either Stopped with the Start button, or Started with the Stop button.
-
-
Instance Properties
-
Instance Name
Displays a clickable link for the unique name assigned to the Oracle Application Server Managed Instance at the time is was created or registered.
-
Oracle Home
Displays the complete path to the Oracle home where this Oracle Application Server instance was installed.
-
Oracle Administrative User
Displays the administrative user credential that is used by Server Manager to perform administrative tasks on the oracle application server instance. This is typically the oc4jadmin administrative account.
-
Oracle Administrative Password
The administrative password credential that is used by Server Manager to perform administrative tasks on the oracle application server instance. This is typically the oc4jadmin administrative account.
-
-
13.2 Register a WebSphere Application Server, Version 7.0
Only WebSphere Application Servers, version 7.0 that are registered with the Management Console can be managed by the Management Console. The WebSphere Application Server must be installed outside of Server Manager. You should always verify that your WAS versions are fix-current per IBM directives. You should also verify that your version of WAS is compatible with JD Edwards EnterpriseOne servers (for details refer to Section 3.1, "Accessing the Certifications (Minimum Technical Requirements)" in this guide).
Note:
Registration of a WebSphere Application Server requires that a Management Agent first be installed on the WebSphere Application Server. This server must be installed with the correct user and also started with the correct user. Refer to Chapter 5, "Install a Management Agent".If you have enabled administrative security in a WebSphere Application Server profile, refer to Section 13.2.1, "Configure WebSphere Application Server to Work With Server Manager When Administrative Security is Enabled" in this chapter.
To register an existing WebSphere Application Server:
-
Select the Managed Home with which you wish to register the WebSphere Application Server.
-
Click the Create a New Managed Instance button to create the Managed Instance within the Managed Home.
-
On Create/Register a Managed Instance, Instance Type, select the WebSphere Application Server 7.0 radio button.

-
On Create/Register a Managed Instance, Instance Properties, complete these fields:
-
Instance Name
Enter a unique name for the instance name.
-
Install Location
Enter the installation location for the existing WebSphere Application Server. This location should include the path up to the parent folder of the
profilesfolder.For example:
OS400 (IBMi / IBM i)
/QIBM/ProdData/WebSphere/AppServer/V7/NDUnix
/u01/WebSphere7/AppServer
-
-
Click Continue.
-
On Create/Register a Managed Instance, Confirmation, there are no configuration items to confirm.
-
Click Continue.

-
On Create/Register a Managed Instance, Finish, click the Create Instance button to complete the registration of the WebSphere Application Server.
After you have completed the installation the browser is redirected to the Management Console page for the newly registered WebSphere Application Server. This server also appears as a Managed Instance within the corresponding Managed Home.
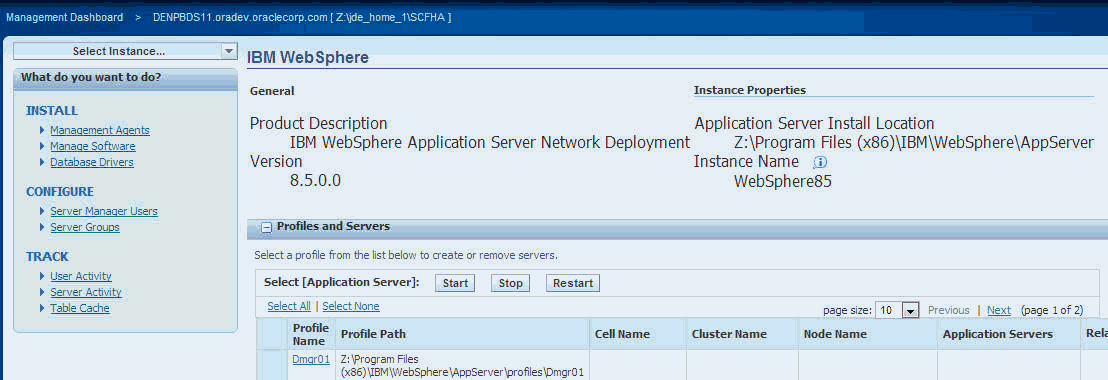
For each registered WebSphere Application Server Managed Instance, the Management Console displays appropriate information at the top of the web page:
-
Product Description
Displays the description for this WebSphere Application Server Managed Instance.
-
General
-
Version
Displays the version of this WebSphere Application Server Managed Instance.
-
-
Instance Properties
-
Application Server Install Location
Displays the full path for the install location of the selected WebSphere Application Server Managed Instance.
-
Instance Name
Displays a clickable link for the unique name assigned to the WebSphere Application Server Managed Instance at the time is was created or registered.
-
-
13.2.1 Configure WebSphere Application Server to Work With Server Manager When Administrative Security is Enabled
To configure WebSphere Application Server to work with Server Manager when Administrative Security is enabled:
-
Locate the
soap.client.propsfile associated with the security profile.Typically the file is found at this location:
WAS_Install_Location\profiles\Profile_Name\properties\soap.client.props -
Modify these settings in the
soap.client.propsfile:com.ibm.SOAP.securityEnabled=truecom.ibm.SOAP.loginUserid=admin_usercom.ibm.SOAP.loginPassword=admin_passwordwhere admin_user and admin_password are values appropriate to your environment.
-
In order for the security changes to take effect, you must restart the Management Agent to which the WebSphere Application Server is registered. For instructions, refer to Section 6.3, "Restart a Management Agent".
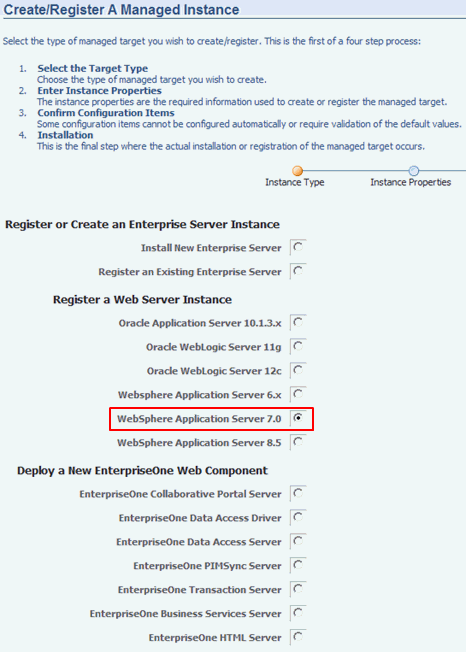
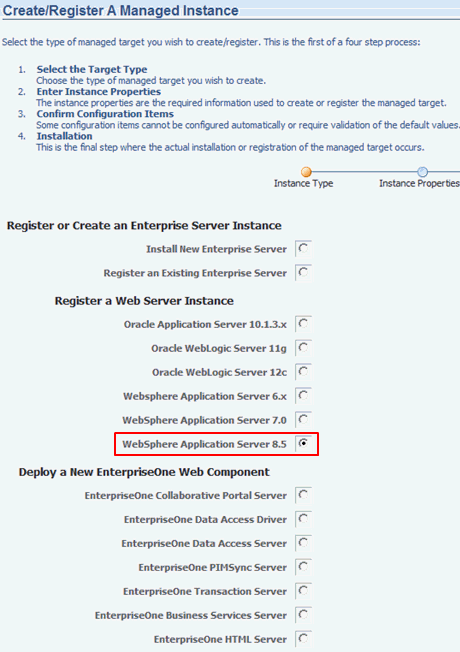
13.3 Register a WebSphere Application Server, Version 8.5 (Tools Release 9.1 Update 2.3)
Note:
Tools Release 9.1 Update 2.3. Beginning with this release, WebSphere Application Server Version 8.5 is supported with JD Edwards EnterpriseOne.Only WebSphere Application Servers, version 8.5 that are registered with the Management Console can be managed by the Management Console. The WebSphere Application Server must be installed outside of Server Manager. You should always verify that your WAS versions are fix-current per IBM directives. You should also verify that your version of WAS is compatible with JD Edwards EnterpriseOne servers (for details refer to Section 3.1, "Accessing the Certifications (Minimum Technical Requirements)" in this guide).
Note:
Registration of a WebSphere Application Server requires that a Management Agent first be installed on the WebSphere Application Server. This server must be installed with the correct user and also started with the correct user. Refer to Chapter 5, "Install a Management Agent".If you have enabled administrative security in a WebSphere Application Server profile, refer to Section 13.3.1, "Configure WebSphere Application Server to Work With Server Manager When Administrative Security is Enabled" in this section.
To register an existing WebSphere Application Server:
-
Select the Managed Home with which you wish to register the WebSphere Application Server.
-
Click the Create a New Managed Instance button to create the Managed Instance within the Managed Home.
-
On Create/Register a Managed Instance, Instance Type, select the WebSphere Application Server 8.5 radio button.
-
On Create/Register a Managed Instance, Instance Properties, complete these fields:
-
Instance Name
Enter a unique name for the instance name.
-
Install Location
Enter the installation location for the existing WebSphere Application Server. This location should include the path up to the parent folder of the
profilesfolder.For example:
OS400 (IBM i)
/QIBM/ProdData/WebSphere/AppServer/V85/NDUnix
/u01/WebSphere85/AppServer
-
-
Click Continue.
-
On Create/Register a Managed Instance, Confirmation, there are no configuration items to confirm.
-
Click Continue.
-
On Create/Register a Managed Instance, Finish, click the Create Instance button to complete the registration of the WebSphere Application Server.
After you have completed the installation the browser is redirected to the Management Console page for the newly registered WebSphere Application Server. This server also appears as a Managed Instance within the corresponding Managed Home.
For each registered WebSphere Application Server Managed Instance, the Management Console displays appropriate information at the top of the web page:
-
Product Description
Displays the description for this WebSphere Application Server Managed Instance.
-
General
-
Version
Displays the version of this WebSphere Application Server Managed Instance.
-
-
Instance Properties
-
Application Server Install Location
Displays the full path for the install location of the selected WebSphere Application Server Managed Instance.
-
Instance Name
Displays a clickable link for the unique name assigned to the WebSphere Application Server Managed Instance at the time is was created or registered.
-
-
13.3.1 Configure WebSphere Application Server to Work With Server Manager When Administrative Security is Enabled
To configure WebSphere Application Server to work with Server Manager when Administrative Security is enabled:
-
Locate the
soap.client.propsfile associated with the security profile.Typically the file is found at this location:
WAS_Install_Location\profiles\Profile_Name\properties\soap.client.props -
Modify these settings in the
soap.client.propsfile:com.ibm.SOAP.securityEnabled=truecom.ibm.SOAP.loginUserid=admin_usercom.ibm.SOAP.loginPassword=admin_passwordwhere admin_user and admin_password are values appropriate to your environment.
-
In order for the security changes to take effect, you must restart the Management Agent to which the WebSphere Application Server is registered. For instructions, refer to Section 6.3, "Restart a Management Agent".
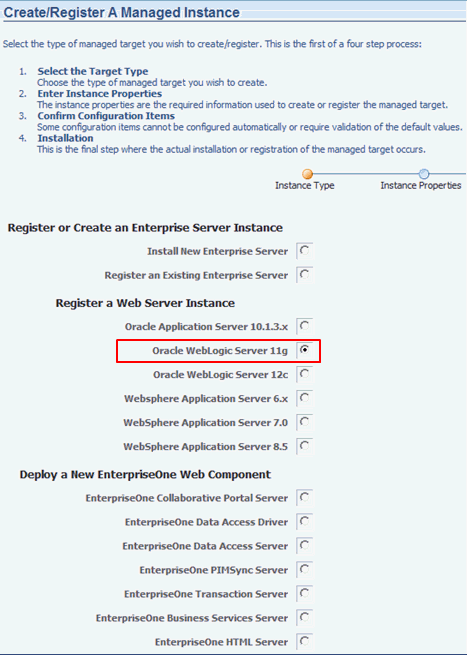
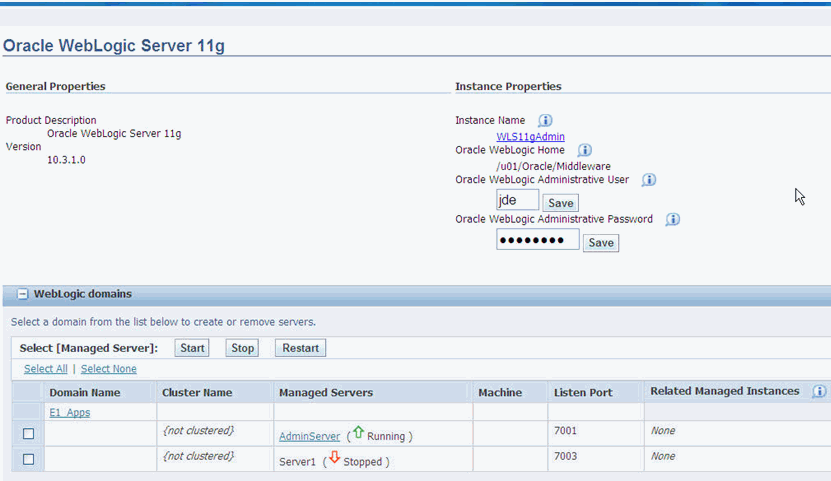
13.4 Register an Oracle WebLogic Server 11g
Only Oracle WebLogic Servers that are registered with the Management Console can be managed by the Management Console. The Oracle WebLogic Server must be installed outside of Server Manager. You should always verify that your Oracle WebLogic Server versions are fix-current per Oracle directives. You should also verify that your version of Oracle WebLogic Server is compatible with JD Edwards EnterpriseOne servers (for details refer to Section 3.1, "Accessing the Certifications (Minimum Technical Requirements)" in this guide).
Note:
Registration of an Oracle WebLogic Server requires that a Management Agent first be installed on the Oracle WebLogic Server. This server must be installed with the correct user and also started with the correct user. Refer to Chapter 5, "Install a Management Agent".To register an existing Oracle WebLogic Server:
-
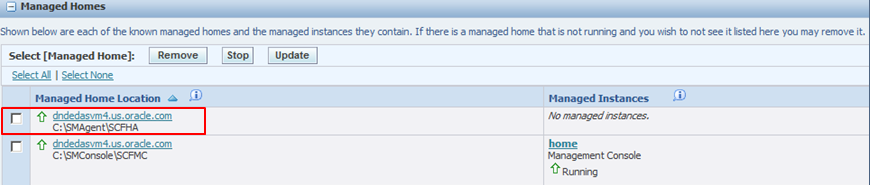
Select the Managed Home with which you wish to register an Oracle WebLogic Server.

-
On Managed Instances, click the Create New Managed Instance button.
-
On Create/Register a Managed Instance, Instance Type, select this radio button:
Oracle WebLogic Server 11g
-
Click the Continue button.
-
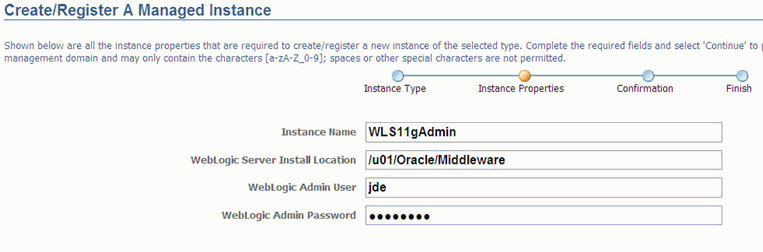
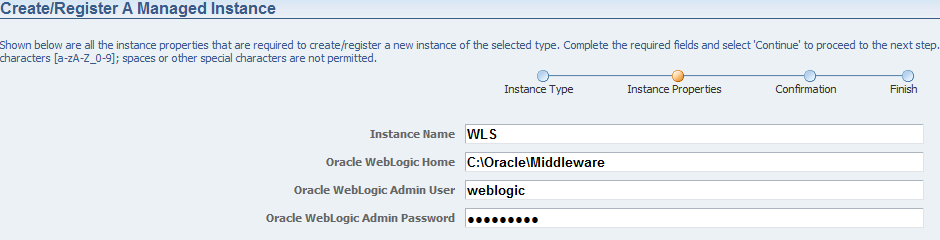
On Create/Register a Managed Instance, Instance Properties, complete these fields:
-
Instance Name
Enter a unique name for the instance name.
-
Oracle WebLogic Server Install Location
Enter the installation location for the existing Oracle WebLogic Server. This is the Oracle WebLogic Home, where the default value is:
/u01/Oracle/Middleware -
Oracle WebLogic Admin User
Enter the administrative user for the Oracle WebLogic Administrative Console on which this Managed Instance will be created. The default admin user is:
Oracle WebLogic -
Oracle WebLogic Admin Password
Enter the administrative user for the Oracle WebLogic Administrative Console on which this Managed Instance will be created. For the default password refer to the
/u01/Oracle/Middleware/utils/quickstart/quickstart.shprogram. Access the Start Administration Console option.
-
-
Click the Continue button.

-
On Create/Register a Managed Instance, Confirmation, there are no configuration items to confirm.
-
Click the Continue button.

-
On Create/Register a Managed Instance, Finish, click the Create Instance button to complete the registration of the Oracle WebLogic Server.
After you have completed the installation, the browser is redirected to the Management Console page for the newly registered Oracle WebLogic Server. This server also appears as a Managed Instance within the corresponding Managed Home.
For each registered Oracle WebLogic Server Managed Instance, the Management Console displays appropriate information at the top of the web page:
-
General Properties
-
Product Description
Oracle WebLogic Server 11g
-
Version
10.3.1.0
-
-
Instance Properties
-
Instance Name
Displays a clickable link for the unique name assigned to the Oracle WebLogic Server Managed Instance at the time is was created or registered.
-
Oracle WebLogic Home
Displays the complete path to the Oracle WebLogic Server Home where this Oracle WebLogic Server instance was installed.
-
Oracle WebLogic Administrative User
Displays the administrative user credential that is used by Server Manager to perform administrative tasks on the Oracle WebLogic Server instance.
-
Oracle WebLogic Administrative Password
Displays the administrative password credential that is used by Server Manager to perform administrative tasks on the Oracle WebLogic Server instance.
-
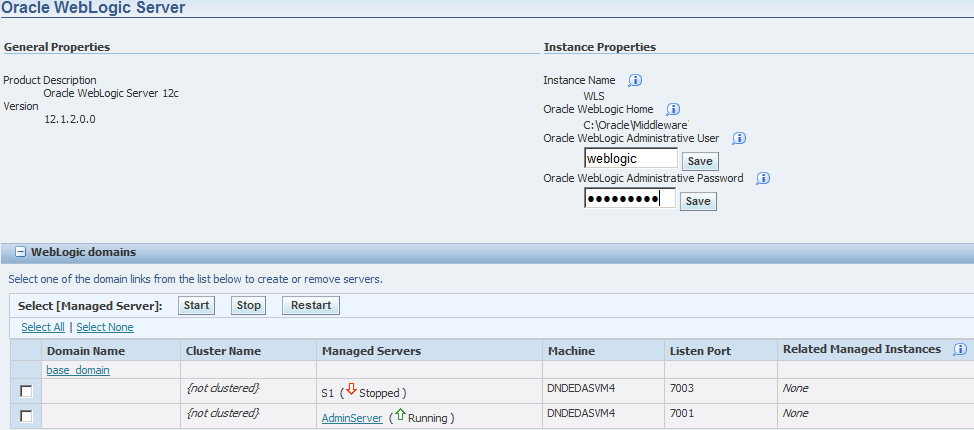
13.5 Register an Oracle WebLogic Server 12c
Only Oracle WebLogic Servers that are registered with the Management Console can be managed by the Management Console. The Oracle WebLogic Server must be installed outside of Server Manager. You should always verify that your Oracle WebLogic Server versions are fix-current per Oracle directives. You should also verify that your version of Oracle WebLogic Server is compatible with JD Edwards EnterpriseOne servers (for details refer to Section 3.1, "Accessing the Certifications (Minimum Technical Requirements)" in this guide).
Note:
Registration of an Oracle WebLogic Server requires that a Management Agent first be installed on the Oracle WebLogic Server. This server must be installed with the correct user and also started with the correct user. Refer to Section 5, "Install a Management Agent".To register an existing Oracle WebLogic Server:
-
Select the Managed Home where you want to register an Oracle WebLogic Server.
-
On Managed Instances, click the Create New Managed Instance button.
-
On Create/Register a Managed Instance, Instance Type, select the Oracle WebLogic Server 12c radio button.
-
Click the Continue button.
-
On the Create/Register a Managed Instance screen for Instance Properties, complete these fields:
-
Instance Name
Enter a unique name for the instance name.
-
Oracle WebLogic Server Install Location
Enter the installation location for the existing Oracle WebLogic Server. This is the Oracle WebLogic Home, where the default value is:
C:\Oracle\Middleware
-
Oracle WebLogic Admin User
Enter the administrative user for the Oracle WebLogic Administrative Console on which this Managed Instance will be created. The default admin user is:
Oracle WebLogic
-
Oracle WebLogic Admin Password
Enter the administrative user for the Oracle WebLogic Administrative Console on which this Managed Instance will be created.
-
-
Click the Continue button.
-
On the Create/Register a Managed Instance screen for Confirmation, there are no configuration items to confirm.
-
Click the Continue button.
-
On the Create/Register a Managed Instance screen for Finish, click the Create Instance button to complete the registration of the Oracle WebLogic Server.


After you have completed the installation, the browser is redirected to the Management Console page for the newly registered Oracle WebLogic Server. This server also appears as a Managed Instance within the corresponding Managed Home.
For each registered Oracle WebLogic Server Managed Instance, the Management Console displays appropriate information at the top of the web page:
-
Product Description
Oracle WebLogic Server 12c
-
Version
12.1.2.0.0
-
Instance Name
Displays a clickable link for the unique name assigned to the Oracle WebLogic Server Managed Instance at the time is was created or registered.
-
Oracle WebLogic Home
Displays the complete path to the Oracle WebLogic Server Home where this Oracle WebLogic Server instance was installed.
-
Oracle WebLogic Administrative User
Displays the administrative user credential that is used by Server Manager to perform administrative tasks on the Oracle WebLogic Server instance.
-
Oracle WebLogic Administrative Password
Displays the administrative password credential that is used by Server Manager to perform administrative tasks on the Oracle WebLogic Server instance.