84 Expected Sales Report Entry
This chapter contains these topics:
The Expected Sales Report Entry screen lets you enter and work with the sales information for a tenant whose product scale records have already been set up. Prior to the sales entry, you must first run Expected Sales Report Generation. You then use the screen to add the sales amounts to the existing sales information in the Sales Reporting Control file (F1540). This method is also called "heads down" sales entry because you look away from the screen as you manually type the amounts from the sales information submitted by the tenant.
This screen is also available in three other versions:
-
Unexpected Sales Report Entry
-
Adjust Sales Reports
-
Adjust Sales History
Though the fields are identical for the versions, each version provides a different function in the sales entry process. The processing options for the program control what function is allowed. For information unique to the specific versions, see the respective chapters in this guide.
With the Expected Sales Report Entry screen, most of the information is automatically generated. Therefore, this method has the following advantages:
-
It is more efficient and accurate than unexpected sales entry, which involves manual entry of all the information.
-
It is the basis for tracking delinquent sales reports.
-
It lets you identify leases either with problems in the existing setup for sales overage or that have no setup at all.
If you do not run Expected Sales Report Generation, you must use the Unexpected Sales Report Entry screen to enter the sales information
Caution:
All relevant product scale records must be set up before you generate the sales overage billings.For an overview of sales overage, see Chapter 79, "Sales Overage Process" in this guide.
From the Real Estate Management System menu (G15), choose Sales Overage.
From the Sales Overage (Percent Rent) menu (G1522), choose Sales Report Processing.
From the Sales Report Processing menu (G15221), choose Expected Sales Report Entry.
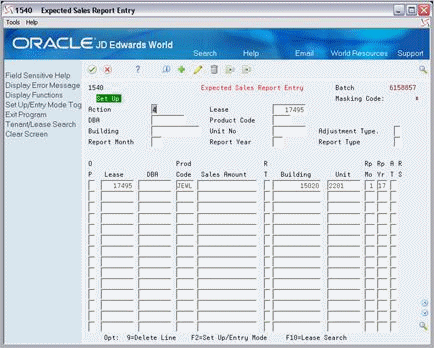
Figure 84-1 Expected Sales Report Entry screen

Description of "Figure 84-1 Expected Sales Report Entry screen"
The screen first appears in the setup mode. When you press F2, you toggle between this mode and the entry mode. The mode is highlighted in the upper left corner of the screen.
84.1 Inquire (Setup Mode)
To display the sales information for a lease, type I in the Action Code field, type the number of the lease in the Lease field, and press Enter. The system displays all the existing information for that lease in the Sales Reporting Control file (F1540).
You can limit the list of product scale records with the fields in the upper part of the screen. When you enter more values in combination, the search is more specific.
84.2 Change (Setup Mode)
After you inquire on the sales information for a lease, you can change the amount on a detail line that is unposted. To do this, type C in the Action Code field, type the new amount in the Sales Amount field, and press Enter.
84.3 Delete (Setup Mode)
There are two methods you can use to delete the information you have displayed:
-
To delete all the unposted detail lines, type D in the Action Code field and press Enter. You cannot delete posted information.
-
To delete one or more unposted detail lines, type C (Change) in the Action Code field, type 9 in the OP (Option) field for each line you want to delete, and press Enter.
Caution:
The system does not prevent you from deleting lines that exist as an audit trail for adjustments with A as the report status code.You cannot delete a detail line that is posted.
84.4 Set Up for Sales Entry
To set up the screen for sales report entry, type the appropriate information in the respective fields and press F2. The system displays the entry mode with A in the Action Code field and the format you specified for the setup mode. You can press F2 at any time to toggle between the setup and entry modes, so that you can change the information that is displayed for the entry mode. However, this does not affect the information that you may have already typed in the lower part of the screen.
You use the upper part of the screen in the setup mode to customize the format for the entry mode. This can make the data entry more efficient and reduce the possibility of errors.
-
To set up and enter information on a lease-by-lease basis, you must first inquire on the lease.
-
You can use the fields in the upper part of the screen to specify information the system automatically supplies to the respective fields in the entry mode. This is helpful if there is repetitive information such as the lease, product code, building, or unit. In this case, the fields are not input-capable for the entry mode, but are still used when the system searches the Sales Reporting Control file.
-
You can mask any field if it is not relevant to the sales information. For example, the AT (Adjustment Type) field is not applicable to an original entry. To mask such a field, type * (asterisk) in the first position of the field in the upper part of the screen. In this way, the fields are not input-capable for the entry mode and are not used when the system searches the Sales Reporting Control file.
Caution:
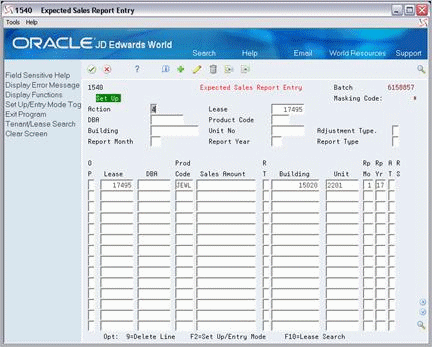
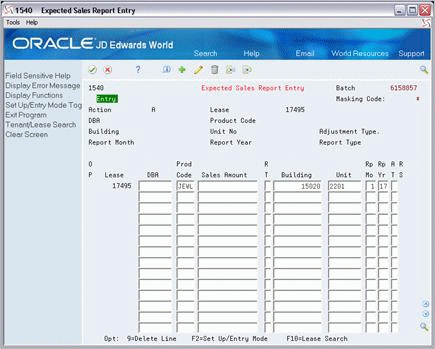
You must limit the display to only the unposted detail lines that have blank Sales Amount fields. Otherwise, when you press Enter in Entry Mode, the system gives you an error and does not accept the new amounts you typed.For example, suppose you want to enter the sales amounts that are expected for lease 17495. The following screens show what the upper part of the screen might look like for the setup mode and the related entry mode:
Figure 84-2 Expected Sales Report Entry (Setup Mode) screen

Description of "Figure 84-2 Expected Sales Report Entry (Setup Mode) screen"
Figure 84-3 Expected Sales Report Entry (Related Entry Mode) screen

Description of "Figure 84-3 Expected Sales Report Entry (Related Entry Mode) screen"
84.5 Add (Entry Mode)
You use the detail lines in the lower part of the screen to enter the appropriate information. Note the following:
-
For each detail line, the following fields are required:
| Field | Field |
|---|---|
| Lease | Unit |
| Prod Code (Product Code) | Rp Mo (Report Month) |
| Sales Amount | Rp Yr (Report Year) |
| Building |
-
For any input-capable field in the lower part of the screen, the system requires that you use the Tab key or Field Exit key to advance to the next field. This function allows for a consistent pattern of cursor movement during data entry.
-
Because you might be looking away from the screen during the sales report entry, the system does not let the cursor "wrap around" after you have typed information on the last detail line of the screen. This function prevents data entry problems.
-
When you press Enter, the system searches the Sales Reporting Control file for the product scale record that matches the information entered for each detail line.
-
A matching record that does not have a sales amount is considered an expected sales record, and the system updates the amount from the related detail line.
-
If you enter information for more than one lease at a time and some of the fields are left blank, there may be more than one record that matches a specific detail line. In this case, the system gives you an error and prompts you to enter the additional information to make the search specific to a single record. All the fields also become input-capable at this time.
-
The RS (Report Status) field is blank for the original or most recent sales information.
-
84.6 Processing Options
To restrict sales report entry to only expected sales, options 2, 3, and 4 must be blank.
84.7 Guidelines
-
The Sales Report Type field in the Sales Reporting Control file (F1540) and the Invoice Estimates field in the Sales Overage Master file (F15013) control whether the sales report process involves actual or estimated sales amounts.
-
The Sales Report Listings (P15321) can contain sales information that is expected, unexpected, delinquent, or non-actual (estimated). Therefore, you can use this report to review such information at the appropriate points in the entry process.