165 Property/Building Information
This chapter contains these topics:
The facility information for commercial, residential, or other rentable property is organized on a property, building, floor, and unit basis. The Property/Building Information screen lets you set up and maintain information for properties and buildings, which are business units. A building is the minimum required element for facility information and is the most specific level by which accounts can be grouped. To further define the information and make it more flexible, you can relate one or more buildings to a common property and separate a building into floors and units. If a property consists only of one building, it can have the same business unit as the building.
The level of detail relates parent and subordinate business units. In the Real Estate Management system, it indicates whether a building or property is related to a higher level of project or grouping. You can use up to nine levels of detail. The following example, which shows a grouping with four levels, indents the descriptions according to the level of detail to emphasize the relationship.
| Business Unit | Level of Detail | Description |
|---|---|---|
| 15 | 1 | Real Estate Management Company |
| 15001 | 2 | University Center |
| 40001 | 3 | Fashion Mall |
| 40002 | 4 | Fashion Center |
| 50001 | 3 | Stanford Office Building |
| 60001 | 3 | Dublin Tower |
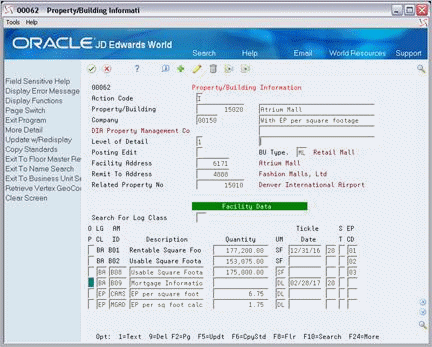
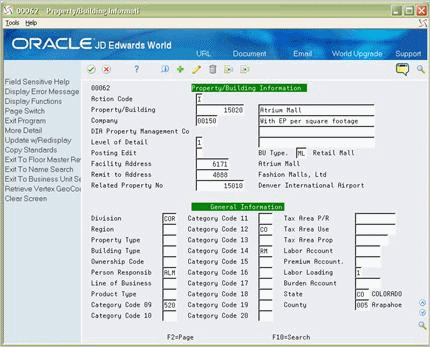
The screen is available in two formats: Facility Data and General Information. The first format displays detail about the property or building in the form of log lines. Log lines include information such as critical dates, the number of units within a building, inspection of the sprinkler system, and so on. The second format displays category codes that you can use for reporting purposes. This information is stored in the following files: Building (Business Unit) Master (F0006), Log Standards Master (F1503), and Log Standards Extension Master (F1504).
The screen has processing options that control how the system displays and processes the information.
From any Real Estate Management menu, enter 29 in the Selection field.
From the Real Estate Management Setup menu (G1541), choose Property/Building Information.
Figure 165-1 Property/Building Information screen

Description of "Figure 165-1 Property/Building Information screen"
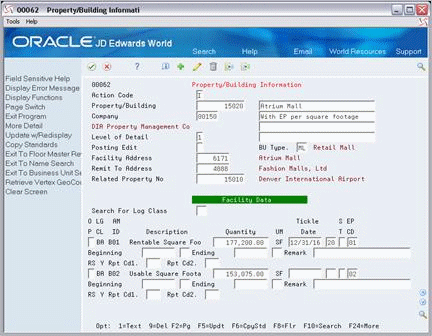
Figure 165-2 Property/Building Information (Fold Area) screen

Description of "Figure 165-2 Property/Building Information (Fold Area) screen"
Figure 165-3 Property/Building Information (Alternate Format) screen

Description of "Figure 165-3 Property/Building Information (Alternate Format) screen"
Note:
The seven fields to the right of the category codes (Tax Area P/R through Burden Account) are not applicable to the Real Estate Management system.165.1 Add a Property or Building
To add a property or building, choose Add in the Action Code field, type the appropriate information, and then press Enter or F5.
The following information is required for adding a property or building:
-
Property or building number (business unit)
-
Company number
-
Business unit type
-
Facility address
165.2 Display Information for a Property or Building
To display the information for a property or building, choose Inquire in the Action Code field, type the business unit in the Property/Building field, and then press Enter.
165.3 Change Property or Building Information
To change the information that you have displayed, choose Change in the Action Code field, type the new information, and then press Enter or F5.
165.4 Delete Property or Building Information
There are two methods that you can use to delete the information that you have displayed:
-
To delete the property or building, choose Delete in the Action Code field and then press Enter.
All account transactions for a business unit must be closed before you can delete it.
-
To delete a log line, choose Change in the Action Code field, type 9 in the OP (Option) field for that line, and then press Enter or F5.
Note:
If extended text exists for a log line, the OP (Option) field for that line is highlighted. In this case, JD Edwards World recommends that you first delete the text information before you delete the line. This prevents the wrong text from appearing for a duplicate log line.165.5 Copy Standard Log Information
You can copy standard log information to reduce the entry time and the possibility of errors. To do this, you can use either an automatic method or a manual method. A processing option controls whether the system automatically copies the information.
-
If the processing option is set to automatically copy the information, the system copies a model of standard lines into a business unit when you first add it. After you have typed the necessary information, press Enter or F5 and the screen displays the log information. This gives you a chance to verify and make more changes to the information. To add the building, you then must press Enter or F5 a second time.
-
When you add a building, you can manually copy a model into it. You use this method if the processing option is not set to automatically copy the information or if no log line within the model has a Y in the RS field. To do this, choose Add in the Action Code field, type the appropriate information, and press F6. Then press Enter or F5.
-
You can also manually copy a model into an existing property or building you have displayed. To do this, type C (Change) in the Action Code field, press F6, and then press Enter or F5. Remember to press F6 only once. If you press it more than once, duplicate log lines appear for the business unit because the system copies each log line from the model as many times as you press F6.
The system uses the business unit type to choose standard log lines. Before you can copy a model of the standards, therefore, you must set up the model for the specific business unit type. To do this, use the Log Standards Information screen.
165.6 Processing Options
165.7 Guidelines
-
Before you can add a property or building, the following information must already be set up:
-
Company and its related chart of accounts
-
Business unit type
-
Address book information for the facility
-
-
You use the four untitled fields to the right of the business unit for the description. The first line is reserved for the name of the business unit.
-
If the system verifies areas, you get an error message if the area for the building is changed and it is less than the total area of all floors in the building. In this case, the system highlights the Property/Building field. If the error is related to a floor, review the information for the floors on the Floor Information screen. You must correct the error before you can change the area of the building. For more information about area edits, see Chapter 167, "Floor Information" in this guide.
-
For business units, note the following:
-
Short numbers make data entry easier.
-
Alpha characters make data entry more difficult.
-
You must assign a company to it.
-
When properties and buildings are related to one another, JD Edwards World recommends that you assign numbers that are in numerical sequence. For example, suppose property 15001 has three buildings tied to it. You could set up the buildings as 40001, 50001, and 60001. A fourth building tied to building 40001 could be 40002.
-
You do not have to structure special meaning into business units. You use category codes for this purpose. For example, you could use the category code for region to specify that a property is located in the Western region.
-
The system uses the level of detail for reports in the Financial Analysis Spreadsheet Tool and Report Writer (FASTR) facility. FASTR can summarize quantities and total them at the different levels. This eliminates the need to set up all the accounts for the properties and buildings in the higher business units. For more information, see the JD Edwards World FASTR Guide.
-