Release 2.0.6
A77230-01
Library |
Product |
Contents |
Index |
| Oracle Internet Directory Administrator's Guide Release 2.0.6 A77230-01 |
|
![]()
![]()
This chapter explains how to manage the Oracle Internet Directory processes using Oracle Directory Manager and command line tools.
The administration tasks are explained in the following sections:
When you issue a start-server message through the OID Control Utility, that message refers to a configuration set entry containing server parameters. You can add, modify, and delete configuration set entries by using either Oracle Directory Manager or the appropriate command line tool.
|
See Also:
|
This section covers the following topics:
Although you can change values in the default configuration set, namely, configset0, all of your changes will be carried over to every new configuration set entry that you create. This is because configset0 values are used as the template for all new configuration set entries.
When you want to change values that should not always be in effect for every instance of the server that you run, it is better to create new configuration set entries. Note that, in Release 2.0.6, this applies to the LDAP server instances only. The Oracle Replication Directory Server supports only one configuration set in this release.
You may want to establish a separate instance of a directory server with different values. If you do not want those values to be exercised by all users, set up a new configuration set entry and run a separate server instance pointing to that configset for groups with special needs.
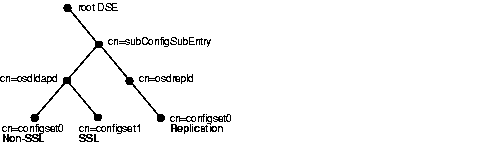
For example, Figure 5-1 shows:
configset0 with SSL set to off
configset1 with SSLenable set to on
configset0
See Also:
You can use Oracle Directory Manager to view, add, modify, and delete configuration set entries. These topics are covered in the following sections:
You cannot change the parameters for an active instance directly; you must change the parameters in a configuration set entry and save it. After the configuration set entry is saved, use the OID Control Utility restart command to stop current instances and restart them.
You can change a configuration set and start fresh instances that use the new parameters. The changes will not affect the older instances that are still running, however, unless they have been restarted.
For information on restarting directory server instances, see "Restarting Directory Server Instances".
Important Note:
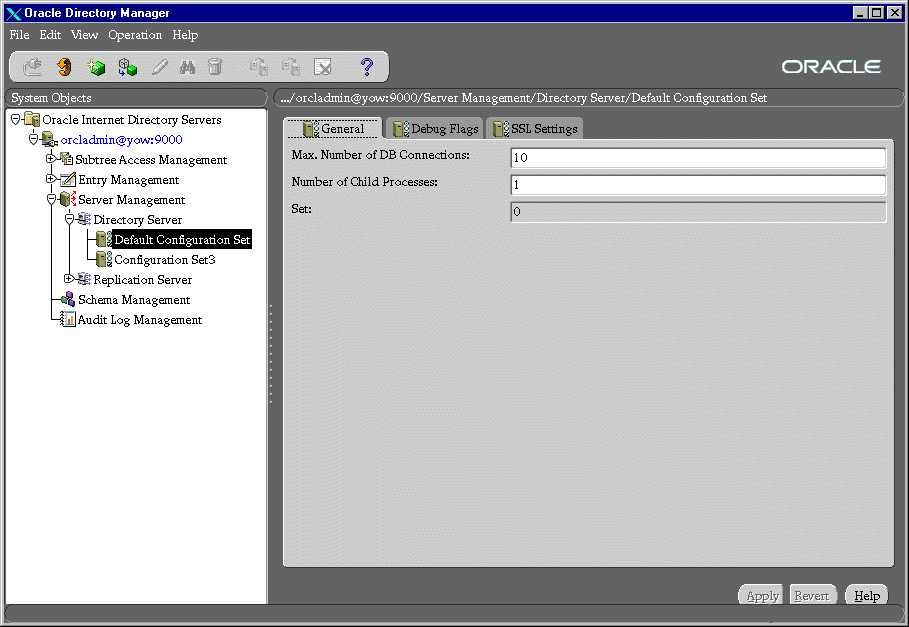
To view configuration set entries:
The parameters of the active instance appear in the right pane. You can see all of them by scrolling horizontally.
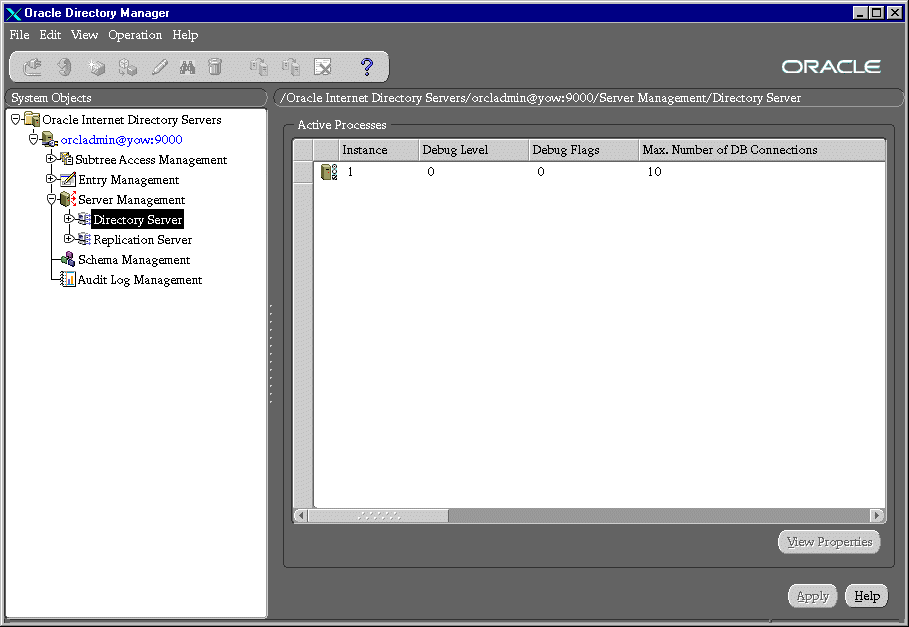
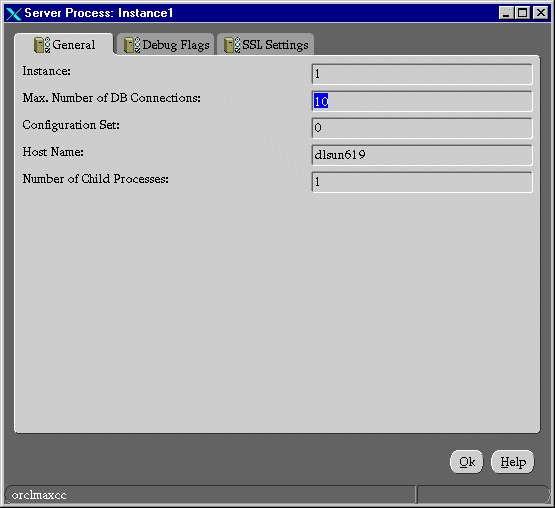
You can see all the parameters for the instance by selecting the tabs across the top of the dialog box. However, you cannot change them in this dialog box. To change them, you must change the configuration set entry on which they are based.
The first time you add a configuration set entry, you can use the default configuration set as a template, then copy from the ones you create to make subsequent configuration sets.
To add configuration set entries:

Table 5-1 Adding a Configuration Set Entry: General Tab
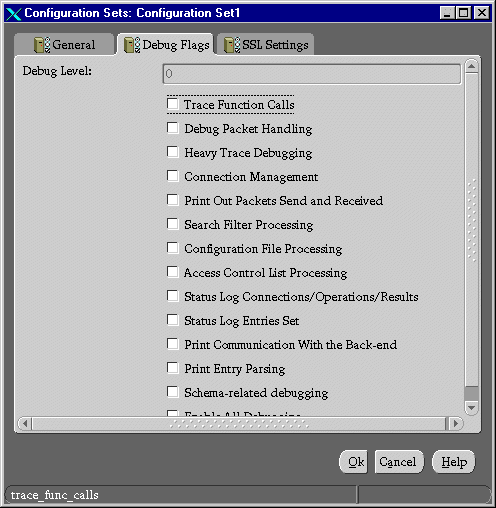
Ordinarily, you can leave these radio buttons unselected. However, if you need to generate a log for a specific problem, you can use this tab page to specify the debug logging level.
Fill in the fields with the information described in the following table:
| Field | Description |
|---|---|
|
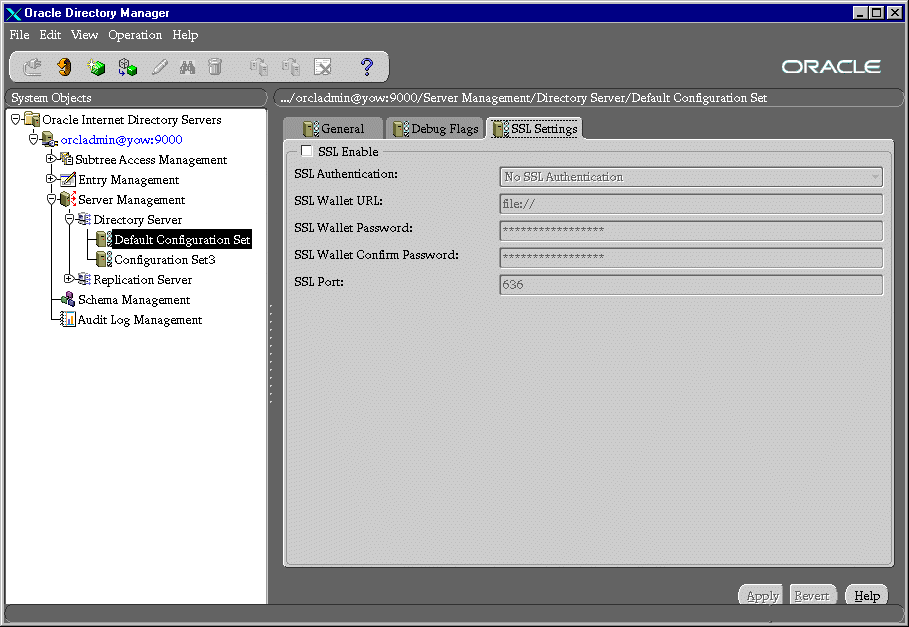
SSL Enable |
Select to enable SSL authentication. If you do not select this check box, SSL is not enabled, and you do not need to set any other parameters on this page. |
|
SSL Authentication |
Choose one of the following:
|
|
SSL Wallet URL |
Enter the location of the SSL wallet. If you elect to change the location of the Oracle wallet, you must change this parameter. You must set the wallet location on both the client and the server. For example, on Solaris, you could set this parameter as follows: orclsslwalleturl=file:/Home/my_dir/my_wallet On Windows NT, you could set this parameter as follows: file:C:\my_dir\my_wallet For information on setting the location of the Oracle Wallet and the Oracle Wallet password, see Appendix D. |
|
SSL Wallet Password |
Enter the password for the wallet. This password was set during creation of the wallet. See "Creating a New Wallet". If you change the password, you must change this parameter. |
|
SSL Wallet Confirm Password |
Retype the new password in this field when you change the password. |
|
SSL Port |
The default SSL port is 636. You can change the SSL port. |
Remember, the changes will not affect the active instance until you restart it. See "Restarting Directory Server Instances".
Note:
To create a new configuration set entry without copying from a previous entry:
To modify configuration set entries:
Remember, the changes will not affect the active instance until you restart it. See "Restarting Directory Server Instances".
Note:
To delete configuration set entries:
Remember, the changes will not affect the active instance until you restart it. See "Restarting Directory Server Instances".
Note:
Although changing configuration set entries by using Oracle Directory Manager is desirable, it can sometimes be more convenient to use the available command line tools--for example, when you want to make the same set of changes across multiple LDAP servers.
This section tells you how to perform the tasks described in the following sections:
When you add or modify configuration set entries by using the command line tools, the input file for adding a new configuration set entry should be written in LDAP Data Interchange Format (LDIF). It should contain only the attributes and values that differ from the installed defaults. The directory server uses the attribute values that you establish in the new configuration set entry to override its own existing values for these attributes.
If you are adding a new Oracle Directory Server instance, you can either use an existing configuration set entry, or add a new one for the new instance.
To add a new configuration set entry, create an input file, and then load the input file with ldapadd. These operations are explained in the steps below.
Input files must use LDIF format, which is explained in "Using LDAP Data Interchange Format (LDIF)". When you create the input file, you need to define or include only those attributes that differ from the current values in that configuration set entry.
In the following example, the parameter configset2 is the RDN, or local name, of the new entry, the wallet location is: /HOME/test/wallet, and the password is welcome.
dn:cn=configset2, cn=oidldapd, cn=subconfigsubentry

cn:configset2

objectclass:orclConfigSet

objectclass:orclLDAPSubConfig

objectclass:top

orclsslauthentication:1

orclsslenable:1

orclsslport:5000

orclsslversion:3

orclsslwalletpasswd:welcome

orclsslwalleturl:file:/HOME/test/wallet
At the system prompt, type the command to add the input file. If the example shown the example above were given the file name newconfigs, the ldapadd command would look something like the following:
ldapadd [options] -f newconfigs
To modify or delete an existing configuration set entry, create an input file containing only the attributes that you want to change, and then load the input file with the ldapmodify command. These operations are explained in the steps below.
When you create the input file, define or include only those attributes that differ from the installed defaults.
Input files must have LDIF format. LDIF format is explained in "Using LDAP Data Interchange Format (LDIF)".
In the example of the input file shown below, the parameter cn=configset2, cn=osdldapd, cn=subconfigsubentry is the DN, or local name, of an existing configuration set entry. This example shows how to modify the orclsslport parameter to 7000.
dn:cn=configset2, cn=osdldapd, cn=subconfigsubentry

changetype: modify

replace: orclsslport

orclsslport: 7000
Type the command to reference the input file at the system prompt. For example, if the input file were named configfile, your ldapmodify command would look something like the command shown below:
ldapmodify[options] -f configfile
Operational attributes--as opposed to application attributes--pertain to the operation of the directory itself. Some operational information is specified by the directory to control the server--for example, the time stamp for an entry. Other operational information, such as access information, is defined by administrators and is used by the directory program in its processing.
You can view and set some of the operational attributes for each Oracle Directory Server to which you are connected by using Oracle Directory Manager. To do this, in the navigator pane expand Oracle Internet Directory Servers, then select a server. System operational attributes appear in the right pane:
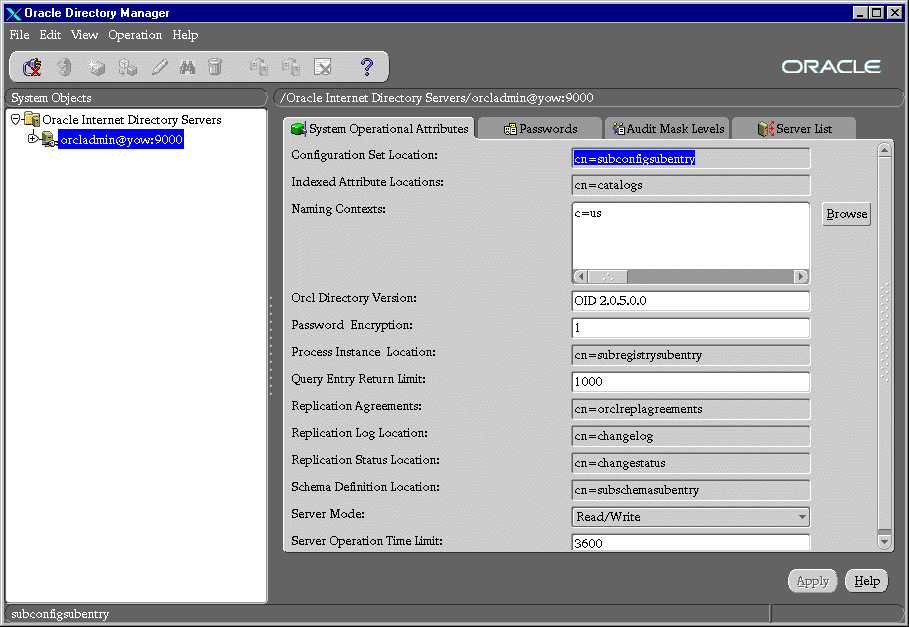
Table 5-3 describes the field for each operational attribute.
The modifiable system operational attributes are:
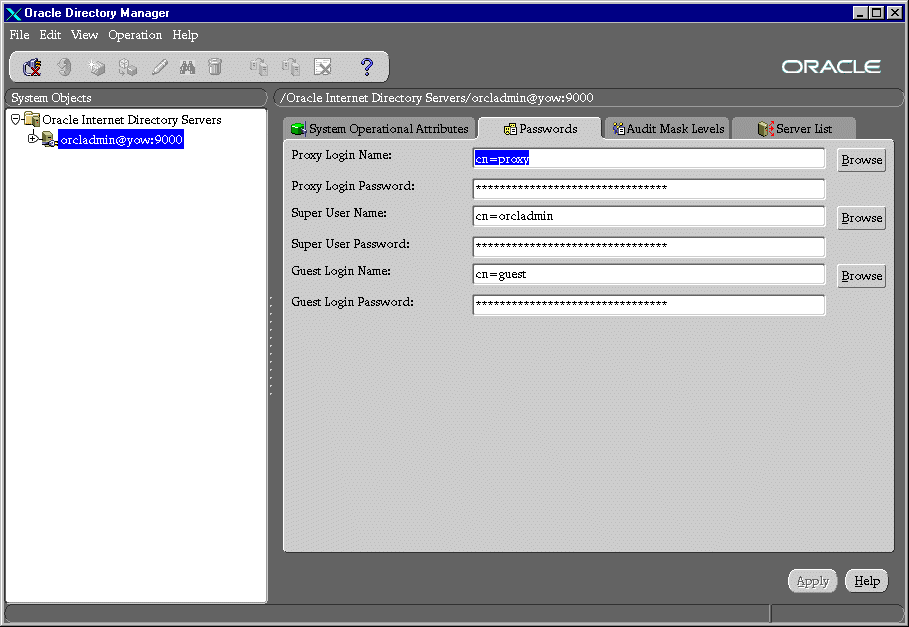
A super user is a special directory administrator who typically has completely open privileges to directory information.
A guest user is one who is not an anonymous user, and, at the same time, does not have a specific user entry.
A proxy user is typically used in an environment with a middle tier such as a firewall. In such an environment, the end user authenticates himself to the middle tier. The middle tier then logs into the directory on the end user's behalf, but does so as a proxy user. A proxy user has the privilege to switch identities and, once it has logged into the directory, switches to the end user's identity. It then performs operations on the end user's behalf, using the authorization appropriate to that particular end user.
You can administer user names and passwords for the super, guest, and proxy users by using either Oracle Directory Manager or ldapmodify.
This section covers topics in the following subsections:
To change a user name or password for a super, guest, or proxy user by using Oracle Directory Manager:
Table 5-1 lists and describes the fields in the Passwords tab page.
| Field | Description |
|---|---|
|
Super User Name |
The default is |
|
Super User Password |
The default is |
|
Guest Login Name |
Guests have privileges determined by the Access Control Policy Points (ACPs) in the directory. The default is |
|
Guest Login Password |
The default is |
|
Proxy Login Name |
Proxy users have privileges determined by the ACPs in the directory. The default is |
|
Proxy Login Password |
The default is |
To change administrative user names and passwords, you use ldapmodify on the following attributes.
| User Name/Password | Attribute |
|---|---|
|
Super user |
orclsuname |
|
Super user password |
orclsupassword |
|
Guest user |
orclguname |
|
Guest user password |
orclgupassword |
|
Proxy user |
orclprname |
|
Proxy user password |
orclprpassword |
For example, to change the password of the super user to superuserpassword, we would use ldapmodify to modify the DSE by using an LDIF file containing the following:
dn:
changetype:modify
replace:orclsupassword
orclsupassword:superuserpassword
You can use Oracle Directory Manager to view information about any active server instance. To do this:

"Managing Server Configuration Set Entries by Using Oracle Directory Manager" for instructions on changing configuration set entries
See Also:
This section tells you how to set debug logging levels by using the OID Control Utility. You can also set debug logging levels by using Oracle Directory Manager as described in "Managing Server Configuration Set Entries by Using Oracle Directory Manager".
To set debug logging levels by using the OID Control Utility, restart the Oracle Directory Server using the -debug option for an LDAP server, and the -d flag for the replication server. Use the debug level number based on Table 5-5.
Since debug levels are additive, you need to sum together the numbers representing the functions that you want to activate, and use that sum in the command line option.
For example, if you want to trace function calls (1) and active connection management (8), you would enter 9 as the debug level (8 + 1 = 9) as follows:
oidctl server=oidldapd instance=1 flags='-debug 9' restart
oidctl server=oidrepld instance=1 flags='-h my_host -p 389 -d 9' restart
The above example restarts the LDAP server as well as the replication server with the debugging flags. Table 5-5 provides the complete list of debug logging levels.
The audit log records critical events on the Oracle Directory Server that are important from a security point of view or for operations. An administrator can query the audit log using ldapsearch commands. Because the log generation is contingent upon events occurring on the server, only the Oracle Internet Directory server itself can create the log entries. You cannot add audit log entries with either the Oracle Directory Manager or the command line tools. Only the server can add entries.
The audit log is made up of regular directory entries, one entry for each event. You can specify search criteria using ldapsearch, and you can view the audit log entries by using Oracle Directory Manager.
By default audit logging is turned off. To turn it on, modify the DSE attribute orclauditlevel to the level you want. You can configure audit levels to audit selected events only.
To clean up audit log entries, use bulkdelete to remove all the audit log entries. Specify cn=auditlog as the base of the bulkdelete. Because bulkdelete will delete all the entries under cn=auditlog, use LDIF writer to write the entries to a file for later reference.
The remainder of this section discusses topics in the following subsections:
Each audit log entry contains the orclAuditoc object class. Like all other structural object classes, orclAuditoc inherits from top. Its attributes include the following:
Note that the audit log entries do not become part of a regular search result set even though the search filter may satisfy the query criteria. For example, a search with the condition objectclass=top will not yield results from the auditlog entries. Only a search with cn=auditlog as the base of the search will find audit log entries.
|
Note:
By default, the attributes |
The audit log container is part of the DSE. It holds its entries as children, organized according to the orclsequence attribute. See Figure 5-2.
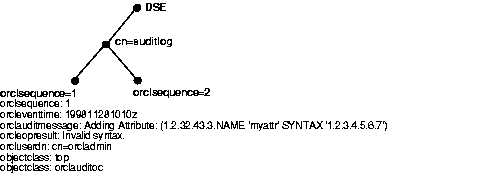
Table 5-6 shows the auditable events and their audit levels. The third column, Audit Levels, contains hexidecimal values. You can audit more than one event by adding their corresponding values found in this column. This is explained in "Setting the Audit Level by Using ldapmodify".
Events described in the previous section can be turned on or off. DSE attribute orclauditlevel indicates the current audit level set on the server. A value of 0 for the attribute means no auditing, which is the default.
You can set the audit level by using either Oracle Directory Manager or ldapmodify. Both methods are described in this section.
To set the audit level by using Oracle Directory Manager:
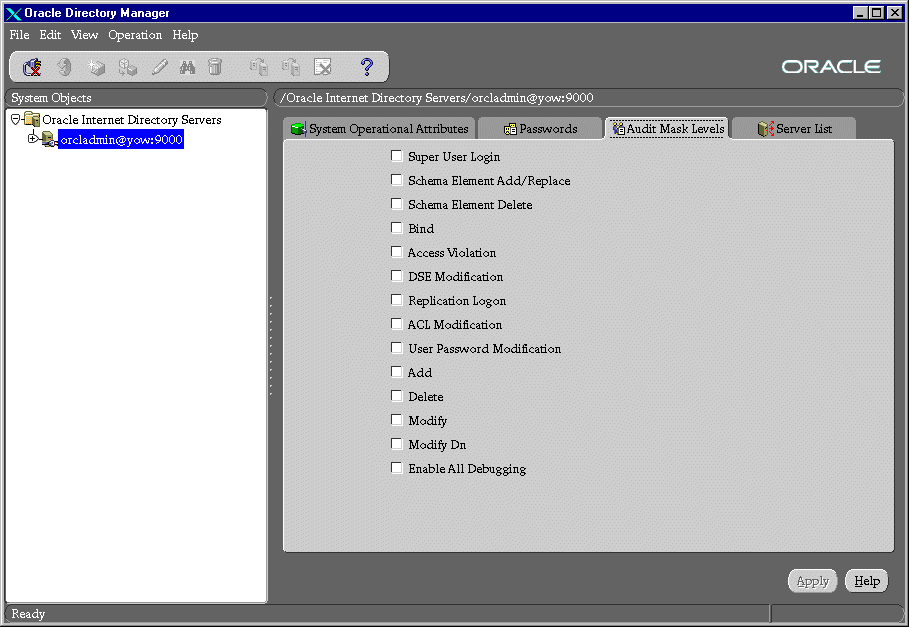
To audit more than one event, add the values of their the audit masks. For example, suppose you want to audit the following three events:
|
Schema element delete |
0x0004 |
4 |
|
DSE modification |
0x0020 |
32 |
|
Add |
0x0200 |
512 |
|
|
|
548 |
The total value of the audit masks is 548. The ldapmodify command would therefore look something like the following:
ldapmodify -p port -h host << EOF
dn:
changetype:modify
replace: orclauditlevel
orclauditlevel: 548
EOF
Restart the server after any changes are made to orclauditlevel for the changes to take effect.
You can search for audit log entries by using either Oracle Directory Manager or ldapsearch.
The DN for the audit log container object is cn=auditlog. To search for audit log entries, you do a subtree or one-level search, with the container object cn=auditlog as the base of the search.
The Oracle Internet Directory uses a password when connecting to an Oracle database. The default for this password when you install Oracle Internet Directory is ODS. You can change this password by using the OID Database Password Utility.
|
|
 Copyright © 1999 Oracle Corporation. All Rights Reserved. |
|