Skip Headers

Oracle Application Server Wireless Administrator's Guide
10g (9.0.4)

Part Number B10188-01
Go To Documentation Library
Home
Go To Product List
Solution Area
Go To Table Of Contents
Contents
Go To Index
Index

Go to previous page Go to next page

17
Integrating Wireless Notification with Microsoft Exchange

17.1 Overview

This chapter describes how to configure Microsoft Exchange to enable Wireless notification. This chapter includes the following sections:

17.2 Wireless Notification Architecture

Oracle Application Server Wireless supports a wireless notification architecture that sends notification messages to a user's preferred device at the moment an event of interest to that user occurs. This architecture supports notification from several different applications, such as Oracle Unified Messaging, Oracle Calendar, and Microsoft Exchange Server.

The wireless notification architecture for Microsoft Exchange uses standard Microsoft Exchange Store events. A COM object (also referred to as Event Sink) is registered to subscribe users' email event. It forwards notification events to a special Exchange notification account. These events are then retrieved and processed by Oracle Application Server Wireless, and notification messages are sent out accordingly. Oracle Application Server Wireless users who are using Microsoft Exchange email set up their notification preferences in Oracle Application Server Wireless, which uses the Exchange Notification Setting Adapter to set up the notification criteria in the external Exchange server. The Exchange Notification Setting adapter communicates with Microsoft Exchange Server through ASP calls over standard HTTP protocol.

17.3 Configuring the Microsoft Exchange 2000 Server

This section details the configuration tasks described in the Overview. This section includes the following:

17.3.1 Configuration Overview

To enable the wireless notification for Microsoft Exchange Email, you must perform the following configuration tasks on the machine that runs Microsoft Exchange Server:

  1. Create A System User for Registering COM Objects: For the event sink and event registration to work, the corresponding COM+ objects must have access to all of the users' inbox folders. Therefore, you must create an Exchange system user in the Exchange server domain who is given full access to the entire Microsoft Exchange Store.

  2. Register the Event Sink and Registration COM Objects: Create two COM+ applications using the provided .dll files, NotificationSink.dll and RegCom.dll.

    1. One COM+ application is activated by notification setting ASP file to create notification event registration. The COM+ application is activated by the Exchange Server when new emails arrive in the folders.

    2. Create the Exchange Notification Account: A special email account needs to be created to receive notification event emails from event sink. This email account also needs to be configured in Oracle Application Server Wireless as Notification Account.

  3. Configure the Notification Setting ASP: In this task, you must create a virtual directory in the Internet Information Server web site. This virtual directory name also needs to be configured in the Oracle Application Server Wireless as ASP Virtual Path. In addition you must enforce basic authentication on the folder, and copy the rule setting ASP file into that directory.

.


Note:

This section describes configuration steps that are performed on the Microsoft Exchange Server Machine for information on configuring the machine running Oracle Application Server Wireless, see Section 17.4, "Exchange Notification Administration in Oracle Application Server Wireless"


17.3.1.1 Requirements

You must install the following on the server machine before you can configure the Microsoft Exchange 2000 server:


Note:

All of these components must run properly. 


17.3.1.2 Creating A System User for Registering COM Objects

The Exchange notification sink and registration COM objects need to be run as a server process by a user that has access to all of the users' mailboxes. You must create a user and give this user full access to the entire exchange store.

To create this user:

  1. Logon as Administrator to the Exchange domain.

  2. Click the Windows Start button

  3. From the Programs menu, select Microsoft Exchange and then select Active Directory Users and Computers.

  4. Create a user in the correct domain. Make sure to add the user to the Exchange Domain Servers group. The name of the system account can be any valid user name, for example, notificationreg.

To give the user full access to the Exchange Mailbox Store:
  1. Click the Windows Start button.

  2. From the Programs menu, select Microsoft Exchange and then System Manager.

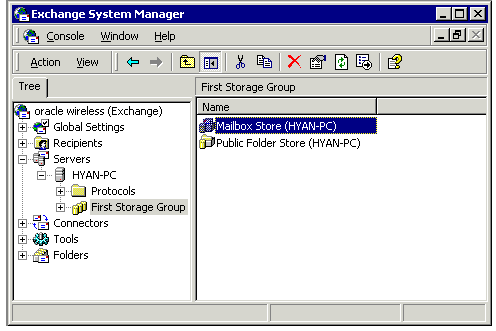
  3. In the System Manager dialog box (Figure 17-1), expand the Servers category and then select First Storage Group.

  4. Select Mailbox Store under the correct Exchange Server name.

Figure 17-1 Exchange System Manager


Text description of ex1.gif follows.
Text description of the illustration ex1.gif

  1. Right click Mailbox Store and then select Properties. The Properties Page appears.

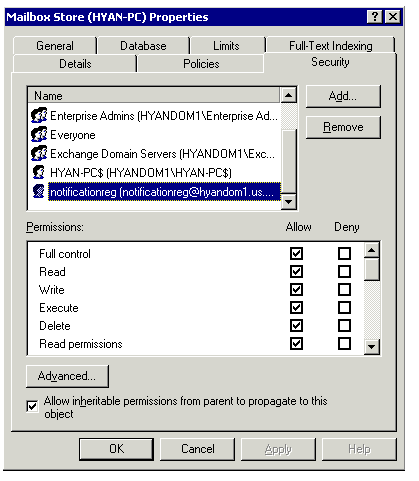
  2. Select the Security tab (Figure 17-2).

Figure 17-2 Mailbox Store Properties


Text description of ex3.gif follows.
Text description of the illustration ex3.gif

  1. Under the Security tab, click Add and then select the user notificationreg from the list of users, and then click OK.


    Note:

    Be sure to select Full control is selected for the notificationreg user. 


  2. Right-click the Mailbox Store and select Properties to go to the property page.

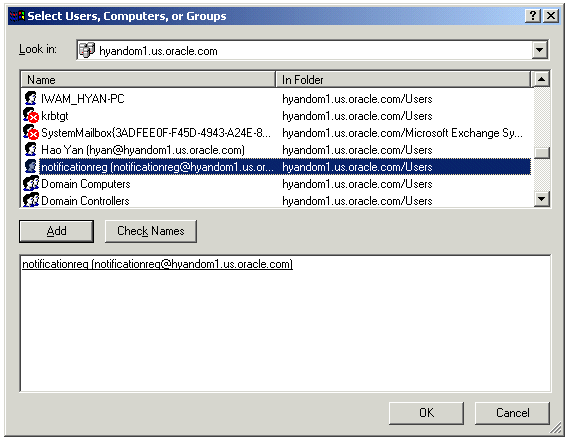
  3. Under the Security Tab, click Add then select the user notificationreg from the list of users as depicted in Figure 17-3, and then click OK.

Figure 17-3 Select Users, Computers, Groups


Text description of ex2.gif follows.
Text description of the illustration ex2.gif

In the following dialog box, make sure Full control is selected.

17.3.1.3 Registering Event Sink and Registration COM Objects

This section provides you with an example of registering the event sink and the registration com objects.

  1. On local drive of the Exchange Server machine, create a directory for holding the notification-related files. In this example you create a directory on the C: drive called oracle.

  2. Copy files NotificationSink.dll and RegCom.dll from the Oracle Application Server Wireless installation directory,
    ($ORACLE_HOME/wireless/sample/exchange) to the oracle directory.

  3. Open a command prompt. Change directory to c:\oracle. Use the regsvr32 tool to register the two .dll files as follows:

    regsvr32 NotificationSink.dll
    regsvr32 RegCom.dll
    

17.3.1.4 Creating Out-of-Process COM+ Components

Microsoft Exchange does not allow event sinks to run in process with its Web Storage System process, yet a DLL runs in process by default. Therefore, you must create out-of-process COM+ components for the DLLs, so that the event sink methods can be called successfully during runtime. You must do the same for the notification registration DLL.

To create a COM+ component:
  1. Click the Windows Start button.

  2. From the Programs menu, select Administrative Tools and then Component Services.

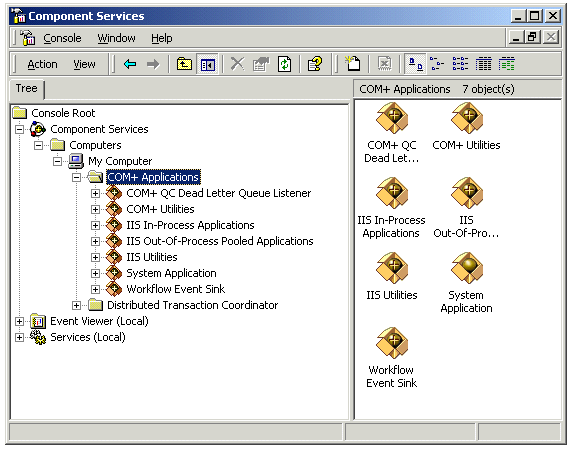
  3. Expand the Component Services and then double-click the COM+ Applications folder (as depicted in Figure 17-4). This folder contains all existing COM+ applications.

Figure 17-4 Component Services


Text description of ex4.gif follows.
Text description of the illustration ex4.gif

  1. Right-click the COM+ Applications folder.

  2. Select New and then Application.

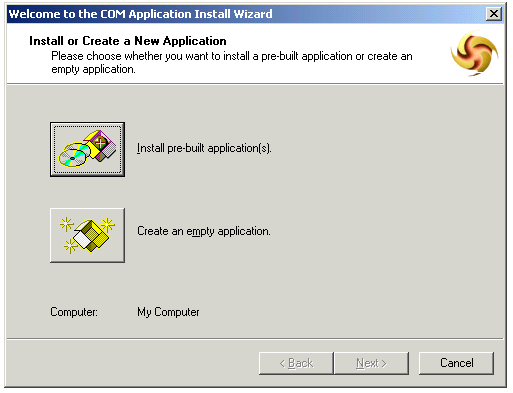
  3. Click Next on the Welcome window. The Install or Create a New Application windows appears (Figure 17-5).

Figure 17-5 Install or Create a New Application


Text description of ex5.gif follows.
Text description of the illustration ex5.gif

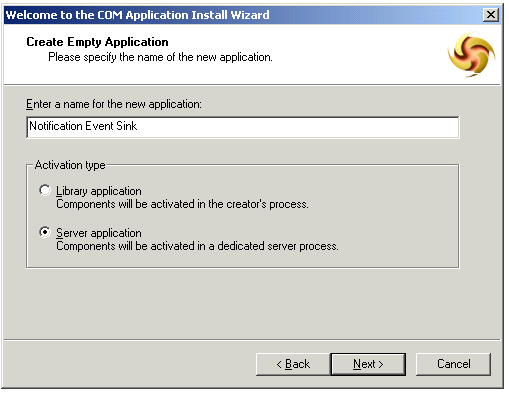
  1. Select Create to create an empty application from the Install or Create a New Application Window. The Create an Empty Application window appears (Figure 17-6).

Figure 17-6 Create Empty Application


Text description of ex6.gif follows.
Text description of the illustration ex6.gif

  1. Enter Notification Event Sink as the name for the new application. Be sure that Server application is the Activation type.

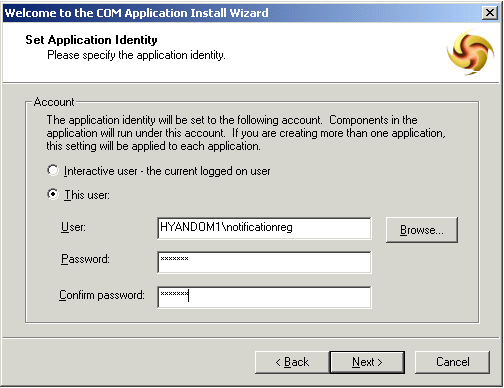
  2. Click Next. The Set Application Identity window appears (Figure 17-7).

Figure 17-7 Set Application Identity


Text description of ex7.gif follows.
Text description of the illustration ex7.gif

  1. From the Set Application Identity page, perform the following:

  2. Click Next. The Thank you window appears.

  3. Click Finish.

17.3.1.5 Adding the DLL Components to the COM+ Component

Next, you add the DLL components to the COM+ application.

To add the components:
  1. Expand the application folder and right-click the Components folder.

  2. Select New and the select Component. The Welcome window appears.

  3. Click Next.

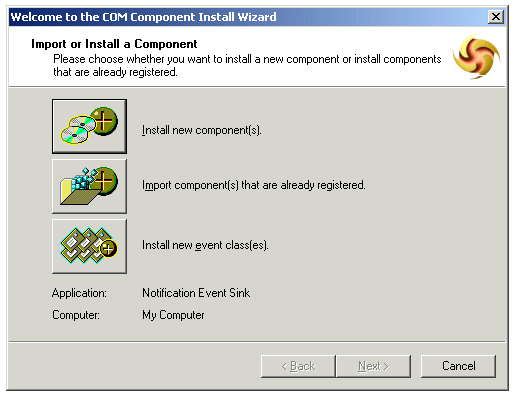
  4. On the Import or Install a Component window (Figure 17-8), click the Install new component(s) button to create new COM+ components for DLL.

Figure 17-8 Import or Install a Component


Text description of ex8.gif follows.
Text description of the illustration ex8.gif

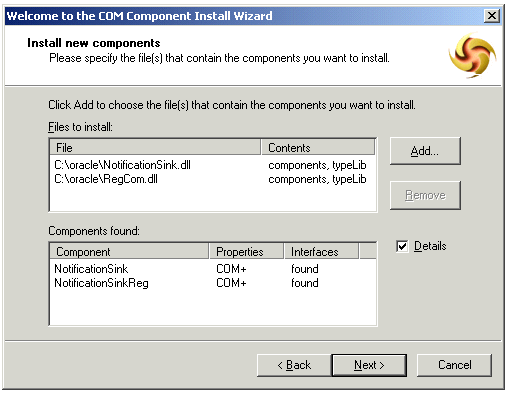
  1. On the Install new components window (Figure 17-9), click Add and then locate the NotificationSink.dll file.

Figure 17-9 Install New Components


Text description of ex9.gif follows.
Text description of the illustration ex9.gif

  1. Click Add and locate the RegCom.dll file.

  2. Click Next.

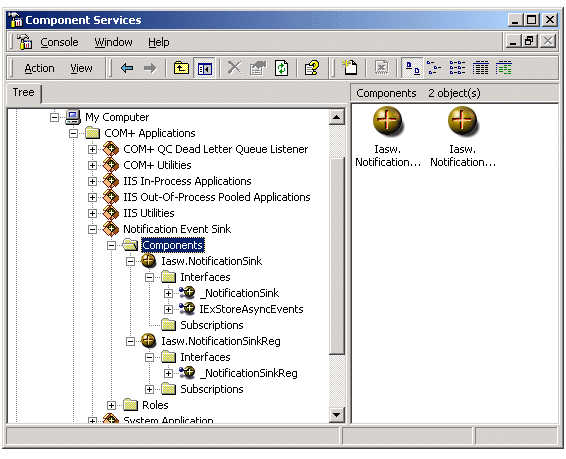
  3. On the Thank you page, click Finish to close the window. Iasw.NotificationSink and Iasw.NotificationSinkReg appear under Notification Event Sink in Component Services (Figure 17-10).

Figure 17-10 Component Services


Text description of ex10.gif follows.
Text description of the illustration ex10.gif

17.3.2 Creating an Exchange Notification Account

You create an Exchange notification account to hold the notification event emails sent from the event sink. The email address is configured in Oracle Application Server Wireless as Notification Account. For the examples in this section, create an exchange notification account called emailnotif. This account must receive emails and support IMAP or POP3.

17.3.3 Configuring the Notification Setting ASP

When users set their notification settings, Wireless invokes an ASP residing on the Exchange Server machine using HTTP. The ASP then calls the NotificationSinkReg COM interface to register event sink for the user. For this to work, the Internet Information Server with the HTTP server must run on the same machine as Exchange server. The URL that Oracle Application Server Wireless instance uses the form of:

http://exchangehost.company.com/virtualpath/regevent.asp

The virtual path needs to be configured so that the regevent.asp can be found. Also, this URL must be password-protected.

Copy the file regevent.asp from the Wireless installation, ($ORACLE_HOME/wireless/sample/exchange) directory and put it into the oracle directory that you previously created.

To configure a virtual directory that points to the c:\oracle directory:
  1. Click the Windows Start button.

  2. Select Programs.

  3. From the Programs menu, select Administrative Tools and then Internet Service Manager.

  4. Expand the right server name.

  5. Right-click Default Web Site.

  6. Select New and then Virtual Directory. The Welcome window appears.

  7. Click Next.

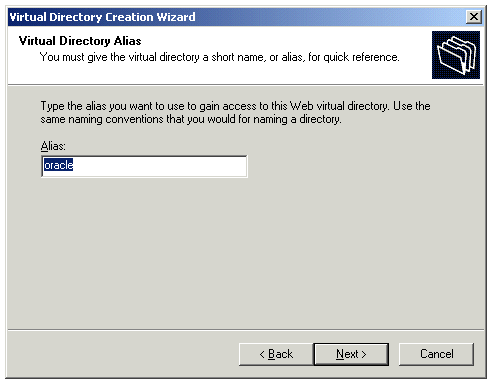
  8. In the Virtual Directory Alias window (Figure 17-11), enter the virtual path name, such as oracle.

  9. Click Next. This virtual path name must match the URL path of the Oracle Application Server Wireless configuration Adapter URL path.

Figure 17-11 Virtual Directory Alias


Text description of ex12.gif follows.
Text description of the illustration ex12.gif

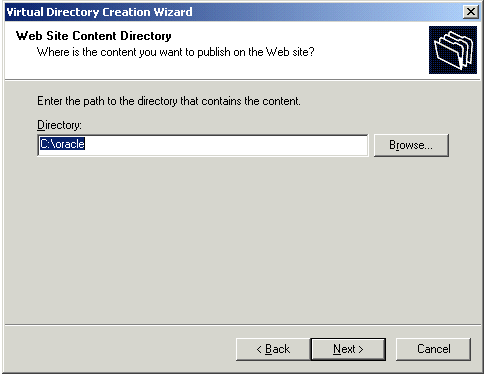
  1. In the Web Site Content Directory window (Figure 17-12), click the Browse button and select the directory that contains the regevent.asp file.

Figure 17-12 Web Site Creation Directory


Text description of ex13.gif follows.
Text description of the illustration ex13.gif

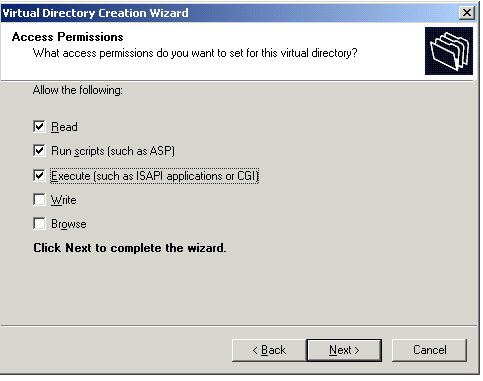
  1. In the Access Permissions window (Figure 17-13), select Read and Run scripts (such as ASP) and click Next.

Figure 17-13 Access Permissions


Text description of ex14.gif follows.
Text description of the illustration ex14.gif

  1. Click Finish.

17.3.3.1 Enabling Basic Authentication

After creating the virtual directory, you must enable basic authentication on the directory by performing the following:
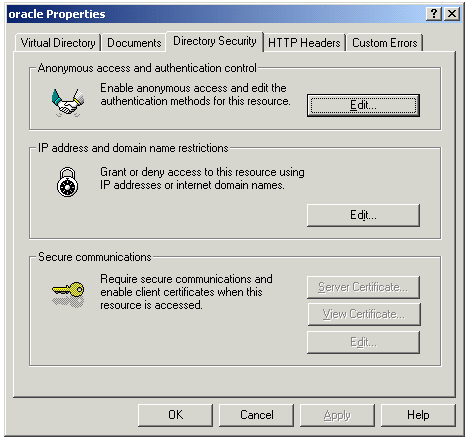
  1. Right click the directory name and select Properties.

Figure 17-14 Oracle Properties


Text description of ex15.gif follows.
Text description of the illustration ex15.gif

  1. Under the Directory Security tab (Figure 17-14), click Edit (under Anonymous access and authentication control)

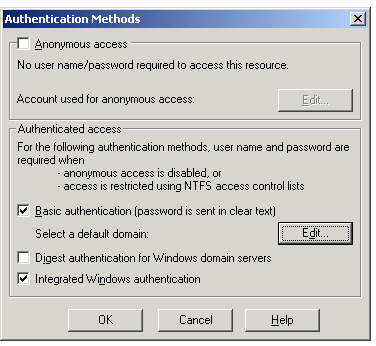
  2. In the Authentication Methods window (Figure 17-15), do not select Anonymous access.

  3. Select Basic authentication.

Figure 17-15 Authentication Methods


Text description of ex16.gif follows.
Text description of the illustration ex16.gif

  1. Click OK. The Exchange Server is configured for wireless notification.

17.4 Exchange Notification Administration in Oracle Application Server Wireless

Web-based user interfaces are used to create, delete, and modify a user's notification settings. Underlying the notification setting interface are generic notification setting APIs that use mail system accessing adapters to enable notification for specific users in the Microsoft Exchange mail system.

Another part of the notification picture is receiving notification events from Microsoft Exchange server, formatting the notification content, and delivering notification messages according to users' preferences. A notification event collector module in the architecture contains notification processing components to handle different event delivering method and event content from each supported notification application, including Microsoft Exchange. All the notification processing components use the same notification sender component which perform contact rule look-up and the actual delivery of notification messages using the transport APIs in Wireless.

Wireless communicates with Microsoft Exchange Server using standard internet protocols. The users' notification settings are sent to the Microsoft Exchange Server host through the HTTP protocol. Exchange notification events are delivered to a specific Exchange notification account in standard email form. The exchange notification processing component in the notification event collector retrieves those event emails through standard IMAP or POP3 protocol.

17.4.1 Site-Level Configuration

For Wireless to process notification messages from Microsoft Exchange Server, you must configure the accessing details to the Exchange Server in the system. The notification setting interface uses these configurations to create custom notification criteria for individual users; the notification event collector uses these configurations to retrieve email notification messages.

These parameters are unique across the whole system, despite the configurations of the individual middle-tier instances. There should be at most one Microsoft Exchange Server configured for access.

You modify these Site-level configuration parameters using the System Manager, which you access through the Oracle Enterprise Manager Application Server Control. For more information on accessing Wireless through the Application Server Control, see Section 2.3.

17.4.2 Configuring the Microsoft Exchange Notification Event Settings

From the Component Configuration section of the Administration page select Microsoft Exchange Notification Event Settings (located under Notification Event Collector).

The Microsoft Exchange Notification Event Settings screen appears (Figure 17-16). This screen is divided into two sections: the Microsoft Exchange Server section and the Notification Event Settings section. Use the Microsoft Exchange Server section to enter accessing information to the Microsoft Exchange Server; use the Notification Event Settings section to configure the accessing information which is specific to wireless notification.
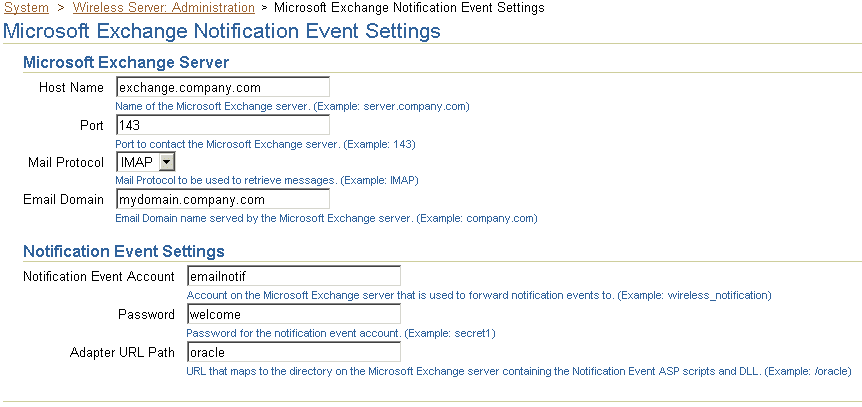
Figure 17-16 The Microsoft Exchange Notification Event Settings Screen


Text description of cme_cmen.gif follows.
Text description of the illustration cme_cmen.gif

Table 17-1 describes the parameters in the Microsoft Exchange Notification Event settings screen.

Table 17-1 Parameters of the Microsoft Exchange Notification Event Settings Screen
Parameter  Description  Possible Values 

Hostname 

The name or IP address for the host that runs Microsoft Exchange Server. 

A string value, such as exchange.company.com (for a name) or 166.123.23.22 (for an IP address). 

Port 

The port for email retrieval from the Microsoft Exchange Server. 

A string value for the port number The default value for POP3 is 110; for IMAP, it is 143. 

Mail Protocol 

The name of mail protocol used to retrieve email from Microsoft Exchange Server. 

A string value, such POP3 or IMAP. The default value is IMAP

Email Domain 

The email domain name served by the Exchange server. This value can be different from the Hostname. 

A string value, such as mydomain.company.com

Notification Account 

The account on the Microsoft Exchange Server that is used to collect notification messages. 

A string value, such as emailnotif

Password 

The password for the notification account. 

A password string, such as welcome

Adapter URL Path 

The URL that maps to the directory on the Microsoft Exchange Server which contains the notification setting files. Oracle Application Server Wireless uses this URL to communicate with Exchange server in the following format:

http://hostname/adapter_url_path/regevent.asp 

A string value, such as /oracle. 

17.4.2.1 Email Notification Engine Backend Configuration

The wireless notification architecture in Wireless supports both Microsoft Exchange mail system and Oracle Unified Messaging system. However, only one of these can be configured for each mail service. For the Wireless and Voice applications, the following configuration parameter (described in Table 17-2) is required to indicate which mail system is used for the notification backend. For more information on setting this parameter, see Section 8.3.7.

Table 17-2 Configuration for the Email Notification Backend
Parameter  Description  Possible Values 

Email System 

The type of email system that is configured with the current mid-tier instance. 

OrcaleUM or Exchange. 

17.4.3 Configuration and Running Notification Related Processes

The Wireless notification architecture requires two standalone processes to run at the same time: the Notification Event Collector process and the Notification Event Handler process. After installation, an instance of each process should be preconfigured and listed in the StandAlone Processes table on the Wireless Server home page.


Note:

Each process in the Standalone Processes table is represented as a hyperlink, enabling you to drill down to a detail page where you can start and stop a process, view performance metrics, or configure the process. 


To turn on notification for Microsoft Exchange server, click the link for a Notification Event Collector process to drill down the detail page. From the detail page, select Administration. The administration page appears (Figure 17-17). Select the Microsoft Exchange checkbox and then click OK. After you have completed this configuration, start (or restart) the Notification Event Collector process.
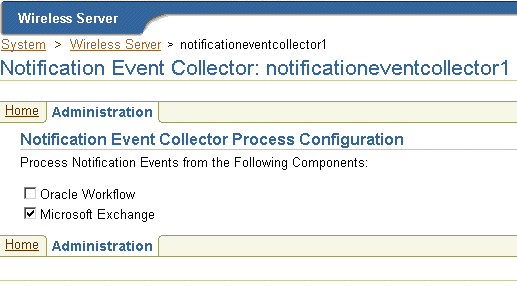
Figure 17-17 The Administration Page for a Notification Event Collector Process


Text description of cme_cnev.gif follows.
Text description of the illustration cme_cnev.gif

No further configuration is required for the Notification Event Handler process.


Note:

Be sure that the Notification Event Collector Process has been started. 


For more details of managing standalone processes, see Section 3.3.4.2.


Go to previous page Go to next page
Oracle
Copyright © 2003 Oracle Corporation.

All Rights Reserved.
Go To Documentation Library
Home
Go To Product List
Solution Area
Go To Table Of Contents
Contents
Go To Index
Index